background image

47

Initial operation – prior to first use

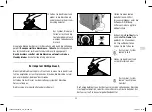
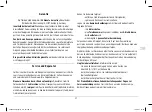
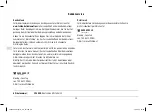
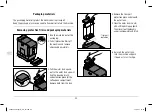
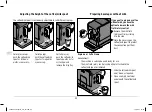
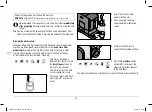
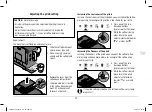
1.  Set up the machine...
 

...    on a level worktop or surface that is not sensitive to moisture.


...   close to a wall socket. The length of the connection cable  

is approx. 80 cm.


...    at a distance of at least 1 m away from hot, flammable  

surfaces (hobs, ovens, radiators, etc.).


...   at least 150 mm away from walls.

150 mm

150 mm

150 mm


 The figure above shows the space required for machine  
operation when the drip tray and drip grid are in place.  
Pay attention to this when selecting the installation location  
for the machine. 

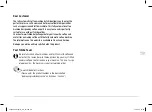
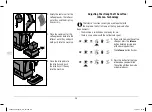
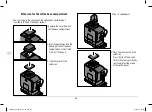
2.  

Push the drip tray and  

drip grid all the way into  

the machine as illustrated.  

The drip tray is held in  

place by magnets.

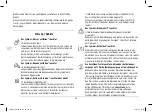
3.   Insert the stainless steel wand 

into the silicone tube of the 

milk froth rotary control.  


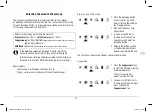
4.   Open the cover cap on the  

coffee/milk spout.

5.   Insert the milk froth rotary  

control into the connection 

port as shown, making sure to 

keep it completely straight.  

Insert it as far as it will go. 


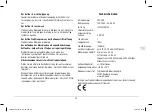
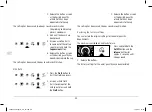
6.   Pull the water tank up  

and out of the machine.


en

106466 en Esperto_Pro_v5.indd   47

14.06.21   12:24

Содержание 393 500

Страница 1: ...utomat Esperto Pro Esperto Pro Coffee Machine Plně automatický kávovar Esperto Pro de Original Betriebsanleitung und Garantie en Original instructions for use and warranty cs Originální návod k použití a záruka cs de en 106466 de Esperto_Pro_v5 indd 1 15 06 21 12 28 ...

Страница 2: ... Sie Ihren Lieblingskaffee und erhalten praktische Tipps zur Zubereitung mit dem Kaffeevollautomaten Wir wünschen Ihnen viel Freude mit Ihrem neuen Kaffeevollautomaten Ihr Tchibo Team Wir prüfen jede Maschine sorgfältig und testen sie mit Kaffee und Wasser Trotz gründlicher Reinigung ist es möglich dass sich noch minimale Reste von Kaffee oder Wasser in der Maschine befinden Dies ist kein Zeichen ...

Страница 3: ...en 18 Kaffeesystem spülen 19 Stärke des Kaffees anpassen Intense Technologie 20 Getränkemenge verändern 22 Mahlgrad einstellen 22 Mahlgrad gröber einstellen Inhalt 22 Mahlgrad feiner einstellen 23 Erweiterung für den Kaffeebohnenbehälter 24 Automatischen Spülvorgang anpassen 24 Standby Modus Ruhemodus 25 Reinigen 25 Gehäuse reinigen 25 Wassertank reinigen 26 Restwasserschale Kaffeesatzbehälter und...

Страница 4: ...els Frühstückspensionen und anderen Wohneinrichtungen Wenn die Maschine gewerblich eingesetzt wird muss sie von geschultem Personal beaufsichtigt und gereinigt werden Eine über die Reinigung hinausgehende Wartung ist für die Maschine nicht erforderlich Einsatzort Stellen Sie die Maschine in einem trockenen Innenraum auf Vermeiden Sie hohe Luftfeuchtigkeit oder Staubkonzen tration Die Maschine ist ...

Страница 5: ...rvice durchführen Wenn das Anschlusskabel dieses Gerätes beschädigt wird muss es durch den Hersteller oder seinen Kundendienst oder einer ähnlich qualifizierten Person ersetzt werden um Gefährdungen zu vermeiden Ziehen Sie den Netzstecker aus der Steckdose wenn eine Störung auftritt wenn Sie die Maschine längere Zeit nicht benutzen bevor Sie die Maschine reinigen Ziehen Sie dabei am Netzstecker ni...

Страница 6: ...schine sobald dies angezeigt wird Um die Maschine zu bewegen fassen Sie sie immer am äußeren Gehäuse an Zum Gebrauch stellen Sie die Maschine auf eine stabile waagerechte ebene Fläche die gut ausgeleuchtet und gegen Feuchtigkeit und Wärme unempfindlich ist Stellen Sie die Maschine nicht auf eine Herdplatte direkt neben einen heißen Ofen Heizkörper o Ä damit das Gehäuse nicht schmilzt Verlegen Sie ...

Страница 7: ...ckungsmaterial 3 Ziehen Sie den Wassertank nach oben heraus Im Wassertank befinden sich die Erweiterung für den Kaffeebohnenbehälter und die Reinigungsbürste Nehmen Sie beides heraus Transportschutz 4 Entfernen Sie den Transport schutz der sich unter dem Wassertank befindet 5 Reinigen Sie den Wasser tank unter Zusatz eines Geschirr spülmittels Spülen Sie ihn danach unter fließendem Wasser gründlic...

Страница 8: ...regler Kaffeesatzbehälter Kaffeebohnenbehälter 160 g Abdeckklappe Brüheinheit Brüheinheit Ein Aus Taste Höhenverstellbarer Kaffee Milchauslauf Milchaustrittsöffnung Restwasserschale Abtropfgitter Abtropfschale Auf einen Blick Lieferumfang Kaffeeaustrittsöffnung Abdeckung abnehmbar de 106466 de Esperto_Pro_v5 indd 8 15 06 21 12 28 ...

Страница 9: ...er Maschine sichtbar Espresso zubereiten Intense Funktion Caffè Crema zubereiten Milchschaum zubereiten Cappuccino zubereiten EasyClean Spülfunktion Hinweisanzeigen orange Die Hinweisanzeigen leuchten nur wenn bei der Maschine Handlungsbedarf auftritt Wasser auffüllen Brühgruppe Bohnen auffüllen Entkalken Kaffeesatz leeren System leeren de 106466 de Esperto_Pro_v5 indd 9 15 06 21 12 28 ...

Страница 10: ... Maschine mit eingesetzter Abtropfschale mit Abtropfgitter Beachten Sie dies für den Aufstellort der Maschine 2 Schieben Sie die Abtropf schale mit Abtropfgitter wie abgebildet ganz an die Maschine heran Die Abtropfschale wird von Magneten in Position gehalten 3 Stecken Sie die Edelstahllanze in den Silikonschlauch des Milchschaum Drehreglers 4 Öffnen Sie die Abdeckkappe am Kaffee Milchauslauf 5 S...

Страница 11: ...feebohnen ein wie Sie an einem Tag verbrauchen In den Kaffeebohnenbehälter passen ca 160 g Der Kaffeebohnenbehälter lässt sich auf eine Füllmenge von ca 300 g vergrößern siehe Kapitel Erweiterung für den Kaffeebohnenbehälter 11 Setzen Sie die Abdeckung wieder auf den Kaffeebohnen behälter Drücken Sie die Abdeckung ganz hinein damit die Aromaschutz Dichtung das Aroma der Bohnen optimal schützt 12 S...

Страница 12: ...Maschine ist einsatzbereit Maschine einschalten Voraussetzungen Der Netzstecker steckt in der Steckdose Die Maschine ist ausgeschaltet Der Wassertank ist gefüllt Der Kaffeebohnenbehälter ist gefüllt Um die Maschine einzuschalten gehen Sie wie folgt vor Drücken Sie die Ein Aus Taste um die Maschine ein zuschalten Die EasyClean Taste blinkt und der Aufheizvorgang startet Nach wenigen Sekunden starte...

Страница 13: ...zubereiten Wenn Sie einen Kaffee ohne Milch zubereiten möchten können Sie den Milchschaum Drehregler optional abnehmen Ziehen Sie den Milchschaum Drehregler zur Seite ab Verschließen Sie die Abdeck kappe am Kaffee Milchaus lauf um den Anschluss vor Staub zu schützen Espresso oder Caffè Crema Voraussetzungen Die Maschine ist eingeschaltet und einsatzbereit Der Milchschaum Drehregler kann am Kaffee ...

Страница 14: ...hine eingesetzt wurde m Um den Brühvorgang vorzeitig zu stoppen drücken Sie die selbe Getränke Taste während des Brühvorgangs noch einmal Tipp Sie können die jeweilige Getränkemenge verändern Wie Sie dazu vorgehen finden Sie im Kapitel Getränkemenge verändern Voreinstellung beim Kauf der Maschine Espresso ca 40 ml Caffè Crema ca 125 ml Getränke mit Milch zubereiten Voraussetzungen Die Maschine ist...

Страница 15: ...auslauf ganz nach oben 2 Stellen Sie ein hohes Glas unter den Kaffee Milch auslauf 3 Drücken Sie 1x kurz auf die Cappuccino Taste Die Cappuccino Taste leuchtet und der Aufheizvorgang für das Milchaufschäumen startet Der Aufschäum und Brüh vorgang startet und stoppt automatisch Nach dem Milch aufschäumen startet sofort die Espressozubereitung Am Anfang und am Ende des Aufschäum und Brüh vorgangs er...

Страница 16: ... den Kaffee Milchauslauf ganz nach oben und entfernen Sie die Abtropfschale 2 Stellen Sie ein hohes Glas unter den Kaffee Milchaus lauf 3 Drücken Sie 1x kurz auf die Aufschäum Taste Die Aufschäum Taste leuchtet und der Aufheizvorgang für das Milchaufschäumen startet Der Aufschäumvorgang startet und stoppt automatisch Am Anfang und am Ende des Aufschäumvorgangs ertönt ein Signalton Aufheizvorgang u...

Страница 17: ...systems ersetzt keinesfalls das tägliche Reinigen Reinigen Sie das Milchsystem am Ende des Tages wie im Kapitel Reinigen beschrieben Nach jeder Zubereitung von Milchgetränken blinkt die EasyClean Taste einige Sekunden lang Dies dient als Hinweis das Milchsystem zu spülen 1 Füllen Sie einen Becher oder ein Glas mit frischem klarem Leitungs bzw Trinkwasser 2 Stecken Sie die Edelstahllanze in das Was...

Страница 18: ...haustrittsöffnung kann Verbrühungen verursachen Fassen Sie während sowie unmittelbar nach dem Gebrauch nicht an die Kaffee oder Milchaustrittsöffnung Vermeiden Sie den Kontakt mit dem herauslaufenden Getränk Kaffeesatzbehälter Restwasser und Abtropfschale leeren Wenn der Kaffeesatz behälter voll ist nach 10 Brühvorgängen leuchtet das Symbol Kaffeesatz leeren Damit das Symbol erlischt muss die Masc...

Страница 19: ...fees anpassen Intense Technologie Die Intense Funktion kann nur zusammen mit der Espresso der Caffè Crema oder der Cappuccino Taste verwendet werden Voraussetzungen Die Maschine ist eingeschaltet und einsatzbereit Eine Tasse steht unter dem Kaffee Milchauslauf m Wenn Sie den Kaffee stärker mögen drücken Sie zuerst die Intense Taste bevor Sie eine der Getränke Tasten drücken Die Intense Taste blink...

Страница 20: ...en Sie im Abschnitt Werkseinstellungen wiederherstellen nachlesen Voraussetzungen Die Maschine ist eingeschaltet und einsatzbereit Eine Tasse oder ein Glas steht unter dem Kaffee Milchauslauf Espresso und Caffè Crema 1 Drücken Sie die gewünschte Getränke Taste z B Caffè Crema um den Mahl und Brühvorgang zu starten 2 Warten Sie bis die Bohnen gemahlen sind 3 Sobald der Kaffee aus der Kaffee austrit...

Страница 21: ...ie die Aufschäum Taste um den Aufschäumvor gang zu starten 2 Sobald der Milchschaum aus der Milchaustritts öffnung läuft halten Sie die Aufschäum Taste gedrückt 3 Wenn die gewünschte Milch schaummenge in die Tasse gelaufen ist lassen Sie die Taste los Die Einstellung ist gespeichert zur Bestätigung ertönen 2 Signaltöne Werkseinstellungen wiederherstellen Sie können die ursprünglichen Wassermengen ...

Страница 22: ...stellen Stellen Sie den Mahlgrad gröber ein wenn der Kaffee schneller fließen soll z B weil der Kaffee Ihnen zu stark schmeckt 4 Drücken Sie eine der beiden Getränke Tasten Espresso oder Caffè Crema 5 Während der Kaffee gemahlen wird drehen Sie den Mahl gradregler im Uhrzeigersinn in Richtung auf einen größeren Punkt Mahlgrad feiner einstellen Stellen Sie den Mahlgrad feiner ein wenn der Kaffee la...

Страница 23: ... ab 2 Setzen Sie die Erweiterung wie abgebildet auf die Öffnung des Kaffeebohnen behälters Drücken Sie sie ganz hinein 3 Nehmen Sie die Abdeckung von der Erweiterung ab 4 Füllen Sie Kaffeebohnen ein 5 Setzen Sie die Abdeckung wieder auf die Erweiterung Drücken Sie den Deckel ganz hinein damit die Aroma schutz Dichtung das Aroma der Bohnen optimal schützt de 106466 de Esperto_Pro_v5 indd 23 15 06 2...

Страница 24: ...Standby Modus Ruhemodus Schalten Sie die Maschine nach Gebrauch stets mit der Ein Aus Taste in den Standby Modus Die Maschine verbraucht dann nur noch geringfügig Strom Wenn etwa 10 Minuten lang keine Taste gedrückt wird schaltet die Maschine automatisch in den Standby Modus Dies ist einerseits eine Sicherheitsfunk tion andererseits wird dadurch Energie gespart Zur Auswahl stehen vier Zeitspannen ...

Страница 25: ...er scheuernde Reinigungsmittel Die Maschine selbst sowie alle anderen abnehmbaren Teile dürfen nicht in der Spülmaschine gereinigt werden Täglich Wöchentlich Bei Bedarf Maschinen gehäuse X X Wassertank reinigen X X Wassertank ausspülen X X Filter im Wassertank X X Kaffeesatzbehälter Restwasserschale Abtropfschale X X Brüheinheit X X Milchsystem X X Gehäuse reinigen M M Wischen Sie das Gehäuse mit ...

Страница 26: ...heraus 3 Leeren Sie den Kaffeesatz behälter die Restwasser und bei Bedarf die Abtropfschale 4 Waschen Sie alle Einzelteile unter Zusatz eines Geschirr spülmittels ab Trocknen Sie die Teile gut ab Diese Teile sind nicht spülmaschinen geeignet 5 Setzen Sie den Kaffeesatz behälter wieder in die Restwasserschale und schieben Sie beide Teile in die Maschine 6 Setzen Sie das Abtropfgitter in die Abtropf...

Страница 27: ...ie von der Maschine ab 3 Halten Sie die beiden orange farbenen Tasten fest gedrückt und ziehen Sie die Brüheinheit gerade aus der Maschine her aus 4 Reinigen Sie die Brüheinheit unter fließendem warmem Wasser 5 Lassen Sie die Brüheinheit anschließend gut trocknen 6 Entfernen Sie sämtliche Kaffeepulverreste im Aufnah mefach mit der beiliegenden Reinigungsbürste Click 7 Drücken Sie die Brüheinheit m...

Страница 28: ...ignet Nur so wird eine umfassende Hygiene eine hohe Milchschaumqualität und eine lange Lebensdauer des Gerätes sichergestellt Das Reinigen muss zusätzlich zum regelmäßigen Spülen des Milchsystems vorgenommen werden Milchsystem auseinandernehmen und reinigen 1 Ziehen Sie den Milchschaum Drehregler zur Seite ab 2 Ziehen Sie den Silikonschlauch vom Milchschaum Drehregler ab 3 Ziehen Sie die Edelstahl...

Страница 29: ...n Sie alle Teile anschlie ßend mit klarem kalten Wasser ab Trocknen Sie alle Teile sorgfältig ab und lassen Sie sie über Nacht offen trocknen Für eine optimale Reinigung des Milchsystems empfehlen wir alle Teile außer dem Drehrad des Milchschaum Drehreglers regelmäßig für einige Zeit in warmem Wasser unter Zusatz des durgol Milchsystem Reiniger erhältlich in jeder Tchibo Filiale und im Fachhandel ...

Страница 30: ...gler Es muss bis zum Anschlag drauf stecken 8 Stecken Sie die Edelstahllanze wie abgebildet in den Silikon schlauch 9 Stecken Sie den Silikon schlauch wie abgebildet auf den Milchschaum Drehregler 10 Öffnen Sie die Abdeckkappe am Kaffee Milchauslauf 11 Stecken Sie den Milchschaum Drehregler wie abgebildet ganz gerade bis zum Anschlag in den Anschluss de 106466 de Esperto_Pro_v5 indd 30 15 06 21 12...

Страница 31: ... Entkalken Sie die Maschine in den nächsten Tagen Warten Sie nicht länger da sich sonst so viel Kalk bilden kann dass ein Entkalker nicht mehr wirkt Der Entkalkungsvorgang dauert etwa 15 Minuten Lassen Sie die Maschine während des Entkalkungsvorgangs nicht unbe aufsichtigt Voraussetzungen Die Maschine ist eingeschaltet und einsatzbereit 1 Ziehen Sie den Wassertank nach oben aus der Maschine heraus...

Страница 32: ...gegebene Entkalkerlösung nach jedem Pumpvorgang weg damit der unter gestellte Behälter nicht überläuft Nach Abschluss leuchtet das Symbol Entkalken und das Symbol Wasser auffüllen und die Espresso Taste blinken 9 Nehmen Sie den Wassertank aus der Maschine 10 Reinigen Sie den Wassertank gründlich wie im Kapitel Reinigen Abschnitt Was sertank reinigen beschrieben Nun beginnt die Spülphase Spülphase ...

Страница 33: ...n Gründen die Maschine zu reini gen wie im Kapitel Reinigen beschrieben Entfernen Sie das Wasser aus dem Leitungssystem der Maschine Voraussetzungen Die Maschine ist eingeschaltet und einsatzbereit 1 Stellen Sie einen leeren Behälter mind 250 ml Fassungsvermögen unter die Kaffeeaustrittsöffnung Entfernen Sie dazu ggf die Abtropfschale 2 Halten Sie die Ein Aus Taste und die Caffè Crema Taste gedrüc...

Страница 34: ...hine eingesetzt Setzen Sie sie wieder in die Maschine ein siehe Schritt 7 im Kapitel Kaffeesatzbehälter Restwasser und Abtropfschale leeren Das Symbol Brüheinheit leuchtet Ist die Brüheinheit oder die Abdeckklappe nicht korrekt eingesetzt Nehmen Sie die Abdeckklappe ab und prüfen Sie den festen Sitz der Brüheinheit siehe Kapitel Reinigen Abschnitt Brühein heit reinigen Das Symbol Entkalken leuchte...

Страница 35: ...usammen gesteckt sind siehe Kapitel Reinigen Abschnitt Milchsystem reinigen Drehen Sie den Milchschaum Drehregler im oder gegen den Uhrzeigersinn um die Milchschaumkonsistenz zu verändern siehe Kapitel Getränke mit Milch zubereiten Abschnitt Milch schaumkonsistenz einstellen Technische Daten Artikelnummer 393 500 Netzspannung 220 240 V 50 60 Hz Leistung 1235 1470 Watt Stromverbrauch im ausgeschalt...

Страница 36: ...gestellt die wiederverwertet werden können Dies verringert den Abfall und schont die Umwelt Entsorgen Sie die Verpackung sortenrein Nutzen Sie dafür die örtlichen Möglichkeiten zum Sammeln von Papier Pappe und Leichtverpackungen Geräte die mit diesem Symbol gekennzeichnet sind dürfen nicht mit dem Hausmüll entsorgt werden Sie sind gesetzlich dazu verpflichtet Altgeräte getrennt vom Hausmüll zu ent...

Страница 37: ...chen Schaden nimmt reinigen Sie bitte alle Behälter die Abtropfschale die Brüh einheit sowie den Innenraum in den die Brüheinheit eingesetzt wird bevor Sie die Maschine verpacken Gehen Sie dabei wie folgt vor entfernen Sie Kaffeepulverreste und Flüssigkeiten spülen und trocknen Sie alle Einzelteile Legen Sie eine Kopie des Kaufbelegs zum Artikel und geben Sie bitte folgende Daten an Ihre Adressdat...

Страница 38: ...ch mit Ihren persönlichen Angaben füllt erfassen Sie diese manuell Das Versandetikett und der Reklamations beileger werden Ihnen dann automatisch an die im Formular angegebene E Mail Adresse zugeschickt Drucken Sie bitte beides aus Wichtig Der Strichcode beim Versandetikett darf nicht beschrieben oder überklebt werden Der Versand mit diesem Etikett ist nur innerhalb Deutsch lands möglich 0800 300 ...

Страница 39: ...offee with the fully automatic coffee machine The information on this website is available in French and German We hope you will be entirely satisfied with this product Your Tchibo Team We carefully check all our machines and test them with coffee and water For this reason despite thorough cleaning you may still find minimal coffee or water residue in your machine This is not a sign of poor qualit...

Страница 40: ...e leftover water tray and the drip tray 56 Adjusting the strength of the coffee Intense technology 57 Adjusting the amount of beverage 59 Adjusting the grind setting 59 Increasing the coarseness of the grind 59 Increasing the fineness of the grind 60 Extension for the coffee bean compartment 61 Adjusting the automatic flushing process 61 Standby mode 62 Cleaning 62 Cleaning the casing 62 Cleaning ...

Страница 41: ...ained in the safe use of the machine and understand the potential dangers Children must not be allowed to clean the machine unless they are over 8 years of age and supervised while doing so This machine is maintenance free Set up the machine out of the reach of children Safety warnings Intended use The coffee machine has been designed for the following uses Preparing espresso and caffè crema from ...

Страница 42: ...ave repairs carried out by a specialist workshop or our customer care service If the connection cable of this machine becomes damaged it must be replaced by the manufacturer its customer service or a similarly qualified person in order to avoid danger Remove the mains plug from the wall socket if a fault occurs if the machine is to be out of use for a prolonged period before cleaning the machine A...

Страница 43: ... unit becomes hot when preparing beverages Do not remove the brewing unit during or shortly after use The surfaces of the heating element stay warm after use If there is too little water in the tank during preparation the machine will stop the brewing process The brewing process will automatically resume once the water tank has been filled and reinserted in the machine CAUTION risk of injuries or ...

Страница 44: ... materials 3 Pull the water tank up and out In the water tank you will find the cleaning brush and extension piece for the coffee bean compartment Remove both from the tank Transport protection 4 Remove the transport protection piece underneath the water tank 5 Clean the water tank in water with a little washing up liquid Then rinse it out thoroughly under running water and dry it 6 Reinsert the w...

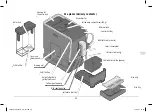
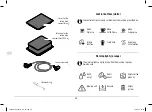
Страница 45: ...rotary control Container for coffee grounds Coffee bean compartment 160 g Cover cap brewing unit Brewing unit On Off button Height adjustable coffee milk spout Milk spout opening Leftover water tray Drip grid Drip tray At a glance delivery contents Coffee spout opening Cover removable en 106466 en Esperto_Pro_v5 indd 45 14 06 21 12 24 ...

Страница 46: ...only visible when the machine is switched on Make Espresso Intense function Make Caffè Crema Froth milk Make Cappuccino EasyClean rinse function Warning lights orange The warning lights only light up when the machine requires maintenance Refill water Brewing unit Refill beans Descale Empty coffee grounds Empty system en 106466 en Esperto_Pro_v5 indd 46 14 06 21 12 24 ...

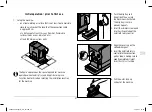
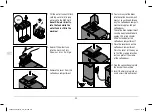
Страница 47: ...ip tray and drip grid are in place Pay attention to this when selecting the installation location for the machine 2 Push the drip tray and drip grid all the way into the machine as illustrated The drip tray is held in place by magnets 3 Insert the stainless steel wand into the silicone tube of the milk froth rotary control 4 Open the cover cap on the coffee milk spout 5 Insert the milk froth rotar...

Страница 48: ... ment as you will need for one day The coffee bean compart ment holds approx 160 g of coffee beans The coffee bean compartment can also be extended to hold approx 300 g see chapter titled Extension for the coffee bean compartment 11 Place the cover back on the coffee bean compartment Press the cover all the way on so that the aroma protection seal can protect the aroma of the coffee beans 12 Plug ...

Страница 49: ...e machine on Requirements The mains plug is plugged into the socket The machine is switched off The water tank is full The coffee bean compartment is full To switch on the machine proceed as follows Press the On Off button to switch on the machine The EasyClean button flashes and the heating up process starts The pump starts after a few seconds A small amount of water is flushed through the system...

Страница 50: ...ut milk If you want to prepare a coffee without milk you have the option to remove the milk froth rotary control Remove the milk froth rotary control by sliding it to the side Close the cover cap on the coffee milk spout to protect the connection port from dust Espresso or Caffè Crema Requirements The machine is switched on and ready for use The milk froth rotary control can be either attached to ...

Страница 51: ...chine m If you would like to stop the brewing process prematurely press the same drinks button again while brewing Tip You can change the amount of the beverage being brewed Learn more about how to do this in the chapter titled Adjusting the amount of the beverage Default settings upon purchasing the machine Espresso approx 40 ml Caffè Crema approx 125 ml Preparing beverages with milk Requirements...

Страница 52: ... Place a tall glass underneath the coffee beverage spout 3 Press the Cappuccino button briefly once The Cappuccino button lights up and the heating up process for the milk frothing starts The frothing and brewing process starts and stops automatically The espresso will start to be made immedi ately after the milk has been frothed A beep will sound at the start and end of the frothing and brewing p...

Страница 53: ...unt of the beverage Frothing milk 1 Push the coffee milk spout upwards as far as it will go and remove the drip tray 2 Place a tall glass underneath the coffee milk spout 3 Press the Froth button briefly once The Froth button lights up and the heating up process for the milk frothing starts The frothing process starts and stops automatically A beep sounds at the start and end of the frothing proce...

Страница 54: ...h milk Rinsing the milk system must never replace daily cleaning Clean the milk system at the end of the day as described in the section titled Cleaning Each time a beverage is prepared that contains milk the EasyClean button will flash for a few seconds This indicates that the milk system should be rinsed 1 Fill a cup or glass with fresh clear tap water or drinking water 2 Insert the stainless st...

Страница 55: ...ds out of the machine Rinsing the coffee system If you have not used the machine for longer than two days rinse the machine by allowing two cups of water to flow through it Requirements The machine is switched on and ready for use 1 Slide the coffee milk spout up or down as required 2 Place an empty container underneath the coffee milk spout 3 As soon as all buttons are illu minated press and hold...

Страница 56: ...n before pressing one of the beverage buttons The Intense button flashes m Press the button for the type of beverage you would like The coffee will then be made using more beans 2 Empty the container for the coffee grounds the leftover water tray and the drip tray if necessary 3 Place the container for the coffee grounds back into the leftover water tray and push both parts into the machine 4 Plac...

Страница 57: ...ginal amount of beverage can be found in the section titled Restoring the factory settings Requirements The machine is switched on and ready for use There is a cup or a glass underneath the coffee milk spout Espresso and Caffè Crema 1 Press the beverage button of your choice e g Caffè Crema to start the grinding the brewing process 2 Wait until the beans have been ground 3 As soon as coffee starts...

Страница 58: ... 1 Press the Froth button to start the frothing process 2 As soon as milk froth starts to come out of the milk spout press and hold the Froth button 3 Release the button as soon as the desired quantity of milk froth has been dispensed into the cup The setting has been saved 2 beeps sound in confirmation Restoring the factory settings You can restore the original settings for the water quantity Req...

Страница 59: ...g the coarseness of the grind Increase the coarseness of the grind when you want the coffee to flow more quickly for example if the coffee is too strong for your taste 4 Press one of the two beverage buttons Espresso or Caffè Crema 5 While the coffee is being ground turn the grind adjuster clockwise towards or a larger dot Increasing the fineness of the grind Increase the fineness of the grind whe...

Страница 60: ... bean compartment 2 Insert the extension into the opening of the coffee bean compartment as illustrated Press it all the way in 3 Take the cover off the extension 4 Pour in coffee beans 5 Place the cover back on the extension Press the lid all the way on so that the aroma protection seal can protect the aroma of the coffee beans en 106466 en Esperto_Pro_v5 indd 60 14 06 21 12 24 ...

Страница 61: ...fter 10 minutes Machine off after 20 minutes Machine off after 30 minutes Machine off after 120 minutes Adjusting the automatic flushing process The factory settings for the machine mean that automatic flushing only starts when the machine is cold If the machine is still warm from recent previous use flushing will not be performed again when it is switched on A new flushing process will only be tr...

Страница 62: ... products for cleaning The machine itself as well as all other detachable parts must not be cleaned in the dishwasher Daily Weekly As required Machine casing X X Cleaning the water tank X X Rinsing the water tank X X Filter in the water tank X X Container for coffee grounds Leftover water tray Drip tray X X Brewing unit X X Milk system X X Cleaning the casing M M Wipe the casing with a soft damp c...

Страница 63: ...er for the coffee grounds out of the machine 3 Empty the container for the coffee grounds the leftover water tray and the drip tray if necessary 4 Wash all parts with water and washing up liquid Dry all parts thoroughly These parts are not dishwasher safe 5 Place the container for the coffee grounds back into the leftover water tray and push both parts into the machine 6 Place the drip grid into t...

Страница 64: ...at the top and pull it off the machine 3 Firmly press and hold the two orange tabs and pull the brewing unit horizontally out of the machine 4 Rinse the brewing unit under warm running water 5 Then let the brewing unit dry completely 6 Remove all the leftover coffee powder from the tray using the enclosed cleaning brush Click 7 Press the brewing unit back into the machine using some force and with...

Страница 65: ...s the only way to ensure maximum hygiene high quality milk froth and a long service life for the machine Cleaning must be carried out in addition to the regular rinsing of the milk system Disassembling and cleaning the milk system 1 Remove the milk froth rotary control by sliding it to the side 2 Remove the silicone tube from the milk froth rotary control 3 Remove the stainless steel wand from the...

Страница 66: ...l parts carefully and leave them to dry overnight For optimal cleaning of the milk system we recommend that all parts be regularly immersed in warm water with added durgol milk system cleaner for a while with the exception of the rotary dial of the milk froth control This product is available from most Tchibo retailers Assembling the milk system 1 Insert the adapter into the silicone sleeve pushin...

Страница 67: ...it will go 8 Insert the stainless steel wand into the silicone tube as shown 9 Attach the silicone tube to the milk froth rotary control as shown 10 Open the cover cap on the coffee milk spout 11 Insert the milk froth rotary control into the connection port as shown pushing it in as far as it will go and making sure to keep it completely straight en 106466 en Esperto_Pro_v5 indd 67 14 06 21 12 24 ...

Страница 68: ...ears on the display the machine needs to be descaled Descale the machine within the next few days Do not wait any longer otherwise so much limescale may build up that a descaling agent will no longer have any effect Descaling takes about 15 minutes Do not leave the machine unattended during the descaling process Requirements The machine is switched on and ready for use 1 Pull the water tank up and...

Страница 69: ... the dispensed water each time to ensure that the container does not overflow Once the process is com plete the Descale sym bol and the Refill water symbol will appear and the Espresso button will flash 9 Remove the water tank from the machine 10 Clean the water tank thorough ly as described in the chapter titled Cleaning section Cleaning the water tank The rinsing process will now start Rinsing p...

Страница 70: ...reasons of hygiene that you clean the machine as described in the Cleaning chapter Remove the water from the machine s pipe system Requirements The machine is switched on and ready for use 1 Place an empty container with a capacity of at least 250 ml under the coffee spout Remove the drip tray if necessary 2 Press and hold the On Off button and the Caffè Crema button for approx 5 seconds until you...

Страница 71: ...the container for the coffee grounds correctly inserted in the machine If not put it back into the machine see step 7 in the section titled Emptying the container for the coffee grounds the leftover water tray and the drip tray The Brewing unit symbol is lit up Is the brewing unit or the cover cap incorrectly inserted Remove the cover cap and check that the brewing unit is securely in place see ch...

Страница 72: ...ectly assembled see chapter Cleaning section Cleaning the milk system Turn the milk froth rotary control clockwise or anti clockwise to change the milk froth consistency see chapter Preparing beverages with milk section Adjusting the milk froth consistency Technical specifications Product number 393 500 Mains voltage 220 240 V 50 60 Hz Power 1235 1470 watts Power consumption when turned off 0 5 wa...

Страница 73: ...isposed of improperly may cause harm to health and the environment Information about collection points where old appliances can be disposed of free of charge is available from your local authorities Declaration of Conformity Tchibo GmbH hereby declares that this product is in compliance with the essential requirements and other relevant provisions of the following directives at the time of its bei...

Страница 74: ...to decalcify as well as worn parts and consumables are not covered by the warranty These can be ordered from our customer care service This warranty does not restrict statutory warranty rights Service and repair If contrary to our expectations a defect is found please contact our customer care service Our customer consultants will be happy to advise you on further procedure If you have any questio...

Страница 75: ...tránkách www tchibo de kaffeeguide si najdete svou oblíbenou kávu a získáte praktické tipy k její přípravě v tomto plně automatickém kávovaru Věříme že Vám bude tento nový plně automatický kávovar dlouho sloužit k Vaší spokojenosti Váš tým Tchibo Každý kávovar pečlivě testujeme a zkoušíme jej s kávou a vodou I přes důkladné čištění je možné že se v kávovaru nacházejí ještě minimální zbytky kávy ne...

Страница 76: ...cí misky 92 Úprava síly kávy technologie pro sílu kávy Intense 93 Změna množství kávy 95 Nastavení stupně mletí 95 Nastavení hrubšího stupně mletí 95 Nastavení jemnějšího stupně mletí 96 Nástavec na zásobník na zrnkovou kávu 97 Přizpůsobení automatického procesu proplachování 97 Pohotovostní režim režim klidu 98 Čištění 98 Čištění pláště 98 Umývání nádržky na vodu 99 Umývání misky na zbytkovou vod...

Страница 77: ...ěti starší 8 let a osoby s omeze nými fyzický mi senzorickými nebo duševními schopnostmi nebo nedostatkem zkuše ností a nebo vědo mostí pokud jsou pod dohledem nebo pokud jim bylo vysvětleno jak se s přístrojem bezpečně manipuluje a pokud pochopily jaká jim při používání přístroje hrozí nebezpečí Děti nesmí přístroj čistit s výjimkou případu že jsou starší než 8 let a jsou během čištění pod dozore...

Страница 78: ... v odborné opravně nebo přes náš zákaznický servis Pokud se poškodí připojovací kabel tohoto přístroje je nutno ho nechat vyměnit výrobcem jeho zákaznickým servisem nebo podobně kvalifiko vanou osobou aby se předešlo ohrožení Vytáhněte síťovou zástrčku ze zásuvky pokud dojde k poruše pokud nebudete kávovar delší dobu používat než začnete kávovar čistit Přitom tahejte za síťovou zástrčku ne za přip...

Страница 79: ...utnost odvápnění Pokud budete chtít kávovar přemístit uchopte ho vždy za vnější plášť K používání postavte kávovar na stabilní vodorovnou a rovnou plochu která je dobře osvětlená a odolná proti vlhkosti a teplu Nestavte kávovar na plotýnky sporáku do bezprostřední blízkosti horké trouby nebo kamen topných těles apod aby se plášť kávovaru neroztavil Připojovací kabel položte tak aby o něj nebylo mo...

Страница 80: ...ý obalový materiál 3 Vytáhněte z kávovaru nádržku na vodu směrem nahoru V nádržce na vodu se nachází nástavec na zásobník na zrn kovou kávu a čisticí kartáček Vyjměte je ven přepravní pojistka 4 Odstraňte přepravní pojistku která se nachází pod nádržkou na vodu 5 Nádržku na vodu umyjte vodou a prostředkem na mytí nádobí Potom ji důkladně vypláchněte pod tekoucí vodou a utřete 6 Nádržku na vodu opě...

Страница 81: ...or mléčné pěny nádobka na kávovou sedlinu zásobník na zrnkovou kávu 160 g kryt spařovací jednotky spařovací jednotka vypínač výškově nastavitelná výpust kávy mléka otvor výpusti mléka miska na zbytkovou vodu odkapávací mřížka odkapávací miska otvor výpusti kávy kryt odnímatelný Přehled rozsah dodávky cs 106466 cs Esperto_Pro_v5 indd 81 14 06 21 10 44 ...

Страница 82: ...ž je kávovar zapnutý příprava espresa tlačítko pro sílu kávy Intense příprava caffè crema příprava mléčné pěny příprava kapučína EasyClean funkce pro plachování Kontrolky oranžové Oranžové kontrolky zobrazují nutnost zásahu obsluhy doplnit vodu spařovací jednotka doplnit zrnkovou kávu odvápnit vysypat kávovou sedlinu vyprázdnit systém cs 106466 cs Esperto_Pro_v5 indd 82 14 06 21 10 44 ...

Страница 83: ...aru s nasazenou odkapávací miskou a odkapávací mřížkou Při umisťování kávovaru na to prosím myslete 2 Odkapávací misku s odkapá vací mřížkou posuňte až úplně ke kávovaru tak jak vidíte na obrázku Odkapávací miska drží na svém místě díky magnetům 3 Trubičku z ušlechtilé oceli vsuňte do silikonové hadičky otočného regulátoru mléčné pěny 4 Otevřete kryt na výpusti kávy mléka 5 Zastrčte otočný regulát...

Страница 84: ...ruba tolik zrnkové kávy kolik spotřebujete za jeden den Do zásobníku na zrnkovou kávu se vejde cca 160 g Zásobník na zrnkovou kávu můžete zvětšit tak aby se do něj vešlo cca 300 g viz kapi tola Zvětšení zásobníku na zrnkovou kávu 11 Kryt opět nasaďte na zásobník na zrnkovou kávu Kryt zatlač te úplně dovnitř aby mohlo těsnění pro zachování aroma optimálně chránit aroma zrnkové kávy 12 Připojovací z...

Страница 85: ...dpoklady Síťová zástrčka je zasunutá v zásuvce Kávovar je vypnutý Nádržka na vodu je plná Zásobník na zrnkovou kávu je plný K zapnutí kávovaru postupujte následovně Zapněte kávovar stisknutím vypínače Tlačítko EasyClean bliká a spustí se proces zahřívání Za několik sekund se spustí čerpadlo Systém trubic v kávovaru se pro pláchne malým množstvím vody která následně vyteče do odkapávací misky Kávov...

Страница 86: ...ru a odstraňte odkapávací misku Příprava nápojů bez mléka Když budete chtít připravovat kávu bez mléka můžete otočný regulátor mléčné pěny odejmout Stáhněte otočný regulátor mléčné pěny stranou Zavřete kryt na výpusti kávy mléka abyste přípojku chránili před prachem Espreso nebo caffè crema Předpoklady Kávovar je zapnutý a připravený k používání Otočný regulátor mléčné pěny může být umístěn na výp...

Страница 87: ...u a nádržku opět vložíte do kávovaru m Pokud budete chtít proces spařování předčasně zastavit stiskněte během procesu spa řování totéž tlačítko pro volbu druhu nápoje ještě jednou Tip Dané množství nápoje můžete změnit Postup při změně množství najdete v kapitole Změna množství nápoje Přednastavení při koupi kávovaru jsou následující espreso cca 40 ml caffè crema cca 125 ml Příprava nápojů s mléke...

Страница 88: ...ně nahoru 2 Pod výpust kávy mléka postavte vysokou sklenici 3 Stiskněte 1x krátce tlačítko Kapučíno Tlačítko Kapučíno svítí a spustí se proces zahřívání k napěňo vání mléka Proces napěňování a spařo vání se spouští a zastavuje automaticky Po přípravě pěny se okamžitě spustí příprava espresa Na začátku a na konci procesu napěňování a spařo vání zazní signální tón Přerušení procesu zahřívání m Během...

Страница 89: ...je Napěnění mléka 1 Výpust kávy mléka posuňte úplně nahoru a odstraňte odkapávací misku 2 Pod výpust kávy mléka postavte vysokou sklenici 3 Stiskněte 1x krátce tlačítko Napěňování Tlačítko Napěňování svítí a spustí se proces zahřívání pro přípravu mléčné pěny Proces napěňování se spouští a zastavuje automaticky Na začátku a na konci procesu napěňování zazní signální tón Přerušení procesu zahřívání...

Страница 90: ...mléčných nápojů Proplachování systému trubic a hadiček na mléko v žádném případě nenahrazuje každo denní čištění Systém trubic a hadiček na mléko na konci dne vyčistěte tak jak je popsáno v kapitole Čištění Po každé přípravě nápojů s mlékem bliká tlačítko EasyClean po dobu několika sekund To slouží jako upozor nění že je nutno systém trubic a hadiček na mléko propláchnout 1 Naplňte hrnek nebo skle...

Страница 91: ...y Když jste kávovar déle než 2 dny nepoužívali propláchněte jej tak že jím necháte protéct 2 šálky vody Předpoklady Kávovar je zapnutý a připravený k používání 1 Výpust kávy mléka posuňte podle potřeby dolů nebo nahoru 2 Pod výpust kávy mléka postavte prázdnou nádobu 3 Jakmile budou svítit všechna tlačítka stiskněte tlačítko EasyClean a držte jej stisknuté po dobu cca 5 sekund dokud nezazní 2 krát...

Страница 92: ...pro sílu kávy Intense Funkci Intense lze používat pouze společně s tlačítkem pro přípravu kávy espreso caffè crema nebo kapučíno Předpoklady Kávovar je zapnutý a připravený k používání Pod výpustí kávy mléka stojí šálek m Pokud máte rádi silnější kávu stiskněte nejdřív tlačítko pro sílu kávy Intense a až potom stiskněte některé z tlačítek pro volbu druhu nápoje Bliká tlačítko Intense m Stiskněte p...

Страница 93: ...e můžete dočíst v oddíle Obnovení továrního nastavení Předpoklady Kávovar je zapnutý a připravený k používání Pod výpustí kávy mléka stojí šálek nebo sklenice Espreso a caffè crema 1 Spusťte proces mletí a spařo vání kávy tak že stisknete požadované tlačítko pro volbu druhu nápoje např Caffè crema 2 Počkejte dokud se nenamele zrnková káva 3 Jakmile začne z výpusti kávy vytékat káva stiskněte tlačí...

Страница 94: ... 1 Proces napěňování spustíte stisknutím tlačítka Napěňo vání 2 Jakmile začne z výpusti mléka vytékat mléčná pěna stiskněte tlačítko Napěňování a držte jej stisknuté 3 Jakmile do šálku nateče požadované množství mléčné pěny tlačítko pusťte Nastavení je uloženo do paměti Jako potvrzení zazní 2 signální tóny Obnovení továrního nastavení Můžete také znovu nastavit původní množství vody Předpoklady Ká...

Страница 95: ...e mele káva otočte regulátorem stupně mletí proti směru hodinových ruči ček směrem k menšímu puntíku Pokud je stupeň mletí nastavený příliš na jemno je možné že bude káva vytékat velmi pomalu nebo nebude vytékat vůbec Nastavení stupně mletí POZOR na věcné škody Nastavení stupně mletí se smí provádět pouze když je mlýnek v pro vozu Stupeň mletí měňte pouze po malých krocích a pozorujte změnu chuti ...

Страница 96: ... zásobníku na zrnko vou kávu nasaďte nástavec tak jak vidíte na obrázku Zatlačte jej úplně dovnitř 3 Sejměte víko z nástavce na zásobník na zrnkovou kávu 4 Nasypte zrnkovou kávu 5 Kryt opět nasaďte na nástavec na zásobník na zrnkovou kávu Víko zatlačte úplně dovnitř aby mohlo těsnění pro zacho vání aroma optimálně chránit aroma zrnkové kávy cs 106466 cs Esperto_Pro_v5 indd 96 14 06 21 10 45 ...

Страница 97: ...knutím vypínače Kávovar pak bude spotřebovávat už jen minimální množství elektrické energie Pokud jste po dobu cca 10 minut nestiskli žádné tlačítko přepne se kávovar do pohotovostního režimu automaticky To je na jednu stranu bezpečnostní funkce a na druhou stranu se tím zajišťuje úspora energie Na výběr máte ze čtyř časových úseků po kterých se kávovar má automaticky vypnout 10 minut 20 minut 30 ...

Страница 98: ...sti se nesmí umývat v myčce na nádobí denně týdně dle potřeby plášť přístroje X X umývání nádržky na vodu X X vyplachování nádržky na vodu X X filtr v nádržce na vodu X X nádobka na kávovou sedlinu miska na zbytkovou vodu odkapávací miska X X spařovací jednotka X X systém trubic a hadiček na mléko X X Čištění pláště M M Plášť kávovaru otírejte měkkým vlhkým hadříkem M M Pokud je třeba vytřete měkk...

Страница 99: ...ob kou na kávovou sedlinu 3 Vyprázdněte nádobku na kávovou sedlinu misku na zbytkovou vodu a dle potřeby i odkapávací misku 4 Jednotlivé díly umyjte vodou a prostředkem na mytí nádobí Potom všechny díly dobře utřete Tyto díly nejsou vhodné do myčky 5 Vložte nádobku na kávovou sedlinu opět domisky na zbytkovou vodu a zasuňte oba dva díly do kávovaru 6 Vložte odkapávací mřížku do odkapávací misky 7 ...

Страница 100: ...hoře a stáhněte jej z kávovaru 3 Stiskněte obě dvě oranžová tlačítka držte je pevně stisknutá a vytáhněte spařovací jednotku rovně ven z kávo varu 4 Spařovací jednotku umyjte pod tekoucí teplou vodou 5 Následně nechte spařovací jednotku dobře uschnout 6 Odstraňte veškeré zbytky mleté kávy z přihrádky dodaným čisticím kartáčkem Click 7 Spařovací jednotku zatlačte s trochou síly opět do kávova ru an...

Страница 101: ...u vhodné do myčky Pouze tak bude zajištěna kompletní hygiena vysoká kvalita mléčné pěny a dlouhá životnost kávovaru Čištění je nutno provádět dodatečně k pravidelnému proplachování systému trubic a hadiček na mléko Demontáž a čištění systému trubic a hadiček na mléko 1 Stáhněte otočný regulátor mléčné pěny stranou 2 Stáhněte silikonovou hadičku z otočného regulátoru mléčné pěny 3 Stáhněte trubičku...

Страница 102: ...chny části opláchněte čistou studenou vodou Všechny díly pečlivě utřete a nechte je přes noc otevřené schnout Pro optimální vyčištění systému trubic a hadiček na mléko doporu čujeme všechny díly kromě otočného regulátoru mléčné pěny pravidelně nechat odmočit po nějakou dobu v teplé vodě s čističem mléčného systému durgol Milchsystem Reiniger k dostání ve většině prodejen Tchibo Složení systému tru...

Страница 103: ...é na doraz 8 Zastrčte trubičku z ušlechtilé oceli do silikonové hadičky tak jak vidíte na obrázku 9 Silikonovou hadičku zastrčte do otočného regulátoru mléčné pěny tak jak vidíte na obrázku 10 Otevřete kryt na výpusti kávy mléka 11 Zastrčte otočný regulátor mléčné pěny úplně rovně až na doraz do přípojky tak jak vidíte na obrázku cs 106466 cs Esperto_Pro_v5 indd 103 14 06 21 10 46 ...

Страница 104: ...ispleji svítit symbol Odvápnit je nutno kávovar odvápnit Kávovar v následujících dnech odvápněte Nečekejte s odvápňováním déle protože jinak se v kávovaru může vytvořit tolik vápenných usazenin že odvápňovací prostředek již nemusí účinkovat Proces odvápňování trvá zhruba 15 minut Nenechávejte přístroj během procesu odvápňování nikdy bez dozoru Předpoklady Kávovar je zapnutý a připravený k používán...

Страница 105: ... ml 8 Po každém procesu čerpání vylijte roztok s odvápňovacím prostředkem který vytekl z výpusti kávy aby nádobka pod výpustí kávy nepřetekla Po dokončení procesu svítí symbol Odvápnit a symbol Dolít vodu a tlačítko Espreso bliká 9 Vyjměte z kávovaru nádržku na vodu 10 Nádržku na vodu důkladně umyjte podle popisu v kapitole Čištění oddíl Umývání nádržky na vodu Nyní začne fáze proplachování Fáze p...

Страница 106: ...dů kávovar vyčistit tak jak je popsáno v kapitole Čištění Odstraňte vodu ze systému trubic v kávovaru Předpoklady Kávovar je zapnutý a připravený k používání 1 Pod výpust kávy postavte práz dnou nádobku s objemem minimálně 250 ml Pokud bude třeba odstraňte odkapávací misku 2 Stiskněte vypínač a tlačítko Caffè crema a držte je stisk nuté po dobu cca 5 sekund dokud nezazní 2 signální tóny 3 Tlačítka...

Страница 107: ...ložené v kávovaru nebo že nejsou vložené správně Vložte je opět do kávovaru viz krok 7 v kapitole Vyprázdnění nádobky na kávovou sedlinu misky na zbytkovou vodu a odkapávací misky Svítí symbol spařovací jednotka Je možné že je nesprávně vložená spařovací jednotka nebo kryt spařovací jednotky Odejměte kryt spařovací jednotky a zkontro lujte jestli spařovací jednotka pevně sedí viz kapitola Čištění ...

Страница 108: ...e káva rychle vychladne Šálek předehřejte Káva je příliš slabá Nastavte jemnější stupeň mletí Pokud chcete aby byla káva silnější stiskněte nejdřív tlačítko pro sílu kávy Intense a až potom tlačítko pro volbu druhu nápoje Káva vytéká z výpusti kávy pomalu Nastavte hrubší stupeň mletí Zahřívání kávovaru trvá nezvykle dlouhou dobu Káva nebo horká voda vytékají z výpusti kávy jen ve velmi malém množs...

Страница 109: ... přístroje získáte u obecní nebo městské správy Prohlášení o shodě Společnost Tchibo GmbH tímto prohlašuje že tento výrobek splňuje v době uvedení na trh základní požadavky a všechna příslušná opatření následujících směrnic 2006 42 ES Směrnice o strojních zařízeních 2014 30 EU Směrnice o elektromagnetické kompatibilitě 2009 125 ES Směrnice o stanovení rámce pro určení požadavků na ekodesign výrobk...

Страница 110: ...epoškodil vyčistěte prosím před zabalením všechny nádoby odkapávací misku spařovací jednotku a také vnitřní prostor ve kterém je vsazena Postupujte následovně odstraňte zbytky mleté kávy a tekutiny vypláchněte a osušte všechny jednotlivé díly K výrobku přiložte kopii účtenky a uveďte prosím následující údaje svou úplnou adresu telefonní číslo na kterém jste přes den k zastižení a nebo e mailovou a...

Страница 111: ...cs 106466 cs Esperto_Pro_v5 indd 111 14 06 21 10 47 ...

Страница 112: ...o de instructions www tchibo cz navody Artikelnummer Product number Číslo výrobku 393 500 Made exclusively for Tchibo GmbH Überseering 18 22297 Hamburg Germany www tchibo de www tchibo cz 106466 cs Esperto_Pro_v5 indd 112 14 06 21 10 47 ...

Отзывы: