


LM6
54
DB6 Single / Multi / AES – Firmware version 1.30
LM6 – Basic Use
LM6 can be used with mono, stereo and 5.1 ma-
terial for any type of program material. It visual-
izes…
– short-term loudness,
–
loudness history and
–
long-term statistical descriptors.
To bring up the Radar display:
–
Select the M1 (Meter 1) or the M2 (Meter 2) tab
depending on which of the two Loudness me-
ters you want to display.
–
Select the Edit page.
–
Select the Radar subpage.
During normal operation, you will be using this
page most of the time. The basic functionality of
the LM6 Radar page is shown in Fig 3.
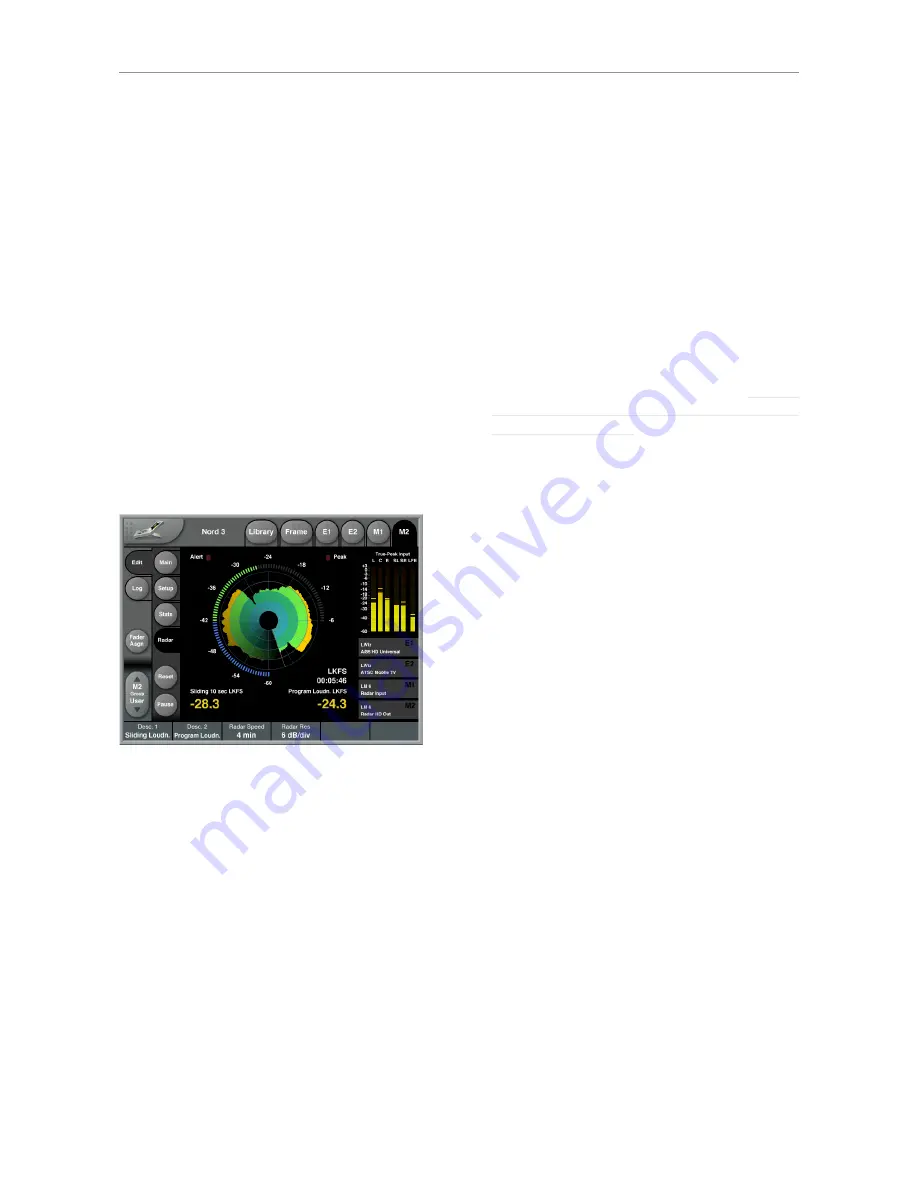
Reading the Radar display
Fig 3.: The LM6 Radar page
Target Loudness
is displayed at the “12 o’clock”
position of the outer LED ring, and at the radar
circle marking the transition from green to yel-
low.
The yellow numbers in the lower part of the dis-
play are the two descriptors
Loudness Range
and
Program Loudness.
Pausing and resetting
the Radar display
The Pause and Reset buttons to the left of the
display are the “transport controls” of LM6. They
are used to make the radar and descriptor mea-
surements run, pause and reset.
Click the Reset button to reset the Radar display
and the descriptors.
Setting up LM6
To change the current LM6 preset’s name and
adjust basic parameters, click the “Main” button.
To configure what information is displayed, click
the “Setup” button.
Working with LM6 presets
LM6 presets define parameters such as target
loudness, noise floor, and overload conditions.
You can use TC Icon’s Library functions to re-
name, store and recall presets. See the “Recall-
ing, storing and deleting settings” section in the
DB6 operation manual.
LM6 – Radar Page
Outer Ring: Current Loudness
The segmented outer ring of the Radar page
displays Momentary loudness. The “12 o’clock”
position represents the 0 LU point (i.e. Target
Loudness). Values above this point are shown
in yellow. The “LU Reference” parameter can be
found on the LM6 Main page.
The Low Level point is marked by the transition
from green to blue. The “Low Level Below” pa-
rameter can be found on the Setup page.
The user should be instructed to keep the out-
er ring in the green area, and around the “12
o’clock” position on the average. Excursions into
the blue or the yellow area should be balanced,
and not only go in one direction.
The numbers associated with the outer ring may
be referenced at either maximum loudness or
have a zero point set at Target Level. You can set
this on the LM6 Main page using the “Loudness
Unit” parameter. Either way of looking at loud-
ness is valid.
LUFS
reading is in line with how peak level is typ-
ically measured in a digital system, and compat-
ible with Dolby AC3 and E metadata, while the
LU
approach calls for a certain Target Loudness
to have been predetermined, like e.g. a VU meter.
Содержание DB6
Страница 2: ......
Страница 4: ......
Страница 41: ...Updating DB6 firmware English Manual 2014 03 05 37...
Страница 73: ...Technical specifications English Manual 2014 03 05 69...
Страница 74: ...Technical specifications 70 DB6 Single Multi AES Firmware version 1 30...
Страница 75: ...Technical specifications English Manual 2014 03 05 71...
Страница 76: ...Technical specifications 72 DB6 Single Multi AES Firmware version 1 30 Item No E60537014...


