background image

Maintenance, Service, and Repair

Brakes


Page 8

BLEED THE BRAKE SYSTEM

NOTE: Start this procedure at the wheel furthest from the master cylinder,

then work toward the wheel closest to the master cylinder.

6. Thoroughly clean the area around the master cylinder cap and remove the cap.

Do not ingest brake fluid or allow contact with skin or eyes. Always

wear protective clothing and a face shield when working with or

around brake fluid.
SKIN CONTACT
Flush area immediately with water for several minutes. If a rash or

skin irritation develops, get medical attention immediately.
EYE CONTACT
Immediately flush the eye with water for 15 minutes and call

physician.
INGESTION
Get medical attention immediately.

1. Make sure the key-switch is in the “OFF” position, then remove

the key.

2. Place the forward-reverse switch in the center “OFF” position.
3. Set the park brake.
4. Place blocks under the front wheels to prevent vehicle movement.
5. Disconnect the main positive and negative cables at the batteries.

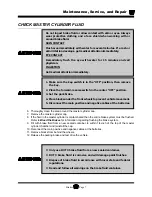
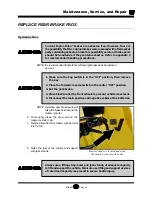
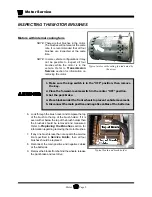
Master cylinder is located under the

floorboard by the throttle pedal.

Содержание MB-238-00

Страница 1: ...e Best Way To Go About Your B u s i n e s s Serial Number Starting 164954 MANUAL MB 238 00 Operation Troubleshooting and Replacement Parts Manual Models Inlcuded B0 012 38 3 wheel RR Special Revision...

Страница 2: ......

Страница 3: ...nn Mfg All rights reserved No part of this work may be reproduced or transmitted in any form or by any means electronic or mechanical including photocopying and recording or any information storage or...

Страница 4: ...B2 48 With Dump Bed Option B2 10 Ambulance B2 48 with Steel Cab Foldaway 4 Passenger Seat and Stake Sides ET 3000 ET1 50 Full Size Truck P2 50 30 000 Pound Tow Tractor...

Страница 5: ...ooting 12 Electrical Troubleshooting 13 Wire diagram 14 Illustrated Parts 15 Appendix A Special Tools 16 Appendix B Suggested Torque Values 17 Appendix C Brake Lining Handling Precautions 18 Taylor Du...

Страница 6: ...TAYLOR DUNN...

Страница 7: ...n About this manual 2 Who Should Read This Manual 2 Responsibilities 2 How To Use This Manual 3 Conventions 3 How to Identify Your Vehicle 4 Taking Delivery of Your Vehicle 5 R 3 80 shown with extende...

Страница 8: ...pplicable models and serial numbers on the front cover Please be aware of all cautions warnings instructions and notes contained in this manual RESPONSIBILITIES Of the Owner The owner of this or any T...

Страница 9: ...entions Symbols and or words that are used to define warnings cautions instructions or notes found throughout this manual Refer to the examples below Note Alerts the reader to additional information a...

Страница 10: ...ted below This vehicle conforms to requirements for Type E vehicles as described in O S H A Standard Section 29 CFR 1910 178 Powered Industrial Trucks and with all applicable portions of the American...

Страница 11: ...Dunn vehicle is a factory authorized service technician Repairs made by unauthorized personnel may result in damage to the vehicles systems which could lead to an unsafe condition resulting in severe...

Страница 12: ...B2 48 With Stake Side Dump Bed Option SC1 00 Stock Chaser E4 55 Sit Down Tow Tractor C4 25 Sit Down Tow Tractor...

Страница 13: ...dal 5 Steering 6 Charger Interlock built in charger 6 Vehicle Operational Guidelines 7 Safety Guidelines 7 Starting 7 While driving 7 Loading and Unloading 7 Towing Loads 7 Parking 8 Towing This Vehic...

Страница 14: ...fferential Motor DC 36 Volt 3 2 kW 4 4 Horse Power for 60 min Separately Excited 5 1 kW 6 9 Horse Power for 5 min Field Brakes Rear Wheel Hydraulic Disc Hand Operated Park Brake 4 Wheel Hydraulic Disc...

Страница 15: ...center OFF position 3 Set the park brake 4 Place blocks under the front wheels to prevent vehicle movement 5 Disconnect the main positive and negative cables at the batteries DRIVER TRAINING PROGRAM...

Страница 16: ...tion of the Smart View Display 3 Forward Off Reverse Switch The forward off reverse switch located to the left of the key switch determines the direction of travel of the vehicle Push the top of the s...

Страница 17: ...he brake in an automobile Applying pressure to the brake pedal slows the vehicle according to the amount of pressure applied Relieving pressure from the pedal releases the braking action 2 Accelerator...

Страница 18: ...he interlock shown is mounted external of the charger Some vehicles may have the interlock built into the charger Steering The steering wheel and steering system are similar to an automobile To turn r...

Страница 19: ...represents a motor symbol with a P in the center Run Time Hours Accumulated length of time that the vehicles has been in operation Time is accumulated when the FS 1 switch in the accelerator module is...

Страница 20: ...009 Discharged battery or defective wiring Charge the battery If the battery is good check wiring to the controller note 2 04010 Battery voltage too high Incorrect battery installed 04011 Personality...

Страница 21: ...ake 4 Rotate the ON OFF switch to the ON position 5 Wait 1 second then place the forward off reverse switch in the desired direction of travel 6 Release the parking brake 7 Release the foot brake 8 Sl...

Страница 22: ...th an automatic electric brake do not tow the vehicle with the drive wheels on the ground Use another driver to steer this vehicle while it is being towed Be sure the driver uses the brakes when the t...

Страница 23: ...ger charging times Signet Charger Operation The Signet HB 600 and HB 1000 chargers use a semi automatic charging system The charger will turn itself ON when the AC power cord is connected to the AC po...

Страница 24: ...es before they are completely discharged we recommend waiting until they are discharged a minimum of 25 to reduce the possibility of overcharging Refer to Vehicle Controls in this section for informat...

Страница 25: ...h and Service Batteries l Check Park Brake l Check Motor Brushes and Blow Out Motor l Check Front Wheel Bearings l Check Rear Axle Oil l Change Rear Axle Oil l Check and Tighten all Nuts and Bolts l C...

Страница 26: ...only Inspect and tighten all nuts and bolts First 500 hours and then every 1000 hours 2 1000 Inspect and tighten all nuts and bolts Clean and repack front wheel bearings Inspect and tighten all wire...

Страница 27: ...inclusive of a severe duty application Extreme temperature Bumpy dusty or ill maintained roads Excessively wet areas Corrosive or contaminated areas Frequent loading of vehicle at near capacity Use on...

Страница 28: ...TAYLOR DUNN...

Страница 29: ...Table of Contents General Maintenance Maintenance Guidelines 2 Troubleshooting Guide 3 Lubrication Chart 4 Model E 4 55 Tow Tractor Model C 4 25 Tow Tractor...

Страница 30: ...or cleaning parts Only properly trained and authorized technicians should perform maintenance or repairs to this vehicle Periodic maintenance and service must be performed on this vehicle Failure to c...

Страница 31: ...orn Drive Gears Front End Out of Alignment Defective Speed Control Abnormal Noise Worn Drive Gears or Bearings Worn Front Rear Axle Bearings Loose Lug Nuts Motor Bearings Worn Oil Leak in Rear Bearing...

Страница 32: ...Lubricant Type 1 2 Fork Bearings 1 General Purpose Grease 3 Ball Joints 2 General Purpose Grease 4 Pedal Linkages 4 General Purpose Grease 5 Front Wheel Bearings 2 Wheel Bearing Grease 6 7 Drive Drain...

Страница 33: ...TABLE OF CONTENTS Inspect the Front Wheel Bearings 2 Adjust Front Wheel Bearings 3 Front Axle Removal and Installation 4 Removal 4 Installation 4 Replace Front Wheel Bearings 5 Front Axle Service...

Страница 34: ...the Adjust Front Wheel Bearings section for information regarding the adjustment of the wheel bearings 9 Spin the wheel and listen for any grinding noise Any noise may be an indication of worn or dam...

Страница 35: ...ands Installation 1 Raise the front of the vehicle so that the hole for the axle is the same height as the front wheel hub 2 Assemble the bearing spacers into the front wheel hub and place the front w...

Страница 36: ...talling the axle 12 Lower the vehicle 13 Reconnect the main positive and negative cables at the batteries 14 Remove the blocks from behind the wheels 15 Release the park brake and test drive the vehic...

Страница 37: ...el 2 Inspect the Steering Components 3 Ball Joints 3 Fork Bearings 3 Adjust the Steering Gear 4 Center the Steering Gear 4 Replace the Steering Gear 5 Replace the Ball Joints 5 Repair the Steering Gea...

Страница 38: ...turn until the turning radius is at 155 inches Stop and adjust the right turn steering stop until it touches the pitman arm Do not drive the vehicle while the steering wheel or front fork is tied in p...

Страница 39: ...heels are tied in position Driving the vehicle while the steering wheel or front wheels tied in position may cause loss of control of the vehicle resulting in severe bodily injury and or property dama...

Страница 40: ...to prevent vehicle movement 5 Disconnect the main positive and negative cables at the batteries Always use a lifting strap hoist and jack stands of adequate capacity to lift and support the vehicle Fa...

Страница 41: ...falling out of the vehicle and could cause severe bodily injury and or property damage REPLACE THE BALL JOINTS NOTE If a ball joint is worn out we recommend replacing all of the ball joints as a set...

Страница 42: ...f turns in the original direction 2 Remove the worm bearing adjuster locking ring and the worm bearing adjuster 3 Remove the side cover pitman shaft assembly by removing the three side cover bolts and...

Страница 43: ...r worm bearing on the worm shaft and install the worm shaft ball nut assembly into the housing being careful not to damage the worm shaft seal 10 Install the assembled worm bearing adjuster into the h...

Страница 44: ...Maintenance Service and Repair Steering Page 8 Exploded View of Steering Gear...

Страница 45: ...4 Adjust the Service Brakes 5 Adjust the Parking Linkage 6 Check Master Cylinder Fluid 7 Bleed the Brake System 8 Flush the Brake System 10 Replace Rear Brake Pads 11 Hydraulic Disc 11 Replace the Whe...

Страница 46: ...pad If the brake pad lining is 1 16 inch or less then the brake pad must be replaced It is recommended to replace the left and right side brake pads as a set Current Taylor Dunn brakes are asbestos f...

Страница 47: ...d its service limits then the front hub must be replaced Refer to Front Axle Servicefor information on replacing the front hub NOTE Depending on the rear axle configuration the rear brake rotor may be...

Страница 48: ...for any signs of damage wear or missing cotter pins If any sign of damage or wear is found on the locking mechanism cables or linkages then they must be repaired or replaced immediately Failure to rep...

Страница 49: ...cylinder See Check the Master Cylinder Fluid section Air in the brake lines See Bleed the Brakes section Worn brake pads See Inspect the Service Brake section Worn brake rotor See Inspect the Service...

Страница 50: ...er pins and tighten all jam nuts 11 Set the park brake 12 Reconnect the main positive and negative cables at the batteries 13 Remove blocks from behind the wheels 14 Release the park brake and test dr...

Страница 51: ...es Always wear protective clothing and a face shield when working with or around brake fluid SKIN CONTACT Flush area immediately with water for several minutes If a rash or skin irritation develops ge...

Страница 52: ...id SKIN CONTACT Flush area immediately with water for several minutes If a rash or skin irritation develops get medical attention immediately EYE CONTACT Immediately flush the eye with water for 15 mi...

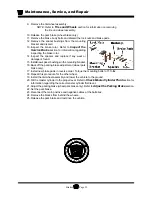
Страница 53: ...low enough to allow air to enter the brake lines If air enters the brake lines during the bleeding process then you will have to start again from the beginning 14 Repeat the above steps until you are...

Страница 54: ...the wheels 10 Remove the wheel cylinders from each axle Refer to Replace the Wheel Cylinder section for information regarding removing the wheel cylinder 11 Attach a clear hose to the bleeder valve o...

Страница 55: ...dled as if they contain asbestos Refer to appendix C for recommended handling precautions Always use a lifting strap hoist and jack stands of adequate capacity to lift and support the vehicle Failure...

Страница 56: ...nting bracket 16 Back off the parking brake adjustment wheel park brake only 17 Install new brake pads in reverse order Torque the mounting bolts to 11 ft lbs 18 Repeat this procedure for the other wh...

Страница 57: ...nn brakes are asbestos free However there is the possibility that the original brakes were replaced with aftermarket parts containing asbestos Since this possibility exists all brake parts should be h...

Страница 58: ...12 Disconnect the brake hose from the brake body 13 Install the new brake body assembly in reverse order Use teflon tape thread sealant on the brake hose fitting Torque the brake body bolts to 11 ft...

Страница 59: ...ake fluid spills Any debris or contaminates left in the brake system could lead to brake failure and result in property damage and or severe bodily injury Do not ingest brake fluid or allow contact wi...

Страница 60: ...ging off of the end of the piston 14 Insert the rubber boot piston into the brake body making sure that the boot is properly seated in the groove 15 Press the pistons all the way down into the brake b...

Страница 61: ...clothing and a face shield when working with or around brake fluid SKIN CONTACT Flush area immediately with water for several minutes If a rash or skin irritation develops get medical attention immed...

Страница 62: ...Bleed the brakes refer to Bleed the Brakes section for information regarding bleeding the brakes 16 Reconnect the main positive and negative cables at the batteries 17 Remove the blocks from behind t...

Страница 63: ...Remove the rubber boot 4 Depress the plunger and remove the plunger spring clip retainer 5 Pull the plunger and all seals out of the master cylinder bore 6 Thoroughly clean inspect and replace parts...

Страница 64: ...TAYLOR DUNN...

Страница 65: ...specting the Motor Brushes 2 Motors with internal cooling fans 2 Motor Removal and Installation 3 Motor Inspection 3 Replacing the Brushes or Armature Bearing 7 Repairing the Commutator 8 Service Limi...

Страница 66: ...then the brushes should be removed and measured Refer to Replacing the Brushes section for information regarding removing the motor brushes 7 If any one brush is less than or equal to the service lim...

Страница 67: ...out away from the commutator 3 Remove the dust cap from the rear motor housing 4 Place the motor in a press and press the armature out of the rear bearing NOTE Removing the armature will damage the mo...

Страница 68: ...n it must be machined on a lathe Do not machine the commutator past the minimum diameter specified in Service Limits section Refer to Repair Commutator section for information regarding machining the...

Страница 69: ...then we recommend that the armature or motor be replaced 9 Using the continuity function of digital multi meter check the continuity around the entire commutator by placing one test lead against one...

Страница 70: ...nstall the rear motor housing to the stator housing 4 Lightly grease the inside diameter of the armature bearing 5 Carefully insert the armature through the stator housing and onto the motor bearing i...

Страница 71: ...laced as a set NOTE The motor must be disassembled to replace the brushes or the bearing Refer to Motor Inspection Disassembly section for information on taking the motor apart NOTE The motor must be...

Страница 72: ...the motor apart 3 Using a lathe cut the armature just enough to remove all grooves depressions or ridges 4 Measure the diameter of the commutator If the commutator is less than the minimum diameter sp...

Страница 73: ...cut the commutator insulation to the proper depth Refer to undercut depth in Service Limits 2 Once all segments have been properly undercut mount the armature in a lathe and smooth the commutator with...

Страница 74: ...0 025 69 85 2 75 15 87 0 625 0116 1 20 70 054 41 XP 1789 or DY2 4001 0 635 0 025 69 85 2 75 15 87 0 625 0 011 0 43 70 057 40 XP 1673 or DV1 4003 0 635 0 025 69 85 2 75 15 87 0 625 0 008 0 58 70 052 40...

Страница 75: ...ear Hub or Rotor 5 Removing and Installing the Rear Axles Disc Brakes 6 Transmission Assembly 8 Remove and Install 8 Disassembly and Reassembly of the Primary Reduction Gear Case 9 Disassembling the 3...

Страница 76: ...uired until level with the bottom of the opening Refer to the Lube Chart section for information regarding type of oil b If oil comes out of the opening allow to drain until level with the bottom of t...

Страница 77: ...al up to the bottom of the level plug opening Refer to the Lube Chart section for information regarding type of oil 11 Replace the fill plug 12 Reconnect the main positive and negative cables at the b...

Страница 78: ...ove the key 2 Place the forward reverse switch in the center OFF position 3 Set the park brake 4 Place blocks under the front wheels to prevent vehicle movement 5 Disconnect the main positive and nega...

Страница 79: ...embly 8 Remove the axle hub bolt and washer and remove the hub from the axle 9 Remove the outer brake pad Refer to section Brake Service for information regarding removing the brake pads 10 Remove the...

Страница 80: ...se a lifting strap hoist and jack stands of adequate capacity to lift and support the vehicle Failure to use lifting and support devices of rated load capacity may result in severe bodily injury NOTE...

Страница 81: ...ead locking compound They are intended for one time use only If removed they must be replaced Reusing the original bolts could cause loss of brakes resulting in severe bodily injury and or property da...

Страница 82: ...axle mounting brackets and brake arms 8 Disconnect the wiring from the motor 9 Disconnect the hydraulic brake lines from the left and right brake bodies 13 Reinstall the drive in reverse order 14 Ble...

Страница 83: ...in positive and negative cables at the batteries 7 Place a drain pan under the gear case that is capable of holding four quarts of oil and drain the oil from the front gear case 8 If required remove t...

Страница 84: ...the output gear from the pinion shaft NOTE If necessary remove the seal from the input shaft bore at this time 15 Mark the gear case position in relation to the 3rd member housing so that it will be r...

Страница 85: ...the front flange on the 3rd member and gear case cover NOTE Pack the motor seal with non acetic based grease 20 Fill the differential with oil NOTE Refer to Changing the Differential Oil for informati...

Страница 86: ...rive from the vehicle 8 Place a drain pan under the gear case that is capable of holding four quarts of oil and drain the oil from the front gear case and 3rd member 9 Place the 3rd member on an appro...

Страница 87: ...adjusting nut from the side plate 14 Turn the side plate over and remove the carrier bearing race from the side plate 15 Remove the differential assembly from the 3rd member housing 16 Remove the carr...

Страница 88: ...front bearing from the input shaft NOTE The input shaft may have to be driven out to perform this procedure 19 Remove the input shaft s shims and spacer 20 Remove the pinion shaft from the 3rd member...

Страница 89: ...carrier bearing race ring nut so that the ring gear is not in binding against the pinion gear 6 Remove the differential assembly NOTE Do not allow the ring nut to rotate 7 Remove the pinion gear and...

Страница 90: ...ions 15 Check the gear lash between the ring and pinion gears The gear lash should be 0 005 to 0 007 inches 16 Adjust the gear lash if needed by tightening or loosening the carrier bearing race ring n...

Страница 91: ...gear case axles and housings motor and install the complete drive onto the vehicle 20 Fill the drive with oil Refer to the Lube Chart section for information regarding type of oil Refer to Change Oil...

Страница 92: ...inion bearing 3 Install the main gear onto the pinion shaft and torque the pinion nut to 154 169 ft lbs 4 Measure the torque required to rotate the pinion shaft in the housing 5 The torque required to...

Страница 93: ...him mm where DV The number on the face of the pinion gear A The distance in millimeters from the face of the pinion gear to the top of the inner pinion bearing race see below B 54 C The number on the...

Страница 94: ...Maintenance Service and Repair Transmission Page 20 NOTE Values shown are for reference only C D...

Страница 95: ...TABLE OF CONTENTS Suspension Replace the Rear Springs 2 Replace the Front Springs 2 Replace the Spring Bushings rear only 5 Replace the Shocks 6 Front 6 Rear 6...

Страница 96: ...pring from the vehicle 11 Inspect the spring hardware for signs of wear or damage If any wear or damage is found then the hardware must be replaced 12 Install the new spring in reverse order 13 Lower...

Страница 97: ...trap hoist and jack stands of adequate capacity to lift and support the vehicle Failure to use lifting and support devices of rated load capacity may result in severe bodily injury 7 Raise the rear le...

Страница 98: ...es Always use a lifting strap hoist and jack stands of adequate capacity to lift and support the vehicle Failure to use lifting and support devices of rated load capacity may result in severe bodily i...

Страница 99: ...TABLE OF CONTENTS Tire Inflation 2 Tire Inspection 2 Replace the Front Tire Wheel 3 Replace the Rear Tire Wheel 3 Replace the Tire pneumatic 3 Repair the Tire pneumatic 4 Tires and Wheels...

Страница 100: ...tread as the tire approaches its wear limit see illustration below Replace the tire if any tread depth indicator can be seen or any part of the tread depth is 1 16 inch or less Refer to Replace the Ti...

Страница 101: ...To replace the tire the tire wheel assembly must be removed from the vehicle Refer to Replace the Tire Wheel section for information on removing the tire wheel assembly Tire replacement should only be...

Страница 102: ...severe bodily injury and or property damage REPAIR THE TIRE PNEUMATIC NOTE To properly repair a puncture the tire must be removed from the wheel Refer to Replace the Tire section for information on r...

Страница 103: ...BLE OF CONTENTS Battery Service Cleaning 2 Testing 3 Charging 4 Watering 5 Replacing 6 volt batteries only 6 Moist Charge Batteries 7 Storage and Returning to Service 8 Storage 8 Returning to Service...

Страница 104: ...may result in severe bodily injury and or property damage Battery electrolyte will stain and corrode most surfaces Immediately and thoroughly clean any surface outside of the battery that the battery...

Страница 105: ...ctrolyte is poisonous and dangerous It contains sulfuric acid Avoid contact with skin eyes or clothing Wear rubber gloves and safety glasses while servicing batteries DO NOT INGEST This may result in...

Страница 106: ...ger accepting a charge and should be replaced NOTE Refer to Charger Troubleshooting for information on checking the charging system The highest reading will be the cell that is accepting the most char...

Страница 107: ...n contact with the battery terminals will initiate a short circuit of the battery This could cause the battery to explode resulting in severe bodily injury and or property damage Battery electrolyte i...

Страница 108: ...be replaced 9 Remove all battery jumpers from both posts of the battery or batteries being replaced NOTE It is recommended to replace the battery jumpers when replacing the batteries 10 Remove the bat...

Страница 109: ...that is formulated to be used in wet lead acid batteries and is available at most automotive parts distributors that carry batteries When torquing battery hardware use a backup wrench on the battery...

Страница 110: ...l source It cannot be disconnected or neutralized Do not drop any tool or conductive object onto the battery A conductive object that comes in contact with the battery terminals will initiate a short...

Страница 111: ...tion for information regarding checking the electrolyte level 8 Test the batteries Refer to Testing section for information on testing the batteries 9 The batteries are now ready to be put back into s...

Страница 112: ...TAYLOR DUNN...

Страница 113: ...4 Important Notes and Instructions 4 Troubleshooting for Built in Charger 5 Troubleshooting for Portable Charger 8 Testing The Timer Relay 9 Testing the Interlock Relay 10 Turn the Key switch OFF BEF...

Страница 114: ...urrent state of charge when it is plugged in it assumes that the batteries require charging when it is connected For this reason it is recommended to discharge the batteries approximately 50 1175 1200...

Страница 115: ...efore connecting the charger The electrolyte in the batteries is too high boil over The electrolyte in the batteries is too low excessive gassing or sulfur smell To test the charger to see if it is tu...

Страница 116: ...than 80 discharged as per hydrometer reading The battery voltage must be above approximately 65 of the chargers rated DC voltage If the batteries are below approximately 65 of the chargers rated DC vo...

Страница 117: ...r has a bad connection Stop here and repair the problem Slide the insulators back onto the connectors on the two 10 gauge wires Slide the insulators off the connectors on the two 14 gauge wires Re Con...

Страница 118: ...re continuing Connect a 2k ohm resistor across the capacitor terminals for 10 seconds Do not touch the capacitor terminals with your hands The resistor should be held with a pair of insulated pliers F...

Страница 119: ...mer Relay Test Stop here and repair the problem Test the AC voltage across the transformer primary circuit The transformer primary consists of the two solid wires with the brown fiber insulator that a...

Страница 120: ...blem Remove the charger cover and perform the following tests 1 Inspect the internal wiring of the charger and repair as required 2 Check the continuity of both fuse links and replace if bad 3 Disconn...

Страница 121: ...f the charger If it is less than the rated AC voltage of the charger then the timer relay is bad Stop here and repair the problem Test the AC voltage across the transformer secondary circuit The volta...

Страница 122: ...here and repair the problem 9 Connect the charger to a working AC power source The charger should turn on If the charger does not turn on then their may be a problem with the AC power source or the A...

Страница 123: ...BLE OF CONTENTS Test Equipment Required 2 Important Notes and Instructions 2 Definitions 2 Terminology used 2 Start Troubleshooting Here 3 Test 8 Anti Rolloff Fault 22 Test 9 Electric Motor Brake 23 S...

Страница 124: ...the start of each test sequence you will be instructed on how to place the control switches While testing do not change the position of any switches unless instructed to do so DURING ALL TESTS After...

Страница 125: ...uits Do not continue unless the indicator shows a charged battery If the vehicle runs in one direction only then skip ahead to test 3 If the vehicle runs slow in forward but otherwise runs normal then...

Страница 126: ...ad to section 5 If the voltage does not start at 24 volts then go to section 4 TEST 1 2 Test the voltage from B to B on the Controller If the voltage equals battery volts then go to test 1 3 If the vo...

Страница 127: ...e drive wheels to the ground TEST 1 4 Test the voltage at pin 5 on the 12 pin logic card connector If the voltage is low then skip ahead to test 1 5 If the voltage is high then Check the seat switch f...

Страница 128: ...ke switch for shorted contacts Check the wire to the park brake switch for short circuits to B Stop trouble shooting here and repair the problem When the repair is completed completely retest the vehi...

Страница 129: ...the voltage is above 0 3 volts then skip ahead to Test 6 TEST 1 8 Test the voltage at pin 4 on the 12 pin logic card connector If the voltage is low then skip ahead to test 1 9 If the voltage is high...

Страница 130: ...he vehicle before lowering the drive wheels to the ground TEST 2 2 Check the resistance from the motor A1 to the A2 terminals If the resistance is less than 1 Ohm then go to test 2 3 If the resistance...

Страница 131: ...ult in unexpected movement of the vehicle resulting in injury or property damage This troubleshooting guide is written in sequential order All tests must be performed in the order that they are writte...

Страница 132: ...tage at pin 2 on the 12 pin logic card connector If the voltage is low then skip ahead to test 3 2 If the voltage is high then skip ahead to Test 7 TEST 3 2 Test the voltage at pin 3 on the 12 pin log...

Страница 133: ...voltage at pin 3 on the 12 pin logic card connector If the voltage is low then skip ahead to test 3 4 If the voltage is high then skip ahead to Test 7 TEST 3 4 Test the voltage at pin 2 on the 12 pin...

Страница 134: ...the controller Connect the negative lead to the F2 terminal on the controller The test should show the presence of a diode approx 0 5v If the test is open or shorted then one or both directional FET...

Страница 135: ...r open circuits Stop trouble shooting here and repair the problem When the repair is completed completely retest the vehicle before lowering the drive wheels to the ground TEST 4 2 Test the voltage at...

Страница 136: ...th the wire from the cold side of the key switch to pin 1 on the 12 pin logic card connector The relay is located in the charger cabinet Stop trouble shooting here and repair the problem When the repa...

Страница 137: ...actor coil If the voltage is not within 1 volt of battery voltage then the contactor is bad and must be replaced NOTE An open contactor coil should be accompanied by a 4 flash code from the logic LED...

Страница 138: ...t of the vehicle resulting in injury or property damage B Terminal on the Sevcon controller This troubleshooting guide is written in sequential order All tests must be performed in the order that they...

Страница 139: ...in numbers are cast into the connector as shown in the illustration TEST 6 1 Accelerator pedal released Test the voltage from pin 9 to battery positive If the voltage equals battery volts then skip ah...

Страница 140: ...quals battery volts then skip ahead to test 6 4 If the voltage does not equal battery volts then check the wire from pin 4 to the battery voltage negative circuit breaker Stop trouble shooting here an...

Страница 141: ...een 4 8 and 5 1 volts then the module has failed and must be replaced Stop trouble shooting here and repair the problem When the repair is completed completely retest the vehicle before lowering the d...

Страница 142: ...e circuit breaker Stop trouble shooting here and repair the problem When the repair is completed completely retest the vehicle before lowering the drive wheels to the ground TEST 7 2 If the vehicle do...

Страница 143: ...e at the White Black wire on the F R switch If the voltage equals battery volts skip ahead to test 7 4 If the voltage does not equal battery volts then the F R switch has failed Stop trouble shooting...

Страница 144: ...in the center OFF position and turn the key switch ON TEST 8 1 Read the motor field current on the Ammeter If the field current is greater than specified in the Motor Specification table see Motor Ser...

Страница 145: ...f the brake is not engaged then Disconnect the electric brake harness connector and repeat the test If the brake is still not engaged then Remove the brake and repair or replace the brake as required...

Страница 146: ...rd connector is broken Stop trouble shooting here and repair the problem When the repair is completed completely retest the vehicle before lowering the drive wheels to the ground If the test is bad th...

Страница 147: ...igh Low High low Switch in low High 7 Hand brake switch closed Low Hand brake switch open High 8 Key switch on ref battery positive Key switch off ref battery positive Battery volts 9 System off ref b...

Страница 148: ...short Burned Motor Repair as required 4 Contactor fault or open motor Contactor Failure Open Circuit Check contactor and motor 5 Not used 6 Accelerator module fault FS 1 Micro Switch Failure Faulty Wi...

Страница 149: ...TABLE OF CONTENTS Wire Diagrams Complete Vehicle 2...

Страница 150: ...k Gray Black White Black Blue Black Violet Black Red Blue White Red White Blue Yellow Green Black Gray Black White Black Blue Black Violet Black Red Blue White Gray White Blue Black White Black Violet...

Страница 151: ...ster Cylinder 14 Brake Lines 16 Motor 18 Rear Suspension 20 Wheels and Tires 20 Need tire and wheel 21 Speed Control Panel 22 Instrument Panel dash 22 Resetting the Smart View Display Maintenance Mete...

Страница 152: ...Illustrated Parts Parts Page 2 Front Fork Assembly 1 2 3 4a 5 9 5 4b 6 8 7 13 16 17 15 24 See Tires and Wheels 25 22 22 20 23 21 27 28 19 10 10 11 20 23 21 15 26 19 27 18 28 7 14 16 12...

Страница 153: ...Bushing 4 11 98 753 12 Bump stop 2 12 88 109 80 3 8 NC HEX HD NUT 2 13 K1 159 04 Axle 1 14 97 229 00 NUT 1 14NS NYLON INSERT 1 15 88 130 20 7 16 NF X 3 HEX HD GR 5 16 88 130 86 7 16NF FIB INSERT LOCK...

Страница 154: ...Illustrated Parts Parts Page 4 Steering Linkage 2 1 3 4 6 7 8 9 10 11 12 13 14 5 Cowling removed for clarity...

Страница 155: ...100 20 Steering column 1 4 96 123 45 U BOLT 3 8 X 2 X 2 5 8 1 5 80 400 10 Bearing 2 6 K47 100 22 Steering shaft 1 7 18 308 21 Steering gear 1 8 88 120 15 7 16 X 1 1 2 NC HEX HD GR 5 3 9 Nut 1 10 K1 15...

Страница 156: ...Illustrated Parts Parts Page 6 Steering Gear 4 1 6 8 7 5 9 10 2 3 14 17 12 11 13 15 16 Exploded Steering Gear dwg...

Страница 157: ...orm bearing 1 5 18 308 22 Upper worm bearing race 1 6 18 308 77 Housing 1 7 18 308 78 Seal pitman shaft 1 8 18 308 80 Nut pitman shaft 1 9 18 308 81 Lock washer 1 10 18 308 79 Seal input shaft 1 11 18...

Страница 158: ...Illustrated Parts Parts Page 8 Transmission Gear Case...

Страница 159: ...1 12 GT 72019 Seal 1 18 GT 71979 Bearing 1 21 GT 3273633 Pinion nut 1 23 See Note 1 previous page Spacer 1 24 GT 3287453 Output gear 30 1 0 or 1 GT 3287463 Output gear 24 1 0 or 1 GT 3287473 Output ge...

Страница 160: ...al Case Rear Axle Inner bearing on optional double bearing axle does not have an oil seal or o ring Orientation of bearing should have o ring groove adjacent to o ring on outer bearing Axle Shaft Inne...

Страница 161: ...Bolt 12 29 GT 71978 Bearing and race 2 30 GT 70299 10mm Washer 12 31 GT 71881 Seal 1 32 GT 70052 Vent 1 Rear Axle ITEM PART DESCRIPTION QTY 1 41 154 25 Axle shaft 2 2 80 505 20 Bearing 2 2a 80 505 30...

Страница 162: ...Illustrated Parts Parts Page 12 Rear Brakes Brake Body Assembly...

Страница 163: ...assembly 2 9 88 840 11 Retaining ring 2 10 See below Brake bleeder 2 11 32 220 03 Bushing 2 12 41 350 56 Park brake pin 2 13 41 350 12 Park brake lever bracket 2 14 41 350 52 Clevis pin 2 15 41 350 53...

Страница 164: ...Illustrated Parts Parts Page 14 Master Cylinder Brake linkage Floorboard remoed for clarity 1 14 3 4 5 6 7 8 2 3 Brake Cross Shaft 2 3 9 10 11 12 13...

Страница 165: ...8 X 1 STEEL COTTER PIN 4 4 K47 100 28 Linkage 1 5 88 119 80 3 8 NF Hex nut 1 6 50 028 10 Threaded rod 1 7 88 119 80 3 8 NF Hex nut 1 8 96 762 00 Clevis 1 9 96 762 00 Clevis 1 10 88 119 80 3 8 NF Hex...

Страница 166: ...Illustrated Parts Parts Page 16 Brake Lines Illustration not available...

Страница 167: ...to brake switch 1 K47 600 02 Brake line Brake switch to rear t fitting 1 99 603 68 Brake line Left side to brake hose 1 99 603 68 Brake line Right side to brake hose 1 99 564 00 T fitting rear 1 71 1...

Страница 168: ...Illustrated Parts Parts Page 18 Motor...

Страница 169: ...at time of printing The original motor provided under part number 70 054 40 has been discontinued It has been replaced by 70 054 41 The 70 054 41 motor has slightly more power torque The 70 054 40 mo...

Страница 170: ...Illustrated Parts Parts Page 20 Wheels and Tires Ref wheel hub 1 2 3 Rear Suspension...

Страница 171: ...M PART DESCRIPTION QTY Not shown 96 240 00 1 2NC x 4 Spring bolt front of the leaf spring 2 32 214 50 Spring bushing front of the leaf spring 4 14 85 510 17 Leaf spring 2 15 16 861 40 Spring mounting...

Страница 172: ...Illustrated Parts Parts Page 22 Speed Control Panel Instrument Panel dash...

Страница 173: ...PASTE 13 5OZ NOTE To order part number 62 400 05 you will need to provide the vehicle serial number The controller will be programmed to match the vehicle as originally manufactured Instrument Panel I...

Страница 174: ...Illustrated Parts Parts Page 24 Miscellaneous Electrical Miscellaneous Wire Harness Clamps 2 3 17 16 15 18 4...

Страница 175: ...650 01 Wire Harness Clip stick on 3 96 642 00 Wire ahrness Clip push mount 4 62 033 48 Accelerator Module 1 15 96 640 00 Clamp 3 16 Push Mount 16 96 629 80 not shown Clamp Rubber Lined 3 16 ID 96 630...

Страница 176: ...rts Parts Page 26 Lestronic Charger page 1 6 8 5 4 3 7 11 1 2 8 3 4 5 10 7 6 2 1 8 9 Typical Built In charger Typical Portable charger Use K1 156 44 for complete portabel charger assembly with modifie...

Страница 177: ...79 730 00 79 566 10 76 200 00 22640 79 303 20 36LC40 8ET 150 60 16 36 40 Built In 79 852 00 79 805 67 79 808 00 79 902 00 79 749 10 S O 79 831 10 79 530 00 79 809 50 76 200 00 11860 79 304 65E 36LC25...

Страница 178: ...Illustrated Parts Parts Page 28 Lestronic Charger page 2 6 8 5 4 3 7 11 1 2 8 3 4 5 10 7 6 2 1 8 9 Typical Built In charger Typical Portable charger...

Страница 179: ...31 10 79 531 00 79 530 00 S O 76 200 00 13110 79 301 10 24LC25 8ET 115 60 9 24 25 Portable 79 851 10 79 805 64 79 808 10 79 902 00 S O S O S O 79 831 00 79 532 00 79 530 00 79 566 10 76 200 00 12750 7...

Страница 180: ...tteries Illustration not available Signet Charger NOTE The harness connectors are not included with the charger When replacing the charger order 2 each of the following PART DESCRIPTION 75 318 20 Butt...

Страница 181: ...ry 6 77 051 00 160AH Gell Note requires special charger 6 K1 153 67 Power cord assembly 1 77 969 12 LIFT OUT BATTERY BOX 1 77 969 04 Hold down strap 1 88 069 80 1 4 NC HEX HEAD NUT hold down strap 4 8...

Страница 182: ...Illustrated Parts Parts Page 32 Seat Cushions Deck and Lights Frame Illustration not available...

Страница 183: ...2 88 080 13 Seat mounting bolt 4 88 080 11 Mounting plate bolts 6 97 211 25 U Nut mounting plate 6 88 088 60 5 16 CUT WASHER 10 88 089 81 5 16 NC LOCK NUT 4 72 034 10 Tail light 2 Frame ITEM PART DES...

Страница 184: ...Illustrated Parts Parts Page 34 Decals...

Страница 185: ...00 Brake warning 1 3 94 384 01 Not a motor vehicle 1 4 94 373 10 Vehicle identification 1 5 94 301 42 Arms and legs 1 6 94 313 20 Safety warning 1 7 94 301 41 Brake fluid 1 8 94 384 17 Do not wash 1...

Страница 186: ...Illustrated Parts Parts Page 36 Hitches...

Страница 187: ...ed Torque Limits for Standard Hardware 3 Hardware Identification 3 Standard Head Markings 3 Hex Bolts 3 Other Bolts 3 Hex Nuts 4 Hex Lock Nuts stover 4 Other Nuts 4 Suggested Torque Values non critica...

Страница 188: ...set the Smart View display maintenance meter includes instructions 62 027 61 Sevcon Handset Analyzer with Speed Adjust Capability Same as 62 027 61 above plus allows a limited range of speed adjustmen...

Страница 189: ...Carriage Bolt grade 2 unless marked as above Other Bolts NOTE Torque value used should be for lowest grade of hardware used If a grade 2 nut is used on a grade 8 bolt use grade 2 torque value NOTE Toq...

Страница 190: ...as S A E Grade 2 Lock nuts use a letter to indicate the grade of the nut Grade A locknuts would be the equivelent of Grade 2 hex nuts Grade B as Grade 5 and Grade C as Grade 8 NOTE Nuts with no marki...

Страница 191: ...2 13 39 59 60 90 85 128 95 1 2 20 44 66 68 102 96 144 110 9 16 12 56 84 87 131 123 184 140 9 16 18 63 94 97 146 137 206 160 5 8 11 78 117 120 180 170 254 195 5 8 18 88 132 136 204 192 288 225 3 4 10 1...

Страница 192: ...center section Dana F N R 25 35 300 420 34 47 6 Carrier cap bolts Dana 100 120 1200 1440 136 163 2 Differential Cover plate Dana H12 18 25 216 300 24 5 34 Drain plug Dana H12 25 40 300 480 34 54 4 Dra...

Страница 193: ...um cleaner or any alternate method approved by OSHA to minimize the hazard caused by airborne asbestos fibers and brake dust Do not grind sand break or chisel the brake pads shoes as this will cause u...

Страница 194: ...Taylor Dunn Mfg 2114 W Ball Rd Anaheim CA 92804 800 688 8680 714 956 4040 FAX 714 956 0504 Mailing Address P O Box 4240 Anaheim California 92803 Visit our Website www taylor dunn com...

Отзывы: