


Electrical Troubleshooting
Charger Troubleshooting
Page 3
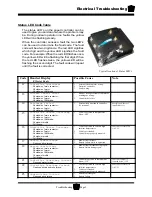
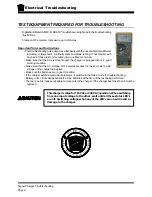
TESTING THE CHARGING CYCLE
In typical installations, the charger will remain on for up to 12 hours depending on the state of charge of the
battery when the charge cycle was started.
A charger could remain on for longer than 12 hours if:
• The charging cycle is interrupted at any time during the charging cycle.
• Defective batteries causing a fluctuating DC voltage that confuses the charger.
• A brownout (drop in AC line voltage) during the charging cycle.
• An electrically noisy charging environment.
A charger could turn off in less than 12 hours, but still show symptoms of overcharging if:
• The batteries were not discharged to 50% before connecting the charger.
• The electrolyte in the batteries is too high (boil over).
• The electrolyte in the batteries is too low (excessive gassing or sulfur smell).
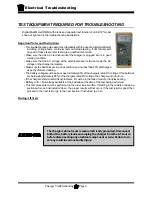
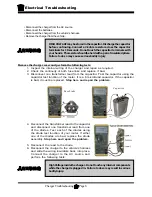
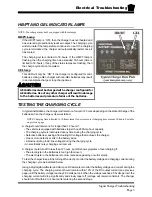
To test the charger to see if it is turning off correctly, monitor the battery
voltage and the electrolyte specific gravity during the charging cycle as
indicated below.
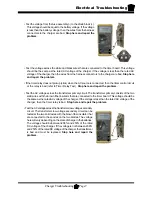
Specific Gravity
Using a hydrometer take the specific gravity reading of several cells, at 1 hour intervals while charging. If
the specific gravity of the electrolyte does not rise for three consecutive readings and the charger does not
shut off, then the charger is running too long.
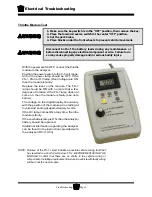
Battery Voltage
Using an accurate 5-1/2 digit digital voltmeter, monitor the battery voltage during the charging cycle. Take
readings every 30 minutes. If the battery voltage does not increase 0.012 volts in two consecutive readings,
then the charger is running too long.
Содержание B0-248-48AC
Страница 2: ......
Страница 14: ...B2 48 With Stake Side Dump Bed Option SC1 00 Stock Chaser E4 55 Sit Down Tow Tractor C4 25 Sit Down Tow Tractor...
Страница 33: ...TABLE OF CONTENTS General Maintenance Maintenance Guidelines 2 Troubleshooting Guide 3 Lubrication Chart 4...
Страница 70: ...Maintenance Service and Repair Steering Page 22 Exploded View of Steering Gear...
Страница 88: ...TAYLOR DUNN...
Страница 108: ...Maintenance Service and Repair Transmission Page 20 NOTE Values shown are for reference only C D...
Страница 114: ...TAYLOR DUNN...
Страница 120: ...TAYLOR DUNN...
Страница 132: ...TAYLOR DUNN...
Страница 134: ...TAYLOR DUNN...
Страница 164: ...Illustrated Parts Parts Page 2 Front Axle...
Страница 166: ...Illustrated Parts Parts Page 4 Steering Knuckle...
Страница 168: ...Illustrated Parts Parts Page 6 Steering Linkage...
Страница 174: ...Illustrated Parts Parts Page 12 Rear Suspension View from rear...
Страница 176: ...Illustrated Parts Parts Page 14 Transmission Gear Case...
Страница 180: ...Illustrated Parts Parts Page 18 Rear Brakes Front Brakes...
Страница 182: ...Illustrated Parts Parts Page 20 Brake Lines Master Cylinder...
Страница 184: ...Illustrated Parts Parts Page 22 Motor...
Страница 186: ...Illustrated Parts Parts Page 24 Motor Mount Apply 94 421 34 grease to inside of motor coupler...
Страница 188: ...Illustrated Parts Parts Page 26 Wheels and Tires Ref wheel hub 1 2 5 assembly 4 3 6 7 8 9 10...
Страница 190: ...Illustrated Parts Parts Page 28 Instrument Panel Up To Serial 179501 Instrument Panel Starting Serial 179502...
Страница 196: ...Illustrated Parts Parts Page 34 Lighting Stobe Light 4 1 2 3 5 6 7...
Страница 206: ...Illustrated Parts Parts Page 44 Seat Cushions and Deck...
Страница 208: ...Illustrated Parts Parts Page 46 Mirrors 92 202 00 Assembly Miscellaneous Frame Components...
Страница 210: ...Illustrated Parts Parts Page 48 Decals...
Страница 212: ...Illustrated Parts Parts Page 50 Cab Options Steel Cab Fiberglass cab...
Страница 216: ...Illustrated Parts Parts Page 54 3 8 9 6 7 5 4 2 1 Typical door assembly Door Options Fiberglass Cab...
Страница 218: ...Illustrated Parts Parts Page 56 Hydraulic Dump Body Option...
Страница 220: ...Illustrated Parts Parts Page 58 Rear Cargo Box 1 2 3 4 5 6 5 Top Covers...
Страница 222: ...Illustrated Parts Parts Page 60 Hitches...
Страница 224: ...TAYLOR DUNN...