background image

After Sales Support            

TEL: 1300 922 271        EMAIL: [email protected]

14

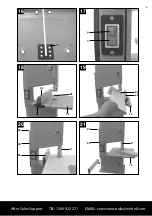
10.1. Longitudinal cuts (Fig.20)

Longitudinal cutting is when you use the saw to cut along the 
grain of the wood.

• 

 Place the parallel stop (Fig.20/Item 24) to the left of the 

blade (Fig.2/Item 26), as far as possible, for the width 
required.

• 

 Lower the blade guide (Fig.20/Item 11) down to the 

workpiece (see 8.5).

• 

Switch on the saw.

• 

 Press the edge of the workpiece with your right hand to 

hold it securely against the parallel stop (Fig.20/Item 24) 
and flat on the table (Fig.20/Item 15). 

• 

 Guide the workpiece along the parallel stop


(Fig.20/Item 24) and through the blade (Fig.2/Item 26) 
at a uniform speed. 

• 


Important:

 Long workpieces must be secured against 

falling off at the end of the cut (e.g. with a roller stand etc.)

10.2. Angular cuts (Fig.19)

To enable you to perform angular cuts parallel to the blade 
(Fig.19/Item 26) , the table (Fig.19/Item 15) can be tilted 
forwards between 0° - 45°.

• 

Undo the fixing handles (Fig.2/Item 18).

• 

 Tilt the saw table (Fig.19/Item 15) forwards until the 

required angle value is set on the dial scale (Fig.2/Item 16).

• 

Re-tighten the fixing handles (Fig.2/Item 18).

• 


Important: 

When the table (Fig.19/Item 15) is tilted, place 

the parallel stop (Fig.19/ Item 24) to the right of the blade 
(Fig.19/Item 26) looking in the direction in which you are 
working, on the side pointing downwards (provided the 
workpiece is wide enough in order to stop the workpiece 
from slipping off).

• 

Carry out the cut as described in 10.1.

10.3. Freehanded cuts (Figure 21)

One of the most outstanding features of a bandsaw is the ease 
with which it allows you to make curved cuts and radius. 

• 

 Lower the blade guide (Fig.21/Item 11) to the workpiece 

(see 8.5).

• 

Switch on the saw.

• 

 Hold the workpiece securely on the table (Fig.21/Item 15) 

and guide slowly through the blade (Fig.2/Item 26).

• 

 Freehanded cuts should be made at low feed speed so 

that you can guide the blade (Fig.2/Item 26) along the 
required line.

• 

 It often pays to first cut off surplus curves and corners up 

to about 6 mm from the cutting line. 

• 

 In the case of curves which are too tight for the blade to 

cut correctly, it can help to make a series of close-lying 
cuts at right angles to the curved line. When you saw the 
radius the material will simply drop off.

11. Transport

To transport the bandsaw, hold the supporting foot 
(Fig.1/Item 5) with one hand and the frame (Fig.2/Item 25) 
with the other hand. 

Important!

 Never use guards to lift or 

transport the equipment.

12. Maintenance

• 

Caution!

 Pull out the power plug first.

• 

 Remove dust and dirt regularly from the bandsaw. 

Cleaning is best carried out with a fine brush or a cloth.

• 

Do not use caustic cleaning agents for cleaning plastic.

13. Ordering spare parts

Contact our After Sales Support on 1300 922 271 and quote 
the following data when ordering spare parts:

• 

Type of machine

• 

Article number of the machine 

• 

Identification number of the machine

• 

Spare part number of the part required

14. Disposal and recycling

The unit is supplied in packaging to prevent its being 
damaged in transit. This packaging is raw material and 
can therefore be reused or can be returned to the raw 
material system. 
The unit and its accessories are made of various types of 
material, such as metal and plastic. Defective components 
must be disposed of as special waste. Ask your local council.

Содержание TT-SB 200

Страница 1: ...After Sales Support TEL 1300 922 271 EMAIL service australia einhell com 250W BANDSAW INSTRUCTION MANUAL MODEL NUMBER TT SB 200 N26704 ...

Страница 2: ...ort services details of which can be found in this manual and on the product itself Welcome Section Congratulations on choosing to buy a TAURUS product All products brought to you by TAURUS are manufactured to the highest standards of performance and safety and as part of our philosophy of customer service and satisfaction are backed by our comprehensive 1 Year Warranty We hope you will enjoy usin...

Страница 3: ...1 2 3 9 13 12 24 12 13 19 20 26 18 6 17 11 10 8 15 3 2 21 25 22 5 7 1 4 4 14 2 16 23 3 After Sales Support TEL 1300 922 271 EMAIL service australia einhell com ...

Страница 4: ...After Sales Support TEL 1300 922 271 EMAIL service australia einhell com 4 4 5 8 9 7 6 27 17 34 37 35 36 37 30 28 27 26 26 33 31 49 28 40 ...

Страница 5: ...5 After Sales Support TEL 1300 922 271 EMAIL service australia einhell com 12 10 11 14 15 13 38 38 15 15 29 11 26 11 d 41 42 f 3 ...

Страница 6: ...After Sales Support TEL 1300 922 271 EMAIL service australia einhell com 6 18 16 17 20 21 19 26 g 29 28 28 11 11 24 26 h 15 15 15 21 24 17 29 28 ...

Страница 7: ...itch on invites accidents d Remove any adjusting key or wrench before turning the power tool on A wrench or a key left attached to rotating part of the power tool may result in personal injury e Do not overreach Keep proper footing and balance at all times This enables better control of the power tool in unexpected situations f Dress properly Do not wear loose clothing or jewellery Keep your hair ...

Страница 8: ...ill enable you to operate the machine with both hands 13 Avoid abnormal working postures Make sure you stand squarely and keep your balance at all times 14 Look after your tools Keep your tools sharp and clean for better and safer performance Follow the instructions for maintenance work and for changing any attachments Check the plug and cable regularly and if damaged have them replaced by an auth...

Страница 9: ...e guard so it is approx 3 mm above the material you want to saw 41 Important Support long workpieces e g with a roller table to prevent them sagging at the end of a cut 42 Make sure the blade guard is in its lower position when the saw is being transported 43 Safety guards are not to be used to move or mis use the machine 44 Blades that are misshapen or damaged in anyway must not be used 45 If the...

Страница 10: ...se suitable holding devices The machine is to be used only for its prescribed purpose Any use beyond that mentioned is considered to be a case of misuse The user operator and not the manufacturer shall be liable for any damage or injury resulting from such cases of misuse The machine is to be operated only with suitable sawblades To use the machine properly you must also observe the safety regulat...

Страница 11: ... dust mask is used 2 Damage to hearing if no suitable ear protection isused 7 Before putting the machine into operation Make sure the machine stands securely i e bolt it to a workbench or solid base There are two holes for this purpose in the machine foot The saw table must be mounted correctly All covers and safety devices have to be properly fitted before the machine is switched on It must be po...

Страница 12: ...ighten the Allen screw 35 CAUTION The blade will be rendered useless if the teeth touch the guide pins while the blade is running Undo the Allen screws 37 Move the guide pins 28 towards the blade so that there is a gap of approx 0 5 mm between the guide pins 28 and the blade 26 The blade must not jam Re tighten the Allen screws 37 Turn the upper blade pulley 8 several times in a clockwise directio...

Страница 13: ...nt increased likelihood of injury the table insert Fig 16 Item 17 should be changed whenever it is worn or damaged Detach the table Fig 1 Item 15 see 8 1 Lift out the worn table insert Fig 16 Item 17 Fit the replacement table insert by following the above in reverse 8 11 Extractor sockets The bandsaw is equipped with extractor sockets Fig 1 Item 6 for extracting sawdust and chips 9 Control element...

Страница 14: ...bandsaw is the ease with which it allows you to make curved cuts and radius Lower the blade guide Fig 21 Item 11 to the workpiece see 8 5 Switch on the saw Hold the workpiece securely on the table Fig 21 Item 15 and guide slowly through the blade Fig 2 Item 26 Freehanded cuts should be made at low feed speed so that you can guide the blade Fig 2 Item 26 along the required line It often pays to fir...

Страница 15: ...After Sales Support TEL 1300 922 271 EMAIL service australia einhell com 15 ...

Страница 16: ...After Sales Support TEL 1300 922 271 EMAIL service australia einhell com 16 07 2013 01 43 080 05_11013 ...

Отзывы: