background image

After Sales Support            

TEL: 1300 922 271        EMAIL: [email protected]

13

8.7. Blade selection

The blade supplied with the bandsaw is designed for all-
purpose use. When you select a blade you should have regard 
to the following criteria:

• 

 Use a narrow blade to cut tighter radius than you can with 

a wider blade.

• 

 Wide blades are used to saw straight cuts. This is 

particularly important in cutting wood because the blade 
has a tendency to follow the grain of the wood and there 
by deviate easily from the cutting line. 

• 

 Finely toothed blades provide smoother cuts but are 

slower than coarse blades.

Important: Never use warped or lacerated blades!

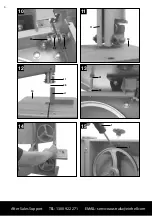
8.8. Changing the blade (Fig.14)

• 

 Move the blade guide (Fig. 1/Item 11) into a position 

approximately half way between the saw table 
(Fig.1/Item 15) and the machine housing (Fig.2/Item 25).

• 

 Undo the fasteners (Fig.1/Item 13) and open the side 

cover (Fig. 1/Item 12).

• 

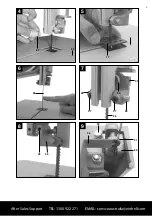
Remove the web panel (Fig.3/Item 4).

• 

 Turn the tightening screw (Fig.1/Item 9) anti-clockwise to 

remove the tension from the blade (Fig.2/Item 26).

• 

 Remove the blade (Fig.2/Item 26) from the blade pulleys 

(Fig.1/Item 7 &  8) and take out through the slot in the table 
(Fig.1/Item 15).

• 

 Fit the new blade (Fig.2/Item 26), aligned centrally on the 

blade pulleys (Fig.1/Item 7 &  8).

• 

 The teeth of the blade (Fig.2/Item 26) must point 

downwards in the direction of the table.

• 

Tension the blade (Fig.2/Item 26) (see 8.2)

• 

Close the side cover (Fig.1/Item 12) again.

• 

Mount the web panel (Fig.3/Item 4) again.

8.9. Changing the rubber tires on the blade pulleys

After a certain time the rubber tires (Fig.15/Item 3) on the 
blade pulleys (Fig.1/Item 7 & 8) will get worn by the sharp teeth 
of the blades and must be replaced.

• 

Open the side cover (Fig.1/Item 12).

• 

Remove the blade (Fig.2/Item 26) (see 8.7).

• 

 Lift the edge of the tire (Fig.15/Item 3) with a small 

screwdriver (Fig.15/Item f) and remove from the upper 
blade pulley (Fig.1/Item 8).

• 

Repeat for the lower blade pulley (Fig.1/Item 7).

• 

 Fit the new tire (Fig.15/Item 3), replace the blade


(Fig.2/Item 26) and close the side cover (Fig.1/Item12).

8.10. Changing the table insert (Fig.16)

To prevent increased likelihood of injury the table insert 
(Fig.16/Item 17) should be changed whenever it is worn 
or damaged.

• 

Detach the table (Fig.1/Item 15) (see 8.1).

• 

Lift out the worn table insert (Fig.16/Item 17).

• 

 Fit the replacement table insert by following the above


in reverse.

8.11. Extractor sockets

The bandsaw is equipped with extractor sockets (Fig.1/Item 6) 
for extracting sawdust and chips.

9. Control elements

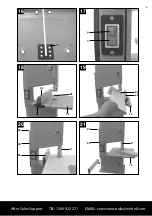
9.1. On/Off switch (Fig.17)

• 

To turn the machine on, press the green button “l” (g).

• 

To turn the machine off again, press the red button “0“ (h).

• 

 Your bandsaw has a switch with under voltage release. 

After a power failure you must re-activate the switch.

9.2. Parallel stop (Fig.18)

• 

Push the clip (21) on the parallel stop (24) upwards.

• 

 Move the parallel stop (24) along the table (15), from 

either the right or left of the blade (26), and position 
as required.

• 

 Push the clip (21) down to fix the parallel stop (24). If the 

clip (21) does not give enough hold, turn it clockwise 
several times until the parallel stop is securely fixed. 

• 

 You must always ensure that the parallel stop (24) is 

positioned parallel to the blade (26).

10. Operation

Caution!

 After every new adjustment we recommend to make 

a trial cut in order to check the new settings.

• 

 For all cutting operations it is important to position the blade 

guide (Fig.1/Item 11) as close as possible to the workpiece 
(see 8.5).

• 

 Always guide the workpiece with both hands, holding 

it flat on the table (Fig.1/Item 15) in order to prevent the 
blade (Fig.2/Item 26) from jamming. 

• 

 Feed the workpiece at a uniform speed that enables the 

blade to cut through the material without difficulty and 
without blocking. 

• 

 Always use the parallel stop (Fig.2/Item 26) on all cuts for 

which they are intended.

• 

 Always aim at making a complete cut in one pass rather 

than in a stop-and-go operation requiring the workpiece 
to be withdrawn. If you have to withdraw the workpiece, 
switch off the bandsaw first and wait for the blade (Fig.2/
Item 26) to stop before freeing the workpiece.

• 

 The workpiece must always be guided by the longer side 

during cutting.

Important!

 When handling narrower workpieces, it is 

essential to use a push stick.The push stick (Fig.20/Item 28) 
must always be kept close at hand at the hook (Fig.20/Item 29)  
provided for that purpose on the side of the saw.

Содержание TT-SB 200

Страница 1: ...After Sales Support TEL 1300 922 271 EMAIL service australia einhell com 250W BANDSAW INSTRUCTION MANUAL MODEL NUMBER TT SB 200 N26704 ...

Страница 2: ...ort services details of which can be found in this manual and on the product itself Welcome Section Congratulations on choosing to buy a TAURUS product All products brought to you by TAURUS are manufactured to the highest standards of performance and safety and as part of our philosophy of customer service and satisfaction are backed by our comprehensive 1 Year Warranty We hope you will enjoy usin...

Страница 3: ...1 2 3 9 13 12 24 12 13 19 20 26 18 6 17 11 10 8 15 3 2 21 25 22 5 7 1 4 4 14 2 16 23 3 After Sales Support TEL 1300 922 271 EMAIL service australia einhell com ...

Страница 4: ...After Sales Support TEL 1300 922 271 EMAIL service australia einhell com 4 4 5 8 9 7 6 27 17 34 37 35 36 37 30 28 27 26 26 33 31 49 28 40 ...

Страница 5: ...5 After Sales Support TEL 1300 922 271 EMAIL service australia einhell com 12 10 11 14 15 13 38 38 15 15 29 11 26 11 d 41 42 f 3 ...

Страница 6: ...After Sales Support TEL 1300 922 271 EMAIL service australia einhell com 6 18 16 17 20 21 19 26 g 29 28 28 11 11 24 26 h 15 15 15 21 24 17 29 28 ...

Страница 7: ...itch on invites accidents d Remove any adjusting key or wrench before turning the power tool on A wrench or a key left attached to rotating part of the power tool may result in personal injury e Do not overreach Keep proper footing and balance at all times This enables better control of the power tool in unexpected situations f Dress properly Do not wear loose clothing or jewellery Keep your hair ...

Страница 8: ...ill enable you to operate the machine with both hands 13 Avoid abnormal working postures Make sure you stand squarely and keep your balance at all times 14 Look after your tools Keep your tools sharp and clean for better and safer performance Follow the instructions for maintenance work and for changing any attachments Check the plug and cable regularly and if damaged have them replaced by an auth...

Страница 9: ...e guard so it is approx 3 mm above the material you want to saw 41 Important Support long workpieces e g with a roller table to prevent them sagging at the end of a cut 42 Make sure the blade guard is in its lower position when the saw is being transported 43 Safety guards are not to be used to move or mis use the machine 44 Blades that are misshapen or damaged in anyway must not be used 45 If the...

Страница 10: ...se suitable holding devices The machine is to be used only for its prescribed purpose Any use beyond that mentioned is considered to be a case of misuse The user operator and not the manufacturer shall be liable for any damage or injury resulting from such cases of misuse The machine is to be operated only with suitable sawblades To use the machine properly you must also observe the safety regulat...

Страница 11: ... dust mask is used 2 Damage to hearing if no suitable ear protection isused 7 Before putting the machine into operation Make sure the machine stands securely i e bolt it to a workbench or solid base There are two holes for this purpose in the machine foot The saw table must be mounted correctly All covers and safety devices have to be properly fitted before the machine is switched on It must be po...

Страница 12: ...ighten the Allen screw 35 CAUTION The blade will be rendered useless if the teeth touch the guide pins while the blade is running Undo the Allen screws 37 Move the guide pins 28 towards the blade so that there is a gap of approx 0 5 mm between the guide pins 28 and the blade 26 The blade must not jam Re tighten the Allen screws 37 Turn the upper blade pulley 8 several times in a clockwise directio...

Страница 13: ...nt increased likelihood of injury the table insert Fig 16 Item 17 should be changed whenever it is worn or damaged Detach the table Fig 1 Item 15 see 8 1 Lift out the worn table insert Fig 16 Item 17 Fit the replacement table insert by following the above in reverse 8 11 Extractor sockets The bandsaw is equipped with extractor sockets Fig 1 Item 6 for extracting sawdust and chips 9 Control element...

Страница 14: ...bandsaw is the ease with which it allows you to make curved cuts and radius Lower the blade guide Fig 21 Item 11 to the workpiece see 8 5 Switch on the saw Hold the workpiece securely on the table Fig 21 Item 15 and guide slowly through the blade Fig 2 Item 26 Freehanded cuts should be made at low feed speed so that you can guide the blade Fig 2 Item 26 along the required line It often pays to fir...

Страница 15: ...After Sales Support TEL 1300 922 271 EMAIL service australia einhell com 15 ...

Страница 16: ...After Sales Support TEL 1300 922 271 EMAIL service australia einhell com 16 07 2013 01 43 080 05_11013 ...

Отзывы: