background image

29

OPENING & CLOSING

DOOR OPENING &  CLOSING

02

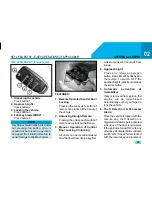
DOOR OPENING / CLOSING :

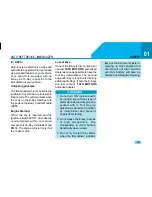
Locking / unlocking door with key:

Front driver door  has separate locking
facility. All doors can be locked or
unlocked from outside using the E-key.

Insert the E-key and turn it anti-
clockwise to open or clockwise to lock
the door. Pull the Door handle  to open
the unlocked door.

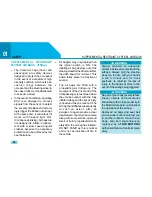
1

Location of door opening / locking
lever.

2

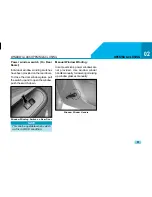
Locking without a key from inside:

All the doors can also be locked or
unlocked independently from inside by
pressing or pulling the knob (1). 

Press

to lock and 

Pull

 to unlock.

NOTE

When locking doors this way, do not
leave the key inside the vehicle.

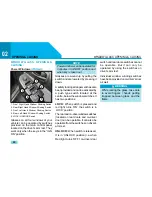
Opening the doors from inside :

All doors can be opened from inside.
To open, pull the door opening knob
(1) and then lever (2).

Содержание Zest

Страница 1: ...1 Owner s Manual Passenger Vehicle Business Unit PVBU Mumbai Pune ...

Страница 2: ...ecifications and or to make additions or improvements in this product without obligation to install them on the vehicles previously sold This owner s manual includes information on the operation and maintenance of various features installed on the different variants Please note that this manual applies to all the variants and explains all features including options which may not be applicable to y...

Страница 3: ...refully and follow the recommendations to ensure enjoyable and safe operation of your new vehicle We recommend that all service and maintenance on your vehicle should be performed by an authorized TATAMOTORS DEALER TATA MOTORS Authorised Service Centres TASCs to ensure that only latest methods and genuine replacement parts are used for continued reliability safety and performance of your vehicle Y...

Страница 4: ...e Centre will be glad to assist you on our Toll Free no 1800 209 7979 You can also approach nearest TATA MOTORS dealer A separate Dealer network address booklet is provided with the Owner s manual TATA MOTORS 24X7 Roadside Assistance Program offers technical help in the event of a breakdown Call to the toll free Roadside Assistance For additional information refer to 24X7 Roadside Assistance secti...

Страница 5: ...g Torque Contol 22 Cornering Stability Control 22 Driving in Adverse Conditions 23 2 OPENING CLOSING 02 Keyless Entry E Key Operation 25 Doors 29 Window Glasses 30 Bonnet 32 Fuel Lid 33 Trunk lid 33 INSTRUMENTS CONTROLS 03 Cockpit 34 Instrument Cluster 35 Instruments Gauges 37 Driver Information Display 39 Tell tales Indicators 46 Audio Warnings 51 Combination Switch 52 Fascia Switches 55 Steering...

Страница 6: ...ng Tips 75 Good Driving Practices 76 Running In Period 76 Seat Seat Adjustments 77 Rear View Mirrors 79 Sun Visors 80 Steering Wheel Angle Adjustment 81 Preparing to drive 81 Steering Lock cum Ignition Switch 82 Gear Lever Shifting Pattern 84 Drive Modes 88 Brakes Braking 90 Parking Brake 91 Vehicle Parking 91 Reverse ParkAssist 92 5 CLIMATE CONTROLS Air Vents Distribution 62 Manual HVAC 63 FATC F...

Страница 7: ...cessory Fitment 117 24 X 7 On Road Assistance 118 Engine Compartment 123 Engine Oil Level 125 Brake Fluid Level 125 Engine Coolant Level 126 Transaxle Oil Level 127 Windshield Washer Fluid Level 127 Spark Plug Petrol Engine 128 Tyres 129 Battery 132 Remote Battery 133 On Board Diagnostic OBD 134 Routine Service 135 Vehicle Service 136 Service Schedule 137 Fuel Specification 140 Lubricants Specific...

Страница 8: ...AND CONDITIONS 161 12 ENVIRONMENT SAFETY 163 CONTENTS 13 ALPHABETICAL INDEX 165 10 Car Care 149 Washing 149 Waxing 150 Polishing 150 Interior Fabric Cleaning 150 Paint Care 151 Wiper Care 151 Vehicle Parking For Long Duration 152 Value Added Services 153 ...

Страница 9: ...ving general tips are listed below Take into account the traffic road and weather conditions particularly with regard to stopping distance Never drive under the influence of alcohol or drugs Refrain from using a cell phone while driving Fatigue is a result of physical or mental exertion that impairs judge ment Driver fatigue may be due to inadequate sleep extended work hours strenous work or non w...

Страница 10: ...adjusted belt that fits across the hip bone Make sure that your seat is adjusted to a good driving position and the back of the seat is upright Importance of Wearing Seat Belt 1 It will help to keep you in the proper position when the air bag inflates 2 Reduces the risk of harm in rollover side or rear impact collisions 3 Reduces the risk of harm in frontal angular collisions that are not enough t...

Страница 11: ...he buckle Guide the belt to the pillar as it retracts WARNING 1 The belts are intended for adult occupants only 2 Each belt should be used by one occupant only The belt must not be put round a child seated on passengers lap 3 Use approved child restraint system for children 4 If the belt was in use in a serious accident or shows signs of severe fraying damageorofhavingbeen cut replace it with an a...

Страница 12: ...act force directly on the abdominal area causing serious injury Wear the lap portion of the belt snugly and as low as possible Pregnant Woman A pregnant woman should wear a Lap shoulder belt and the lap portion should be worn as low as possible below the womb throughout the pregnancy When a safety belt is worn properly it is more likely that the foetus will not be hurt in a crash Pregnant women sh...

Страница 13: ...ults or children experience the collision force In contrast to adults and teenagers children s muscles and bones are not yet fully developed Children must be transported using CRS especially suited to their size weight and build CRS can help protect children in vehi cles in the event of an accident only if they are secured properly Selection of CRS Not every child will fit in the CRS speci fied fo...

Страница 14: ...upright position Installation Procedure Strictly follow the instructions given in the CRS installation manual Adjust the seat backrest to an upright position if a CRS is to be used on front seat Fasten children s seat belts correctly and make sure they assume a correct seating position Try to move the CRS in all directions to make sure it is securely installed Always secure the child in CRS and CR...

Страница 15: ...y necessary to read all of the information concerning airbag system before transporting babies or children in a CRS on the front passenger seat WARNING If your vehicle is equipped with a front passenger airbag do not install a rear facing CRS in the front passenger s seat Inflating front passenger airbag child in a rear facing CRS could be killed or seriously injured If your vehicle is equipped wi...

Страница 16: ... using the seat belt always guide the belt through or around the child seat as described in the instructions from the CRS manufacturer 4 Always make sure that the seat belt routing is correct for children and they are sitting in the correct position 5 Whenever possible fit the CRS on the passenger side seat so that children can exit the vehicle on the kerb side 6 Do not leave any toys or other obj...

Страница 17: ...2 years of age or 150 cm of height properly use the child restraints which conform to AIS 072 ECE R44 norm the standard for child restraints Child restraint system CRS suitability for various seat positions Group Mass group Age Group Front Rear Rear Rear Passenger Outboard Outboard Center LH RH 0 Up to 10 kg Up to 9 months X U U X 0 Up to 13 kg Up to 24 months X U U X I 9 to 18 kg 9monthsto48month...

Страница 18: ...ey Tag number SAFETY ANTI THEFTDEVICE IMMOBILIZER 01 Take precaution about E key as without E key vehicle cannot be started Operation of Immobilizer system in Brief VEHICLE STATUS LAMP VEHICLE MEANING FUNCTION OF THE STATE CONDITION STATE Ignition OFF Blinking Locked Vehicle Immobilized and Awaiting Electronic key Ignition ON OFF Unlocked Normal Condition Ready to start the vehicle ON Locked Probl...

Страница 19: ...if all the codes match Loss of keys If one of the E Key is lost contact your nearest TATA MOTORS authorised dealer as soon as possible to have the lost key deactivated The second original E Key is required for making additional E Keys If both the E Keys are lost contact TATA MOTORS authorised dealer WARNING 1 Do not turn ON ignition switch by using E key with any type of metal wound around its gri...

Страница 20: ...action of second The air bags are filled with a propellant gas nitrogen The movement of the driver and of the front passenger is cushioned when they make contact with the fully inflated airbag and the risk of injury to head and chest is reduced The air bag then deflates subsequently to such an extent after an accident to again provide a clear view forward You may hear a noise along with some smoke...

Страница 21: ...er working condition Any Maintenance required to be performed on any SRS components or other components located near SRS should be done by TATA MOTORS Authorized Service Centre Only Do not permit anyone else to do any service inspection maintenance or repair on any SRS components or wiring Improper work on the SRS system will result in inadvertent deployment of the air bag or malfunctioning ...

Страница 22: ... taking into consideration prevailing weather and traffic conditions ELECTRONIC BRAKE FORCE DIS TRIBUTION EBD if provided EBD optimizes braking pressure dis tribution between front and rear axle to ensure vehicle stability ENGINE DRAG TORQUE CONTROL EDTC if provided On slippery road conditions during 1 In gear Braking or 2 Shift down of gear or 3 Sudden throttle release on a curve road This causes...

Страница 23: ...ntered the engine gearbox or transfer case the lubricants will have to be replaced Get the starter and alternator checked Driving on a Rainy Day Check brakes steering and windows Check tyres for wear and tyre pressure Check wiper blades for proper functioning Avoid harsh braking and sharp turns It may cause loss of control and lead to a skid For slowing down shift to lower gears and brake gently K...

Страница 24: ...a lower gear has to be done cautiously to avoid loss of traction If the wheels start to slip within few feet of the end of the climb motion can be maintained by swinging the steered wheels left and right thereby providing increased grip Descending Sharp Gradients Depending on the severity of the gradient shift into appropriate gear Use engine braking judiciously without over revving the engine Bra...

Страница 25: ... will unlock all the Doors 3 Manual Operation of Central Door Locking Unlocking All doors can be locked unlocked fromthedriverdoorusingakeyfrom outside or driver s door knob from inside 4 Approach Light Press and release approach button Red LED will be flashed on the remote To switch OFF the approach lights press and release the same button 5 Automatic activation of Immobiliser If key is removed f...

Страница 26: ...s flash twice and when the vehicle is unlocked turn indicators flash once 8 Auto Locking Unlocking of Doors Vehicle doors get automatically locked when the vehicle speed crosses 10 kmph Also when ignition key is taken out all the doors get automatically unlocked 9 Anti grab Anti scan coding The remote control set of this security system is protected against the use of devices called scanners and g...

Страница 27: ...authorized service outlet DONT S 1 Don t play with Lock Unlock push button of remote while in the vicinity of your vehicle as it could lead to an unintentional unlocking your vehicle 2 Don t lock the vehicle by remote while sitting inside the vehicle 3 Don t use discharged batteries in remote as it could damage the remote 4 Don t remove the battery connection of the vehicle while the vehicle has b...

Страница 28: ...remote battery 2 Vehicle battery is discharged low 2 Charge Change the vehicle battery as required 3 Central door locking fuse has blown 3 Fit fuse properly Change fuse if it has blown No locking by remote Key is in ignition switch Remove the key from ignition switch and then try After turning the ignition switch the The system is in the automatic arming Press the Unlock push button of vehicle sti...

Страница 29: ...e to lock the door Pull the Door handle to open the unlocked door 1 Location of door opening locking lever 2 Locking without a key from inside All the doors can also be locked or unlocked independently from inside by pressing or pulling the knob 1 Press to lock and Pull to unlock NOTE When locking doors this way do not leave the key inside the vehicle Opening the doors from inside All doors can be...

Страница 30: ...ered by pressing it down A safety locking arrangement has also been provided and can be activated by a push type switch located at the centre below the window switches It has two positions LOCK When switch is pressed and red light turns ON the switch is in LOCK position Therearandco driverwindowswitches located on rear doors and co driver door can be operable It can also be operable from the switc...

Страница 31: ...ding switches have been provided on the rear doors To close the door window glass pull the switch up and to open the window push the switch down Manual Window Winding In some versions power windows are not provided Use window winder handle manually for lowering or raising up window glasses manually NOTE This can be operable when switch no 5 is in LOCK condition ...

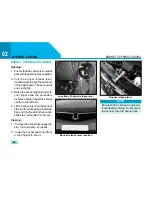
Страница 32: ...dary lock lever located under the bonnet centre to the left side 4 Lift the bonnet up Pull the bonnet stay rod from its clip and insert the free end into the slot in the bonnet slide stay rod outward to secure Closing 1 To close the bonnet disengage the stay rod and clamp it properly 2 Lower the bonnet and drop it from a short height to shut it Location of bonnet release lever Bonnet release lever...

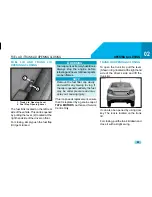
Страница 33: ...replaced by a genuine cap at TATA MOTORS Authorized Service Centre Only TRUNK LID OPENING CLOSING To open the trunk lid pull the lever Shown in fig located at the right hand side of the driver s side and lift the trunk lid 1 Trunk Lid Opening Lever 2 Fuel Flap Opening Lever The fuel lid is located on the left rear side of the vehicle This can be opened by pulling the lever 2 located at the right h...

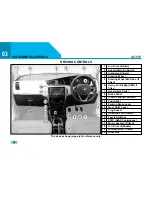
Страница 34: ...Pedal 8 Brake Pedal 9 Clutch Pedal Not in AMT 10 Cup Holder 11 Parking Brake Lever 12 Gear Shift Lever 13 Plug Socket 14 USB AUX Port if fitted 15 Fascia Switches 16 FATC HVAC Control panel 17 Music System if fitted 18 A C Air vent Middle 19 Air Bag PAB if fitted 20 Glove Box The above shown image is for reference only INSTRUMENTS CONTROLS COCKPIT 03 DRIVING CONTROLS ...

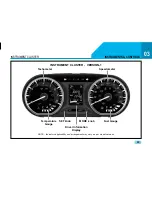
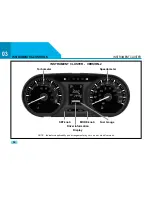
Страница 35: ... INSTRUMENTCLUSTER 03 Fuel Gauge MODE knob SET knob Temperature Gauge Driver Information Display Tachometer Speedometer INSTRUMENT CLUSTER VERSION 1 NOTE Indicators applicability and arrangement may vary as per model versions ...

Страница 36: ... CONTROLS INSTRUMENTCLUSTER 03 Driver Information Display INSTRUMENT CLUSTER VERSION 2 MODE knob SET knob Tachometer Speedometer Fuel Gauge NOTE Indicators applicability and arrangement may vary as per model versions ...

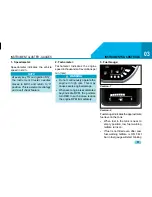
Страница 37: ... engine speed in thousands of revolutions per min rpm WARNING Do not continuously operate the engine in high rpm This may cause severe engine damage Whenever engine is accelerated beyond safe RPM the pointers turn RED In such a case reduce the engine RPM immediately 3 Fuel Gauge Fuel Gauge Indicates the approximate fuel level in the tank When fuel in the tank is near to empty position low fuel war...

Страница 38: ...ed if it is equipped on the fuel station The sensor in the fuel tank may misjudge the amount of fuel remaining 5 Running the fuel tank too low or empty can cause your engine to stall and could endanger you and your passengers You must stop and obtain additional fuel as soon as possible after low fuel warning telltale turns ON 6 Low fuel warning symbol will blink if there is any fault in the system...

Страница 39: ...d by a vehicle in Trip mode which is resettable by user Range 0 0 to 9999 9 km 5 digits Resolution 0 1 km Trip meter reading becomes 0 0 after it crosses 9999 9 kms 7 Average Fuel Displays Average Fuel consumption since it was last Economy for Trip A reset and Trip B Range 0 0 to 99 9 3 digits Resolution 0 1 km l 8 Distance To Empty Indicates distance that your vehicle can travel with available fu...

Страница 40: ...display 0 km or 0 days and spanner symbol will blink Never reset the display between service intervals otherwise this may results in to incorrect readings Information is retained in the service interval display also after the vehicle battery is disconnected NOTE If Service Reminder warning is displayed in the instrument Cluster kindly visit at TATA MOTORS Authorised Service Centre for servicing 13...

Страница 41: ...he three doors i e co driver rear left and rear right door is open 15 Drive Mode Automatic Manual Transmission Vehicle As applicable AUTO indicatedAuto Drive mode MAN indicated Manual Drive mode Drive Mode AMT Manual Transmission Vehicle As applicable Indicates the mode in which vehicle is driven SPORT indicates sport drive This mode is used to produce more torque from engine ECO indicates Economy...

Страница 42: ...e fuel economy is displayed as take your vehicle to TATA MOTORS authorized service centre NOTE AFE value is estimate of fuel economy It may vary significantly based upon driving conditions driving habits and condition of vehicle Average Fuel Consumption will get Reset to 0 when Battery is removed and refitted 3 Distance to Empty DTE DTE value may differ from the actual driving distance available N...

Страница 43: ...43 INSTRUMENTS CONTROLS INSTRUMENTCLUSTER DIGITALDISPLAY 03 OPERATIONS FOR DRIVER INFORMATION ON VEHICLES VERSION 1 ...

Страница 44: ...44 INSTRUMENTS CONTROLS INSTRUMENTCLUSTER DIGITALDISPLAY 03 OPERATIONS FOR DRIVER INFORMATION ON VEHICLES VERSION 2 ...

Страница 45: ...ards next respective value Instrument Cluster Illumination For Instrument Cluster illumination level settings it is necessary to turn the Park Lamp ON and then Press the SET knob on Instrument Cluster Press SET knob to change the illumination intensity level in 5 steps A delayed press on the SET knob for a selected intensity will confirm it WARNING The Clock and Instrument Cluster Illumination set...

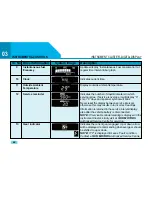
Страница 46: ... Engine Management System Contact a TATA MOTORS Authorized Service Centre Immobilizer Red 1 Illuminates when the system disables engine start if the original key is not used 2 Lamp blinks Vehicle is in immobilized condition when key is not inserted 3 Lamp ON Problem with key system Contact a TATA MOTORSAuthorized Service Centre Water in fuel Amber 1 Illuminates momentarily when ignition is switche...

Страница 47: ...gh Beam Blue Illuminates when the high beam headlamps are switched ON or flashed Low Oil Pressure Red 1 Illuminates momentarily when ignition is switched ON 2 Illuminates continuously if engine oil level is less than a pre defined minimum level Stop the vehicle as soon as safety permits and switch off the engine Check engine oil level and top up if required Contact TATA MOTORS assistance before st...

Страница 48: ...l be audible Airbag status Red Illuminates momentarily when ignition is switched ON Once If applicable engine is cranked it turns OFF It will continuously illuminate when there is malfunction of airbag SRS system Contact a TATA MOTORS Authorized Service Centre immediately EPAS Amber Illuminates momentarily when ignition is switched ON Once engine is cranked it turns OFF Illuminates when there is a...

Страница 49: ... turns OFF Illuminates continuously if there is any malfunction in ABS Normal braking system will be operational without assistance of ABS Contact a TATA MOTORS Authorized Service Centre immediately Low Fuel Amber Illuminates momentarily when ignition is switched ON Once engine is cranked it turns OFF Illuminates when fuel level is low 1st bar on fuel gauge will start blinking when fuel level is l...

Страница 50: ...lluminates continuously when there is a fault in Automatic Manual Transmission system Contact a TATA MOTORS authorized Service Centre immediately ECO Green ECO indicates Economy drive This mode is used to achieve As applicable better fuel economy CITY Blue CITY indicates City drive mode This mode is used to achieve As applicable optimum torque and better fuel economy SPORT Amber SPORT indicates Sp...

Страница 51: ... and buzzer willprovideaudiowarningcontinuously Disengage the park brake to stop audio warning Reverse Gear reminder IfReverseGearisengaged audiowarn ing will alert you This chime is applicable for both Manual and AMT transmission vehicles Seat Belt reminder If seat belt is not buckled and vehicle speed goes above 25 kmph audio alarm will start and continue for 90 sec onds This will stop when vehi...

Страница 52: ...o position B to turn ON the Park ing lamps DRL will be OFF C Low Beam Rotate to position C to turn ON the Low Beam function DRL will be OFF Head lamp leveling rotary switch Inner rotary switch on right hand stalk is provided for head lamp leveling With the inner rotary switch Head lamp leveling can be done with head lamp in Low Beam and in ON position Depending upon the number of occu pants and lu...

Страница 53: ...witch ON automatically when The ignition is ON All lights position light front fog lamp side marker lamp low beam high beam are OFF When either of parking lamp front fog lamp low beam high beam is ON Day time running lamps are OFF NOTE Daytime running lamps can be enabled or disabled by a TATA MOTORS authorized service centre if required NOTE Misting may occur on the inside of a lamp lens due to c...

Страница 54: ... Rear Wash and Wipe Rotary Switch wipe It will return to OFF position as soon as released Rear Wipe Turn the rotary knob Counter clockwise such that it aligns its positions with arrow mark to operate rear windshield wash and wipe It will return to Rear Wipe position as soon as released Rear wiper will start wiping continu ously Rear Windshield Wiper and Washer Switch Turn the rotary knob counter c...

Страница 55: ...visibility in adverse weather conditions to avoid accidents when visibility is poor The rear fog lamp can be switched ON with ignition and headlamp or front fog lamp is ON WARNING The rear fog lamp should only be turned ON if visibility is particularly poor to avoid dazzling to vehicles behind your vehicle ECO mode Switch If fitted Refer DRIVE MODES chapter in STARTING and DRIVING section SPORT mo...

Страница 56: ...els SOURCE To select the required source in the infotainment USB AUX AM FM STEERING WHEEL SWITCHES RHS If fitted PTT PHONE RECEIVE Push to talk PTT will enable the infotainment head unit in voice command and reception mode from the user This button is also used to accept in coming call when a cell phone is con nected via bluetooth NOTE For more information please refer to the Infotainment Manual p...

Страница 57: ...ected for playing music tracks stored in these devices through the vehicles music system AUX Provided to connect Audio input devices for playing music tracks stored in the devices through vehicle s speakers Speakers if fitted Speakers and tweeters are provided on models with infotainment system While provisions are given for music system and speakers on models with out infotainment system Antenna ...

Страница 58: ...dimming when either of the doors are opened When the last door is closed the lamp will remain ON for 25 sec and turns OFF with dimming This helps settling in the seat and inserting the key in the ignition switch When the key is turned to the IGN position the lamp goes OFF immediately OFF In this position the lamp will remain OFF LUGGAGE COMPARTMENT LAMP if fitted Boot lamp is fitted in the luggage...

Страница 59: ... pocket box Rear utility pocket box Cup holder B UTILITY POCKET BOX 1 Pocket for Owner s Manual 2 Pocket for First Aid Kit 3 Pen Holder To open pull the lever outward and open the glove box flap To close push the flap back upwards until it engages C CUP HOLDER A cup holder is provided on the centre console Utility Pockets are provided on all doors and it can be used to keep magazines books etc ...

Страница 60: ...n the centre console ahead of the gear shift lever Power socket can be used to tab 12V 10A supply for operating external gadgets Roof Grab Handle Fixed Foldable Roof Grab Handle If applicable E ROOF GRAB HANDLE These are provided on all seats except driver s seat This helps in comfortable positioning of passengers during a journey ...

Страница 61: ...le F LUGGAGE COMPARTMENT G LUGGAGE COVER Luggage cover is designed only for hiding the luggage compartment WARNING Do not place anything on luggage cover as it could obstruct driver s rear view Also in case of accident or sudden braking it could cause an injury to occupants 1 Luggage Space 2 Luggage Cover 2 1 ...

Страница 62: ...lear for better visibility Climate control can only be operated when the engine is running Optimum operation will be achieved with all doors windows closed Air distribution The incoming air is distributed through the ventilation points in the passenger compartment as shown Towards Foot Board Central Air Vents Demisting Vents Side Air Vents Towards Foot Board Side Air Vents Side Window Demist Vents...

Страница 63: ...ontrol B Blower Speed Control C Temperature Control D Air Recirculation E AC ON OFF Air flows from the center and side air vents Air flows from the center sideventsandfootwellvents Air flows from mainly foot well vents Air flows from the defroster and foot well vents always select fresh air mode Air flows from the defroster vents always select fresh air mode B Blower Speed control A Air Distributi...

Страница 64: ...c pollution Maximum cooling is required Fresh Air mode Switch OFF Indicator light OFF Outside air is drawn into the passen ger compartment and distributed through the selected outlet Always use when Discomfort is felt or windows are fogging up Using or air flow modes during demist defrost Using normal heating mode AC ON OFF Press the button to turn ON the AC compressor The indicator light turns ON...

Страница 65: ...ON Switched OFF and then 2 or 3 the stop to Fresh air mode then Recirculation mode Normal Cooling or 1 2 or 3 Desired Recirculation Switched ON temperature mode Quick Cooling or To MAX speed To the left up to Recirculation Switched ON and then 2 or 3 the stop mode Demisting 2 or 3 Desired Fresh air mode Switched ON temperature Default Optional Defrosting 4 Desired Fresh air mode Switched ON temper...

Страница 66: ...ws begin misting up Do not adjust the heating and air conditioning controls while driving so that full attention may be given to vehicle operation NOTE Condensation starts inside the air conditioning unit when the air conditioner is running and is safely discharged underneath your vehicle Traces of water on the ground are therefore normal After parking in the sun drive for 2 or 3 minutes with the ...

Страница 67: ...R DISTRIBUTION MODE BUTTON 8 OFF MODE 9 TEMPERATURE CONTROL KNOB 10 AUTO ON SELECTION BUTTON GENERAL DESCRIPTION FATC system controls the in cabin Temperature of the vehicle automati cally and provides maximum passen ger convenience regardless of outside weather conditions NOTE If the display flashes ERR in peri odic pattern Display will show ERR for 5 sec and set temperature for 30 sec It indicat...

Страница 68: ...regulate the blower speed automatically DISPLAY UNIT FATC display is shown on main display screen FATC functions can be controlled using both the FATC control panel and the touch screen display Whenever the user presses any push button or turns the rotary knob then the display unit will show the relevant Climate Information Also when the display is not in cli mate mode then climate information wil...

Страница 69: ...15 min of continuous opera tion 6 FRESH AIR RECIRCULATION BUTTON A When the recirculation Button or LED is switched ON air from the vehicle s interior is sent through out the system B When the recirculation button is switched off air is brought in from outside of the vehicle fresh mode Whenever discomfort is felt switch to fresh air mode NOTE The out side air intakes for the climate control system...

Страница 70: ... from the defroster and foot well vents always select fresh air mode Air flows from the defroster vents always select fresh air mode 8 AUTOMATIC OPERATION A Press the AUTO button B Set the desired temperature by turning temperature control knob The display will show all the functions during AUTO mode C The system automatically selects the proper mix of conditioned and or heated air that will as qu...

Страница 71: ...the temperature control knob clockwise increases the temperature of the air The desired temperature will be increased by steps of 0 5ºC User can select temperature range from 18ºC to 30ºC Where as the anti clockwise direction decreases the tem perature When you set the temperature to its lower limit Lo or its upper limit Hi Press the OFF button to switch OFF The system OFF will be displayed on the...

Страница 72: ... down fast by following the steps given below A Start the engine B Turn on A C by pressing the button Make sure the temperature control is set to maximum cool In case of FATC set temperature to Low mode C Set the fan to maximum speed for ETC manual HVAC variants D Open windows half set air direc tion towards face and fresh air mode E When the interior has cooled down to a more comfortable level cl...

Страница 73: ...servoir 6 Battery electrolyte level 7 Ensure sufficient Fuel ADJUST 1 Adjust your seat position 2 Check adjustment of all rear view mirrors 3 Check and adjust steering angle VEHICLE STARTING 1 Vehicle starting function is controlled by EMS ECU it requires gearinNeutral and fully pressed clutch pedal These interlocks are included to avoid unintended vehicle movement during cranking as a safety meas...

Страница 74: ...rs Hazard warning Ensure that all side indicators hazard warning lights are always in working condition and they are used when required Horn Ensure the horn is working properly Horn provides safety to other road users by alerting your presence Brakes Ensure brakes are working properly Check brake fluid level in reservoir Do not drive the vehicle when brake warning lamp is ON Tyres Check the condit...

Страница 75: ...hifting Always follow the gear shifting recommendations provided on instrument cluster for selected models Always maintain clean air filter The amount of air supplied will reduce due to clogged air filter resulting in wastage of fuel due to incomplete combustion Avoid incorrect tyre pressure Under inflated tyres result in increased running resistance of the tyres leading to wastage of fuel Refer t...

Страница 76: ...vehicle leaves the roadway do not steer sharply Slow down slightly before pulling back into the travel lanes RUNNING IN PERIOD Avoid rapid acceleration and prolonged high speed running of the engine while using the new vehicle for the first 1500 1800 km of operation Do not exceed the following road speeds during running in period Quadrajet Revotron Gear Speed Speed kmph kmph 1st 20 20 2nd 30 40 3r...

Страница 77: ...ed direction Release the lift bar to lock the position Ensure the seat locking by delibrate movement of your body in the seated condition in forward and backward direction Adjustable Head restraint if fitted Adjustable head restraints are provided to increase the height and fix at a desired comfortable position To reduce the height press release button to move downwards Make sure that the top of r...

Страница 78: ...afety element Do not attempt to adjust the head restraint while driving the vehicle To avoid possible loss of vehicle control all seat head restraint steer ing wheel and rear view mirror adjustments as well as fastening of seat belts must be done before setting the vehicle in motion A bench type fixed seat is provided for rear passengers ...

Страница 79: ...m outside and can be adjusted by the lever provided inside the door The mirrors are provided on both the doors Outer Rear View Mirror Manual Adjustment Motorised Outer Rear View Mirrors If provided Your vehicle is equipped with motor ized outer rear view mirrors fitted on both front doors and can be adjusted to the desired position with the help of a switch knob mounted on the driv er s side along...

Страница 80: ...s SUN VISORS Two adjustable sun visors are provided inside the cab above the windshield to prevent sun glare Lower the sun visors to protect the eyes from bright sunlight The sun visors can also be moved sideways towards door window A vanity Mirror has been provided on the back of the Co driver s sun visor Pocket has been provided for keeping documents NOTE When not in use keep the sunvisors in th...

Страница 81: ...p to the lock position Make sure that steering wheel is securely locked by checking up and down direction NOTE Steering wheel should be adjusted only when the vehicle is stationary PREPARING TO DRIVE Release the parking brake Ensure the gear is in Neutral position Check that all items that you may be carrying inside are fully secured Ensure that all doors are locked properly Check adjust seat Fast...

Страница 82: ...y moved from lock toACC position and activates electrical accessories 1 LOCK Steering Locked KEY IN OUT condition 2 ACC Steering Column Unlock 3 IGN All electrical ON 4 START Engine Crank 3 IGN All electricals and accessories are switched ON 4 START Press the clutch pedal fully and turn the key further clockwise to the START position spring loaded to start the engine As soon as the engine starts r...

Страница 83: ...get the key back to OFF position wait for 30 secs WARNING Running the engine in confined areas is extremely dangerous The engine consumes oxygen and produces carbon monoxide which is highly toxic and lethal gas NOTE After starting run the engine in idle speed for atleast 30 sec Do not press accelerator pedal while starting the engine to avoid damage to the turbocharger ...

Страница 84: ... Wait for 5 seconds after declutching to ensure smooth engagement of the reverse gear Current Gear Indication The Driver Information display DIS in the Instrument Cluster indicates the current gear position engaged Up or down arrow will be displayed recommending whenever gear should be shifted to up or down Gear Recommendation Up or down arrow will be displayed in DIS recommending whenever gear sh...

Страница 85: ...e in position N b Fully depress the brake pedal c Turn the Ignition ON and crank the engine d With the engine running and brake pedal pressed depending on your requirement shift the lever on R A or M e Check the position engaged on the Instrument Cluster display f Release the brake pedal and accelerate NOTE Theenginecanonlybestartedwhen the gearshift lever is in N position with the brake pedal fir...

Страница 86: ...ry and brake pedal pressed An audio signal indicates when reverse gear is engaged R will be indicated in instrument cluster WARNING Always make sure to place the gear shift lever in the N position when the engine is running and vehicle is stationary Do not shift the lever in N position even momentarily when the vehicle is in motion Automatic Mode Gear Upshift and Downshift will be done automatical...

Страница 87: ... button again Stopping Thevehiclecanbestoppedbydepress ing the brake pedal regardless of the gear position This is because the clutch is automatically disengaged to prevent the engine from stopping If the gearshift lever is in the A position the gear will be downshifted to 1st when the vehicle stops If the gearshift lever is in the M position the gear will be downshifted to 1st when the vehicle st...

Страница 88: ...onfirm the gear position by check ing the gear position indicator on instrument cluster 3 Stop the engine DRIVE MODES Applicable for Revotron 1 2T Three drive modes ECO CITY and SPORT are provided These modes can be used to adjust engine charac teristics and vehicle performance inline with desired requirement Drive mode selection switches are provided on dashboard fascia to activate the programs S...

Страница 89: ...Switches ECO Optimum engine Torque and Power output for FUEL EFFICIENT As applicable performance CITY default Increased engine Torque and Power output for BALANCED As applicable performance SPORT Max engine Torque and Power output for SPORTY performance As applicable ...

Страница 90: ...g on level roads To reduce the strain on the brakes shift into a lower gear and let the engine help with the braking Do not forget that if you are towing the brakes will be subjected to a greater than normal load WARNING If you shift gear down on a slippery road surface in an attempt to increase the engine s braking effect the wheels could lose their grip This may lead to increased danger of skidd...

Страница 91: ...minates on the instrument cluster To release it pull the lever up slightly press the release button and push the lever down Parking brakes tell tale on the instrument cluster will go OFF when the lever is fully released NOTE Apply the parking brake properly beforeleavingthevehicleandrelease it before moving 1 2 VEHICLE PARKING Park the vehicle in a safe place Switch on the indicator signal before ...

Страница 92: ...everse Park Assist Switch By pressing the Reverse Park Assist Switch on the fascia the feature gets activated Once activated yellow LED will glow until the feature is deactivated LED Indications a On start of ignition if the LED turns ON for a second then Reverse Park Assist system is healthy b On start of ignition if the LED turns ON and OFF 10 times then Reverse Park Assist system is unhealthy C...

Страница 93: ...f you turn ON the ignition in reverse gear mode Reverse park assist feature will start automatically There is no way to permanently disable Reverse park assist feature in the vehicle You can deactivate by Reverse Gear Park Assist Music System Button user interface X button Reverse Gear E E E Park Assist Switch r E E Music System user r E E interface If you activate by Park Assist Indications In ca...

Страница 94: ...d by the system d If object is made covered by foam or sponge or snow where ultrasonic sound signals are absorbed Objects close to the rear bumper can go undetected by the Reverse Park Assist field of detection Driver should use extreme caution while parking the vehicle WARNING Due to any reason if the sensor gets misaligned or loses its intended fitment position contact your dealer for re fitment...

Страница 95: ... vehicle on the side of the road to avoid collision with or inconvenience for others While driving in emergency or under adverse conditions it is advisable to switch ON Hazard warning indicators Hazard warning switch remains functional even while ignition switch is in OFF condition When the situation is under control switch off the hazard warning indicator ...

Страница 96: ...s of the kit periodi cally and replenish consumed or expired items ADVANCE WARNING TRIANGLE An advance warning triangle is kept in the luggage compartment Remove the advance warning triangle from the bag and assem ble Refer instructions given on the bag Place the triangle on the road atleast 50M behind the vehicle Distance between triangle and the vehicle must be at least 50 meters in the same lan...

Страница 97: ...TANCE TOOL KIT A tool kit is kept in luggage compart ment at LH side NOTE The tool kit should be properly secured after usage JACK AND HANDLE A scissors jack with handle is kept inside the luggage compartment and mounted on the trunk lid outer sill panel ...

Страница 98: ...andle from the vehicle SPARE WHEEL 1 Spare Wheel 2 Retaining Bolt Spare wheel is located in the luggage compartment To access the spare wheel open the tail gate fold lift and hook up the floor cover To remove the spare wheel unscrew and remove retaining bolt which is provided to hold the spare wheel Lift and take out the spare wheel CHANGING FLAT TYRE Slacken but do not remove the wheel nuts using...

Страница 99: ...se an injury If required to change the wheel on slope then block the wheel Do not use oil or grease on studs or nuts which may cause the breakage and slip of the wheel stud Do not start or run the vehicle while supported by a jack Remove wheel mounting nuts and take out flat tyre Roll the spare wheel into position and align the holes in the wheel studs Then reinstall the wheel nuts Engage threads ...

Страница 100: ...etely then tighten the wheel nuts one by one using wheel spanner Press fit the wheel cover back if fitted Restore all the tools and jack at their respective location Place the flat tyre at spare wheel location as described NOTE Check and correct the tyre pressure and nut tightness of the changed wheel at nearest service station Get the flat tyre repaired at the earliest ...

Страница 101: ...s could lead to personal injury resulting from any battery explosion as well as damage to the electrical systems in both vehicle Do not allow battery electrolyte to come in contact with eyes skin fabrics or painted surfaces The fluid contains sulphuric acid which can cause injury and severe damage Wear rubber gloves to avoid risk of contact To lessen the risk of injury wear eye protection when wor...

Страница 102: ...d to engine block OR unpainted metal Engine part which is away from the discharged battery on the vehicle to be started 3 Crank and start the engine 4 While disconnecting follow reverse order i e disconnect Negative lead followed by Positive lead NOTE Do not connect negative terminal if jump start battery Good battery to the negative terminal of discharged battery This may lead to an explosion Con...

Страница 103: ...ON the hazard warning indicators of both the vehicles to warn other road users Put the gearshift lever in the NEUTRAL position Limit the speed to 20 30 kmph In case of brake failure use the parking brake to control the vehicle Do not use flexible cable or rope for towing as your vehicle may crash into the towing vehicle when it applies sudden brake Recommended Towing We recommend that your vehicle...

Страница 104: ...e the towing hook from the tool bag Remove the tow hook cover provided on the front bumper by pressing pulling it Install the towing hook by turning it clockwise into the hole until it is fully installed After towing remove the towing hook and fit the cover NOTE The power steering functions only when engine is running Hence during towing the steering efforts will be more Tow Hook Location at Front...

Страница 105: ...t Fuse Box NOTE Always ensure that the spare fuses are replenished Ensure that all other fuses are pressed firmly in position If the replaced fuse blows out in short time there is probably an electrical problem in your vehicle Get the vehicle attended to the nearest TATA MOTORS Authorised Service Centre immediately WARNING The electrical system is protected by fuses that are designed to fail and p...

Страница 106: ...e No Rating PF1 STARTER MOTOR CAL 1 Battery Mounted Fuse Box WARNING If Fuse box cover is removed for any reason it should be refitted prop erly at its original position NOTE The fuse box layout is for reference purpose only Please refer the sticker provided inside the fuse box cover Fix Fuse Box cover to Battery Mounted Fuse Box if removed ...

Страница 107: ...10A 13 STARTER SOLENOID 20A 14 ABS ECU 25A 15 TCU 15A 16 HORN HIGH LOW TONE 15A 17 FRONT FOG 10A 18 EMS BATTERY 10A 19 AMT HYD PUMP 30A 20 FUEL PUMP 20A 21 BRAKE LAMP 10A 22 RELAY COIL 5A 23 24 FRONT WIPER MOTOR 20A 25 ABS 5A 26 WASHER MOTOR 10A 27 TCU 10A 28 REVERSE BRAKE LAMP 10A 29 REAR WIPER 10A 38 EMS ECU SDE 20A 39 EMS ECU 15A 40 EMS ECU DIESEL 10A EMS ECU PETROL 20A 41 42 HEAD LAMP LOW 15A ...

Страница 108: ...mn To access the fuse box remove cover as per procedure given below 1 Fuse box cover is mounted on dash board with the help of 4 lugs on top and 2 plastic rivets at bottom 2 To remove plastic rivets first pull center pin and then rivet 3 After removing rivets slowly and carefully pull out cover from bottom to disengage top mounting lugs Take out cover ...

Страница 109: ...tment procedure 1 Align and engage the top mounting lugs with respective slots on dash board and gently press 2 Similarly align the bottom rivet mountingholesandinsertrivetsand press center pin to lock NOTE Pull the center pin of rivet before fitment ...

Страница 110: ...MP 5A 6 MIRROR ADJUST MOTOR 5A 7 BCM POSITION LAMP 15A 5A 8 CLUSTER OBD 10A 9 BCM POSITION PARK 15A 5A LAMP 10 KEY IN AFTER MARKET 5A 11 IMMO EPAS 5A 12 13 BLOWER MOTOR 30A 14 CDL ACCESSORY 15A 15 POWER SOCKET 1 15A 16 RELAY COILS 5A 17 18 HVAC 10A 19 HRW FLASHER 25A 10A 20 IGN SUPPLY 10A 21 22 TRANSIT INFOTAINMENT 15A FUSES EMERGENCY BREAK DOWNASSISTANCE 07 ...

Страница 111: ... 12V 19W H16 2 6 STOP POSITION REAR 12V 21 5W P21 5W 2 7 TURN SIGNAL REAR 12V 21W PY21W 2 8 REVERSE LAMP 12V 21W P21W 2 9 FOG LAMP REAR 12V 21W P21W 1 10 REAR REGISTRATION PLATE LAMP LED LED MODULE 2 11 SIDE REPEATER LAMP 12V 5W WY5W 2 12 ROOF LAMP 12V 10W Festoon Bulb 1 13 ROOF SPOT LAMP IfApplicable 12V 5W W5W 2 14 HIGH MOUNTED STOP LAMP LED LED MODULE 1 15 REAR BOOT LAMP 12V 5W W5W 1 16 HIGH MO...

Страница 112: ... heat unevenly and explode when lit Never touch the glass portion of the bulb with your bare hands and always wear eye protection when handling or working around halogen bulbs Always keep halogen bulbs out of the reach of children Location of the head lamp bulbs 1 Low beam lamp 2 High beam lamp Parking Position lamp 3 Turn indicator lamp Replacing the low beam bulb halogen lamp Lift the bonnet to ...

Страница 113: ...113 BULB REPLACEMENT EMERGENCY BREAK DOWNASSISTANCE 07 Fig 1 Fig 2 Fig 3 Fig 4 Fig 5 ...

Страница 114: ... Fig 2 To free the headlamp bulb from the socket press and swing the retaining spring and pull it straight back Fig 3 Pull out the bulb from the socket Fig 4 Insert the new bulb without touch ing the glass into the socket Move the retaining spring up and push it slightly until it lock prop erly Press the connector into the bulb Press the dust cap on headlamp housing until it fits properly Fig 1 Fi...

Страница 115: ...ve the bulb from the bulb holder Insert the new bulb without touch ing the glass into the bulb holder Press fit the bulb holder with the bulb Press the high beam bulb dust cover on headlamp housing until it fits properly Replacing the Front Turn indicator Bulb Lift the bonnet to access the bulb Rotate the front turn signal socket plug assembly anticlockwise and pull it straight back Pull the bulb ...

Страница 116: ... the trunk lid to access the tail lamp s mounting screws inside the boot carpet Slightly remove the boot carpet by pulling out the plastic rivets To remove plastic rivets first pull the center pin and then rivet Carefully slide out tail lamp assem bly to release the two mounting lugs and tail lamp catcher provided as shown in fig Take out the tail lamp assembly Rotate the bulb holder in anti clock...

Страница 117: ...L ACCESSORY FIT MENT if applicable 1 Music System 2 Speakers 3 Central Door Locking 4 Reverse Parking Sensors 5 Accessories Supply Fuse Pro tected upto 7A A plug socket is provided behind the dash board near the cockpit wiring harness For details of fitment please contact TATA MOTORS Authorized Service Centre s TASCs only 1 Turn Indicator lamp 2 Reverse lamp 3 Stop Lamp 4 Tail Lamp and then press ...

Страница 118: ...period The program shall also be available if you avail the same post warranty Response Time for the On Road Assistance Program Within City Limits 60 minutes On State or National Highways 90 minutes Ghat Roads and other places 120 minutes The response time will depend on the location terrain traffic density and the time of the day Standard procedure when calling for On Road Assistance in case of a...

Страница 119: ...ne by the customer II The 24x7 On Road Assistance Program coverage on availing the 24X7 policy post warranty is upto maximum of 6 instance of assistance in one year for both the plans Basic and Premium In the premium plan this includes 1 instance of towing upto the nearest TATA MOTORS authorised workshop EXCLUSIONS 24x7 On Road Assistance Program does not apply to Cost of parts consumables and lab...

Страница 120: ...t account for delays due to but not limited to acts of God laws rules regulations for time being in force orders of statutory or Govt authorities industrial disputes inclement weather heavy down pour floods storms natural calamities road blocks due to accidents general strife and law order conditions viz fire arson riots strikes terrorist attacks war etc On spot repairs at breakdown site shall dep...

Страница 121: ... of ASP taking possession of the vehicle to verify these items when delivery is taken back by them Claim for loss of or damage to items if any should be taken up with ASP directly TATA MOTORS shall not be responsible for any such claims damages loss or any deficiency of service of the ASP Vehicles will be handled repaired towed as per the customer s risk TATA MOTORS shall not be liable for any dam...

Страница 122: ...dealer can provide the necessary parts and service Check your warranty informa tion to find out which parts and services are covered Use only recommended fuels lubri cants fluids and service parts conform ing to specifications Precautions Do not work on a hot engine Make sure that nothing gets caught in moving parts Do not work on a vehicle with the engine running in an enclosed space unless you a...

Страница 123: ...ERVICING 08 1 Wind shield washer container 2 Brake fluid reservoir 3 Dip Stick Engine Oil 4 Air Filter 5 Fuse relay box 6 Battery 7 Auxiliary tank 8 Engine oil filling cap 9 ABS HCU if fitted ENGINE COMPARTMENT QUADRAJET 1 2 3 4 5 6 7 8 9 ...

Страница 124: ...VICING 08 ENGINE COMPARTMENT REVOTRON 1 2T 1 Wind shield washer container 2 Brake fluid reservoir 3 Air Filter 4 Engine oil filling cap 5 Fuse relay box 6 Battery 7 Auxiliary tank 8 Dip Stick Engine Oil 9 ABS HCU if fitted 1 2 3 4 5 6 7 8 9 ...

Страница 125: ...e MAX mark Oil levels above the MAX mark may cause engine damage For location of Engine oil filling cap dip stick please refer respective Engine Compartment pages BRAKE FLUID LEVEL The level of the brake fluid must be between the min and max marks on the side of the brake fluid container If the level falls below the min mark add recommended brake fluid Refer chapter Fuels coolants and lubricants I...

Страница 126: ...cap please refer respective Engine compartment pages NOTE Topping of the coolant should be done in the auxiliary tank only Do not mix different colors or types of coolant in your vehicle Make sure that only recommended coolant is used Mixing of engine coolants may harm your engine s cooling system and its components This may void the warranty Use recommended engine coolant meeting the TATA MOTORS ...

Страница 127: ...SAXLE OIL LEVEL WINDSHIELD WASHER FLUID LEVEL Windshield washer fluid container is located behind the front right hand side panel and its filler neck is provided near the auxiliary tank in the engine compartment NOTE Do not add detergent or any solvent in the windshield washing water For location of Windshield Washer Container filling cap please refer respective Engine compartment pages ...

Страница 128: ...dirt or oil that is collected around the spark plug caps 2 Pull out the spark plug cables by gripping at the connector 3 Remove the spark plug with the help of a special socket 4 Check and adjust the gap it should be 0 7 mm to 0 8 mm 5 Replace the spark plug if the gap is more than 1 1 mm 6 Fix the spark plug and tighten it to the torque of 25 Nm dry 7 Fit the spark plug cable until a click sound ...

Страница 129: ...e life and better fuel efficiency Overinflationoftyresmakesthe vehicle ride bumpy and harsh Tyres are more pronetounevenwearanddamagefrom road hazards Under inflated tyres reduce your comfort in vehicle handling and are prone to failures due to high temperature They also cause uneven wear and more fuel consumption Recommended Tyre Pressures 185 60 R15 WHEELS TYREPRESSURE Front 34 psi 2 35 bar Rear...

Страница 130: ...hich holds the air inside the tyre Removal of this layer due to scratching may cause gradual loss of air and deflation 3 If wheel rim gets damaged in service get the wheel rim repaired replaced immediately Running the vehicle with damaged rim may cause deflation of tyre and subsequent dislodging of tyre from rim TYRES MAINTENANCE SERVICING 08 4 Maintain recommended inflation pressure Over inflatio...

Страница 131: ...tyre life and distribute wear more evenly you should have tyres rotated at specified intervals or earlier depending on the operation of vehicle Wheel Balancing Wheels of your vehicle are balanced for better ride comfort and longer tyre life Balancing needs to be done whenever tyre is removed from rim 1 Permissible imbalance for tyre with rim 250 gm cm max 2 Total balance weight should be within 14...

Страница 132: ...ct it last Clean the battery terminals with a terminal cleaning tool or wire brush Reconnect and tighten the cables coat the terminals with petroleum jelly Ensure that the battery is securely mounted If you need to connect the battery to a charger disconnect both cables to prevent damage to the vehicle s electrical system NOTE During normal operation the battery generates gas which is explosive in...

Страница 133: ...l lows if you wish to replace the dis charged battery yourself 1 Open the key 2 Press off the battery cover with your thumb or using a flat screw driver at the points of the arrows 1 3 Remove the discharged battery from the key by pressing the battery downwards at the point of the arrow REMOTE BATTERY MAINTENANCE SERVICING 08 6 The correct polarity is shown on the battery cover Position the batter...

Страница 134: ...cluster when a fault causes emission levels to increase The OBD system also has a diagnostic connector that can be interfaced with appropriate diagnostic tools which makes it possible to read the fault codes stored in the Electronic Control Unit together with a series of specific parameters for Engine operation and Diagnosis This check can also be carried out by the traffic police To access the di...

Страница 135: ...blems Several maintenance procedures can be done only by a qualified service technician with special tools Improperly done do it yourself maintenance during the warranty period may affect warranty coverage If you re unsure about any servicing or maintenanc procedure have it done by a TATA MOTORS Authorized Dealer TASC WARNING Performing maintenance work on a vehicle can be dangerous You can be ser...

Страница 136: ...e At 14500 15500 km OR 12 months whichever is earlier 3rd free service At 29500 30500 km OR 24 months whichever is earlier All services other than free services are chargeable Servicing of the vehicle can be done at any TATA MOTORS Authorised Dealer Workshop TATAMOTORS Authorised Service Centre TASC or TATA MOTORS Authorised Service Point TASP The details of their locations are given in this manua...

Страница 137: ...ce 6 All standard checks as per job card EVERY Service 7 Check rubber boots and bushes for damages and replace if required 30 000 8 Check rubber hanger Muffler and replace if damaged EVERY Service ENGINE Quadrajet 1 Clean air filter element More frequently for vehicle operating in severe condition 15 000 2 Change engine oil and Oil filter 15 000 Kms or 12 months whichever is earlier 15 000 3 Check...

Страница 138: ...k accesory drive belts for tension wear or damage replace if required 15 000 6 Replace accessory drive belts 60 000 7 Change coolant 60 000 Kms or 24 months whichever is earlier 60 000 8 Replace timing belt 1 05 000 Kms or 60 months whichever is earlier 1 05 000 9 Replace Spark Plugs 30 000 10 Check Valve Clearance At ambient temperature and adjust if necessary 30 000 TRANSAXLE 1 Check oil level a...

Страница 139: ...00 SR MAINTENANCE SCHEDULE OPERATIONS FREQUENCY NO KM WHEELS TYRES 1 Rotate tyres 15 000 FRONT REAR SUSPENSION 1 Check and adjust Wheel Alignment and Balancing 15 000 ELECTRICAL 1 Check headlamp focusing and adjust if required 30 000 A C SYSTEM 1 Check Airconditioning HVAC System for satisfactory performance Clean A c Filter EVERY Service ...

Страница 140: ...llutants At very low temperature fluidity of diesel may become insufficient due to paraffin separation It is therefore neces sary to mix supplementary fuel with summer or winter grade diesel The supplementary fuel to be used is kerosene or aviation turbine fuel Ratio for mixing of supplementary fuel and diesel are shown in the table Ambient Percentage Temperature Summer grade Supplementary upto De...

Страница 141: ...40 or SAE 10W 50 35 deg to 40 deg SAE 5W 30 Brand names As per chart given in the manual Transaxle Use recommended brand of 80W API GL 4 gear oil REVOTRON 1 2T and Semi synthetic SAE 75W80 Quadrajet Grease for axle bearings Lithium base grease IPOL IPLEX LC Grease 2 Brake fluid SAE J 1703 DOT 4 COOLANTS Presence of dirt in coolant chokes up passages in radiator cylinder head and crankcase thereby ...

Страница 142: ...RONAS Syntium 5000 TM 5W30 3 2 Litres COOLANT Pre mixed Class II JIS K2234 SUNSTAR CCI Golden Cruiser LLC 2200NP 6 0 Litres Revotron 1 2T Antifreeze agent Soft TATA SS7700 IOCL Servo Cool TM Plus 7 5 Litres Qudrajet water 50 50 ratio ANSYSCO Puroblue TRANSAXLE Monograde HPCL HP Gear Oil EP 80 1 8 Litres REVOTRON 1 2T SAE 80 W API GL4 CASTROL HYPOY 80 EPT TRANSAXLE Semi Synthetic PETRONAS Tutela ZC...

Страница 143: ...00 RPM Max Torque 190 Nm 1750 3000 RPM 200 Nm 1750 3000 RPM 140 Nm 1750 3500 RPM CLUTCH 1 3L FIAT SDE 75 PS 1 3L FIAT SDE 90PS REVOTRON 1 2T Type Single plate dry friction diaphragm type TRANSAXLE 1 3L FIAT SDE 75 PS 1 3L FIAT SDE 90PS REVOTRON 1 2T Model EVO 2 TA65 Type Synchromesh with overdrive No of gears 5 Forward 1 Reverse STEERING 1 3L FIAT SDE 75 PS 1 3L FIAT SDE 90PS REVOTRON 1 2T Type El...

Страница 144: ...HEELS TYRE 1 3L FIAT SDE 75 PS 1 3L FIAT SDE 90PS REVOTRON 1 2T Tyres 185 60 R15 Wheel Rims 5 5 J x 15 FUEL TANK 1 3L FIAT SDE 75 PS 1 3L FIAT SDE 90PS REVOTRON 1 2T Capacity 44 liters CAB BODY 1 3L FIAT SDE 75 PS 1 3L FIAT SDE 90PS REVOTRON 1 2T Type Compact Sedan Five Door Steel monocoque body Passenger vehicle ELECTRICAL SYSTEM 1 3L FIAT SDE 75 PS 1 3L FIAT SDE 90PS REVOTRON 1 2T System Voltage...

Страница 145: ...50 kmph 158 kmph 155 kmph Max recommended 7 10 17 20 14 50 gradeability Minimum Turning Circle Dia 10200 in mm as per IS 12222 Minimum Turning circle 10900 Clearance dia In mm as per IS 12222 WEIGHT IN KG 1 3L FIAT SDE 75 PS 1 3L FIAT SDE 90PS REVOTRON 1 2T Gross Vehicle Weight 1602 XE 1605 XM XMI 1617 XMS 1620 XT 1565 XE 1572 XM XMI 1620 XMA 1635 XTA 1582 XMS 1585 XT Kerb Weight Unladen 1152 XE 1...

Страница 146: ...146 VEHICLE DIMENSIONS TECHNICALINFORMATION 09 ...

Страница 147: ...147 IDENTIFICATIONPLATES TECHNICALINFORMATION 09 Chassis No on B pillar Chassis No below Driver s seat If applicable Cab No ENG Sr No 100A2600 0006947 Engine Number Revotron 1 2T Engine Number Quadrajet ...

Страница 148: ...148 IDENTIFICATIONPLATES TECHNICAL INFORMATION 09 Transaxle No Quadrajet Transaxle No Revotron 1 2T ...

Страница 149: ...ch are safe for paint surfaces 5 Avoid substances like petrol diesel kerosene benzene thinner or other solvents that cause damage to paint 6 Dry your vehicle thoroughly to prevent any damp spots 7 Rinse all surfaces thoroughly to prevent any traces of soap and other cleaners as this may lead to the formation of stains on the painted surface later WARNING Do not direct high pressure washer fluid wa...

Страница 150: ...lip off the surface but collects over the surface in patches POLISHING Polishes and cleaners can restore shine to the painted surface that has oxidised and become dull They normally contain mild abrasives and solvents that remove the top layer of the finish coat Polish your vehicle if the finish does not regain its original shine after using wax INTERIORFABRICCLEANINGTIPS 1 Stains should be treate...

Страница 151: ...ion to regularly washing your car the following precautions need to be taken PERIODIC INSPECTION Regularly inspect your vehicle for any damage in the paint film such as deep scratches and immediately get them repaired from an authorised service outlet as these defects tend to accelerate corrosion Inspect mud liners for damages Keep all drain holes clear from clogging PROPER PARKING Always park you...

Страница 152: ... in the gear mode 4 Clean and protect the painted parts using protective wax 5 Clean and protect the shiny metal parts using commercially available special compounds 6 Sprinkle talcum powder on the rubber windscreen wiper and lift them off the glass 7 Slightly open the windows 8 Cover the vehicle with a cloth or perforated plastic sheet Do not use sheets of imperforated plastic as they do not allo...

Страница 153: ...ur vehicle We strongly recommend purchase of Extended Warranty at time of purchase of your vehicle Extended Warranty can be availed till 421 days from date of purchase of vehicle The Dealer Service Marketing Executive shall explain to you the Terms and conditions Coverage and Owner s responsibility Extended Warranty Booklet Cover Note The Extended Warranty booklet and cover note is the basis of th...

Страница 154: ...eak down as defined in this warranty and confirmed by the dealer within the stipulated terms and conditions Tata Motors dealer shall either repair or replace any part found to be defective with a new part or an equivalent at no cost to the owner for parts or labour Such defective parts which have been replaced will become property of TATA MOTORS LIMITED Comprehensive list of parts covered is menti...

Страница 155: ... corrosion creeps onto the vehicle from the inside and from the outside The most dangerous kind of corrosion is often not discovered until it is too late Benefits of Anti Rust treatment A professionally applied range of world class products offering real value to the new and used vehicle customer The treatment has been developed to withstand the harshest environmental and climatic conditions rst P...

Страница 156: ...on in a vehicle Product to be used once in the life of the vehicle Life Time Warranty Effect is Life long i e until unless pads are physically removed Negligible increase in Weight hence no effect on fuel consumption Areas covered four doors rear quarter panels dicky In case of diesel vehicles can be used in the bonnet TATA MOTORS has tied up with M s Wuerth M s Autokrom M s 3M India Ltd M s Barda...

Страница 157: ...aint is not protected The enemy Ultraviolet Rays Pollution Tree Sap Bird Droppings Car Wash Chemicals Road Salt Acid Rain Benefits Vehicle Exterior Enrichment Removal of medium scratches orange peel oxidation dust nibs etc swirl marks from painted surface Restoration of original gloss levels UV protection after gloss is restored Cleaning dressing of tyres Bumpers all exterior plastic moldings trim...

Страница 158: ...ll windows inside and outside Dressing of all internal plastics eg door pad trims and rubber parts The treatment involves cleaning and dressing ofAll parts of the exposed interiors Specialised protection for seat fabric from liquid spills TATA MOTORS has tied up with M s Wurth and M s M s Autokrom for this world class treatment at affordable prices This treatment is available in all authorized wor...

Страница 159: ...r deposits In maintaining correct balance of fuel and air in system Resulting in Comprehensive clean up of combustion chamber induction system fuel injector deposits Better fuel economy Increased engine performance and response Smooth Starts idles and quieter run Better combustion increased power Faster starting warm up Reduced emissions Reduced injector pump wear thereby resulting in savings in m...

Страница 160: ... wear Increased engine life especially under severe service conditions Reduced emissions and oil consumption Improved power performance of older engines Prevention of sludge gum and varnish formation on engine parts both petrol diesel engines Please note These are symptomatic treatments to be availed beyond 20000 kms and only when you have problems in your car as mentioned in first paragraph and a...

Страница 161: ...ny part thereof is repaired or altered otherwise than in accordance with our standard repair procedure or by any person other than from our sales or service establishments our authorized dealers service centres or service points in any way so as in our judgment which shall be final and binding to affect its reliability nor shall it apply if in our opinion which shall be final and binding the car i...

Страница 162: ...part and we neither assume nor authorize any person to assume on our behalf any other liability arising from the sale of the car or any agreement in relation thereto 12 The buyer shall have no other rights except those set out above and have in particular no right to repudiate the sale or any agreement or to claim any reduction in the purchase price of the car or to demand any damages or compensat...

Страница 163: ...high power consumption during slow city traffic condition Monitor the vehicle s fuel consumption regularly and if showing rising trend get the car immediately attended at the Company s Authorised Service Outlets Switch off the engine during long stops at traffic jams or signals If you need to keep the engine running avoid unnecessary revving it up or stopping and starting It is not necessary to re...

Страница 164: ...le carrying out servicing or repairs of your vehicle you should pay keen attention to some of the important engine aggregates and wiring harness which greatly affect emission These components are 1 Fuel injection equipments pump Injectors 2 Air Intake Exhaust system especially for leakages 3 Cylinder head for valve leakage 4 All filters such as air oil and fuel filters check periodically 5 Turboch...

Страница 165: ...ety 164 F FasciaSwitches 55 FATC FullyAutomatic Temp Control 67 FirstAidKit 96 FlatTyre Replacement 98 Fuel Lid 33 Fuel Saving Tips 76 FuelSpecification 140 Fuses 105 G Gear Lever Shifting Pattern 84 Glove Box 59 Good Driving Practices 77 H HazardWarningSwitch 95 I IdentificationPlates 147 ImportantSafetyNotes 9 InfotainmentSystem 57 InstrumentCluster 35 Instruments Gauges 37 Interior Fabric Clean...

Страница 166: ... Engine 128 SteeringLockcumIgnitionSwitch 83 SteeringWheeelSwitches 57 SteeringWheelAngleAdjustment 82 Sun Visors 81 SupplementalRestraintSystem Air Bags 20 T TechnicalSpecifications 143 Tell tales Indicators 46 ToolKit 97 Towing The Vehicle 103 Transaxle Oil Level 127 Trunk lid 33 Tyres 129 U Utility Tray Pockets 59 V ValueAdded Services 153 VehicleDimensions 146 Vehicle Parking For Long Duration...

Отзывы: