background image

TASCAM  DR-60DMKII


9

2 – Names and functions of parts

y


.

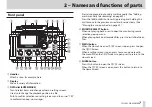
 button 

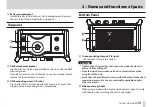
During playback or when stopped in the middle of a file, press to 

return to the beginning of the file.
When stopped at the beginning of a file, press to skip to the 

beginning of the previous file.
Press and hold to search backward.
Press this button while pressing and holding the DATA dial to 

return to the previous mark.
On the setting screens, use this button to move the cursor left. 

On the 

BROWSE

 Screen, press this button to move up a level.

u

 Stop(

8

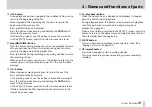
) [HOME] button 

Press this button during playback to cause the playback to pause 

at the current position. Press this button during pause time to 

return to the beginning of the playback file.
Press this button during recording or recording standby to cause 

the recording to stop.
When any other screen is open, press this button to return to the 

Home Screen. Use this button to answer “NO” to a confirmation 

message.

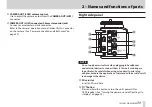
i


/

 button 

When stopped or playing back, press to skip to the next file.
Press and hold to search forward.
On the setting screens, use this button to move the cursor right.
Press this button while pressing and holding the DATA dial to 

move to the next mark.
On the 

BROWSE

 Screen, press this button to move down a level. 

If a file is selected, the file is loaded and the unit returns to the 

Home Screen and stops.

o


7

 (playback) button 

When the Home Screen is displayed and playback is stopped, 

press this button to start playback.
During playback, press this button to start jump-back playback. 
(See “Moving back a few seconds for replay (jump-back 

playback)” on page 62.)
When a file or folder is selected in the 

BROWSE 

screen, press this 

button to return to the Home Screen and play the file or the first 

file in the folder from the beginning.

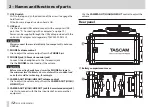
p

  SLATE button 

Press and hold during playback to record a slate stone. (See 

“Adding slate tones” on page 52.) 

a


0

 (record) button 

Press when stopped to start recording standby
Press when recording to pause recording (resume recording 

standby).

Содержание DR-60DmkII

Страница 1: ...REFERENCE MANUAL D01231320A DR 60D Linear PCM Recorder...

Страница 2: ...s 27 Inserting the SD card 27 Removing the card 27 SD card write protection switches 28 Preparing an SD card for use 29 Camera connection and attachment 29 Connecting monitors and headphones 30 Monito...

Страница 3: ...Working with Files and Folders BROWSE screen 54 Screen navigation 54 Icons on the BROWSE screen 55 File operations 55 Folder operations 56 Creating a new folder 57 6 Playback 58 Adjusting playback vol...

Страница 4: ...AA batteries 76 Setting the phantom power voltage 76 Restoring the factory settings 77 Using QUICK FORMAT 77 Using FULL FORMAT 77 Setting the format of file names 78 File name format 78 Setting the W...

Страница 5: ...n provide phantom power 24V 48V TRS mic line inputs 1 L and 2 R support 24dBU input when set to LINE Stereo mini jack input supports mics that require plug in power allowing the input of video mics an...

Страница 6: ...emoval with a coin top Dedicated remote control jack for use with RC 10 and RC 3F sold separately HOLD switch to prevent accidental operation Handles on the front left and right sides protect the scre...

Страница 7: ...Press the or button while pressing and holding this dial to move to the previous or next mark respectively See Moving to a mark position on page 49 4 MONITOR SELECT button When not playing back press...

Страница 8: ...he unit The 1 L PEAK indicator lights when the 1 L input level is about to cause distortion This also lights if distortion occurs in the analog circuitry during mic input but this does not light if di...

Страница 9: ...NO to a confirmation message i button When stopped or playing back press to skip to the next file Press and hold to search forward On the setting screens use this button to move the cursor right Pres...

Страница 10: ...ine level device to a 1 L connector or 2 R connector If you connect a line level device while phantom power is being supplied that device and this unit could be damaged When using a condenser micropho...

Страница 11: ...See Camera connection and attachment on page 29 Right side panel NOTE Do not apply excessive force when plugging in headphones and external devices to connect them to this unit or during use In partic...

Страница 12: ...olume control Use to adjust the volume output from the PHONES jack v PHONES jack 3 5mm stereo mini jack Connect stereo headphones to this stereo mini jack Use the PHONES control to adjust the volume C...

Страница 13: ...s unit to the bottom of a camera or a rack that supports camera mounting screws for example Bottom Panel Tripod mounting threads 1 4 inch Use to attach this unit to a tripod CAUTION Tighten the unit s...

Страница 14: ...2 S Right channel of dual recording mode sub file CH3 Channel 3 sound input 3 M Left channel of dual recording mode main file 3 S Left channel of dual recording mode sub file CH4 Channel 4 sound inpu...

Страница 15: ...d Skipping backward 8 Level meter These show the levels of the input playback signals 9 Track status display This icon changes according to the recording mode Indicators examples Meaning Playing a fil...

Страница 16: ...zer on t Peak value in decibels dB The maximum level that occurs in a fixed period of time is displayed digitally Recording Screen 1 Monitoring mode This shows what audio is being monitored now Indica...

Страница 17: ...ng time of the file appears as hours minutes seconds 6 Number of recording channels This shows the number of recording channels in the file ST or MONO 7 Auto tone function status This icon shows wheth...

Страница 18: ...n icon appears if the limiter function setting for channel 1 2 or 3 4 is set to MONOor LINK See Using the limiter on page 38 Limiter off Limiter on t SLATE button setting This shows the SLATE button s...

Страница 19: ...wired remote control both sold separately page 79 page 80 SYSTEM Various system settings page 76 CAUTION When in recording standby or recording only the INPUT SETTINGand AUTO RECscreens are shown Whe...

Страница 20: ...ress this to return to the Home Screen Use this to answer NO to a confirmation message DATA dial Turn the DATA dial to select items and change values on setting screens You can also turn the DATA dial...

Страница 21: ...gn and playback EQ functions In recording standby Mic input gain setting function When recording Mic input gain setting function When the BROWSEscreen is open File folder operations When the MIXERscre...

Страница 22: ...the amount of power remaining and allow the unit to accurately determine whether power is available for proper operation See Setting the type of AA batteries on page 76 CAUTION Manganese dry cell bat...

Страница 23: ...ne if the unit is too close to the AC adaptor In such a case keep sufficient distance between the AC adaptor and the unit Using an external battery pack sold separately Connect a TASCAM BP 6AA externa...

Страница 24: ...o select BUS POWERand press the DATA dial to select power supply from the USB port The Home Screen will appear NOTE Power is supplied from the USB port if the USB cable is connected to the unit that c...

Страница 25: ...displayed on the display The Home Screen appears when the unit starts up Start Up Screen Home Screen CAUTION When the unit is started up for the first time or when the built in clock is reset after b...

Страница 26: ...iously starts to be played from the position time where the unit left off when shut down NOTE The required data are stored in the SD card The resume function does not work if the card is exchanged or...

Страница 27: ...e format of file names on page 78 CAUTION The date and time setting can only be maintained for a few minutes if the battery power becomes low and the unit is not powered by a TASCAM PS P515U AC adapto...

Страница 28: ...cards that meet SD or SDHC standards can be used with this unit A list of SD cards that have been confirmed to work with this unit can be found on the TEAC Global Site http teac global com SD card wri...

Страница 29: ...y available 3 5mm stereo mini plug cables 1 If you want to record audio from this unit with a camera connect the CAMERA OUT LOW jack on the left side of this unit with the external mic input on the ca...

Страница 30: ...gnals when the unit is stopped using headphones for example Moreover by connecting this unit s CAMERA IN jack with the camera line output you can check the sound being recorded by the camera Enabling...

Страница 31: ...CH1 Sub Monitor the dual recording mode sub file left channel CH2 Monitor the channel 2 input sound CH2 Main Monitor the dual recording mode main file right channel Option Meaning CH2 Sub Monitor the...

Страница 32: ...tton to open the MENUscreen 2 Turn the DATA dial to select REC SETTING and press the DATA dial or button to open the REC SETTINGscreen 3 Turn the DATA dial to select FORMAT and press the DATA dial or...

Страница 33: ...file Depending on the file format the amount of recording time will differ for the same file size The amount of recording time is shown on the right of the setting value in parentheses 8 When finishe...

Страница 34: ...adphone jack or other level controllable output for connection to the unit Setting the input types Set the 1 L and 2 R input switches on the front of the unit according to the types of equipment conne...

Страница 35: ...to 48V than when set to 24V CAUTION Confirm that phantom power is OFF before connecting a line level device to a 1 L connector or 2 R connector If you connect a line level device while phantom power...

Страница 36: ...ng in its unwanted recording or feedback noise Adjusting the input level Muting Before starting recording the input level should be adjusted to prevent the recorded sounds or signals from being distor...

Страница 37: ...screen appears NOTE MUTEwill appear on the Home Screen above the level meters of channels that are muted 7 Use the 1 L 2 R and 3 4 knobs on the front of the unit to adjust the input levels If the inpu...

Страница 38: ...reen CAUTION Distortion might occur if the input sound is too loud even when the limiter is on In such a case lower the input level or increase the distance between the unit and the sound source Durin...

Страница 39: ...monitor the sound output from the speakers may also be recorded causing a poor recording and even feedback NOTE The low cut function can be set and changed even during recording standby and when reco...

Страница 40: ...lect the input source REC MODE SOURCE options Explanation MONO CH1 Channel 1 mono recording CH2 Channel 2 mono recording CH3 Channel 3 mono recording CH4 Channel 4 mono recording STEREO CH1 2 Channel...

Страница 41: ...apsed recording time and the remaining recording time 3 Press the stop 8 HOME button to end recording and create the audio file To pause recording press the record 0 button Press the record 0 button o...

Страница 42: ...lect REC MODE and press the DATA dial or button to open the REC MODEscreen 3 Turn the DATA dial to select REC MODE and press the DATA dial or button 4 Turn the DATA dial to set it to DUAL MONOor DUAL...

Страница 43: ...s the MENU button to return to the MENU screen Press the DATA dial or button to select the other item 15 Turn the DATA dial to select INPUT SETTING and press the DATA dial or button to open the INPUT...

Страница 44: ...e Recording 4 channels You can connect external mics or other equipment to record four independent channels as two stereo recording files channels 1 2 and 3 4 Making 4 channel recording settings 1 Pre...

Страница 45: ...press the DATA dial or button 13 Turn the DATA dial to set the value according to the distance between mics Range 0ms default value to 150ms in 1ms increments NOTE If the mics channels 1 2 and channe...

Страница 46: ...pen the MENUscreen 2 Turn the DATA dial to select AUTO REC and press the DATA dial or button to open the AUTO RECscreen 3 Turn the DATA dial to select MODEand press the DATA dial or button 4 Turn the...

Страница 47: ...ut signal level falls below the END LEVELfor more than the END DELAYtime TRK INC The unit pauses recording resumes recording standby when the input signal level falls below the END LEVELfor more than...

Страница 48: ...ting file the number will be incremented until the new file has a unique name Automatic track increment by file size Without pausing recording a new file can be created automatically during recording...

Страница 49: ...d when playing back the file using software or equipment that supports the BWF format Adding marks automatically to a recording This function allows the unit to add marks automatically using AUTO REC...

Страница 50: ...beginnings of sounds NOTE If recording is started less than two seconds after entering record standby the sound since entering recording standby will be recorded If you turn the pre recording function...

Страница 51: ...sible when using the AUTO REC function Using the auto tone function The auto tone function can be used to automatically add a tone at the beginning and ending of recording By connecting the CAMERA OUT...

Страница 52: ...ial to select highlight the TONE VOLitem for the channel you want to mute and press the DATA dial or button 4 Turn the DATA dial to set the tone volume Options 12dB 18dB default 24dB 30dB 36dB 5 When...

Страница 53: ...WAV BWF 16bit STEREO 44 1kHz 1 41 3 22 6 44 13 28 48kHz 1 33 3 06 6 12 12 24 96kHz 0 46 1 33 3 06 6 12 WAV BWF 24bit STEREO 44 1kHz 1 07 2 15 4 30 9 00 48kHz 1 02 2 04 4 08 8 16 96kHz 0 31 1 02 2 04...

Страница 54: ...r is selected press the button to show the contents of that folder p When a file or folder is selected press the button to exit the currently open folder and go to a higher level in the folder structu...

Страница 55: ...lders Plain folder This icon shows folders that do not contain subfolders Open folder The contents of the folder marked with this icon currently appear on this screen New folder Create a new folder Fi...

Страница 56: ...operations Select the desired folder on the BROWSEscreen and press the QUICK button to open the quick menu pop up window shown below Turn the DATA dial to select the item you want from the following l...

Страница 57: ...ghlight NEW FOLDER and press the DATA dial or button A pop up appears to confirm that you want to create a new folder Press the DATA dial to create a new folder or press the stop 8 HOME button to canc...

Страница 58: ...file on the SD card that you want Adjusting playback volume Use the PHONES and CAMERA OUT HIGH LINE OUT volume controls to adjust the levels output from the PHONES and CAMERA OUT HIGH LINE OUT jacks...

Страница 59: ...open the BROWSEscreen A file list of the folder that contains the file selected in the Home Screen is displayed 3 Use the or button to select a folder level and turn the DATA dial to select a folder F...

Страница 60: ...will be saved in this folder In addition the folder that contains this file becomes the playback area regardless of the playback area folder set previ ously Selecting files for playback skip When the...

Страница 61: ...t forward and search the playback file NOTE Press and hold the or button to accelerate the search speed Changing the playback position When the Home Screen is open and playback is stopped or paused tu...

Страница 62: ...2 Turn the DATA dial to select PLAY SETTING and press the DATA dial or button to open the PLAY SETTINGscreen 3 Turn the DATA dial to select JUMPBACK and press the DATA dial or button 4 Turn the DATA d...

Страница 63: ...k menu pop up window includes mic input gain settings Quick menu during playback on the Home Screen p On the BROWSEscreen the quick menu pop up window includes operations for the selected file of fold...

Страница 64: ...elected file DIVIDE on page 65 LEVEL ALIGN The perceived overall sound pressure can be increased to enhance listenability See Increasing the perceived overall sound pressure to enhance listenability L...

Страница 65: ...ile and return to the Home Screen Push the stop 8 HOME button to cancel deletion and return to the Home Screen NOTE If the currently selected file was recorded using dual recording or four channel rec...

Страница 66: ...al file name are created 4 channel recording file example File names before dividing TASCAM_0003S12 wav TASCAM_0003S34 wav File names after dividing TASCAM_0003aS12 wav part before division point TASC...

Страница 67: ...to open the quick menu pop up 2 Turn the DATA dial to select LEVEL ALIGN When stopped During playback 3 Press the DATA dial to open a pop up menu where you can turn the level align function on or off...

Страница 68: ...eturn to the home screen default value OFF When on the icon appears on the Home Screen during playback When off the icon appears on the Home Screen during playback Setting mic input gain with the quic...

Страница 69: ...the setting name and value in a pop up window at the top right 4 Turn the DATA dial to change the setting value Item Setting range Operation details PAN L12 C R12 Adjusts left right balance L12 left C...

Страница 70: ...input sound as you record or you can record as is and decode during playback The following explanation uses channels 1 and 2 If the mid side mics are connected to channels 3 and 4 however use the same...

Страница 71: ...art playback to decode during playback MS decoder settings When the MS MODEon the MIXERscreen is set to RECor MON the PANitem changes to WIDE which allows you to adjust the stereo width of the sound T...

Страница 72: ...the other functions of the recorder are disabled The unit should be connected directly with the computer instead of via a USB hub When the unit is connected through USB after being turned on or when t...

Страница 73: ...puter You can create subfolders in the MUSIC folder up to the second level for use with this unit The DR 60DMKII cannot recognize subfolders and audio files on the third level or below Since you can s...

Страница 74: ...dial to change the open page The pages show the following information FILE 1 3 Shows information about the currently loaded file CARD 2 3 Shows the use status of the currently inserted SD card SYSTEM...

Страница 75: ...he total SD card capacity REMAIN SIZE USED SIZE Shows the amount of unused used capacity on the SD card Press the or button to switch between REMAINSIZE and USEDSIZE System information page The SYSTEM...

Страница 76: ...ly Options OFF automatic power saving is disabled 3min 5min 10min 30min default value Setting the backlight Use BACKLIGHTto set the time until the backlight automatically turns OFF after the last oper...

Страница 77: ...A dial to execute the quick formatting or press the Stop 8 HOME button to cancel formatting Using FULL FORMAT Use the FULLFORMATitem to completely format the SD card Full formatting checks the memory...

Страница 78: ...e TYPEitem can be set to either WORD default setting or DATE WORD When set to WORD a 6 character file name is used as the beginning of each file name Example TASCAM_0001S12 wav DATE The date is used a...

Страница 79: ...ATA dial or button to open the REMOTEscreen 4 Turn the DATA dial to select CONTROLLER and press the DATA dial or button 5 Turn the DATA dial to select RC 3F default value RC 3F 6 Use the button or DAT...

Страница 80: ...press the DATA dial or button to open the OTHERSscreen 3 Turn the DATA dial to select REMOTE and press the DATA dial or button to open the REMOTEscreen 4 Turn the DATA dial to select CONTROLLER and pr...

Страница 81: ...ery Empty The battery is almost out of power Replace the AA batteries MBR Error Init CARD The SD card is not formatted properly or the formatting is broken Change the SD card or press the DATA dial wh...

Страница 82: ...e too close to the beginning or end of a file Max File Size The file is larger than the designated size File Full The total number of folders and files exceeds 5000 Erase unnecessary files or move the...

Страница 83: ...sold separately and or disconnect the USB cable for bus power supply If the error message continues to appear frequently please contact a TASCAM Customer Support see the back cover for details File E...

Страница 84: ...76 This product is compliant with the European ErP standby power regulations For this reason the automatic power saving function will operate whether it is running on batteries or using the AC adaptor...

Страница 85: ...high 8 8 The playback sounds unnatural Check the playback equalizer setting Is the level align function active 8 8 I cannot erase a file Confirm that you are not trying to erase a file that has been...

Страница 86: ...V 10mA CH or 24V 4V 10mA CH Maximum input level 0dBu Minimum input level 72dBu Mic input gain input level knob at maximum LOW 11 dB MID 36 dB HIGH 52 dB HI PLUS 64 dB Input switch set to LINE Input im...

Страница 87: ...Control input and output USB jack Connector USB Mini B Type Format USB 2 0 HIGH SPEED mass storage class REMOTE jack Connector 2 5mm TRS Jack Audio performance Frequency response 20 20kHz 0 5 2dB LIN...

Страница 88: ...lkaline batteries EVOLTA Format Continuous operating time hours minutes Note Recording 2 channel 44 1kHz 16 bit WAV files About 2 30 MIC PHANTOM 48V input selected Recording 2 channel 44 1kHz 16 bit W...

Страница 89: ...12 00 MIC input selected phantom power not used When using NiMH batteries eneloop pro and BP 6AA eneloop pro Format Continuous operating time hours minutes Note Recording 2 channel 44 1kHz 16 bit WAV...

Страница 90: ...onia Del Carmen Delegaci n Coyoac n CP 04100 M xico DF M xico TEAC UK LIMITED Phone 44 8451 302511 http tascam eu Meridien House Ground Floor 69 71 Clarendon Road Watford Hertfordshire WD17 1DS UK TEA...

Отзывы: