3 – Automation Overview
14
TASCAM DM-24 Automation
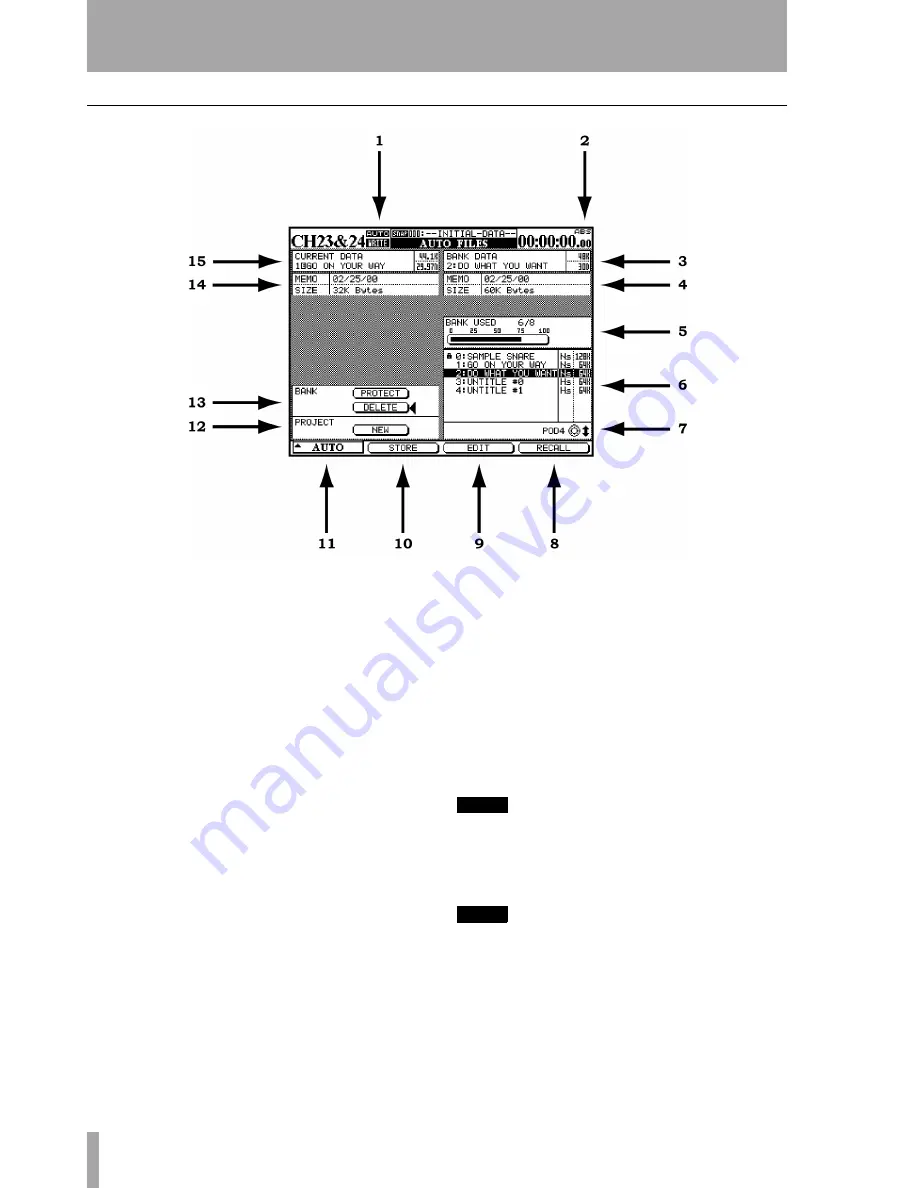
AUTO FILES
1
The word
AUTO
appears here in all mixer LCD
displays when the automation system is enabled.
The word
WRITE
appears here solid when the
mixer is ready to record either Static or Dynamic
mix data. The word
WRITE
flashes when the auto-
mation system is actually writing mix data on the
selected channel. This could be a Write or Trim
operation.
2
This indicates the source of the time code being
used by the mixer and the automation system.
TC
indicates Linear Time Code and
MTC
indicates
MIDI Time Code.
3
Shows the currently selected mix memory bank.
The mix shown here will be the mix used for
Store, Edit and Recall operations chosen at the
bottom of the display.
4
Shows the Memo along with the size of the mix
file for the mix shown in #3 above.
5
Shows the amount of bank memory used by the
selected mix in its memory bank.
6
Shows a list of available mixes in their memory
banks.
7
Use the fourth POD control (the rightmost one)
under the display to highlight a stored mix.
8
The soft key under this display button is used to
recall the highlighted mix into the current mix
memory.
9
The soft key under this display button is used to
start the editing of the name of a stored mix.
10
The soft key under this display button is used to
store the current mix into a storage bank.
11
The soft key under this display button displays the
list of the three automation display screens. Use
the leftmost POD to highlight a display and the
leftmost soft key or the
ENTER
key to activate
the highlighted display.
12
Move the cursor to this LCD button to create a
new project.
NOTE
Creating a new project will erase the contents of the
current mix memory.
13
DELETE
permanently erases the contents of the
highlighted mix bank.
NOTE
There is no undo for this operation.
PROTECT
locks the contents of the highlighted mix
bank so it cannot be accidentally deleted.
14
Any mix memo information along with the size of
the current mix is displayed here.
15
The title of the current mix is displayed here.
See the main manual section on “Libraries” for
details of naming library entries, etc.


