background image

36 

TASCAM DP-24

4 – Preparation

4.  Use the CURSOR (

g

/

t

) buttons to move the cursor 

(blue highlight) to the desire item, and then use 

the JOG/DATA dial to change the value.

5.  After making the settings, press the F2 (

YES

button to return to the Home screen.

NOTE

The time indication stops while time being set.

• 

You can automatically add the date you have set to 

• 

file names by specifying 

Song Name Type

 on the 

PREFERENCE

 menu.

Preparing an SD card for use

In order to use an SD card in this unit, you must format it first.

CAUTION

The included SD card is already formatted, so formatting 

it is not necessary. Formatting the supplied SD card erases 

the demo song previously stored.
1.  Confirm that the SD card is loaded and turn the 

power on.

2.  A pop-up message "Invalid Card" appears when a 

new SD card or an SD card formatted for  use with 

another device is installed in the unit.

3.  You can also reformat a card in this unit at any time. 

(See "Quick formatting an SD card" on page 78 and 

"Full formatting an SD card" on page 79.) 
To clear the pop-up message, press the F1 button.

Recorder modes

This unit has four recorder modes.
Multi Track
Use this mode to operate the unit as a multitrack recorder.
Bounce
Use this mode to perform track bouncing. (See "Bouncing 

tracks" on page 53.) 
Mixdown
Use this mode to mix down tracks to create a master file. 

(See "Mixing down tracks" on page 68 and "Creating a 

master file" on page 69.) 
Mastering
Use this mode to play back the master files that you have 

created and apply effects and tailor them to suit your 

preferences (mastering). (See "Checking the master file" 

on page 70 and "Finishing up a master file (mastering) " 

on page 71.)

When the unit starts up, it defaults to 

Multi Track


mode of the Recorder mode, regardless of the mode used 

last before shutting down.

When Recorder mode is any mode other than 

Multi 

Track

 mode, many of the usual operations using the 

screen are unavailable.
In this manual, the 

Multi Track

 mode is the Recorder 

mode explained unless otherwise noted.

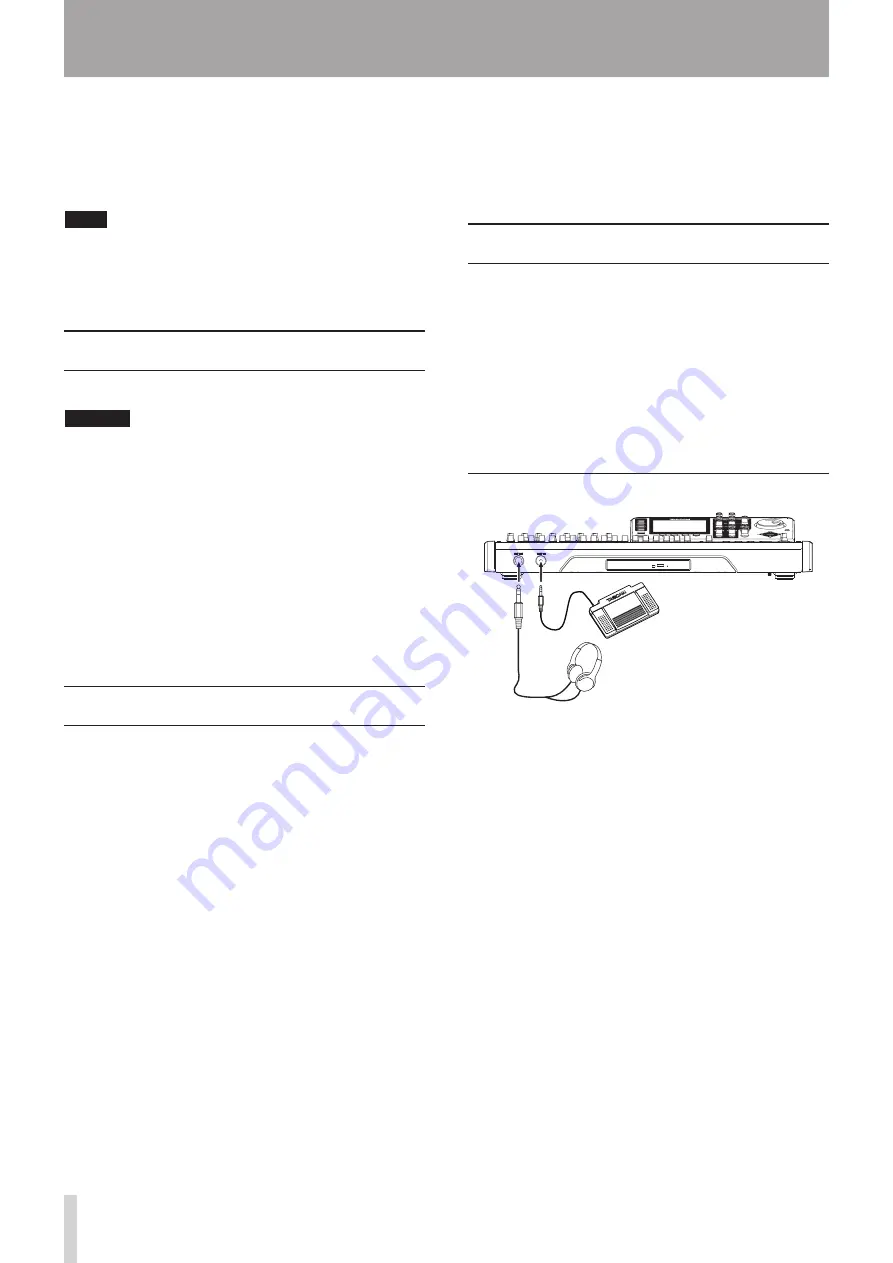
Connecting other equipment

This section shows examples of how to connect other 

devices to this unit.
Precautions before making connections

Turn off (standby) this unit and all devices that you will 

• 

connect beforehand.
Supply power to all the devices from the same line. 

• 

When using a power strip, for example, use one with a 

cable that has a high electric current capacity in order 

to minimize power voltage variations.

Front panel


Foot switch TASCAM RC-3F 

(Optional)

Headphones

Содержание Digital Portastudio DP-24

Страница 1: ...D01159020D DP 24 Digital Portastudio OWNER S MANUAL...

Страница 2: ...equipment into an outlet on a circuit different from that to which the receiver is connected d Consult the dealer or an experienced radio TV technician for help CAUTION Changes or modifications to thi...

Страница 3: ...g is required when the apparatus has been damaged in any way such as power supply cord or plug is damaged liquid has been spilled or objects have fallen into the apparatus the apparatus has been expos...

Страница 4: ...fined in the protective housings The label required in this regulation is shown at 1 For USA 1 Cautions DO NOT REMOVE THE PROTECTIVE HOUSING USING A SCREWDRIVER USE OF CONTROLS OR ADJUSTMENTS OR PERFO...

Страница 5: ...32 4 Preparation 34 Inserting and removing SD cards 34 Inserting an SD card 34 Removing the card 34 About write protected SD cards 34 Powering the unit 34 Start up Shutdown 35 Starting up the unit 35...

Страница 6: ...points 58 Rehearsing punch in out 58 Performing auto punch in out 59 Checking a take 59 Virtual tracks 59 8 Track Editing 60 Overview of track editing 60 Editing points 60 Basic editing procedures 60...

Страница 7: ...Loading a CD 85 Ejecting a CD 86 Forcing disc ejection 86 Playing back an Audio CD 86 Creating an Audio CD 87 Using Disc At Once 87 Using Track At Once 88 Using LIVE WRITER 89 Finalizing a CD 90 Impor...

Страница 8: ...function Track bounce function Track editing functions include COPY INSERT COPY PASTE MOVE INSERT MOVE PASTE OPEN CUT SILENCE CLONE TRACK and CLEAN OUT Undo and redo functions including history level...

Страница 9: ...ermission from the copyright holder or the rightful licensor Please use the product appropriately Under no circumstances will TEAC Corporation be responsible for the consequences of any illegal copyin...

Страница 10: ...n CDs This could damage the delicate playing surface and cause CDs to become unplayable Do not apply labels or other materials to discs Do not use discs that have had tape stickers or other materials...

Страница 11: ...TASCAM DP 24 11 1 Introduction...

Страница 12: ...1225L The bottom panel has a hook cord holder that can be used to hold the AC adapter cord in place When using it wrap the cord around this cord holder to prevent it from being disconnected during us...

Страница 13: ...ighlight SONG and then press the F4 t button The SONG LISTscreen appears 4 Use the JOG DATA dial or the CURSOR 5 b buttons to select DEMO SONG and then press the F4 t button to open a sub menu 5 Use t...

Страница 14: ...us section and that you have connected the monitoring equipment started the unit and inserted the SD card Creating a new song 1 When the recorder is stopped press the MENU button to open the MENUscree...

Страница 15: ...ng source is A INPUT A for TRACK 1 B INPUT B for TRACK 2 C INPUT C for TRACK 3 and so on for Dto H INPUT D to H for TRACK 4 to 8 See Assigning inputs on page 44 Since initially the input source of the...

Страница 16: ...s the STOP 8 button to stop recording The recorded file is saved in the folder of the currently loaded song 3 Press the REC button for TRACK 1 so the REC button becomes unlit Playing back the recordin...

Страница 17: ...0 button lights red and the REC indicator for TRACK 2 stops flashing and becomes lit 8 After you finish your performance press the STOP 8 button to stop recording The recorded file is saved in the fo...

Страница 18: ...TRACK 3 so that the REC button becomes unlit Mixing the tracks Once you have finished your recording you are ready to mix down and create a master file 1 Use the faders for TRACK 1 to 3 to adjust thei...

Страница 19: ...the Masteringmode 2 In this mode press the PLAY 7 button to listen to the master file that you have created NOTE Confirm that both the EQand COMPitems are set to OFF If either is set to ON the sound h...

Страница 20: ...be heard Using normalizing Normalizing maximizes the volume of the master file 1 When Recorder mode is Masteringmode press the F4 NORM button to open the NORMALIZE screen 2 Press the F2 YES button to...

Страница 21: ...ncemode press the BOUNCE button to switch to the Multi Trackmode The disc tray will not open when the Home screen or MENUscreen is displayed Open the disc tray when the CDmenu screen or CD PLAYERscree...

Страница 22: ...you want to write to the CD R CD RW and then press the F2 4 button A check mark 4 appears in the check box next to the song NOTE To remove the check mark 4 from a check box press the F2 4 button again...

Страница 23: ...isc Shutting down Turn the unit off when you are done using it 1 Press the HOME button to open the Home screen 2 Press and hold the STANDBY ON button on the rear panel until PORTASTUDIOappears on the...

Страница 24: ...r damaging equipment and harming people s hearing Do not connect or disconnect a microphone when phantom power is turned on Turn phantom power on only when using a condenser microphone that requires p...

Страница 25: ...the STEREO OUT jacks and PHONES jack Use this fader also to adjust the recording level when bouncing or mixing down tracks t REW m TO ZERO button When stopped or during playback press and hold this b...

Страница 26: ...INPUT A to H or tracks including GROUP that are selected k DYNAMICS button indicator Pressing this button opens a screen to adjust the settings for the effects applied to the inputs INPUT A to H l EFF...

Страница 27: ...adjust the output level of the output signals MARK SET button During recording or playback press this button to set a mark manually AUTO PUNCH button indicator Press this button to turn the auto punch...

Страница 28: ...ety of operations including punch in out start and stop recording I Disc tray When the CDmenu screen is displayed press the F3 button to open the disc tray and then load or remove a disc Push the tray...

Страница 29: ...er to prevent the plug from becoming disconnected accidentally L MIDI OUT jack This is a standard 5 pin DIN MIDI output jack This jack is used for MIDI signal output MIDI IN jack This is a standard 5...

Страница 30: ...ndicators If the input signal of any INPUT A to H source is too loud the corresponding indicators light 8 Track level meter Displays input signal levels during recording and playback signal levels dur...

Страница 31: ...e following items Button Function Reference page ASSIGN Assigns track sources to INPUT A to H Page 44 MIXER Displays the Mixer screen to make equalizer settings for tracks and inputs Pages 46 and 68 D...

Страница 32: ...button when using this screen In this manual the function assigned to a function button is described as F2 4 button for example In this way INFO is assigned to the F3 button and t is assigned to the...

Страница 33: ...TASCAM DP 24 33 3 Names and Functions of Parts...

Страница 34: ...n TASCAM website http tascam com About write protected SD cards SD cards have write protect lock switches When the protect switch is in the LOCK position files cannot be recorded or edited on the card...

Страница 35: ...the STANDBY ON button on the rear panel until the following screen appears The power is turned off standby after the unit completes its shutdown process including saving various information from your...

Страница 36: ...mode to operate the unit as a multitrack recorder Bounce Use this mode to perform track bouncing See Bouncing tracks on page 53 Mixdown Use this mode to mix down tracks to create a master file See Mi...

Страница 37: ...LEVEL knob and external monitoring system A loud noise could occur resulting in damages to equipment and people s hearing Recorder functions cannot be used when the unit is connected to a computer via...

Страница 38: ...wn song file The first step is to load the song that you want to manage load an existing song or create a new song In a song the audio data for the recorded multitrack TRACK 1 to 24 and the master fil...

Страница 39: ...ce the song is created the pop up window disappears and the display returns to the SONG LISTscreen 10 Press the HOME button to return to the Home screen 5 Song Management Saving a song This unit autom...

Страница 40: ...e appears asking you to confirm the copy 5 Change the song name as you want and press the F2 YES button NOTE To cancel the song copy operation press the F1 NO button instead of the F2 YES button 6 Whe...

Страница 41: ...one song stored Therefore one song will be automatically created when you insert or format a card 5 Song Management Protecting songs If you protect a song editing recording and erasing of that song is...

Страница 42: ...audio data old audio data cannot be deleted Unused old audio data in any virtual track that has not been assigned to a physical track can also be deleted See Virtual tracks on page 59 Follow the proc...

Страница 43: ...the name 4 Next press the F4 t button to open the corresponding sub menu Use the JOG DATA dial or the CURSOR 5 b buttons to select the item NAME EDITfrom the sub menu and then press the F4 t button No...

Страница 44: ...s 5 After making the settings press the ASSIGN button or the HOME button to return to the Home screen Selecting the input sources This unit is equipped with eight inputs INPUT A to H and each of them...

Страница 45: ...ntom power is on This could cause a loud noise and damage the equipment Turn phantom power on only when using a condenser microphone that requires phantom power Do not supply phantom power to an unbal...

Страница 46: ...level meters depend on the operating conditions as shown below REC button Transport status Level meter display contents Unlit Playback Track playback signal Flashing recording standby Playback Track p...

Страница 47: ...o boost the equalizer we recommend that you lower the gain to prevent digital clipping Built in Send Effects and External Effects This unit has two external effect send systems EFF 1 and EFF 2 and a b...

Страница 48: ...l fader the internal fader matches the physical fader value and thereafter the physical fader controls the level CAUTION A sudden level change may occur Solo Press the SOLO button to select the Solo m...

Страница 49: ...ator stays lit even when you lower the TRIM knob for that input lower the input source signal level 3 Press the REHEARSE button to select the Rehearsal mode In Rehearsal mode Rehearsalappears on the u...

Страница 50: ...lows you to undo an operation or recording that was not successful or satisfactory Many ordinary operations including editing and recording can be canceled undone This unit has two types of undo funct...

Страница 51: ...number for the undo history is 10 In other words a maximum of 10 operations can be undone This operation is called multi undo because it allows you to undo multiple events and return to an earlier st...

Страница 52: ...tch pedal that you have set to PUNCH IN OUTin the foot switch settings In the initial settings the pedal C center is set to PUNCH IN OUT See Setting the foot switch below Setting the foot switch Set t...

Страница 53: ...ounce destination you can select from all tracks and inputs as bounce sources To set an input as a bounce source assign it to a stereo bus and press its SOURCE button Use the track fader and the PAN k...

Страница 54: ...an locate a position by specifying a music point in BAR mode You can perform the direct location of a preset point through the procedure below This direct location cannot be performed by this procedur...

Страница 55: ...rm and listening to the track sounds Viewing the track s waveform 1 Use the transport button or location function to move the playback position near a position where you want to cue 2 Press the JOG PL...

Страница 56: ...ode Using IN OUT points Regardless of whether the unit is stopped playing back or recording when the recorder is at the desired position press and hold the MARK SET button and press the IN or OUT butt...

Страница 57: ...on plays from the time returned by the preview time to the current time and then stops Auto punch in out You can use the punch in out function to perform an automatic record from the punch in to the p...

Страница 58: ...ing Auto Punch In Out mode Checking punch in out points When punch in out points are set you can confirm the setting by pressing the PLAY 7 button The playback starts from the pre roll point to the po...

Страница 59: ...om Auto Punch mode too press the AUTO PUNCH button If you are not satisfied with the result press the RECORD 0 button again and record another take Virtual tracks This unit allows 8 virtual tracks for...

Страница 60: ...diting Press and hold the MARK SET button and press the IN button to set the IN point at the current position OUT point The OUT point is the end point for the part of the track subject to track editin...

Страница 61: ...track This operation overwrites recorded data on the COPY destination track Therefore the length of the COPY destination track is not changed You can make multiple copies in a single operation In othe...

Страница 62: ...ints on the MOVE source track This operation inserts recorded data into the MOVE destination track starting from the TO point Therefore the MOVE destination track becomes longer The following paramete...

Страница 63: ...oises for example CLONE TRACK Track Duplication Use this function to duplicate a single track or a stereo track to a different track This copies the entire track so the IN OUT TO points have no effect...

Страница 64: ...Mixer screen and use the JOG DATA dial to turn the effect on off Editing a dynamic effect You can edit the parameters of the selected dynamic effect The editing parameters differ depending on the effe...

Страница 65: ...played press the F2 LIBRARY button to display the PRESET USER library list Use the JOG DATA dial to select the USER area and then press the F3 SAVE button NOTE The library list contains a PRESET area...

Страница 66: ...o the Send Effect screen without changing the parameter Saving send effects in the library You can save an edited setting as a user setting in the library 1 When the Send Effect screen is displayed pr...

Страница 67: ...TASCAM DP 24 67 9 Using Built In Effects...

Страница 68: ...ill not be cancelled even if you press the GROUP button The GROUP button blinks In this case if the master fader is operated the SELECT buttons of tracks with a group set light during operation If ano...

Страница 69: ...n 4 Use the SEND EFF 1 knob to adjust the level of the signal sent to the send effect of each track TIP When using an external effect connect the output of the external effect return to INPUT A to H B...

Страница 70: ...right column Exiting Mixdown mode Press the MIXDOWN MASTERING button twice to return to Multi Trackmode of the Recorder mode Checking the master file Follow the procedure below to listen to a master f...

Страница 71: ...F2 MULTI button For the multi band compressor the parameter setting display of the COMP MULTIscreen is split into LOW BAND MID BAND and HIGH BAND areas for individual low mid and high frequency adjust...

Страница 72: ...f the screen changes 3 After making the settings press the F1 g button to return to the Masteringscreen 4 The EQitem state of the Masteringscreen is shown as ONor OFF Using mastering compression You c...

Страница 73: ...eaches the maximum limit CAUTION If you use equalization or compression after normalizing the track distortion might occur Use the normalize function after adjusting the sound quality with equalizatio...

Страница 74: ...o be recorded when you use a microphone to record When the metronome is working you can adjust the LEVELitem on the METRONOMEsetting screen but other items cannot be changed You can use the metronome...

Страница 75: ...e MMC mode and MMC device ID are not related to mixer and effect remote control REMOTE CONTROL With MODE set this unit as a master or slave With PROGRAM CHANGE EFF received program change messages con...

Страница 76: ...buttons to select a parameter and then use the JOG DATA dial to change its setting Contrast LCD adjustment Brightness LCD adjustment Backlight LCD adjustment Foot SW Right Foot switch R assignment Foo...

Страница 77: ...press the F2 YES button to confirm 5 Once the initialization is completed the display returns to the PREFERENCEscreen NOTE If you want to cancel the initialization press the F1 NO button 6 After makin...

Страница 78: ...SDHC cards that are at least 512MB in size can be used A list of SD cards that have been confirmed to work with this unit can be found on TASCAM website http tascam com Quick formatting an SD card Us...

Страница 79: ...his operation cannot be undone Confirm that you will not lose important data before full formatting a card 1 When the recorder is stopped press the MENU button to open the MENUscreen 2 Use the JOG DAT...

Страница 80: ...files is carried out through the AudioDepot folder Master file A master file created on this unit can be transferred to a computer as a stereo WAV file from the Song name folder inside the MUSIC fold...

Страница 81: ...ndows 7 operating systems A PC card icon and arrow appear in the taskbar usually at the bottom right of the screen 1 Left click on this icon to open a pop up bar Click on this pop up bar to disconnect...

Страница 82: ...ATA dial or the CURSOR 5 b buttons to select the WAV file that you want to import and then press the F1 IMPORT button Empty tracks that can be imported appear NOTE If you are trying to import a WAV fi...

Страница 83: ...he F4 t button A confirmation message appears 6 Press the F2 YES button to export the selected track to the AudioDepot folder NOTE When a track file with the same name already exists in the AudioDepot...

Страница 84: ...ded or ejected after being mounted Except for CDmenu screen Since CD mounting is canceled in screens other than CDmenu screen load or eject a CD in the CDmenu screen or CD PLAYERscreen Types of CDs th...

Страница 85: ...ing it unusable Do not touch the writable side of a disc the unlabeled side Doing so could cause it to become dirty or scratched making it unusable Loading a CD 1 As shown in the illustration hold the...

Страница 86: ...back an Audio CD 1 Press the CD button to open the CDmenu screen 2 Load an Audio CD 3 Use the JOG DATA dial to select blue highlight PLAY IMPORTand then press the F4 t button The CD PLAYERscreen appe...

Страница 87: ...s to a CD R CD RW that has been finalized LIVE WRITER function You can use marks to divide a master file into multiple parts and write them as multiple tracks to a disc Using Disc At Once Use Disc At...

Страница 88: ...0 0 to 9 9 seconds in 0 1 units NOTE To change the gap between multiple songs repeat the step 12 above 13 You can press the F2 ALL button to set all gaps at once Use the JOG DATA dial to set the gap...

Страница 89: ...4 from a check box press the F2 4 button again while the song is selected blue highlight 5 Press the F4 t button A pop up window asking whether you want to perform the finalize process appears when th...

Страница 90: ...4 Press the F2 YES button to perform the finalize NOTE Note that an unfinalized CD R CD RW cannot be played in an ordinary CD player You cannot add tracks to a disc that has been finalized Importing...

Страница 91: ...t you will not lose important data before erasing a disc NOTE CD R discs cannot be erased Media Compatibility Table Audio CD Playback Audio CD Import Audio CD Writing CDDA standard format Commercially...

Страница 92: ...e disc tray does not open The disc tray will not open unless the CD mode is selected CDscreen or its sub menu is displayed Return Recorder mode to Multi Trackmode press the CD button to open the CDmen...

Страница 93: ...to import from the computer to the AudioDepot folder of the unit Format Error Format CARD The formatting of the card is abnormal or corrupted This message also appears if you formatted the card for F...

Страница 94: ...e OUT point before the IN point Set the OUT point after the IN point Protected Card The inserted SD card is write protected To record or edit turn off the unit and unprotect the SD card Recorded Track...

Страница 95: ...re is no need to erase the inserted CD RW Blank CD Insert Opened CD A blank CD has been inserted Insert a non finalized CD R CD RW An erased CD R CD RW or unwritten CD R CD RW has been set with the FI...

Страница 96: ...CD You loaded a CD that is not an Audio CD Insert an Audio CD This message appears if the loaded CD is not an Audio CD when you try to use the audio import function with the CD DA IMPORTitem of the C...

Страница 97: ...14 dBu Output impedance 200 PHONES jack Connector 6 3 mm stereo jack Maximum output level 70 mW 70 mW or more THD N 0 1 or less 32 load Control input output ratings MIDI input MIDI IN Connector 5 pin...

Страница 98: ...x 104 x 340 mm Width x Height x Depth excluding projections Weight 6 2 kg 13 67 lb Operating temperature range 5 to 35 C 41 to 95 F Dimensional drawings 514mm 104mm 340mm Illustrations in this manual...

Страница 99: ...TASCAM DP 24 99 17 Specifications Block diagram...

Страница 100: ...100 TASCAM DP 24 17 Specifications Level diagram...

Страница 101: ...center R63 11 DigitalTrim 0 48 42 6dB 16 Low Freq 0 31 32 40 50 60 70 80 90 100 125 150 175 200 225 250 300 350 400 450 500 600 700 800 850 900 950 1 0k 1 1k 1 2k 1 3k 1 4k 1 5k 1 6k Hz 17 Low Gain 0...

Страница 102: ...ck channels 1 to 8 Bank 1 track channels 9 to 16 Bank 2 track channels 17 to 24 Bank 3 inputs A to H The following tables show the preset libraries of each effect Dynamic effects Program Change Displa...

Страница 103: ...W EFF1 Posi EFF2 Posi 6 38 96 97 98 99 Program Change True 0 127 System Exclusive 5 System Common Quarter Frame 3 Song Position 4 Song Select Tune System Real Time Clock Commands 4 Others Local On Off...

Страница 104: ...3 22 21 20 c6 0 2D 2C 2B 2A 29 28 27 c7 0 34 33 32 31 30 2F 2E c8 0 3B 3A 39 38 37 36 35 c9 0 0 0 0 3F 3E 3D 3C c10 0 46 SEARCH 45 VARIABLE PLAY 44 LOCATE 43 UPDATE 42 READ 41 MASKED WRITE 40 WRITE c1...

Страница 105: ...TASCAM DP 24 105 Note...

Страница 106: ...106 TASCAM DP 24 Note...

Страница 107: ...TASCAM DP 24 107 Note...

Страница 108: ...lace Street Mississauga Ontario L4Z 1Z8 Canada TEAC MEXICO S A de C V http www teacmexico net Phone 52 55 5010 6000 R o Churubusco 364 Colonia Del Carmen Delegaci n Coyoac n CP 04100 M xico DF M xico...

Отзывы: