52
TASCAM DP-24
7 - Recorder Functions
Punching in and out
Punching in/out is a technique to replace a part of an
already recorded track.
Start playback and when you reach the part that you want
to replace, switch to record (punch in), then switch back
to playback (or stop) when you finish the part that you
want to replace (punch out).
1. Decide what part of the track you plan to replace.
Choose a point to begin where the new recording can
sit well with the existing recording.
2. Press the REC buttons of the tracks that you want
to replace to put them into recording standby (REC
buttons start flashing).
3. Start playback before the part you want to replace.
4. When the part you want to replace is reached,
press the RECORD (
0
) button and start your
performance.
The unit switches to recording (punch in).
5. When you finish the replacement recording, press
the PLAY (
7
) button.
The unit switches to playback (punch out).
TIP
You can also press the STOP (
8
) button to punch out at
the end of the replacement recording.
Using a foot switch to punch in/out
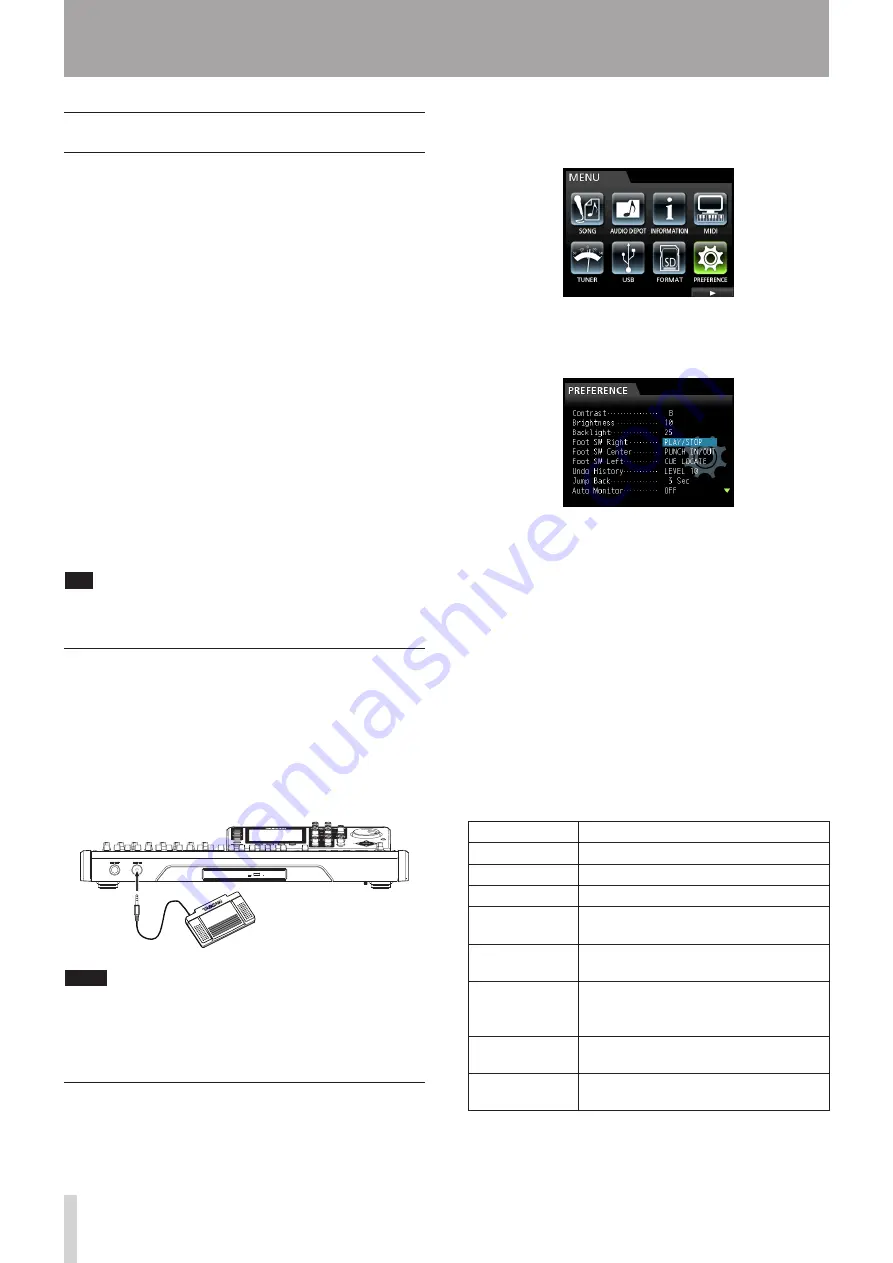
You can connect the dedicated foot switch (TASCAM RC-
3F) to the REMOTE jack on the front panel and use it to
punch in and out.
In step 4 above, step on the foot switch instead of
pressing the RECORD (
0
) button, and in step 5, step on
the foot switch again instead of pressing the PLAY (
7
)
button.
NOTE
Step on the switch (pedal) that you have set to
PUNCH
IN/OUT
in the foot switch settings. In the initial settings,
the pedal C (center) is set to
PUNCH IN/OUT
. (See
"Setting the foot switch" below.)
Setting the foot switch
Set the foot switch on the
PREFERENCE
screen.
1. When the recorder is stopped, press the MENU
button to open the
MENU
screen.
2. Use the JOG/DATA dial or the CURSOR (
5
/
b
/
g
/
t
)
buttons to select (green highlight)
PREFERENCE
,
and then press the F4 (
t
) button.
The
PREFERENCE
screen appears.
3. Use the CURSOR (
5
/
b
) buttons to select (blue
highlight)
Foot SW Right
.
4. Use the JOG/DATA dial to select the function that
you want to assign to the pedal R (right) of the
TASCAM RC-3F foot switch.
Options:
PLAY
,
REC
,
STOP
,
FF
,
REW
,
PUNCH IN/
OUT
,
PLAY/STOP
(Default: Pedal R),
CUE LOCATE
5. In the same way, set the functions for the pedal C
(center) in
Foot SW Center
, and for the pedal L
(left) in
Foot SW Left
.
Options:
PLAY
,
REC
,
STOP
,
FF
,
REW
,
PUNCH IN/
OUT
(Default: Pedal C),
PLAY/STOP
,
CUE LOCATE
(Default: Pedal L)
6. After making the settings, press the HOME button
to return to the Home screen.
Foot switch function list
ª
Function
Description
PLAY
Same as the unit's PLAY (
7
) button
REC
Same as the unit's RECORD (
0
) button
STOP
Same as the unit's STOP (
8
) button
FF
Same as the unit's F FWD (
,
) (TO
LAST REC) button
REW
Same as the unit's REW (
m
) (TO
ZERO) button
PUNCH IN/OUT
Punches in when pressed during
playback, punches out when pressed
during recording.
PLAY/STOP
Starts playback when stopped, stops in
other states.
CUE LOCATE
Locates the last point where playback
started.
Foot switch TASCAM RC-3F
(Optional)
Содержание Digital Portastudio DP-24
Страница 1: ...D01159020D DP 24 Digital Portastudio OWNER S MANUAL...
Страница 11: ...TASCAM DP 24 11 1 Introduction...
Страница 33: ...TASCAM DP 24 33 3 Names and Functions of Parts...
Страница 67: ...TASCAM DP 24 67 9 Using Built In Effects...
Страница 99: ...TASCAM DP 24 99 17 Specifications Block diagram...
Страница 100: ...100 TASCAM DP 24 17 Specifications Level diagram...
Страница 105: ...TASCAM DP 24 105 Note...
Страница 106: ...106 TASCAM DP 24 Note...
Страница 107: ...TASCAM DP 24 107 Note...


