background image

TASCAM CD-9010

 27

5 – Program and cue playback

Editing cue point names

1.  Press the 

MENU

 button to open the 

MENU

 screen. 

2.  Open the 

PROGRAM/CUE

 menu screen

3.  Select 

CUE LIST EDIT

4.  Press the 

DATA

 dial to open the 

CUE

 screen. 

5.  Turn the 

DATA

 dial to select the cue point with the name 

to  be edited, and press the 

DATA

 dial to open the 

CUE


menu. 

6.  Turn the 

DATA

 dial to select 

EDIT CUE TITLE

7.  Press the 

DATA

 dial to open the


EDIT CUE TITLE


screen. 

8.  Edit the


cue point


name. See "Editing text" below for 

instructions 

9.  When you are done editing the name, press the BROWSE 

button to confirm the name change and return to the


CUE


list screen. 

NOTE 

Names containing characters other than the letters of the 

• 

alphabet, numbers and symbols cannot be edited. 
The following symbols and punctuation marks cannot be 

• 

used in names. 


¥ /: ;, * ? " < > | 
Cue point names can be up to six single-byte characters in 

• 

length. 

Editing text

Edit text using the following operations. 
To move the editing (cursor) position

Use the SEARCH 

m

/

,

 buttons. 

To change the character at the cursor position

Turn the DATA dial. 

To confirm the character at the cursor position

Press the DATA dial. 

To insert an empty space

Press the TRACK 

/

 button. 

To delete a character

Press the TRACK 

.

 button. 

To confirm and end editing

Press the BROWSE button. 

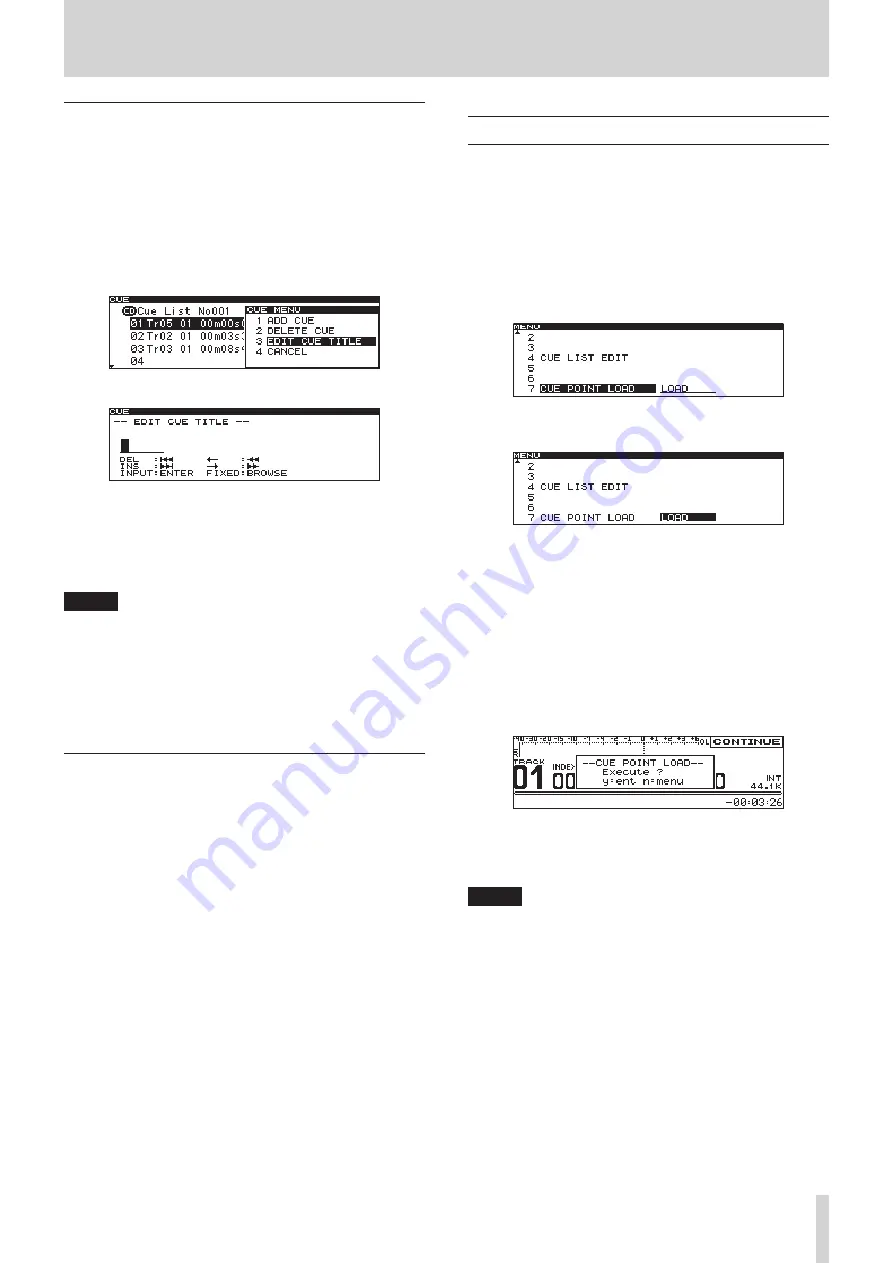
Automatic cue point loading options

Usually when a disc for which cue points have already been 

saved is loaded, the previous cue points are automatically loaded. 

Sometimes, though, you might not want to use the memorized 

cue points. 
You can set whether or not memorized cue points are automati-

cally loaded. 

1.  Press the 

MENU

 button to open the 

MENU

 screen. 

2.  Open the 

PROGRAM/CUE

 menu screen.

3.  Select 

CUE POINT LOAD

4.  Press the 

DATA

 dial to move the cursor to the right and 

select the setting. 

5.  Turn the 

DATA

 dial to change the setting for memorized 

cue point loading. 


• 

LOAD

 (

default

): 

Automatically load previously 

memorized cue points
 

• 

UNLOAD

: Do not load memorized cue points 


• 

SELECT

: Every time the power is turned ON, a pop-up 

menu appears that lets you decide whether or not to 
load cue points. The setting you select stays active until 
the power is turned OFF again. 

Pop-up that appears when set to 

SELECT

6.  Press the 

DATA

 dial again to set the cue list load setting, 

and return to the 

PROGRAM/CUE

 menu screen. 

7.  Press the 

HOME

 button to return to the Home Screen. 

NOTE

When set to UNLOAD (or when set to SELECT and you chose not 

to load cue points), the unit will function as follows.

New cue points that are added will not be saved.

• 

When the active device is changed, all cue points will be 

• 

cleared.
When the setting is changed from UNLOAD to LOAD (and 

• 

vice versa), the change will become effective the next time 

the unit is turned ON again. (The cue list will not be loaded 

immediately when set to LOAD.)
When set to UNLOAD, exporting the cue points will not 

• 

export the recently added ones. (It will export the points 

added when last set to LOAD.)

Содержание CD-9010

Страница 1: ...D01167920A OWNER S MANUAL CD 9010 CD Player...

Страница 2: ...t or table specified by the manufacturer or sold with the appa ratus When a cart is used use caution when moving the cart apparatus combination to avoid injury from tip over 13 Unplug this apparatus d...

Страница 3: ...ossed out indicates that electrical and electronic equipment must be collected and disposed of separately from household waste e Return and collection systems are available to end users For more detai...

Страница 4: ...VE THE PROTECTIVE HOUSING USING A SCREWDRIVER USE OF CONTROLS OR ADJUSTMENTS OR PERFORMANCE OF PROCEDURES OTHER THAN THOSE SPECIFIED HEREIN MAY RESULT IN HAZARDOUS RADIATION EXPOSURE IF THIS PRODUCT D...

Страница 5: ...3 5 Program and cue playback 24 Program playback 24 Program menu operation 24 Adding tracks to a program 24 Clearing a program 25 Removing tracks from a program 25 Moving tracks within a program 25 Cu...

Страница 6: ...ail safe function prevents misoperation during critical playback situations Synchronization with external word clock 44 1 or 48 kHz is possible and the CD playback signal can be output digitally with...

Страница 7: ...agents to clean the unit as they could damage the surface About discs In addition to commercially available music CDs this unit can play CD R discs that have been recorded in audio CD CD DA format as...

Страница 8: ...jack knob Use this standard stereo jack to connect stereo headphones Use the PHONES knob to adjust the headphones output level The knob can be pushed in and locked allowing the unit to be stored and...

Страница 9: ...screen BROWSE screen PROGRAM screen or CUE LIST screen is open press this to return to the Home Screen Press this button when the Home Screen is open to scroll CD TEXT file names and data in the info...

Страница 10: ...g the digital output format on page 29 The digital output signal depends on the master clock setting See Setting the master word clock on page 30 p DIGITAL OUTPUT XLR This outputs a digital CD playbac...

Страница 11: ...Track playback position Shows the current playback position as a bar As playback proceeds the bar extends from the left 7 Repeat playback function indicator This shows the ON OFF status of the repeat...

Страница 12: ...unction during monitoring playback P 21 8 ONLINE PLAY STBY STANDBY button function during online playback P 21 9 REPEAT Repeat playback function P 21 10 EOM EOM function P 22 11 END CHECK END CHECK fu...

Страница 13: ...d operating time P 32 Menu operation basics You can perform the following operations using the MENU screen To select an item vertically on the screen Turn the DATA dial The selected menu item appears...

Страница 14: ...use the TIME DISPLAY button and DATA dial to adjust the display contrast You can also use SYSTEM menu s LCD CONTRAST to adjust it NOTE This operation only adjusts the contrast of this unit It does no...

Страница 15: ...adjust the brightness of the display alone by pressing and turning the DATA dial while pressing and holding the HOME button Setting using the menu 1 Press the MENU button to open the MENU screen 2 Ope...

Страница 16: ...anel buttons RC ONLY default value When a TASCAM RC 9010 RC 9010S remote control sold separately is connected the unit s front panel buttons other than the OPEN CLOSE button are disabled 6 After compl...

Страница 17: ...andby monitoring playback or during jog playback press the PLAY button Status of outputs Output Status DIGITAL OUTPUT On LINE OUTPUTS On MONITOR OUTPUTS Off NOTE Set the SYSTEM menu MON MUTE ONLINE it...

Страница 18: ...track starts and the unit enters playback standby mode the STANDBY button lights 7 Press the PLAY button to start online playback When the track ends the unit re enters playback standby Press the STOP...

Страница 19: ...e point While pressing one of the SEARCH or m buttons to search within a track you can change the search speed by pressing the other SEARCH m button Auto cue function If the auto cue function is ON an...

Страница 20: ...on the CD The incremental playback function setting is retained even when the power is turned OFF ONLINE BACK CUE function If this function is on when the ON LINE button is turned OFF on a connected T...

Страница 21: ...yback NORMAL default value If the playback mode is CONTINUE or SINGLE start playback standby at that point If the playback mode is PROGRAM start playback standby at the beginning of the next track BAC...

Страница 22: ...ime of the current track falls below the specified time an EOM tally signal is output from the REMOTE PARALLEL connector While the EOM tally signal is being output the in the Home Screen track time di...

Страница 23: ...en NOTE Even when the pitch control function is turned OFF the pitch control value set above is stored and will be used when the pitch control function is turned ON again The pitch step setting is ret...

Страница 24: ...dial to select ADD PROGRAM 8 Press the DATA dial to open the BROWSE ADD PROGRAM screen 9 Turn the DATA dial to program to select a track and press the DATA dial to add the track to the program 10 Repe...

Страница 25: ...GRAM screen 5 Turn the DATA dial to select the track you want to remove 6 Press the DATA dial to open the PROGRAM menu 7 Turn the DATA dial to select DELETE PROGRAM 8 Press the DATA dial to remove the...

Страница 26: ...add the cue point The current time of the track being played back or in standby will be added as a cue point to the cue list 8 Repeat steps 5 7 to add cue points as desired The screen shows the track...

Страница 27: ...have already been saved is loaded the previous cue points are automatically loaded Sometimes though you might not want to use the memorized cue points You can set whether or not memorized cue points a...

Страница 28: ...BROWSE screen The icons that appear on the BROWSE screen have the following meanings Folder Folders are shown with this icon Audio file The names of music files appear next to these icons Track title...

Страница 29: ...Screen NOTE This setting only applies to the line outputs This analog reference level setting is retained even when the power is turned OFF Adjusting R L analog reference levels You can adjust the an...

Страница 30: ...right channels of the stereo audio track are each attenuated by 3 dB summed and then output L Mono The left channel of the stereo audio track is output from both L and R outputs R Mono The right chann...

Страница 31: ...FF None None Setting the level meter display type You can change the type of the playback level meters on the Home Screen 1 Press the MENU button to open the MENU screen 2 Open the SYSTEM menu 3 Selec...

Страница 32: ...tput format You can set the signal format used for digital output Follow these steps to make the setting 1 Press the MENU button to open the MENU screen 2 Open the SYSTEM menu 3 Select DIGITAL OUTPUT...

Страница 33: ...FADER START MODE 4 Press the DATA dial to move the cursor right to select the setting 5 Turn the DATA dial to set enable or disable the fader start function Options ENABLE DISABLE default value 6 Afte...

Страница 34: ...the active scale lights 1 Press the MENU button to open the MENU screen 2 Open the REMOTE menu screen 3 Select FADER SCALE 4 Press the DATA dial to move the cursor right to select the setting 5 Turn t...

Страница 35: ...eception operates when at ground 50 ms or longer OUT Signal for tally output display by open collector 50V maximum voltage 100mA maximum current 100mA maximum supplied current Use the P PORT P3 13 ASG...

Страница 36: ...possible due to system limitations 3 caution CAN T SELECT Selection execution was not possible due to system limitations 4 caution TRK PROTECT Editing was not possible because the track is protected...

Страница 37: ...cannot be controlled 8 8 Confirm that the panel lock function is not on Unable to playback a file 8 8 If it is a WAV file confirm that it uses a sampling frequency 44 1 kHz or 48 kHz and a bit rate 1...

Страница 38: ...S PDIFconsumerstandard Output impedance 75 When the DIGITAL OUT TYPE in the SYSTEM menu is set to CONSUMER DIGITAL OUT XLR Connector XLR 3 31 Format AES3 2003 IEC60958 4 AES EBU Output impedance 110 W...

Страница 39: ...ack EOM end check pitch control value external remote jog playback RS 232C digital output analog output online master clock mono mix playback level meter display fail safe monitoring point online moni...

Страница 40: ...9 Wallace Street Mississauga Ontario L4Z 1Z8 Canada TEAC MEXICO S A de C V teacmexico net Phone 52 55 5010 6000 R o Churubusco 364 Colonia Del Carmen Delegaci n Coyoac n CP 04100 M xico DF M xico TEAC...

Отзывы: