


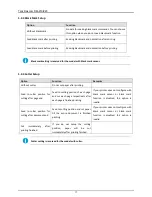
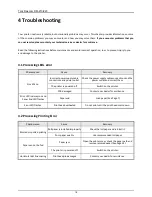

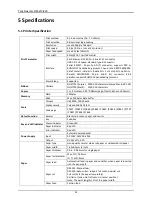
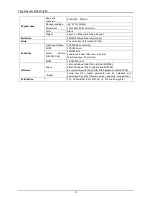


Tally Dascom DM-210/220
15
② Click “OK” to save the setting, the printer prints the corresponding message.
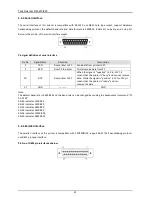
The offset range is -27mm
~
(the distance between two adjacent black marks - 27) mm.
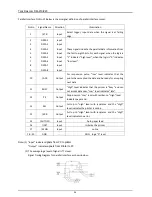
3.1.5 Setting Cutting Position
① Select “TEST” option in the setting window, and then select the cutting mode (full cut or partial cut). The setting
will be valid if the Paper End LED and Error LED flash twice simultaneously.
② Measure the distance between the cutting position and the top of the black mark, then input the value in the
corresponding tab, shown as the below figures.
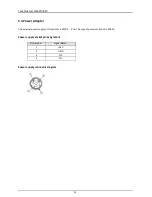
60mm
Cutting position
If the offset is positive, the cutting position is
below the
current black mark
(shown as the left figure).
If offset is negative, the printing home position will be
above the black mark (shown as the left figure).
HHHHHHHHHHH
HHHH
15m
m
Содержание DM-210
Страница 1: ......
Страница 39: ...Tally Dascom DM 210 220 27 6 Character Code Pages 6 1 Common to all pages International Character Set USA ...
Страница 40: ...Tally Dascom DM 210 220 28 6 2 PC437 USA Standard Europe ...
Страница 41: ...Tally Dascom DM 210 220 29 6 3 PC850 Multilingual ...
Страница 42: ...Tally Dascom DM 210 220 30 6 4 PC860 Portuguese ...
Страница 43: ...Tally Dascom DM 210 220 31 6 5 PC863 Canadian French ...
Страница 44: ...Tally Dascom DM 210 220 32 6 6 PC865 Nordic ...
Страница 45: ...Tally Dascom DM 210 220 33 6 7 PC858 Euro ...
Страница 46: ...Tally Dascom DM 210 220 34 6 8 PC866 Cyrillic 2 ...
Страница 47: ...Tally Dascom DM 210 220 35 6 9 PC862 Hebrew ...
Страница 48: ...Tally Dascom DM 210 220 36 6 10 PC737 Geek ...
Страница 49: ...Tally Dascom DM 210 220 37 6 11 PC864 Arabic ...
Страница 50: ...Tally Dascom DM 210 220 38 6 12 PC857 Turkish ...


