Tally Dascom DM-210/220
7
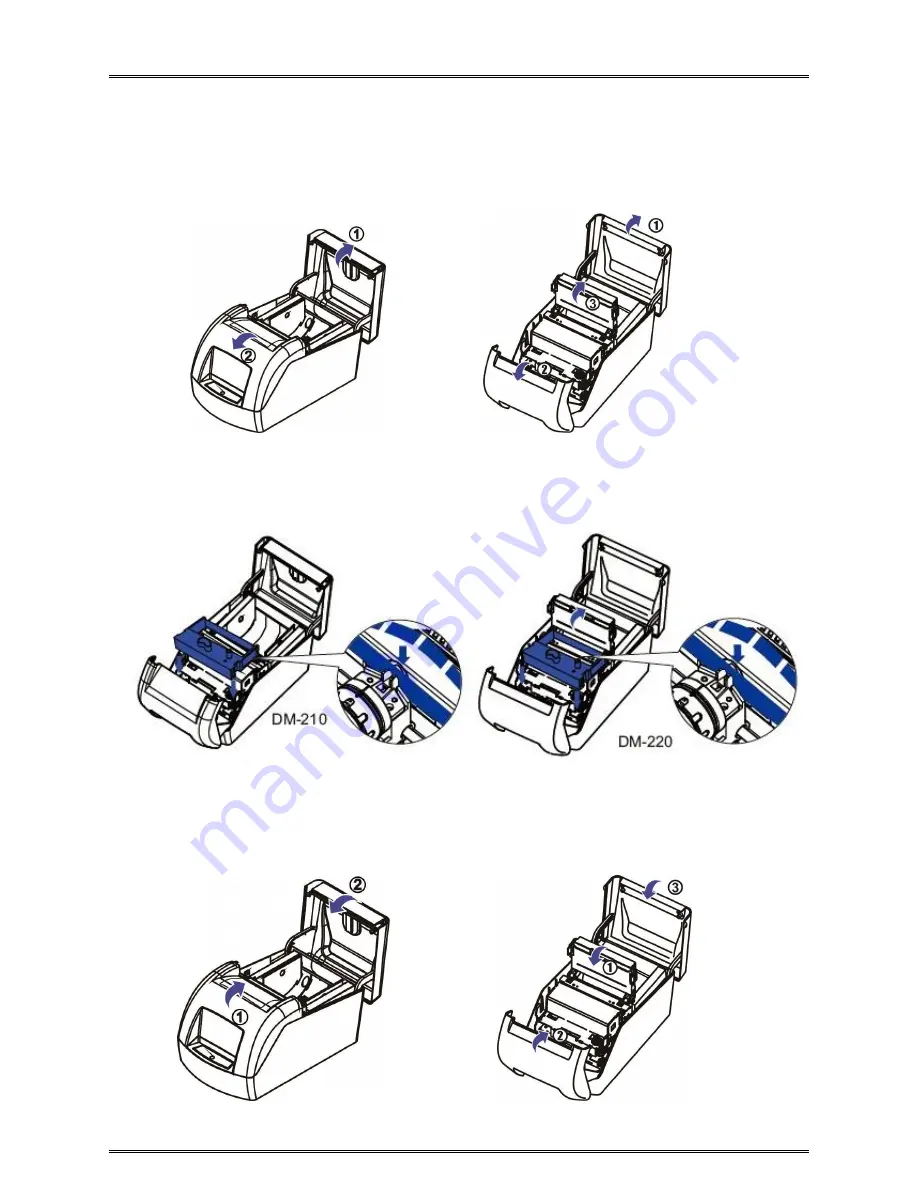
1.6 Installing Ribbon Cartridge
1. DM-210: Open the top cover and then front cover.
DM-220: Open the top cover and then front cover; turn up the cut device.
DM-210
DM-220
2. Stretch the ribbon fabric by turning the ribbon knob - pay attention to the arrow on the ribbon cartridge.
3. Insert the ribbon between the print head and the platen, and press it in until it clicks into place.
4. Turn the knob again to stretch the ribbon fabric.
5. DM-210: Close the front cover and then top cover.
DM-220: Close the cut device; close the front cover and then top cover.
DM-210
DM-220
Содержание DM-210
Страница 1: ......
Страница 39: ...Tally Dascom DM 210 220 27 6 Character Code Pages 6 1 Common to all pages International Character Set USA ...
Страница 40: ...Tally Dascom DM 210 220 28 6 2 PC437 USA Standard Europe ...
Страница 41: ...Tally Dascom DM 210 220 29 6 3 PC850 Multilingual ...
Страница 42: ...Tally Dascom DM 210 220 30 6 4 PC860 Portuguese ...
Страница 43: ...Tally Dascom DM 210 220 31 6 5 PC863 Canadian French ...
Страница 44: ...Tally Dascom DM 210 220 32 6 6 PC865 Nordic ...
Страница 45: ...Tally Dascom DM 210 220 33 6 7 PC858 Euro ...
Страница 46: ...Tally Dascom DM 210 220 34 6 8 PC866 Cyrillic 2 ...
Страница 47: ...Tally Dascom DM 210 220 35 6 9 PC862 Hebrew ...
Страница 48: ...Tally Dascom DM 210 220 36 6 10 PC737 Geek ...
Страница 49: ...Tally Dascom DM 210 220 37 6 11 PC864 Arabic ...
Страница 50: ...Tally Dascom DM 210 220 38 6 12 PC857 Turkish ...


