background image

–10°

+10°

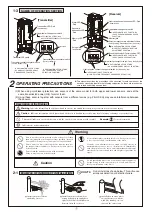
Rough adjustments

+90°

+5°

–90°

–5°

–10°

+10°

Names of the Operation Section

Note: This section describes the name and function of each part used during optical axis adjustment.

Upper transmission/reception authorization LED

Lower transmission/reception authorization LED

Each time the switch is pressed, the optical unit that transmits the light switches.

Transmitter

Receiver

Upper/lower changeover switch

Swing arm
(Red)
Note: For vertical 

angle 
adjustments

Horizontal angle fine adjustment screw
(White)
Note: For horizontal angle adjustments

Vertical angle adjustment screw
(Red)
Note: For vertical angle 

adjustments

Swivel base
(White)
Note 1: For horizontal angle 

adjustments

Note 2: Single notch is 

equivalent to 3°

Near

Far

Note: Sequence of 

adjustment

Near

Far

When the view finder is 
looked closely, view appears 
as the diagram on the right.
Adjust the angle so that the 
target color appears in the 
center of the ring. 

When the view finder is 
looked from a distance, the 
view appears as the diagram 
on the right.
Adjust the angle so that the 
target color appears in the 
center of the ring. 

(The accuracy high)

Double Ring Alignment Mechanism 
Visible from the view finder

6-1

NAMES AND FUNCTIONS OF OPTICAL AXIS ADJUSTMENT PARTS

OPTICAL AXIS ADJUSTMENT

Names of the Optical Unit

View finder

Horizontal

Reflector Section Horizontal/Vertical Angle Adjustment Method

Vertical

Coarse adjustments can be made 
by moving the swivel base 
within the range of 0˚ to ±90˚.

Next, fine adjustments of 0˚ to ±5˚ 
can be made using the horizontal 
angle adjustment screw.

Fine adjustments

Horizontal angle fine 
adjustment screw

Rough adjustments

Fine adjustments

The inclination of the reflector can 
be switched between -10˚ and +10˚ 
by pushing it forwards or 
backwards.

Next, fine adjustments of 0˚ to ±10˚ 
can be made using the vertical 
angle adjustment screw.

6

By aligning the optical axis correctly, a protection line with sufficient margin 
of sensitivity can be created, reducing the occurrence of malfunction. 
Always adjust the optical axis on both upper and lower levels.

Alarm LED
Note: Only available 

on the receiver

• Lights up when an 

alarm is output.

Sensitivity attenuation 
LED
Note: Only available on 

the receiver

• Lights up when the 

sensitivity is 
insufficient.

The corresponding LED lights up when the 
light transmission/reception is authorized. 
(The upper and lower can be switched by 
he upper/lower changeover switch.)

Transmit from both upper and lower

Only transmit 
from upper

Only transmit 
from lower

No transmission

Received on both upper/lower

Only received on lower

Only received on upper

Each time the switch is pressed, the optical unit that receives the light is switched.

Monitor jack Note: Only available on the receiver
    • The monitor output voltage can be checked by using a commercially available tester.

Transmitter: 
    • Transmitter LED switch
Receiver: 
    • Auto gain lock switch

Sound check switch Note: Only available on the receiver
    • Light reception level can be checked by the sound tone.
      In the walk test mode, the beep sound is generated according to the alarm output.

Содержание PXB-100HF-KH

Страница 1: ...econds the receiver detects this break in the light beams and outputs a signal In order to ensure that the detection line has sufficient margin of sensitivity adjust the direction of the light beams b...

Страница 2: ...NTING HEIGHT 4 3 3 OPTICAL AXIS ADJUSTMENT RANGE 5 3 4 EXAMPLE OF PRACTICAL APPLICATION 5 4 INSTALLATION METHOD 4 1 INSTALLATION INTO HOUSING 6 5 WIRING METHOD 5 1 POSITION AND RATING OF TERMINALS 6 5...

Страница 3: ...e Doing so may cause a fire electrical shock or malfunction of the device If smoke or an abnormal odor or sound is found leaving it unattended may cause a fire or electrical shock Immediately turn off...

Страница 4: ...ric beam sensors causing erroneous detections Therefore be sure to prune such plants regularly 3 Other natural phenomena such as insects or bird droppings may soil the sensors causing miss detection B...

Страница 5: ...w t VUVBM JOUFSGFSFODF PS XSBQBSPVOE PG UIF QIPUPFMFDUSJD CFBNT DBO CF QSFWFOUFE CZ DIBOHJOH UIF DIBOOFMT i 91 5 0 0 6 5 0 4 0 6 5 0 3 26 07 3 6 5 0 w PUF 4FU DPSSFTQPOEJOH USBOTNJUUFST BOE SFDFJWFST...

Страница 6: ...tact c contact Built in contact protection resistance Auto gain lock control 2 1 Size of electrical cable used Part No Supply voltage Up to 16 000ft 4 880m Up to 2 200ft 670m Up to 15 000ft 4 570m AWG...

Страница 7: ...its are connected to the same circuit Basic connections for 2 level protection For environmental output tamper output and alarm memory display in the remote mode When multiple sensor units are connect...

Страница 8: ...within the range of 0 to 90 Next fine adjustments of 0 to 5 can be made using the horizontal angle adjustment screw Fine adjustments Horizontal angle fine adjustment screw Rough adjustments Fine adju...

Страница 9: ...djust so that the sensor of the opposite device is visible at the center of the ring using the horizontal and vertical angle fine adjustment screws Turn on the power to the transmitter and receiver ch...

Страница 10: ...aches the highest pitch Adjust both the transmitter and receiver 3 Fine adjust the lower level optical axis 1 Press the upper lower changeover switch on the transmitter to select Only transmit from lo...

Страница 11: ...Press the upper lower changeover switch on the receiver to select Reception authorization on lower only 3 Turn the adjustment screw to fine adjust until the monitor output voltage reaches the highest...

Страница 12: ...center of the detection line and check that an alarm can be output correctly In using the environmental output confirm that the environmental output is generated when the optical axes in both the upp...

Страница 13: ...n 500ft 150 m Model L H Power PXB 100HF KH PXB 200HF KH E g 200 60 m 295 90 m When PXB 100HF KH is set at a distance of 295ft 90 m set to H When PXB 100HF KH is set at a distance of 200ft 60 m set to...

Страница 14: ...or upper and lower Note Only installed on the receiver The margin of sensitivity on this device is set so that an appropriate sensitivity can be obtained when the optical axis is aligned while the dev...

Страница 15: ...t an intruder could run through at top speed 9 Set the transmission power switch to H remove the receiver cover and set the gain lock again 1 Perform angle adjustment again and set the gain lock 2 Rem...

Страница 16: ...ency selection Tone indicator Environmental module Beam power selection Transmitting power adjutment Alarm memory indication Programmed AGC Auto gain lock function Monitorjack Response time adjustment...

Отзывы: