background image


11


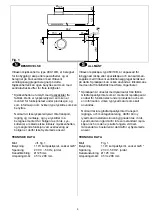
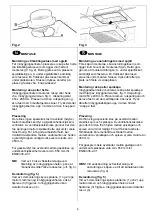
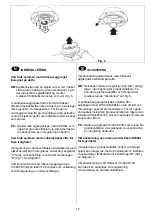
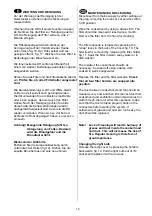
Fig. 7 

 INBERTRIEBNAHME 


Installation mit geeignetem Lüftungsgerät H/R 
von Villavent: 
 
NOTE:

 Die Klappe der Haube muß im geschlos-

senen Zustand dicht schließend sein (keine 
Öffnung für Grundlüftung). Entfernen Sie 
das Klappenblatt und montieren Sie den 
beigelegten Spund nach fig. 6. 


Im Lüftungsgerät wird die Küchenabluft (Haube) 
direct über den Abluftventilator geführt, dadurch 
gelangt kein Dampf/Fett in den Wärmeübertrager. 
Um eine Grundlüftung in der Küche zu erzielen, 
muß das Ablufttellerventil von dort an die Abluft-
leitung der Naßräume angeschlossen werden. 
 

NOTE:

 Nicht anwendbar mit Gerät VX-400 EV/B! 

Dieses Gerät fördert die Grundlüftung der 
Küche ebenfalls über die Haube. (siehe 
Inbetriebnahmeanweisung untenstehend) 

 
Beim Anschluß an zentralen Abluftventilator: 

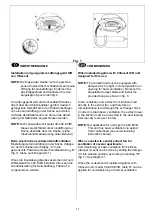
Einstellung der Grundlüftung in der Küche (Klappe 
zu) durch schieben der Klappe „A“ in die 
gewünschte Position (entsprechend Markierung „B“ 
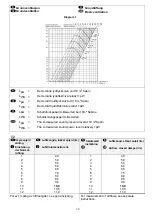
(fig.7). Siehe auch Diagramm 1) 
 
Wenn die Dunstabzugshaube zusammen mit dem 
WRG-Gerät VX-400 EV/B installiert wird, kann die 
Grundeinstellung für Normallüftung, Tabelle T2, 
vorgenommen werden. 


COMMISSIONING


When installed together with Villavent H/R unit 
designed for this use: 
 
NOTE:

 The cookerhood must be equipped with 

damper which is tight in closed position (no 
opening for basic ventilation). Remove the 
adjustable damper blade and install the 
provided bung as shown in fig. 6.


In the ventilation unit, extract from kitchen is led 
directly to the extract fan, and therefore no 
fumes/pollution is led through the exchanger block. 
In order to obtain basic ventilation, the extract louver 
in the kitchen must be connected to the duct leading 
from laundry room (wet rooms). 
 

NOTE:

 Not applicable for unit type VX-400 EV/B. 

This unit has basic ventilation via extract 
from cookerhood (see commissioning 
instructions below).  

 
When conneted to central extract fan for 
ventilation of several apartments: 

Commissioning of basic ventilation from kitchen 
(damper closed) can be done by sliding the damper 
"A" into wanted position, according to marking "B" 
(fig. 7). See diagram 1.  
 
When the cookerhood is installed together with 
Villavent unit, model VX-400 EV/B, table T2 can be 
applied for commissioning of normal ventilation. 


Содержание Villavent 480-10/B

Страница 1: ...122965 06 07 2011 AT KMB 480 10 B Montasje bruks og vedlikeholdsanvisning Montage drift skötselanvisningar Installations Bedienungs und Wartungsanleitung Installation user and maintenance instructions ...

Страница 2: ...e 9 INNREGULERING side 10 BESKRIVELSE OG BRUK side 13 VEDLIKEHOLD OG RENGJØRING side 14 FEILSØKING side 16 Förord Systemair har producerat och levererat utrustning för bostadsventilation i många år Och är installerade i tusentals hem både i Norge och utomlands Även om vi har använt all vår erfarenhet i utvecklingen av produkterna så krävs det att projektering och installation utförs på ett riktigt...

Страница 3: ...9 INBETRIEBNAHME Seite 11 BESCHREIBUNG GEBRAUCH Seite 13 WARTUNG UND REINIGUNG Seite 15 FEHLERSUCHE Seite 16 INTRODUCTION Systemair has manufactured equipment for domestic ventilation for many years The systems are installed in thousands of buildings both in Norway and abroad All our experience has been put into the develop ment of the Villavent ventilation systems but the final result also depend...

Страница 4: ...npassad för inbyggnad i skåp eller specialkåpa och kan samman kopplas med Villavent ventilationsaggregat beräknad på detta Spiskåpan kan också användas tillsammans med central frånluftsfläkt med flera lägenheter Spiskåpan är utrustat med lysarmatur från fabrik Glödlampan lysröret som är monterat i spiskåpan är endast för funktionstest under produktion och som en information vilken typ lysarmatur s...

Страница 5: ...480 10 B is designed for built in installation in kitchen cupboard or special canopies for use with Villavent heat recovery unit designed for this use The model can also be installed together with sentral extract fans serving more than one apartment The Villavent cookerhoods are supplied with light bulb tube from factory These are used during function testing in production and are left in the hood...

Страница 6: ...g 5 Ved evt demontering skyves platene 1 og 2 opp mellom rammen og innbyggingsenheten slik at fjærene 3 frigjøres Innbyggingshetten kan deretter trekkes ut 4 MONTAGE Montering av anslutningstos med spjäll Före kåpan monteras ska anslutningstosen som ligger inuti huven på monteras fig 2 Detta görs genom att montera tätningen A under spjälllocket samtidigt som fästerna B i framkant på stosen placera...

Страница 7: ...ösen 3 Anschließend kann die Haube entfernt werden 4 INSTALLATION Installation of duct connector with damper Mount the duct connector provided before installing the cookerhood see fig 2 This is done by positioning the damper axle A under the damper lid Make sure that the fixing devises B are placed under the edge of the plate Press the connector into position and fix by means of the snap locks Ins...

Страница 8: ...onen über das Kanal netz können Sie in der Montageanleitung für das WRG Gerät nachlesen Ventilationskanal Kanalen mellan spiskåpan och aggregatet ska vara så kort som möjligt för att uppnå bra kapacitet Kanalerna ska vara av obrännbart material Använd spirokanaler galv Stålplåt flexibel slang är godkänd att använda vid själva anslutningen av kåpan Kanalen ska kunna rengöras se skötsel och rengörin...

Страница 9: ...d demontering av inbyggnadskåpan är en godkänd lösning som ej kräver fast installation ELEKTR INSTALLATION Die Elektrische Verdrahtung darf nur von einem zugelassen Unternehmen unter Berücksichtigung der gesetzl Bestimmungen ausgeführt werden Die Villavent Dunstabzugshaube 480 10 B ist intern kpl verdrahtet und wird steckerfertig geliefert Ein seperates Steuerkabel zw DH und WRG Gerät liegt bei De...

Страница 10: ... Villavent aggregat type VX 400 EV B kan tabell T2 benyttes som veiledning ved innregulering av normalventilasjon INJUSTERING Vid användning tillsammans med Villavent aggregatet beräknad på detta NB Spiskåpan måste ha spjäll som är tätt i stängt läge utan öppning för grundventilation Ta bort det reglerbara spjället och montera det medlevererade blindlocket enl fig 6 I ventilationsaggregatet ledes ...

Страница 11: ...B installiert wird kann die Grundeinstellung für Normallüftung Tabelle T2 vorgenommen werden COMMISSIONING When installed together with Villavent H R unit designed for this use NOTE The cookerhood must be equipped with damper which is tight in closed position no opening for basic ventilation Remove the adjustable damper blade and install the provided bung as shown in fig 6 In the ventilation unit ...

Страница 12: ... The A measured sound pressure level at 10 m2 Sabin LWA The A measured sound power level relatively 1pW T2 Skyvespjeld stilling Einstellung der Normal lüftung Luftmengde lukket spjeld l s Luft Volumenstrom l s Skjutspjäll inställning Luftmängd stängt spjäll l s Airflow closed damper l s 1 2 3 4 5 6 7 8 9 10 11 12 4 0 5 0 5 5 6 0 6 5 7 5 8 0 8 5 9 0 10 0 10 5 11 0 1 2 3 4 5 6 7 8 9 10 11 12 4 0 5 0...

Страница 13: ...ambering under kåpan är inte att rekomendera BESCHREIBUNG UND GEBRAUCH Nähere Beschreibung und den Gebrauch des Lüftungssystems lesen Sie bitte in den Anleitungen des WRG Gerätes nach Fig 8 A Switch for light B Switch for damper Wenn Sie die Haube benutzen beim Kochen wollen öffnen Sie die Klappe der Haube mit Schalter A Gleichzeitig schalten die Ventilatoren im Lüftungsgerät auf max Drehzahl Die ...

Страница 14: ...og i ventilasjons kanalen kan medføre fare for antennelse og brannspredning Bytte av lysrør Ta løs lampeglasset ved at klipsfestet trykkes bakover fig 12 Lysrøret trekkes ut av holderen og nytt lysrør trykkes på plass SKÖTSEL OCH RENGÖRING Före rengöring av kåpan måste den göras ström lös antingen genom att dra ur stickkontakten eller ta bort huvudsäkringen Spiskåpan torkas av med en fuktig trasa ...

Страница 15: ...drücken der Halter fig 12 Drehen Sie die kaputte Birne heraus und eine neue hinein MAINTENANCE AND CLEANING Disconnect from mains supply by either pulling out the plug removing the fuses or set service switch to off position Wipe the cookerhood by using a damp cloth The filter should be cleaned at least twice a month Remove the filter from the hood for cleaning The filter cassette is released by p...

Страница 16: ...unkte bevor Sie den Kundendienst benachrichtigen Sicherungen prüfen Prüfen ob der Netzstecker eingesteckt ist Führen Sie einen Check Fehlersuche nach der Bedienungs und Wartungsanl des WRG Gerätes durch Kundendienst Bevor Sie den Kundendienst anrufen notieren Sie sich die Daten auf dem Typenschild auf der Unter seite der Dunstabzugshaube hinter der Lampen abdeckung TROUBLESHOOTING Please check the...

Отзывы: