

- 27 -
EN
9J27
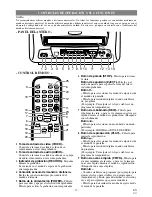
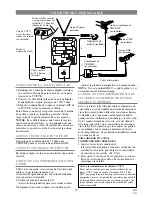
CONTROLES DE OPERACIÓN Y SUS FUNCIONES
VIDEO
AUDIO
STOP/EJECT
REW
PLAY
F.FWD
VOLUME
CHANNEL
EARPHONE
REC/OTR
POWER
REC
1
9
2
3 4
5
6 7 8
12 13
10
11
14
6
Botón de parada (STOP)–
Púlselo para detener
la cinta.
Botón de expulsión (EJECT)–
Púlselo en el
modo de parada para expulsar la cinta del televi-
sor/videograbadora.
Botón
L
–
• Púlselo para seleccionar los modos de ajuste desde
el menúde la pantalla.
• Púlselo para introducir dígitos cuando establezca
un programa.
(Por ejemplo: Para ajustar el reloj o establecer un
programa de temporizador)
7
Botón de rebobinado (REW)–
Púlselo para
rebobinar la cinta, o para ver la imagen en retroceso
rápido durante el modo de reproducción. (Búsqueda
con rebobinado)
Botón
s
–
• Púlselo para seleccionar un modo desde un menú-
particular.
(Por ejemplo: IDIOMA o ADJUST DE USER)
8
Botón de reproducción (PLAY)–
Púlselo para
iniciar la reproducción.
Botón
K
–
• Púlselo para seleccionar los modos de ajuste desde
el menú de la pantalla.
• Púlselo para introducir dígitos cuando establezca
un programa.
(Por ejemplo: Para ajustar el reloj o establecer un
programa de temporizador)
9
Botón de avance rápido (F.FWD)–
Púlselo para
avanzar rápidamente la cinta, o para ver la imagen
en avance rápido durante el modo de reproducción.
(Búsqueda con avance rápido)
Botón
B
–
• Cuando establezca un programa (por ejemplo: para
ajustar el reloj o para establecer un programa de
temporizador), púlselo para determinar su elección y
vaya al paso siguiente que quiera introducir.
• Púlselo para determinar los modos de ajuste desde
el menú de la pantalla.
POWER
WAKE-UP
/SLEEP
1
2
3
4
5
6
7
8
9
+100
0
EJECT
CHANNEL
RETURN
REW
PLAY
STOP
F.FWD
GAME
RECORD
PAUSE/STILL
SPEED
TIME SEARCH
CHANNEL
T-PROG.
CLEAR
COUNTER
RESET
DISPLAY
MUTE
MENU
VOLUME
5
15
12
6
16
7
10
18
19
20
6
24
11
9
8
22
21
23
17
25
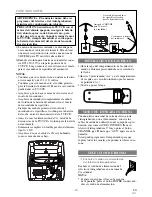
NOTA:
No recomendamos utilizar mandos a distancia universales. No todas las funciones pueden ser controladas mediante un
mando a distancia universal. Si decide utilizar un mando a distancia universal con esta unidad, tenga en cuenta que con el
número de código dado tal vez no se pueda controlar la unidad. En este caso, póngase en contacto con el fabricante del
mando a distancia universal.
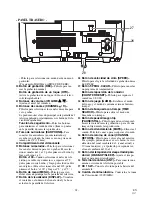
- PANEL DELANTERO -
- CONTROL REMOTO -
1
Toma de entrada de vídeo (VIDEO)–
Conéctela a la toma de salida de vídeo de su
videocámara u otra videograbadora.
2
Toma de entrada de audio (AUDIO)–
Conéctela a la toma de salida de audio de su equipo
de audio, videocámara u otra videograbadora.
3
Indicador de grabación (RECORD)–
Parpadea
durante la grabación.
Se enciende en el modo de espera de la grabación
con temporizador.
4
Ventanilla sensora del mando a distancia–
Recibe las señales infrarrojas procedentes del
mando a distancia.
5
Botón de la alimentación (POWER)–
Púlselo
para encender y apagar el televisor/videograbadora.
Púlselo para activar la grabación con temporizador.