


- 9 -
EN
9J27
ANTENNA/CABLE
CONNECTIONS
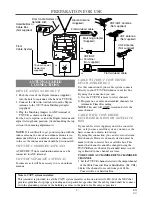
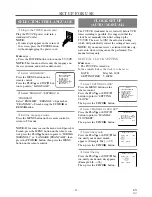
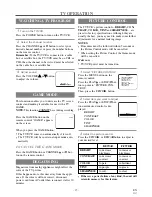
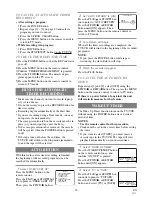
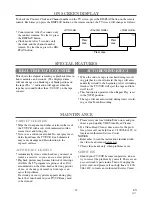
DIPOLE ANTENNA HOOK UP
1. Push the stem of the Dipole Antenna (supplied)
into the hole for antenna at the back of TV/VCR.
2. Connect the flat twin-lead cable from the Dipole
Antenna to the 300/75 ohm Matching Adapter
(supplied).
3. Plug the Matching Adapter to ANT terminal of
TV/VCR as shown in drawing.
For the best reception, extend the Dipole Antenna and
adjust its length and position. (Avoid handling the top
section when making adjustments.)
NOTE:
If it is difficult to get good reception with the
indoor antenna, the use of an outdoor antenna is rec-
ommended. Before an outdoor antenna is connected
to the set, the indoor antenna should be disconnected.
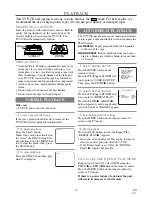
CABLE WITHOUT CONVERTER/
DESCRAMBLER BOX
Use this connection if your cable system connects
directly to your TV/VCR without a converter box.
By using this connection you can:
1) Use the TV/VCR remote to select channels.
2) Program one or more unscrambled channels for
Automatic Timer Recording.
NOTE:
This unit will ONLY record and view the
same channel.
VHF/UHF SEPARATE ANTENNAS
In some areas it will be necessary to use an outdoor
antenna.
VHF/UHF COMBINED ANTENNA
A VHF UHF 75 ohm combination antenna can be
connected to ANT terminal.
Note to CATV system installer:
This reminder is provided to call the CATV system installer’s attention to Article 820-40 of the NEC that
provides guidelines for proper grounding and, in particular, specifies that the cable ground shall be connect-
ed to the grounding system of the building as close to the point of cable entry as practical.
IN
OUT
ANT.
Dipole Antenna
(Supplied)
VHF/UHF Antenna
(Not supplied)
VHF/UHF
Combiner
(Not supplied)
Flat twin-lead cable
UHF Antenna
(Not supplied)
VHF Antenna
(Not supplied)
From
Cable System
75-ohm Coaxial
Cable (Not
supplied)
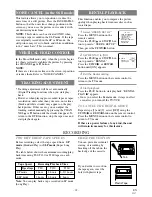
Satellite Box or
Cable Box
(Not supplied)
From Cable System or
Satellite Dish
or
or
or
or
Flat twin-lead cable
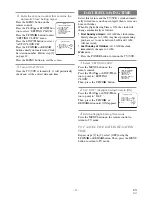
PREPARATION FOR USE
TO RECORD A SCRAMBLED/UNSCRAMBLED
CHANNEL
1. Set the TV/VCR channel selector to the output channel
of the Cable Converter Box or Satellite Box. (Ex. CH3)
2.Select the channel to record from your Cable
Converter Box or Satellite Box.
CABLE WITH CONVERTER/
DESCRAMBLER BOX OR SATELLITE
BOX
If your cable service supplies you with a converter
box or if you use a satellite system, you can use the
basic connection shown in drawing.
By using this connection you can also record scram-
bled channels. However, channel selection must be
made with the converter box or satellite box. This
means that channels cannot be changed using the
TV/VCR Remote Control. Unattended timer record-
ing is limited to one channel at a time.
Matching Adapter
(Supplied)


