background image


3

PRODUCT 

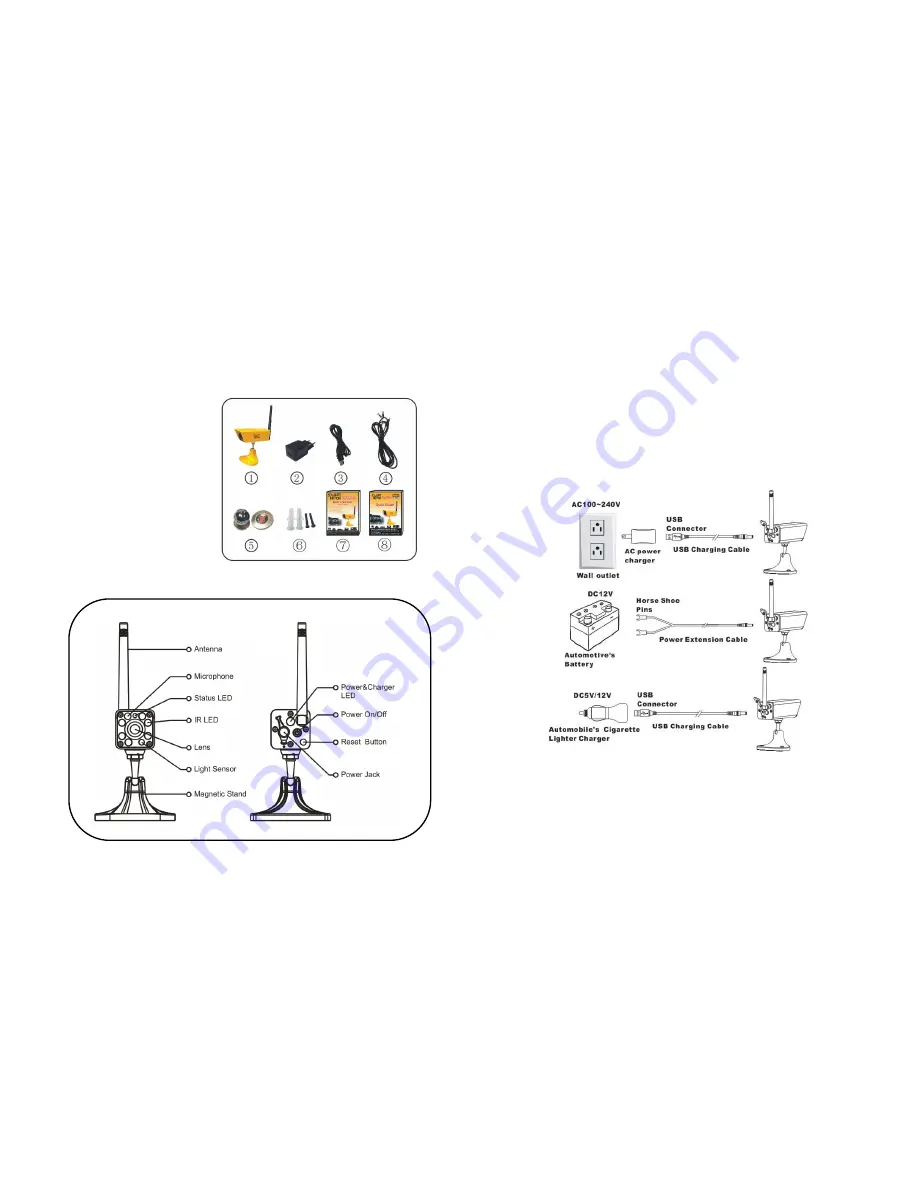
Included Parts 

This package comes with the following items.  Please check whether they are 

all included in the packaging box, if one or some is missing, contact the retailer 
for replacement.


  Camera x1 

  AC power charger x1 

  USB Charging cable x1 

  Power extension cable ×1 

  Magnet holder for phone x1 

  Screw set for camera x1 

  User manual x1 

  Quick installation guide x 1 

Feature Locations 


4

HOW TO USE 

1. Charging the Camera


 There are three ways to charge the camera before using it.  

1)  Charge the camera via AC adapter by connecting USB charging cable 

between AC adapter and camera. Wall outlet can have output of AC 
between 100~240V, adapter output is 5V DC to camera.  

2)  Charge the camera via automotive battery by connecting power extension 

cable between battery and camera. Power extension cable has two horse 

shoe pins for easy connection. Battery output is 12V DC.  

3)  Charge the camera with automotive cigarette lighter charging adapter which 

can have standard 5V DC output or 12V DC output. (Cigarette lighter 

charging adapter is not included)  


When camera starts to take charge, LED indicator on camera back become 

red, full charge normally take 5 hours. Once camera is fully charged, LED 

indicator will go out.  


Содержание SH04

Страница 1: ...Magnetic Holder for smart phone Optional 8 View Camera 8 MAIN FUNCTIONS OF CAMERA 9 MAIN FUNCTIONS OF APP 10 14 Switch between STA Mode and AP Mode 10 11 Turn On Off IR LED and Guide Line 12 Video Pa...

Страница 2: ...the end of this manual for help first and then contact customer support for further assistance Please retain sales receipt for purchase verification Any attempted disassemble of the product will void...

Страница 3: ...via AC adapter by connecting USB charging cable between AC adapter and camera Wall outlet can have output of AC between 100 240V adapter output is 5V DC to camera 2 Charge the camera via automotive ba...

Страница 4: ...mera 1 Go to WiFi setting menu of your smart phone choose camera s wireless network ID SWIFTCAM_xxxxxx and there is no need to input password FIG 01 FIG 01 FIG 02 6 2 Run downloaded APP on smart phone...

Страница 5: ...IG 09 2 Mount the magnetic camera base on your tailgate and then adjust it to a suitable angle FIG 10 FIG 09 FIG 10 8 6 Mount Magnetic Holder for Smart Phone or Pad Optional 1 Stick universal metal pl...

Страница 6: ...stance of the camera as long as your smart phone connects to this router you can see the video from your camera If your router is connected to the internet you can view the video on smart phone anywhe...

Страница 7: ...r Fast blinking every half second Camera is in STA mode but has lost the connection to router Reset Button Status LED Green 12 2 Turn On Off IR LED and Guide Line Tap on icon on the viewing camera pag...

Страница 8: ...e taken and saved in local album of smart phone Go back the camera list interface Refer to FIG 16 Tap on and select the camera which you want to see Then you can find the video or image files FIG 16 N...

Страница 9: ...d FIG 23 Tap OK you can view the alarm picture on your phone FIG 21 FIG 22 FIG 23 FIG 19 FIG 20 Tap on Set to complete alarm settings and back to the camera list you can see the alarm icon as followin...

Страница 10: ...tivity 85dBm 11M Transmission Power 16dBm Max Wireless Antenna 2dBi External Imaging Sensor 1 6 5 CMOS Total Pixels Max 648x488 Resolution 640x480 320x240 Compression Mode MJPEG Frame Rate 25bps QVGA...

Страница 11: ...ful interference in a residential installation This equipment generates uses and can radiate radio communications However there is no guarantee that interference will not occur in a particular install...

Отзывы: