background image

Section V: Parts 


 5.0.PAR.SL-214


90H92 – BASE CYLINDER CIRCUIT 

SL-214 

ITEM 

PART 

QTY 

DESCRIPTION 

WT-

lb/ea. 

WT-

lb/all 

90H74 

Nylon Hose Sleeve x 60" 

0.25 

0.25 

10P39 

Adp Hyd 08MJ/08MB 

0.10 

0.20 

10P43 

Adp Hyd 08MJ/08MJ BHD 

0.30 

0.60 

11P23 

Adp Hyd 08MJ/08MB 90 

0.30 

1.80 

12P51 

Hose Assy 42 08-08FJ/08FJ45 

2.05 

2.05 

12P52 

Hose Assy 38 08-08FJ/08FJ45 

1.90 

1.90 

12P53 

Hose Assy 21 08-08FJ/08FJ45 

1.26 

1.26 

12P54 

Hose Assy 17 08-08FJ/08FJ45 

1.11 

1.11 

12P55 

Hose Assy 31 06-08FJ/08FJ45 

1.46 

1.46 

10 

12P58 

Adp Hyd 08MJ/08MJ/08MJ Tee 

0.30 

0.60 

11 

12P85 

Adp Hyd 08FJ/08MJ 45 

0.30 

0.90 

12 

13P14 

Adp Hyd MJIC Cap (-8) 

0.07 

0.28 

13 

13P72 

Hose Assy 78 08-08FJ/08FJ 

4.68 

4.68 

14 

13P74 

Hose Assy 109 08-08FJ/08FJ45 

5.45 

5.45 

15 

21P28 

Hyd Valve, 2-Way 16 GPM 

2.20 

2.20 

5-8

Содержание SL-214

Страница 1: ...Hooked on Quality PA R T S A N D O P E R AT I O N M A N U A L HOIST SERIAL NUMBER MODEL SL 214...

Страница 2: ......

Страница 3: ...Bumper Assembly 2 19 Rear Bumper Assembly w Extension 2 21 Folding Bumper Assembly 2 23 Drop Down Bumper Assembly 2 25 Cab Guard Assembly 2 27 Container Variability System 2 29 Fender Assembly Single...

Страница 4: ...Installation Kit 5 7 Base Cylinder Circuit 5 8 Tank Circuit 5 9 Pump Circuit 5 10 Manual Controls 2 Section 5 11 VI OPTIONS Adjustable Jib Sub Assembly 6 1 Cylinder Circuit BL 214 6 2 U Lock Assembly...

Страница 5: ...y of personal injury or machine damage Record your SwapLoader Hoist serial number in the appropriate space provided on the title page Your SwapLoader dealer needs this information to give prompt effic...

Страница 6: ...s furnished by SwapLoader U S A Ltd SwapLoader will invoice the distributor or authorized service center for the replacement parts and freight Upon completion of the repair any defective parts to be r...

Страница 7: ...on or with the hook to the rear 4 Do not exceed 1 500 Engine RPM when operating the Power Take Off P T O Never leave the P T O in gear while transporting 5 The hoist must be used with containers that...

Страница 8: ...It is the responsibility of the owner and or installer to insure that any additional safety devices required by state or local codes are installed on the SwapLoader Hoist and or Truck Chassis 10 Keep...

Страница 9: ...DRAULIC OIL SPECIFICATIONS 4 ONE 90P10 HYDRAULIC OIL FLAMMABLE 5 2 90P11 HOIST FALLING 6 ONE 90P12 LEVER CONTROL 7 ONE 90P13 SAFETY INSTRUCTIONS 8 2 90P14 SWAPLOADER JIB 9 ONE 90P18 RELIEF VALVE 10 ON...

Страница 10: ...ty Decals and their part numbers Please use when reordering replacement decals 90P07 OPERATIONS SERVICE MANUAL 90P08 HOIST BODY SPECIFICATIONS 90P09 HYDRAULIC OIL SPECIFICATIONS 90P10 HYDRAULIC OIL FL...

Страница 11: ...Section I Introduction 1 0 INT SL 214 90P14 SWAPLOADER JIB 90P18 RELIEF VALVE 90P78 HIGH PRESSURE FLUID 91P06 LUBRICATION POINTS 91P34 SL 214 90P91 ADJUSTABLE JIB OPERATION 1 7...

Страница 12: ...is located at the front driver side of the hoist gray arrow on first picture The Serial Number is also stamped into the frame of the hoist on the top of the inner rail shown at the rear of the hoist r...

Страница 13: ...The installation of the SwapLoader on a truck chassis will generally follow these steps 1 Install hoist assembly onto truck chassis 2 Mount the hydraulic control valve or EHV system to the hoist and...

Страница 14: ...that the hoist and the light kit are positioned far enough back to eliminate any interference between the fender and the light kit You should also consider the final weight distribution regarding the...

Страница 15: ...allows for drilling into the truck chassis frame rails at 2 3 4 3 3 4 or 4 3 4 bolts are only required on two of the four lower mount bracket holes Once the locations of the mount brackets have been d...

Страница 16: ...s fastened to the floor of the cab and the control cables are routed through additional holes drilled in the floor Your installation may require that additional brackets be fabricated or other modific...

Страница 17: ...aded hub back over the cable 2 Turn 250 28 UNF jam nut onto cable threaded rod until it bottoms 3 Place clevis of threaded rod and bottom against jam nut Turn other 250 28 UNF jam nut onto threaded ro...

Страница 18: ...should be supported by the clamp assemblies that are provided in the Loose Parts Box See Pg 5 7 4 Determine the best location in the cab for the control handle assembly Pt No 20P72 The location should...

Страница 19: ...will notify the operator when the U Lock has been engaged or disengaged 1 Review all directions and diagrams provided before starting installation 2 Mount valve to the hoist s Main Frame and attach al...

Страница 20: ...tric Over Hyd Valve SERVICE PARTS SL 214 ITEM PART QTY DESCRIPTION 1 12P53 1 Hose Assy 21 08 08FJ 08FJ45 2 12P59 1 Hose Assy 20 08 08FJ 08FJ45 3 13P29 1 Hose Assy 75 08 08FJ 08FJ45 4 13P35 1 Hose Assy...

Страница 21: ...ck cab Determine the best location in the cab for the control box location and install with mounting screws included The location should be such that the controls Pt No 22P86 can be easily reached whi...

Страница 22: ...L 214 ITEM PART QTY DESCRIPTION 1 12P53 1 Hose Assy 21 08 08FJ 08FJ45 2 12P59 1 Hose Assy 20 08 08FJ 08FJ45 3 13P29 1 Hose Assy 75 08 08FJ 08FJ45 4 13P35 1 Hose Assy 72 5 08 08FJ 08FJ45 5 13P81 1 Hose...

Страница 23: ...n the cab for the control box location and install with mounting screws included The location should be such that the controls Pt No 22P95 can be easily reached while operating the truck 4 Route indic...

Страница 24: ...ooklift hoist By design the bushing style pumps are single rotation rotation specific All SwapLoader hooklift hoists come standard with a CCW left hand rotation pump which will work for most manual tr...

Страница 25: ...e hydraulic pump as shown on Pg 5 10 3 Connect the suction hose assembly to the hydraulic tank 1 I D hose and route to the hydraulic pump in as short and straight line as possible Be sure to route the...

Страница 26: ...he suggested location of the hydraulic tank to the rear of the control valve assembly on the left hand side of the truck The hydraulic hoses have been sized for the tank to be mounted in this general...

Страница 27: ...orresponds to the movement of the cylinders per the figure below 6 Install all safety decals and product decals as shown on Pg 1 5 after final installation and painting have been completed 7 Fill out...

Страница 28: ...S DRAWING PROVIDES THE CRITICAL SUB FRAME DIMENSIONS FOR COMPATABILITY WITH THE SWAPLOADER HOOK LIFT HOIST IT IS THE SUB FRAME SUPPLIER S RESPONSIBILITY TO PROVIDE A SUB FRAME OF SUFFICIENT CAPACITY W...

Страница 29: ...TABILITY WITH THE SWAPLOADER HOOK LIFT HOIST IT IS THE SUB FRAME SUPPLIER S RESPONSIBILITY TO PROVIDE A SUB FRAME OF SUFFICIENT CAPACITY WHICH PROPERLY SUPPORTS THE BODY CONTAINER WHEN USED WITH THE H...

Страница 30: ...This Page Intentionally Left Blank...

Страница 31: ...e of Motor Carrier Safety OMCS regulations Regulation 393 86 requires that no bumper be located more than 30 off the ground when the truck is empty and the end of the bumper should not be located more...

Страница 32: ...DISCONNECTED AND THE GROUND LEAD FROM THE WELDER SHOULD BE AS CLOSE TO THE PART BEING WELDED TO AVOID THE POSSIBILITY OF ARCING ACROSS BEARINGS GEARS ETC 2 ALL WELDS SHOULD BE DONE UTILIZING A LOW HY...

Страница 33: ...Carrier Safety OMCS regulations Regulation 393 86 requires that no bumper be located more than 30 off the ground when the truck is empty and the end of the bumper should not be located more than 24 fr...

Страница 34: ...ROM THE WELDER SHOULD BE AS CLOSE TO THE PART BEING WELDED TO AVOID THE POSSIBILITY OF ARCING ACROSS BEARINGS GEARS ETC 2 ALL WELDS SHOULD BE DONE UTILIZING A LOW HYDROGEN WELDING PROCESS BUMPER LOCAT...

Страница 35: ...njunction with the Roller Assembly Pt No 10H90 and Roller Mount Brackets Assembly Pt No 10H91 for the container to function properly 2 Locate the best position for the support bars between the cross m...

Страница 36: ...THE GROUND LEAD FROM THE WELDER SHOULD BE AS CLOSE TO THE PART BEING WELDED TO AVOID THE POSSIBILITY OF ARCING ACROSS BEARINGS GEARS ETC 2 DURING INSTALLATION OF THE BUMPER CHECK TO MAKE SURE THAT TH...

Страница 37: ...y and the end of the bumper should not be located more than 24 from the extreme rear of the vehicle including truck bodies see Fig A 2 Position drop down bumper on the longsills of the sub frame see F...

Страница 38: ...lat Washer HT 10 12 00P98 6 5 32 x 1 1 2 Cotter Pin 01 13 00P03 4 3 8 16 x 3 4 HHCS 11 14 00755 4 3 8 Lock Washer 05 15 90P20 10 1 4 8 Grease Zerk 01 16 90P33 2 1 1 8 O D x 10 Spring 60 NOTE 1 PRIOR T...

Страница 39: ...should not be located within 2 3 8 of the truck frame edge see Fig A Drill 21 32 mount holes through cab guard channels 4 Mark mounting holes through the cab guard weldment onto truck frame Remove cab...

Страница 40: ...This Page Intentionally Left Blank...

Страница 41: ...NPT plug from the hydraulic tank Install hydraulic fittings 12P20 12P92 as shown and tighten see Pg 2 28 8 Install the two 90 degree hydraulic fitting Pt No 12P69 into the hydraulic valve on the 12H01...

Страница 42: ...operating properly Start the truck engage the P T O and then retract the jib cylinder full stroke Next while extending the jib cylinder back out have someone push or rotate the CVS lever arm forward...

Страница 43: ...TY DESCRIPTION WT lb ea WT lb all 1 12H01 1 Container Variability System 14 11 14 11 2 23H76 1 Base Plate Bracket CVS 5 30 5 30 3 00755 6 Washer Lock 3 8 Dia 0 03 0 18 4 00P13 6 HHCS 3 8 16 UNC x 1 1...

Страница 44: ...87 1 Hose Assy 21 08 10FJ 08FJ90 1 26 1 26 6 12P92 1 Adp Hyd 10MJ 16MP 0 40 0 40 7 12P93 1 Hose Assy 48 08 10FJ 10FJ90 2 20 2 20 8 13P03 1 Adp Hyd 08MB 08FJ 0 40 0 40 9 21P93 1 Relief Valve CVS 1 20 1...

Страница 45: ...L 220 SL 222 14 0 74 1 2 124 5 8 12 16 0 98 1 2 124 5 8 18 SL 240 12 0 58 1 2 112 5 8 12 13 0 70 1 2 112 5 8 18 SL 330 SL 400 12 0 75 1 4 125 12 13 0 75 1 4 125 12 SL 406 16 0 76 134 12 17 0 88 134 24...

Страница 46: ...This Page Intentionally Left Blank...

Страница 47: ...r truck chassis 4 Mark mounting holes through the fender bracket weldment onto the fender Remove the bracket and drill 7 16 holes in fender see Fig C 5 Attach fender bracket weldments to ender using f...

Страница 48: ...2 HHCS 0 07 9 01P21 16 3 8 16 UNC x 2 1 2 HHCS 0 09 10 90P24 2 Fender Aluminum 19 00 10 90P25 2 Fender Steel 35 00 Note Will include either 2 90P24 aluminum fender or 2 90P25 steel fender depending on...

Страница 49: ...interference Drill mounting holes as required and mount using fasteners provided See Fig C 5 Attach the taillight module to the stub light bar weldments with the fasteners provided see Fig C 6 Mount t...

Страница 50: ...ate 27 33 3 00P44 6 3 8 16 x 1 1 2 HHCS 0 07 4 00P34 6 3 8 16 Locking Hex Nut 0 02 5 00771 6 3 8 Flat Washer 0 01 6 01P18 4 5 8 11 x 3 HHCS 0 35 7 00P81 8 8 32 x 1 RHMS 8 00P82 8 8 32 Hex Nut 9 00P83...

Страница 51: ...Section II Installation Accessories 2 8 INS ACC LEDLB 2 39...

Страница 52: ...This Page Intentionally Left Blank...

Страница 53: ...d as wide as possible for stability For hoist and folding bumper clearance do not place brackets any closer than 11 to the subframe longsill see Fig A Also the roller axle center line should be approx...

Страница 54: ...the roller axle Pt No 10H31 and the fasteners provided see Fig C Grease the rollers before use 10H91 10H90 Figure B Figure C MATERIAL LIST FOR 10H90 AND 10H91 ITEM PART QTY DESCRIPTION WT lb ea 1 32H...

Страница 55: ...orward bottom edge 6 Mark position of mounting holes through brackets onto toolbox Remove toolbox and drill 9 16 dia holes 7 Mount toolbox to brackets using fasteners provided see Fig A MATERIAL LIST...

Страница 56: ...This Page Intentionally Left Blank...

Страница 57: ...ROL LEVER BACKWARD THEN TILT THE ARM BACKWARD LEFT CONTROL LEVER BACKWARD STEP 3 MAKE SURE THE WORK AREA IN FRONT OF THE CONTAINER IS CLEAR OF PEOPLE AND OBSTACLES MOVE THE TRUCK BACKWARDS UNTIL THE H...

Страница 58: ...ING LIFTING STEP 5 WHEN THE CONTAINER IS RESTING ON THE FRAME MOVE THE JIB FORWARD ALL THE WAY TO ENSURE THE CONTAINER IS HELD IN THE BODY LOCKS RIGHT CONTROL LEVER FORWARD DISENGAGE THE P T O LOCK U...

Страница 59: ...ER TOUCHES THE GROUND RELEASE THE BRAKES TO FREE THE TRUCK FOR FORWARD MOVEMENT CAUSED BY THE CONTAINER STEP 3 ROTATE JIB ALL THE WAY BACK UNTIL THE CONTAINER TOUCHES THE GROUND PULL AWAY FROM CONTAIN...

Страница 60: ...PROCEDURE MAY RESULT IN POSSIBLE PROPERTY DAMAGE AND OR PERSONAL INJURY MAKE SURE WORK AREA IS CLEAR OF PEOPLE AND OBSTACLES PRIOR TO CHANGING THE HOOK HEIGHT ON THE ADJUSTABLE JIB STEP 1 WITH THE TE...

Страница 61: ...TO TILT TELESCOPIC ARM REARWARD UNTIL THE DUMP CYLINDERS ARE FULLY EXTENDED REPLACE LOCK PIN AND SECURE WITH HITCH PIN WARNING DO NOT REMOVE LOCK PIN ON THE ADJUSTABLE JIB WHILE JIB IS IN THE 36 HOOK...

Страница 62: ...MAY RESULT IN POSSIBLE PROPERTY DAMAGE AND OR PERSONAL INJURY MAKE SURE WORK AREA IS CLEAR OF PEOPLE AND OBSTACLES PRIOR TO CHANGING THE HOOK HEIGHT ON THE ADJUSTABLE JIB STEP 1 WITH THE TELESCOPIC AR...

Страница 63: ...E TELESCOPIC JIB FULLY EXTENDED IN THE TRANSPORT POSITION AS SHOWN REPLACE THE LOCK PIN AND SECURE WITH HITCH PIN WARNING DO NOT REMOVE LOCK PIN ON THE ADJUSTABLE JIB WHILE JIB IS IN THE 54 HOOK POSIT...

Страница 64: ...This Page Intentionally Left Blank...

Страница 65: ...idth as wide spacing HOIST STANDARD All SwapLoader hooklift hoists are made so that the rear rollers can be spaced at either the wide spacing or narrow spacing depending on the subframe design the onl...

Страница 66: ...er spacer on first then place the rear roller back on the roller shaft 4 Replace and tighten the retaining bolts retaining washer and roller retainer WIDE TO NARROW ROLLER SPACING ADJUSTMENT To change...

Страница 67: ...e refer to lubrication diagram Fittings on lift cylinders quantity 4 Front pins on rear pivot joint weldment quantity 2 Fittings on rear pivot pins and rollers quantity 4 2 Check all bolts and retight...

Страница 68: ...Section IV Maintenance 4 0 MAI SL 214 LUBRICATION DIAGRAM LEGEND GW Grease Weekly GM Grease Monthly 4 2...

Страница 69: ...n Nominal Flow Rating 25 GPM NOTE 1 ALWAYS CONSULT YOUR LOCAL HYDRAULIC OIL SUPPLIER FOR MORE INFORMATION 2 USE CAUTION WHEN OPERATING AT OR BEYOND THE RECOMMENDED TEMPERATURE EXTREMES 3 DO NOT OPERAT...

Страница 70: ...t INSPECTION The mast lock assembly comes adjusted from the factory and should provide years of trouble free operation however there may come a time when parts wear or become damaged and need replaced...

Страница 71: ...the driver side of the hoist see Jib Lockout Valve Mount Detail on Pg 5 2 of the Parts Section of the manual Visually inspect the jib lockout valve roller and the condition of the valve ramp on the h...

Страница 72: ...as follows Clockwise Adjustment Moves the jib lockout valve closer to the valve ramp Counter Clockwise Adjustment Moves the jib lockout valve away from the valve ramp Once the valve has been moved bac...

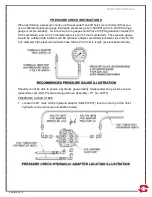
Страница 73: ...meter dial size 4 inch dial is preferred The pressure gauge should be outfitted with a female JIC 4 hydraulic adapter preferably located at the end of a 3 8 inch diameter high pressure hydraulic hose...

Страница 74: ...er and attach the pressure gauge to the hydraulic control valve see illustration below 3 Start the truck and engage the P T O 4 Push the lift dump circuit lever forward until the lift dump cylinders b...

Страница 75: ...he pressure gauge to the hydraulic control valve see illustration below 3 Start the truck 4 Push the lift dump circuit lever left until the lift dump cylinder bottoms out see illustration on the right...

Страница 76: ...clamp assembly for the SwapLoader SL 214 hoist model For optimum performance out of your SwapLoader SL 214 hooklift the gap between the top of the jib horizontal tube and the top inside surface of th...

Страница 77: ...tively the figure above is labeled showing which spool performs which function Press the button on the spool hold and then press the manual over ride button on the bottom of the valve shown in the fig...

Страница 78: ...This Page Intentionally Left Blank...

Страница 79: ...13H48 2 Tube Stop Weldment 3 02 6 04 4 13H52 1 Main Frame Sub Assembly 1175 37 1175 37 5 13H53 1 Pivot Joint Sub Assembly 560 29 560 29 6 13H54 1 Outer Tube Sub Assembly 435 50 435 50 7 23H56 1 Locko...

Страница 80: ...0 02 0 48 8 00P31 2 HHCS 182 13 UNC x 1 1 4 0 10 0 20 9 00P68 24 FSCS 3 8 16 UNC X 1 1 4 SS 0 11 2 64 10 01P08 2 HHCS 5 16 18 x 2 Gr8 0 12 0 24 11 01P20 1 SHCS 3 8 16 UNC x 1 3 4 Gr8 0 07 0 07 12 01P...

Страница 81: ...8 16 UNC x 1 Gr8 0 05 0 10 9 00P73 2 FHCS 1 2 13 UNC x 1 1 4 Gr8 0 11 0 22 10 00P86 2 Washer Lock Countersunk 1 2 0 06 0 12 11 01P25 6 SHCS 7 16 14 UNC x 1 1 2 Gr8 0 05 0 30 12 01P26 6 Washer Lock 7 1...

Страница 82: ...3 54 3 54 10 00P05 1 Snap Ring Ext 1 Shaft 0 01 0 01 11 00P13 4 HHCS 3 8 16 UNC x 1 1 4 Gr8 0 10 0 40 12 00P55 1 Nut Lock 5 8 11 UNC Gr8 0 13 0 13 13 00P62 14 HHCS 3 8 16 UNC x 1 Gr8 0 05 0 70 14 01P1...

Страница 83: ...27H06 1 Pivot Lock Bar 9 60 9 60 7 00P32 2 SHCS 3 8 16 UNC x 1 1 4 0 07 0 14 8 00P34 2 Nut Lock 3 8 16 0 02 0 04 9 01P28 2 Washer Lock Disc 3 8 Pr 0 01 0 02 10 01P30 2 Washer Lock Disc 1 2 Pr 0 02 0...

Страница 84: ...d 2 3 4x1 2x3 1 4 0 19 0 19 3 24H67 1 Shim Jib 2 3 4 x 14GA x3 1 4 0 20 0 20 4 62H11 1 Cover Jib 5 1 4x11GAx5 1 4 0 90 0 90 5 00755 2 Washer Lock 3 8 Dia 0 03 0 06 6 00P03 2 HHCS 3 8 16 UNC x 3 4 0 04...

Страница 85: ...00P15 30 HHCS 1 2 13 UNC x 1 3 4 Gr8 0 20 6 00 10 00P19 3 HHCS 5 16 18 UNC x 2 3 4 0 02 0 06 11 00P20 3 Nut Hex 5 16 18 UNC 0 10 0 30 12 00P35 50 Nut Lock 1 2 13 UNC 0 05 2 50 13 00P56 4 HHCS 5 8 11 U...

Страница 86: ...42 08 08FJ 08FJ45 2 05 2 05 6 12P52 1 Hose Assy 38 08 08FJ 08FJ45 1 90 1 90 7 12P53 1 Hose Assy 21 08 08FJ 08FJ45 1 26 1 26 8 12P54 1 Hose Assy 17 08 08FJ 08FJ45 1 11 1 11 9 12P55 1 Hose Assy 31 06 08...

Страница 87: ...90 LL 0 30 0 60 9 12P17 2 Adp Hyd 10MB 08FB 0 30 0 60 10 12P21 1 Adp Hyd 16MP 12FP 0 20 0 20 11 12P22 1 Adp Hyd 12HB 12MP 0 30 0 30 12 12P23 1 Adp Hyd 12HB 12MB 90 0 60 0 60 13 12P29 1 Hose 3 4 X 24...

Страница 88: ...Bolt Clamp 1 1 2 Dia 0 10 0 20 2 10P32 1 Adp Hyd 10MJ 12MB 45 0 30 0 30 3 10P35 1 Adp Hyd 10MJ 12MB 0 30 0 30 4 10P61 1 Hose Assy 106 08 10FJ 10FJ90 3 80 3 80 5 12P18 1 Adp Hyd 16HB 16MB 0 40 0 40 6...

Страница 89: ...SCRIPTION WT lb ea WT lb all 1 10H51 1 Valve Mount Bracket 8 20 8 20 2 20P08 2 Control Handle Cable 2 80 5 60 3 20P09 1 Control Console 2 Sect 4 10 4 10 4 20P10 2 Bonnet Kit V20 0 50 1 00 5 20P15 2 Co...

Страница 90: ...This Page Intentionally Left Blank...

Страница 91: ...Tube 2 1 2OD x 1 0 30 0 30 8 53586 1 Safety Snap Pin 3 8 Dia x 2 1 2 Lg 0 14 0 14 9 62H11 1 Cover Jib 5 1 4x11GAx5 1 4 0 90 0 90 10 00755 2 Washer Lock 3 8 Dia 0 03 0 06 11 00P03 2 HHCS 3 8 16 UNC x...

Страница 92: ...3 90H74 1 Nylon Hose Sleeve x 60 0 25 0 25 4 00767 4 Washer Lock 5 8 Dia 0 04 0 16 5 00P24 4 Nut Hex 5 8 11 UNC Gr8 0 09 0 36 6 01P40 4 HHCS 1 2 13 UNC x 2 1 2 Gr8 0 19 0 76 7 10P43 2 Adp Hyd 08MJ 08...

Страница 93: ...x 2 0 02 0 04 5 00P55 2 Nut Lock 5 8 11 UNC Gr8 0 08 0 16 6 01P85 2 SS 5 8 11 UNC x 4 1 2 0 75 1 50 7 01P86 2 Washer ZP 5 8 Dia 0 04 0 08 8 01P87 4 Washer ZP 1 Dia 0 10 0 40 9 01P88 2 Pin Clevis 1 x...

Страница 94: ...51 1 Valve Mount Bracket 8 20 8 20 2 12P94 1 Air Line Kit 1 40 1 40 3 20P72 1 Control Handle 2 Section Air 1 60 1 60 4 20P74 1 Air Pressure Protection Valve 0 60 0 60 5 20P95 2 Air Shift Kit V20 1 40...

Страница 95: ...R LINE KIT WHICH CONTAINS FITTINGS FOR MULTIPLE HOIST PLUMBING CONFIGURATIONS NOT ALL FITTINGS MAY BE UTILIZED 2 THE 20P95 AIR SHIFT KITS ARE TO BE INSTALLED ON THE HYD CONTROL VALVE BY THE HOIST INST...

Страница 96: ...TION WT lb ea WT lb all 1 13H76 1 Valve Mount Bkt 3 Sect 11 47 11 47 2 20P08 3 Control Handle Cable 2 80 8 40 3 20P10 3 Bonnet Kit V20 0 50 1 50 4 20P15 3 Control Cable Assy 84 STD 1 83 5 49 5 20P78 1...

Страница 97: ...13H76 1 Valve Mount Bkt 3 Sect 11 47 11 47 2 51H37 1 Air Ctrl Console 3 Sect 4 90 4 90 3 12P94 1 Air Line Kit 1 40 1 40 4 20P73 1 Control Handle 3 Sect Air 2 40 2 40 5 20P74 1 Air Pressure Protection...

Страница 98: ...AIR LINE KIT WHICH CONTAINS FITTINGS FOR MULTIPLE HOIST PLUMBING CONFIGURATIONS NOT ALL FITTINGS MAY BE UTILIZED 2 THE 20P95 AIR SHIFT KITS ARE TO BE INSTALLED ON THE HYD CONTROL VALVE BY THE HOIST IN...

Страница 99: ...8 3 4 4 41 8 82 5 25H91 2 Mount Bkt 8 1 4 x 11 3 68 7 36 6 00784 50 Washer Flat 1 2 Dia HT 0 01 0 50 7 00P01 20 HHCS 1 2 13 UNC x 1 1 2 Gr8 0 21 4 20 8 00P15 30 HHCS 1 2 13 UNC x 1 3 4 Gr8 0 20 6 00...

Страница 100: ...Hyd 20MP 16MP 0 70 0 70 2 11P20 2 Worm Gear Clamp HSS16 0 10 0 20 3 12P21 1 Adp Hyd 16MP 12FP 0 20 0 20 4 12P22 1 Adp Hyd 12HB 12MP 0 30 0 30 5 12P29 1 Hose 3 4 x 24 LP 0 88 0 88 6 20P05 1 Hyd Tank 15...

Страница 101: ...p Hyd 08MJ 08MB 90 LL 0 30 0 90 12 12P17 3 Adp Hyd 10MB 08FB 0 30 0 90 13 12P21 1 Adp Hyd 16MP 12FP 0 20 0 20 14 12P22 1 Adp Hyd 12HB 12MP 0 30 0 30 15 12P23 1 Adp Hyd 12HB 12MB90 0 60 0 60 16 12P29 1...

Страница 102: ...lb all 1 10P21 2 T Bolt Clamp 1 1 2 Dia 0 10 0 20 2 10P32 1 Adp Hyd 10MJ 12MB 45 0 30 0 30 3 10P61 1 Hose Assy 106 08 10FJ 10FJ90 3 80 3 80 4 12P18 1 Adp Hyd 16HB 16MB 0 40 0 40 5 12P19 1 Adp Hyd 10HB...

Страница 103: ...J 08FJ 90 0 30 0 60 2 10P63 2 HHCS 5 16 x 1 3 4 0 03 0 06 3 10P64 2 Cover Plate Clamp 1 2 0 10 0 20 4 10P65 2 Clamp Assy Twin 7 8 0 04 0 08 5 12P53 1 Hose Assy 21 08 08FJ 08FJ45 1 26 1 26 6 12P59 1 Ho...

Страница 104: ...5 16 x 1 3 4 0 03 0 06 5 10P64 2 Cover Plate Clamp 1 2 0 10 0 20 6 10P65 4 Clamp Assy Twin 7 8 0 04 0 16 7 12P53 1 Hose Assy 21 08 08FJ 08FJ45 1 26 1 26 8 12P59 1 Hose Assy 20 08 08FJ 08FJ45 1 22 1 2...

Страница 105: ......

Страница 106: ...1800 NE BROADWAY AVENUE DES MOINES IA 50313 TOLL FREE 888 767 8000...

Отзывы: