sWaP Nova Скачать руководство пользователя страница 14

.

13

sWaP Nova

 user guide

www.s-w-a-p.co.uk

Contents

Audio player

The audio player allows you to listen to your MP3 music 
tracks or podcasts wherever you may be. The audio 
player can also play .WAV and .M4A files.
Note: You can connect the wired earphones to hear 
your music in stereo.

1 From the clock face, tap 

Menu

2 Tap   (twice, if necessary). 
3 Tap 

Audio Player

. The playback screen will be  

displayed:

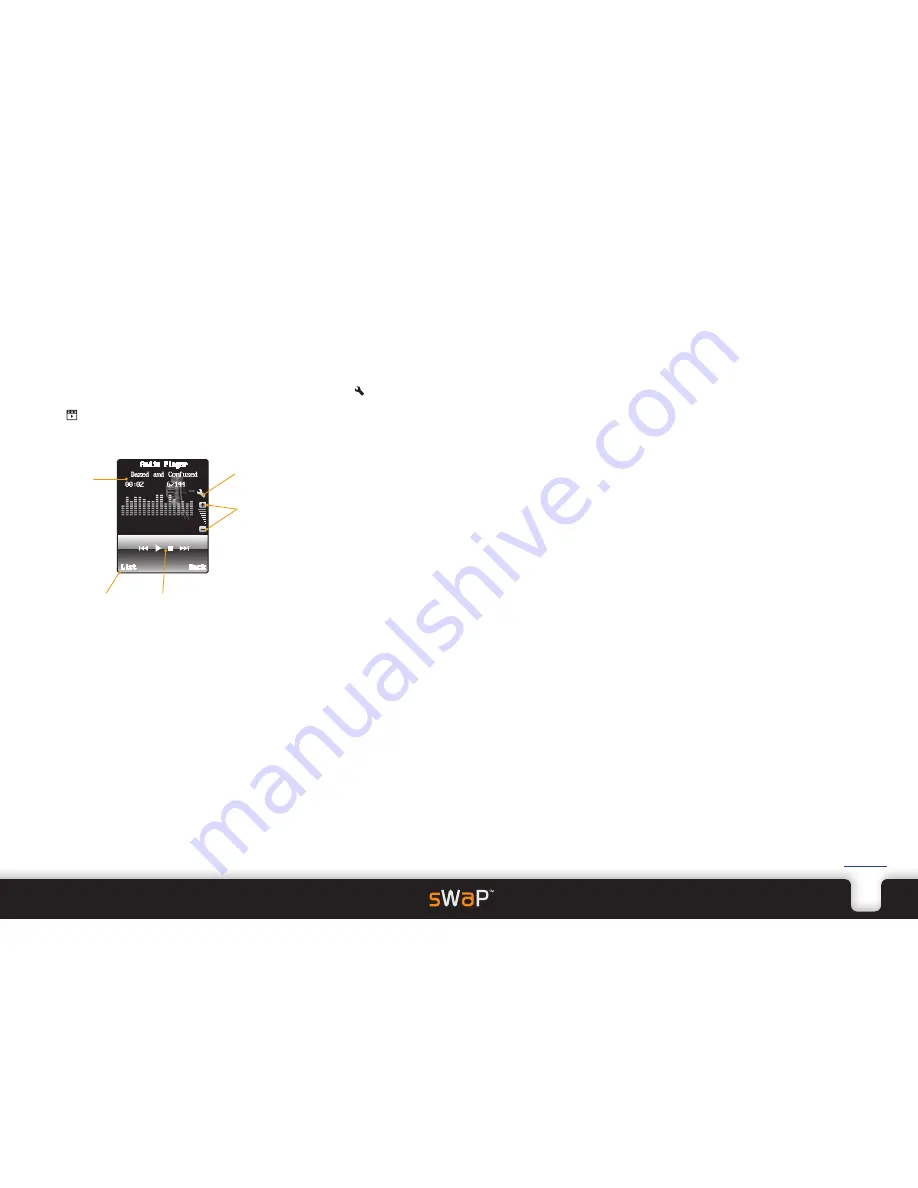
Selecting and playing a track

1 Tap 

List

 and then tap the required track name. 

2 Tap 

Play

 to commence playback. 

  You can now use the playback controls at the foot of 

the screen.

 Tap   to gain quick access to the playback settings 

menu.

  If a call is received (or initiated) while listening to a 

track, playback will be automatically stopped. If the 
Background Play option is enabled, then playback will 
automatically resume after the call is completed.

  Plug in the supplied wired earphones to hear playback 

in stereo.

Adding or transferring audio files

There are three main ways to add or transfer audio 
files:

• Use a USB link with your computer. See the USB link 

section later in this guide for details.

• Use Bluetooth to link with another device. See the 

Bluetooth section later in this guide for details.

• Using MMS to send/receive audio file attachments. See 

the MMS messaging section earlier in this guide for 
details.

Audio player options

Within the audio playback screen, tap 

List

 and then tap 

Option

 to view the menu:

• 

Details

 shows information about the selected track.

• 

Add to Ringtones

 copies the track to your ringtones 

list. See the Settings section for detail about using it.  

• 

Refresh list

 use this when tracks have been added or 

removed.

• 

Settings 

contains the following items: 


List auto gen

 set to On to automatically update the 

tracklist when changes occur.


Repeat 

allows you to play either a single track or your 

whole collection continuously. 


Shuffle 

when enabled, plays tracks in a random order.


Background Play 

when enabled, continues playing 

tracks even when you leave the audio player. Playback 
stops automatically when making or receiving a 
call. When this option is enabled, the track will 
automatically resume playing.


BT Stereo Output 

determines whether audio should 

be redirected to a Bluetooth stereo headphone device. 
This option can be enabled once you have chosen a 
suitable device using the option detailed below. 


BT Stereo Headset 

allows you to locate/choose a 

suitable Bluetooth stereo headphone device to use with 
the audio player. 


Spectrum Display

 determines the appearance of the 

on screen audio spectrum analyser when tracks are 
playing.


Lyrics Display

 determines whether song lyrics (when 

available) should be displayed during playback.

Show 

playlist

Current track 

timing, track 

number and 

name

View settings and 

access the equalizer

Volume increase  

and decrease

Playback 

controls

Содержание Nova

Страница 1: ...Nova user guide www s w a p co uk ...

Страница 2: ...ding a new entry 7 Copying entries 7 Finding an entry 7 Other Phone book options 7 Messages 8 SMS messages 8 MMS messages 10 Voice mail server 11 Broadcast message 11 Media 12 Photo album 12 Video player 12 Audio player 13 Sound recorder 14 FM radio 14 WAP 15 Settings 16 Pen Calibration 16 Organizer 16 File manager 18 Stopwatch 18 User Profiles 19 Phone Setup 19 Call Setup 20 Network Setup 20 Secu...

Страница 3: ...h resolution touch screen Speaker Call button End button Power button Microphone Slide out USB port Options port Up down button Things that you can do Insert your SIM card page 3 Charge the battery page 3 Switch on page 4 Dial answer a call page 5 Use the earphones page 6 Use the phone book page 7 Use messaging page 8 Use multimedia applications page 12 Access websites page 15 USB port eject butto...

Страница 4: ...g the slide out USB port 1 On the underside of your sWaP Nova slide the USB port button towards the base The USB connector will be revealed 2 Carefully insert the USB connector into a vacant socket on your computer TIP Keep your finger on the USB port button to prevent the connector from retracting back into sWaP Nova 3 If your computer is not already switched on switch it on to start charging you...

Страница 5: ...ce analog or digital s a W P 14 Analog clock face Tap here to access the main menu Tap here to access your Phone book Digital clock face Name of the current network The chosen clock face will overlaid with the current network name plus selectable options in the two lower corners The top edge of the clock face will also show one or more of the following status icons Signal level 0 to 4 bars Battery...

Страница 6: ...the dial page 2 Tap the phone number and then press Alternatively tap to access your Phone book 1 2 3 4 5 6 7 8 9 0 Answering a call When the call alert sounds press to answer Alternatively to reject the call press or tap Reject in the lower right corner Voice activation From the clock face press and hold the down button located on the side of your sWaP Nova and then say either CALL xyz or FIND xy...

Страница 7: ...as text message quantities and data usage You can use these records to make calls populate your Phone book and or keep track of your call charges 1 From the clock face tap Menu 2 Tap twice if necessary to view the Call history options Missed Calls Dialed Calls Received Calls Delete Call Log Call Time SMS Counter GPRS Counter Select the required item to view a list of related options or details Usi...

Страница 8: ...ys By scrolling through the list of contacts or by entering one or more characters of the name to make a search Finding an entry by scrolling 1 From the clock face tap Contacts 2 Tap the up or down arrows or use the up down button to scroll through the list 3 When the required entry is highlighted tap to dial or tap Option to send a message or edit the entry Finding an entry by searching 1 From th...

Страница 9: ...ts to your message Tap Option Insert number from your Phone book Insert name from your Phone book Insert object to add small images animations or melodies Format text to change the size style and alignment of the characters Use templates to quickly add a standard phrase to your message Insert bookmark to add internet addresses stored in the WAP browser Note Not all mobile phones are able to displa...

Страница 10: ...hem or delete all messages from a particular sender Copy to Move to Copy All and Move All allow you to copy or transfer messages from one memory area to the other Delete All allows you to keep your Inbox clear of clutter Use Number and Use URL are particularly useful when there are phone numbers or website addresses within the original message These options allow you to use them to make calls save...

Страница 11: ...icture Add Audio Add Video or Add Attachment In each case tap Phone or Memory Card to choose the location of the item Your sWaP Nova applications use Phone storage as standard however this can be changed within each application the memory card has a much larger capacity You will then see the folders located within the chosen storage area e g Images Audio Photos Video etc Tap the appropriate folder...

Страница 12: ...p the appropriate network provider name and tap Activate Protocol This process is required only once you are now ready to use the MMS application Voice mail server This option allows you to configure the phone number of your network service provider s voice mail system These details are often set automatically by your SIM card 1 From the clock face tap Menu 2 Tap twice if necessary 3 Tap Voice Mai...

Страница 13: ...r screensaver or power on off image as the picture for a contact in your Phone book or send the photo to someone either via MMS message or by Bluetooth link The latter option will guide you through the process of searching for and bonding with a Bluetooth device in your vicinity Rename allows you to change the standard filename Delete and Delete All Files allow you to clear away unwanted photos So...

Страница 14: ...for details Audio player options Within the audio playback screen tap List and then tap Option to view the menu Details shows information about the selected track Add to Ringtones copies the track to your ringtones list See the Settings section for detail about using it Refresh list use this when tracks have been added or removed Settings contains the following items List auto gen set to On to aut...

Страница 15: ...cordings Forward allows you to copy the entry for use as an alert tone or send it to someone either via MMS message or by Bluetooth link The latter option will guide you through the process of searching for and bonding with a Bluetooth device in your vicinity FM radio This allows you to listen to any FM radio stations available within your vicinity The stereo headphones must be used uncoiled as th...

Страница 16: ...then there may be a configuration problem see WAP connection configuration for details Once a data connection is made the website will be located and displayed Note While it is possible to access normal websites some will not display correctly because they are designed only for large screens Many organisations offer WAP alternatives which are optimised for compact screens Within each webpage you w...

Страница 17: ...ould in normal operation For best results go through the procedure twice Repeat the procedure once a month to keep accuracy at the opimum level Organizer The organizer contains a number of useful applications for everyday use 1 From the clock face tap Menu 2 Tap twice if necessary 3 Tap Organizer The list of applications will be displayed Calendar This application will ensure that you never forget...

Страница 18: ...ymbol to indicate night and day You can either use the left and right buttons to change to the next city or tap on the map to highlight the nearest featured city within each timezone Tap Option to choose whether the Daylight Saving Time should be switched on or off Calculator Access the Organizer and then tap Calculator The calculator keypad and readout will be shown Tap your figures and operand s...

Страница 19: ... remove the pairing bond File manager Access the Organizer and then tap File Manager Allows you to organise the memory storage areas within your sWaP Nova The screen will show the Phone and Memory Card locations along with total size and free space information To view folders files within a location Tap on a storage location Phone or Memory Card If necessary use the scroll buttons on the right sid...

Страница 20: ...ur sWaP Nova Preferred Input Method determines which on screen keypad is displayed first when you need to enter details Display Characteristics contains numerous settings related to the visual aspects of operation Wallpaper allows you to choose the image that is displayed behind all menus You can choose a standard image from the System option or choose one of your own that is stored within memory ...

Страница 21: ...cel All Change Barring PW password In each case apart from the last two you can Activate Deactivate or Query Status to discover the current setting Restrictive Call allows you to prevent your sWaP Nova from making any outgoing calls Within this option you can choose Call Receive for normal operation or Receive Only to restrict operation to receiving incoming calls only Call Time Reminder allows yo...

Страница 22: ... button and then tap your stylus on a displayed target to unlock your sWaP Nova Fixed Dial allows you to define one or more phone numbers which may be dialled from your sWaP Nova When the Fixed Dial Mode is then enabled only those numbers can be dialled This feature is subject to support from your service provider Barred Dial allows you to define one or more phone numbers which you wish to prevent...

Страница 23: ...sert the small plug of the supplied USB cable into the Options port at the base of your sWaP Nova Options port Note Be sure to insert the plug into the correct socket and in the correct orientation The Options port is the smaller socket just above the slide USB port It has rounded corners on its lower side corresponding to similar corners on the plug 2 Insert the larger plug at the other end of th...

Страница 24: ...ite this number down in advance and store it in a safe place RF energy interference compatibilities Note Nearly every electronic device is susceptible to RF energy interference from external sources if inadequately shielded designed or otherwise configured for RF energy compatibility In some circumstances your sWaP Nova may cause interference Facilities and hazardous areas Turn off your sWaP Nova ...

Страница 25: ...gh periodic and thorough evaluation of scientific studies The standards include a substantial safety margin designed to assure the safety of all persons regardless of age or health The exposure standard for wireless phone devices employs a unit of measurement known as the Specific Absorption Rate or SAR The SAR limit recommended by the International Commission on Non Ionizing Radiation Protection ...

Страница 26: ...tions 1 This device may not cause harmful interference and 2 this device must accept any interference received including interference that may cause undesired operation Note This equipment has been tested and found to comply with the limits for a Class B digital device pursuant to part 15 of the FCC Rules These limits are designed to provide reasonable protection against harmful interference in a ...

Отзывы: