B
ASIC
SETUP
EN
BASIC SETUP
13
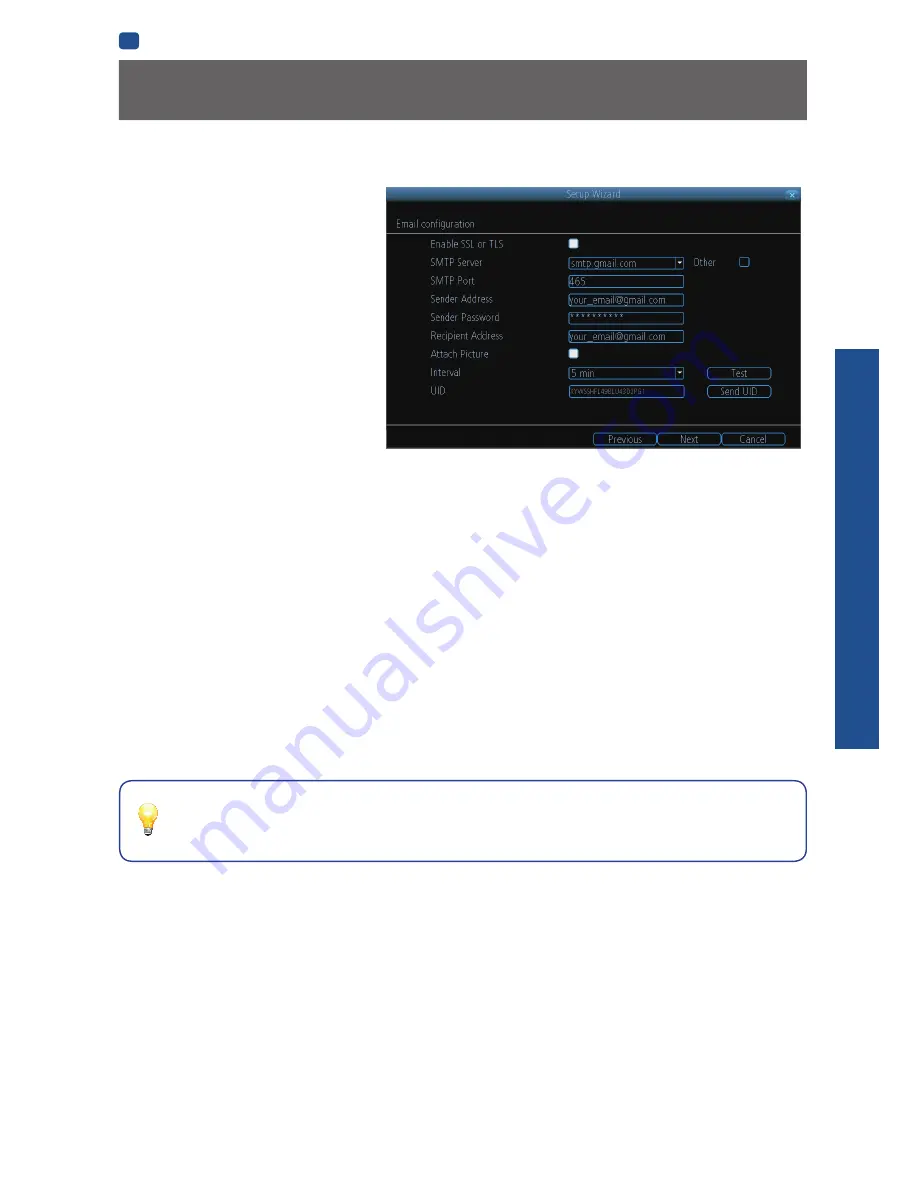
Setup Wizard: Email
If you want the DVR to send email alerts as alarm
events are detected, then you’ll need to configure
an outgoing email server for the DVR to use, and
choose an email address for it to send to.
We recommend creating an account with Gmail
(www.gmail.com) specifically for the DVR.
These instructions assume you’re using a GMail
account. If you’re using a different email, see
“Network: Advanced: Email Settings” on page
36
for details.
Enable SSL or TLS:
Enable.
SMTP Server:
The SMTP address of your email
server. There are 3 preset options to select from:
smtp.gmail.com, smtp.live.com or smtp.mail.yahoo.
com
Other:
Allows for custom definintion of an outgoing
email server. See
“Network: Advanced: Email
Settings” on page 36
if you want to use an email server other than ones provided.
Recommended for advanced users ONLY.
SMTP Port:
The SMTP port of your email server. Gmail’s is 465
(this value will self-populate)
Sender Address:
The email address you want your DVR to send alerts from. For example,
your_email
@gmail.com
Sender Password:
The password of your sending email address.
Recipient Address :
Enter an email address for the DVR to send alerts to (usually your personal email address).
Attach Picture:
When selected, the DVR will attach a still image to better illustrate what has caused the alarm/alert state.
Interval:
The minimum amount of time that must elapse after the DVR sends an email alert before it can be triggered again.
Test:
To check if you’ve set up email alerts properly, click the Test button. If your connection and email details are ok, you will see
a message on the DVR screen confirming the email was sent successfully. After a short delay, you will also receive an e-mail in
your inbox (
Recipient’s Address
) informing you that email alerts from the DVR has been set up. If the test is unsuccessful, please
check your sender’s address/password and recipient’s address(es) and try again.
UID:
This is the DVR’s
U
nique
ID
entifier number. We will use this UID to configure the SwannView Link app & software and
connect to your DVR. You can click the
Send UID
button to receive an email containing the UID (that’s assuming your email
details are configured).
Send UID:
When you’ve finished testing your email, click the
Send UID
button to send the DVR UID to your email address
(
Recipient’s Address
) so you can use it for access from SwannView Link on your PC etc.
Your DVR does not send out email alerts immediately when events occur.
The frequency of email alerts depends on the “Interval” setting you specify here.
Содержание 960H
Страница 1: ...English 1 INSTRUCTION MANUAL EN 960H Digital Video Recorder 8 9 channel models ...
Страница 4: ...4 Chapter 1 Introduction ...
Страница 10: ...10 Chapter 2 Basic Setup ...
Страница 22: ...22 Chapter 3 Menu Functions ...
Страница 50: ...50 Chapter 4 Reference ...


