30
2
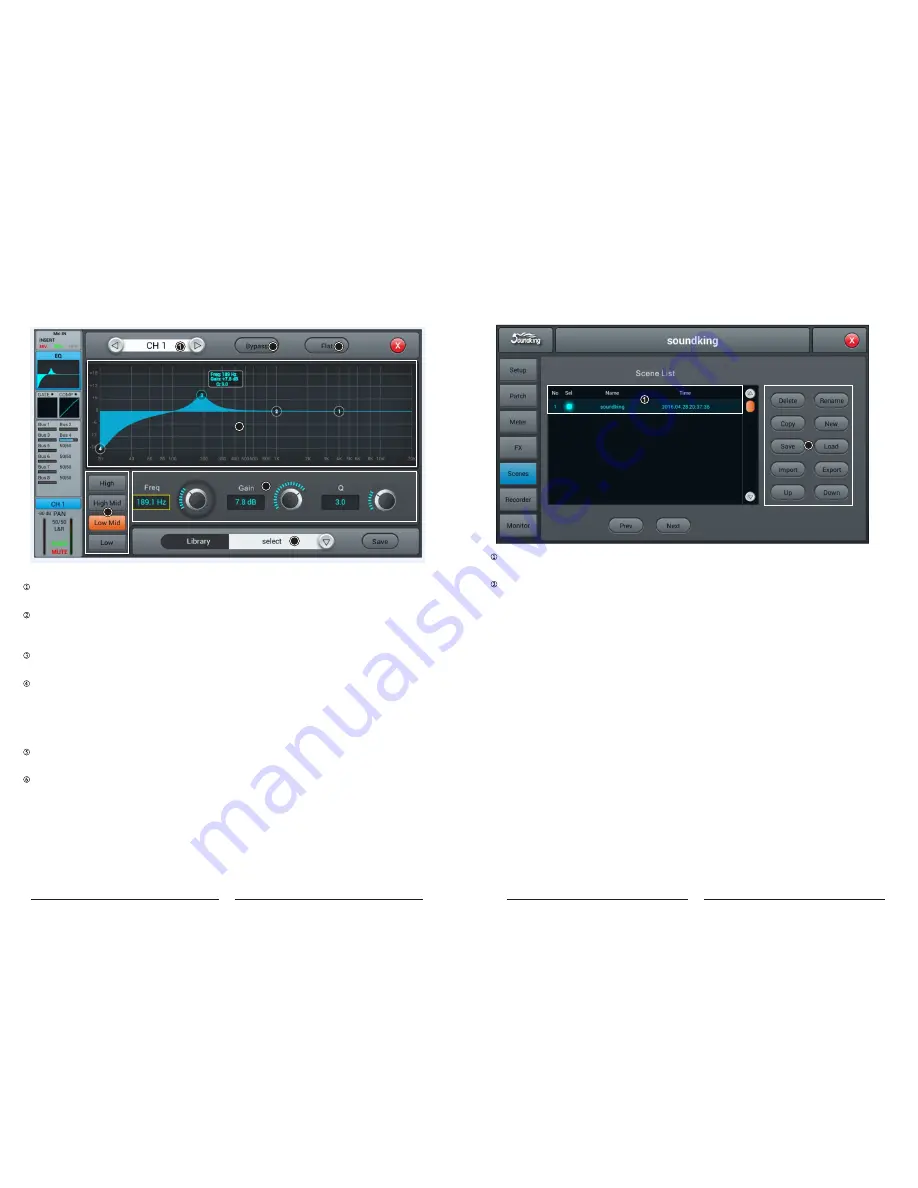
Scenes Page
The page contains Scene List and operations for scenes.
Scene List
Scene List contains number(No) selection(Sel) name(Name) and creat/update time(Time). To select
a certain scene through single pressing option frame in the Sel column.
Operation
Delete
Delete scenes. When select a scene, single press the button, a dialog pops up
“
Are you sure you
Want to delete this scene
?”
single press
“
Yes
”
to delete the scene, single press
“
No
”
to cancel delete.
Rename
Rename scene. When select a scene, single press the button, then you could edit the name
the scene through a soft-keyboard popping up. Press confirm once you have renamed the scene.
Copy
Copy scene. When select a scene, single press the button, to insert copied new scene after selected
scene, the system will automatically name it as
“
(copied scene name)_copy
”
.
New
Create scene. Single press the button, to insert new scene after selected scene or current scene,
system will name it as
“
New *
”
(* being a number, equals to the number of scene+1).
Save
Save scene. Single press the button, to save console's settings to the current scene.
Load:
Load scene. When select a scene, single press the button to load the scene.
Import
load a scene from a USB disk. Single press the button, a dialog pops up
“
Compressed file list
”
,
select scene* list beneath
“
Compressed file list
”
, to load scene from USB disk to the scene list on the
console. If load successfully, system prompts
“
Import success
”
, press
“
Confirm
”
and selected scene will
be transported to the console from the U disk. If USB disk cannot be found, then prompts
“
No USB stick
detected, please reconnect and try again.
”
If cannot find scene file in the USB disk, then prompts
“
Scenes
file not found on USB stick!
”
. If loaded scene shares a same name with the scene file in the console, the
system will automatically rename it as
“
(original file name)_USB
”
.
Export Export
scene file from console to USB disk. Single press
“
Sel
”
option frame in the scene list, to
select scene to be exported. They can be exported individually or multiply. Then single press
“
Export
”
button. If export successfully, system prompts
“
Export success
”
, press
“
Confirm
”
to export selected
scenes to USB disk. If USB disk cannot be found, then prompts
“
No USB stick detected, please reconnect
and try again.
”
Up
move scene upward. When select a scene, single press the button to move selected scene upward,
one press for one row.
Down
move scene downward. When select a scene, single press the button to move selected scene
downward, one press for one row. This function can be used to serve sorting purpose in both ascending
order and descending order.
Prev
browse previous scene. Single press
“
Load
”
to load the current scene once you have seen the
scene you want
Next
browse next scene. Single press
“
Load
”
to load the current scene once you have seen the scene
you want
EQ Sub Page
9
2
3
4
5
6
7
Switch Channels
Single press the key to switch between previous or next channel on the same layer
Bypass
Single press the key to enable Bypass, i.e. bypassed the EQ, press again to bring the EQ back. The default
is set as disabled.
Flat
Single press the key to flat the curves in EQ graph. The default is set as disabled.
4-band EQ graph
There are four points on the curve stand for the key frequencies (each ranges from 20Hz to 20KHz) of four
brands EQ filters, which you could drag, in order to set parameters of 4-band EQ filters. There is a floating
frame shows the parameter (gain, key frequency and Q value) of this filter when you selected a certain point
on the curve.
Select Key of 4-band EQ filter
Single press the key of a certain frequency range, to select the filter for it.
Parameter Settings
To adjust Gain, Frequency or Q value with the touch knob or the knob on the control panel (general tuning
by normally turning the main Encoder, press down the knob to access to the fine tuning)
Gain:
to allow 18dB reduction or increase within the selected frequency range, default as 0dB.
Frequency
: adjust the key frequencies of 4-bandfilters in the EQ. The default of HF is set as 4kHz, HMF
as 1kHz, LMF as 200 Hz, LF as 60Hz.
Q:
adjust the bandwidth of 4-band filters in the EQ, ranges from 0.5(wide) to 10.0(narrow),default as 0.5.


