4-15
Chapter 4: Chassis Setup and Maintenance
Perforated Tabs
Perforated Tabs
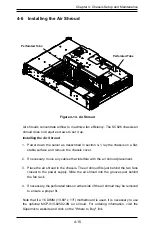
4-6 Installing the Air Shroud
Figure 4-14. Air Shroud
Air shrouds concentrate airflow to maximize fan efficiency. The SC826 chassis air
shroud does not require screws to set it up.
Installing the Air Shroud
1.
Power down the server as desscribed in section 4-1, lay the chassis on a flat,
stable surface and remove the chassis cover.
2. If necessary, move any cables that interfere with the air shroud placement.
3.
Place the air shroud in the chassis. The air shroud fits just behind the two fans
closest to the power supply. Slide the air shroud into the grooves just behind
the fan rack.
4. If necessary, the perforated tabs on either side of the air shroud may be removed
to ensure a proper fit.
Note that if a 16 DIMM (13.68" x 13") motherboard is used, it is necessary to use
the optional MCP-310-82502-0N air shroud. For ordering information, visit the
Supermicro website and click on the "Where to Buy" link.
Содержание SC826 Series
Страница 12: ...SC826 Chassis Manual 1 6 Notes ...
Страница 56: ...SC826 Chassis Manual 4 18 Figure 4 16 Placing the System Fan in the Chassis 3 5 ...
Страница 60: ...SC826 Chassis Manual 4 22 Notes ...
Страница 72: ...SC826 Chassis Manual A 4 Notes ...
Страница 84: ...C 10 SC826 Chassis Manual Notes ...
Страница 94: ...D 10 SC826 Chassis Manual Notes ...
Страница 134: ...F 18 SC826 Chassis Manual Notes ...
Страница 145: ...G 11 Appendix G Cascading Configurations Notes ...

