48
5) Adjustment of automatic thread trimmer
A. Bring in parallel side
②
of the moving blade
①
and
side
④
of the moving blade body
③
.
B. Adjust the screw
⑤
.
(2) Position of moving blade
A. Unfasten the screw
⑩
.
B. Bring in parallel the needle thread hook
⑥
of the
moving blade and the corner
⑧
of the fixed blade
⑦
.
C. When the moving blade is at the far right, move the
fixed blade
⑦
left and right to set the clearance
between the fixed blade
⑦
and the looper thread hook
at 0.5mm.
D. Tighten the screw
⑩
.
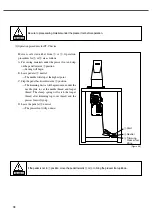
(3) Adjustment between moving blade and fixed blade
[ Figure 85 ]
Before adjustments, always turn off the motor switch and check to make sure that the motor is in stop
mode.
Warning
The trimming device can be moved
manually only when the needle is at
the highest point. Otherwise, parts
can be damaged.
Warning
[ Figure 84 ]
②
⑤
①
④
③
⑨
⑥ ⑧
⑦
⑩
0.5mm
(1) Adjusting thread trimming air cylinder
A. The desirable stroke is 25mm.
B. Adjust the sub guide shaft
①
and the rod end bearing
②
, and conduck setting as in the figure.
[ Figure 83 ]
②
①
47mm
96mm
The operation status of the
automatic thread trimmer should
be re-adjusted when air cylinder
stroke changes. Check the status
of the limit switch.
(Refer to 9-2 Wiring)
Caution


