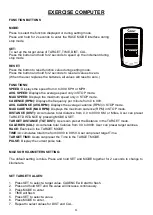
background image

12 


1. 

TARGET: the preset CADENCE. 

2.

 In STOP mode, press SET key to enter the TARGET setting in stop mode. Press SET to increase 

the  CADENCE  five  at  a  time.  The  setting  change  is  15 

20


……

110

115

120

15

20

→……→

115

120

 15 

20


……


3. 

The setting range of 15 -120 (Preset value is 60 CADENCES which equals six bars). 

4. 

Each bar equals 10 CADENCE. Total is 12 bars. 


Each arrow equals 10 CADENCES (1-10 CADENCES displays one arrow, 11-

20 displays two). The maximum arrows displayed is 12.  

This  down  arrow  next  to  the  bicycle  icon  will  be  displayed  when  the  current 

CADENCE is more than the TARGET CADENCE. The bicycle icon will be displayed during exercise 
mode.  
 

RACE MODE: 

Press and hold MODE for 2 seconds to enter RACE mode.  
In RACE MODE, only TIME and DIST can be set. 
Default values for 10 minutes / 4 (KM or Miles). 
Total is 10 bars. 


PULSE: 

To measure the pulse, press MODE until computer is on the PULSE function. Hold the handle pulse 
sensors for at least 5 seconds to measure your pulse. This value is for reference only. It cannot be 
used as the basis for medical treatment. 
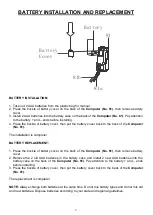
 

BATTERY: 

This computer uses two AAA batteries. If the display appears incorrectly or becomes 

difficult to read, please install new batteries. Always change both batteries at the same time. Do not 
mix battery types and do not mix old and new batteries. Dispose batteries according to your state 
and regional guidelines. 

When Current CADENCE is less than Target CADENCE, 
the up arrow next to the bicycle will be displayed. 

Содержание SF-B1876

Страница 1: ...1876 USER MANUAL IMPORTANT Please retain owner s manual for maintenance and adjustment instructions Your satisfaction is very important to us PLEASE DO NOT RETURN UNTIL YOU HAVE CONTACTED US support s...

Страница 2: ...equipment The equipment is designed for adult use only 4 Use the equipment on a solid flat level surface with a protective cover for your floor or carpet To ensure safety the equipment should have at...

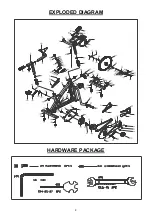
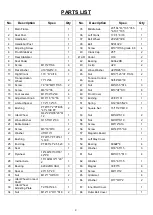
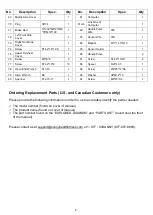
Страница 3: ...2 EXPLODED DIAGRAM HARDWARE PACKAGE...

Страница 4: ...Cover 1 16 Adjustment Knob M16 1 5 18 56 3 50 Bushing 20 20 101 1 17 Limited Spacer 17 2 17 2 35 1 51 Spring 12 49 5 N20 1 18 Bushing PT45 51 2 PTB35 41 L198 PP 2 52 Square Nut 15 15 25 M10 1 19 Idler...

Страница 5: ...w ST4 0 19 7 2 77 Screw ST4 2 16 8 10 88 Spacer 20 43 5 1 78 Open End Wrench S13 15 1 89 Screw M8 25 12 S6 1 79 Allen Wrench S6 1 90 Washer d6 12 1 5 1 80 Spanner S14 15 17 1 91 Screw M8 45 S6 1 Order...

Страница 6: ...o 41R are marked L for the left pedal and R for the right pedal Left Pedal Align the Left Pedal No 41L with the Left Crank No 36 at 90 degrees Gently insert the pedal into the crank arm turn the pedal...

Страница 7: ...of the Main Frame No 1 Adjust the Handlebar Post No 4 to the desired position then secure it in place by reinserting and tightening the Adjustment Knob No 16 Attach the Handlebar No 3 to the Handlebar...

Страница 8: ...the Computer No 81 The installation is complete BATTERY REPLACEMENT 1 Press the buckle of battery cover on the back of the Computer No 81 then remove battery cover 2 Remove the 2 old AAA batteries in...

Страница 9: ...aise or lower the seat to the desired height Once adjusted re insert and tighten the Adjustment Knob No 16 to secure the seat in place To adjust the seat back and forth loosen and pull Adjustment Knob...

Страница 10: ...irmly grasp and hold each side of the handlebar place one foot on the front stabilizer and tilt the bike towards you until the transportation wheels on the front stabilizer touch the ground With the w...

Страница 11: ...time 2 Check your pedals each time before you ride the bike 3 When the pedal starts to wear on the axle it will not function properly We recommend you replace the entire pedal USE Engaging Disengagin...

Страница 12: ...e cadence RPM in STOP mode MAX CADENCE MAX RPM Displays the maximum cadence RPM in STOP mode DISTANCE DIST Accumulates total distance from 0 0 to 999 9 KM or Miles User can preset TARGET DISTANCE by p...

Страница 13: ...ode RACE MODE Press and hold MODE for 2 seconds to enter RACE mode In RACE MODE only TIME and DIST can be set Default values for 10 minutes 4 KM or Miles Total is 10 bars PULSE To measure the pulse pr...

Страница 14: ...damage 3 Clean and lubricate pop pin assemblies Pull on the pin and spray a small amount of lubricant onto the shaft 4 Tighten the seat hardware to make sure the seat is level and centered 5 Brush an...

Страница 15: ...14...

Отзывы: