background image


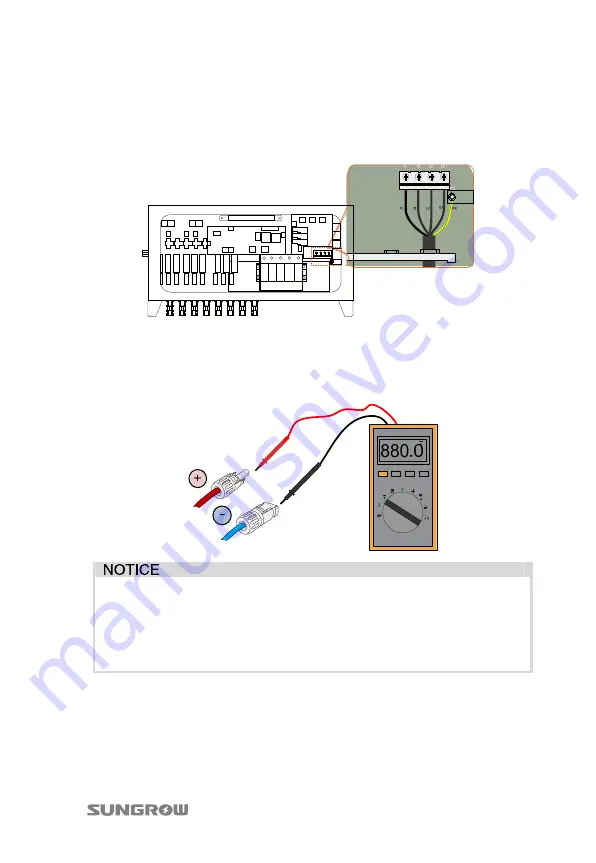
3-3 AC Connection 

Pull the cables and connect L1/L2/L3/N/PE cables ends to the corresponding 
terminal blocks. Fix the AC cable to the corresponding terminals with torque of 
8…12 N

m.


3-4 DC Connection 

Step 1


Check the connection cable of PV string for the correct polarity and that the 
open-circuit voltage does not exceed the inverter input limit 1100V, even 
under the lowest operating temperature.   


• 

Check the positive and negative polarity of the PV cells. After 
confirmation, you can insert the DC connectors into the input terminals 
on the bottom of the inverter. 

• 

For the same MPPT, reverse connection of a single string is prohibited. 
A permanent failure of the system or inverter may follow if otherwise. 


Содержание SG36KRL-M

Страница 1: ...uctions of the user manual and other related regulations before installing the equipment Any violation could result in personal death or injury or device damage 1 Unpacking and Inspection Step 1 Remov...

Страница 2: ...nclude quality certificate packing list product test report and quick user manual D Fastener set Six units It is used for fastening backplate onto metal frame E Fix screws 2 M4 16 screws for fix the i...

Страница 3: ...horizontal position Step 2 Mark the positions to drill holes by using the backplate as the template Step 3 Drill 6 holes at the marks you have made If the shape of the metal frame doesn t fit the hole...

Страница 4: ...n the back of the inverter fit perfectly together with the backplate Step 6 After fit the inverter to the backplate fasten the inverter to the backplate with two M4 16 screws Item Description Remark A...

Страница 5: ...er are not live before you start the electrical work Do not turn on the AC side or DC side circuit breaker until all inverter electrical connections have completed 3 1 Open the Connection Cabinet Loos...

Страница 6: ...cables Range 16 50mm2 DC Cables Cross sectional area Cable External diameter Max withstand voltage Max input current for each PV string 4 6mm2 12AWG 10AWG 6 9mm 1100V 12A Second PE Cable The cross se...

Страница 7: ...the correct polarity and that the open circuit voltage does not exceed the inverter input limit 1100V even under the lowest operating temperature Check the positive and negative polarity of the PV ce...

Страница 8: ...There is a second PE terminal on one side of the inverter and it should be grounded Fig 3 1 Second PE terminal The ground connection of this second PE terminal cannot replace the connection of the PE...

Страница 9: ...re provided on the configuration circuit board of the junction box A 120 terminating resistor can be connected between the A and B communication cable through the dip switch 3 7 Completing Installatio...

Страница 10: ...ter it is referred to as Press Press for more than two seconds Return to the previous menu or cancel the command Hereinafter it is referred to as Press ESC Press for less than 2 seconds Move left or r...

Страница 11: ...where LV signifying low voltage grid MV signifying medium voltage grid Press to select grid code and press ENTER to confirm If the country code set as TK a Grid codes page as shown in the right will a...

Страница 12: ...the data logging Press to move the cursor and Press to set the specific time and date Press ENTER to confirm setting Step 9 After configuring all parameters there will be a setting confirmation scree...

Отзывы: