background image

1

Component List

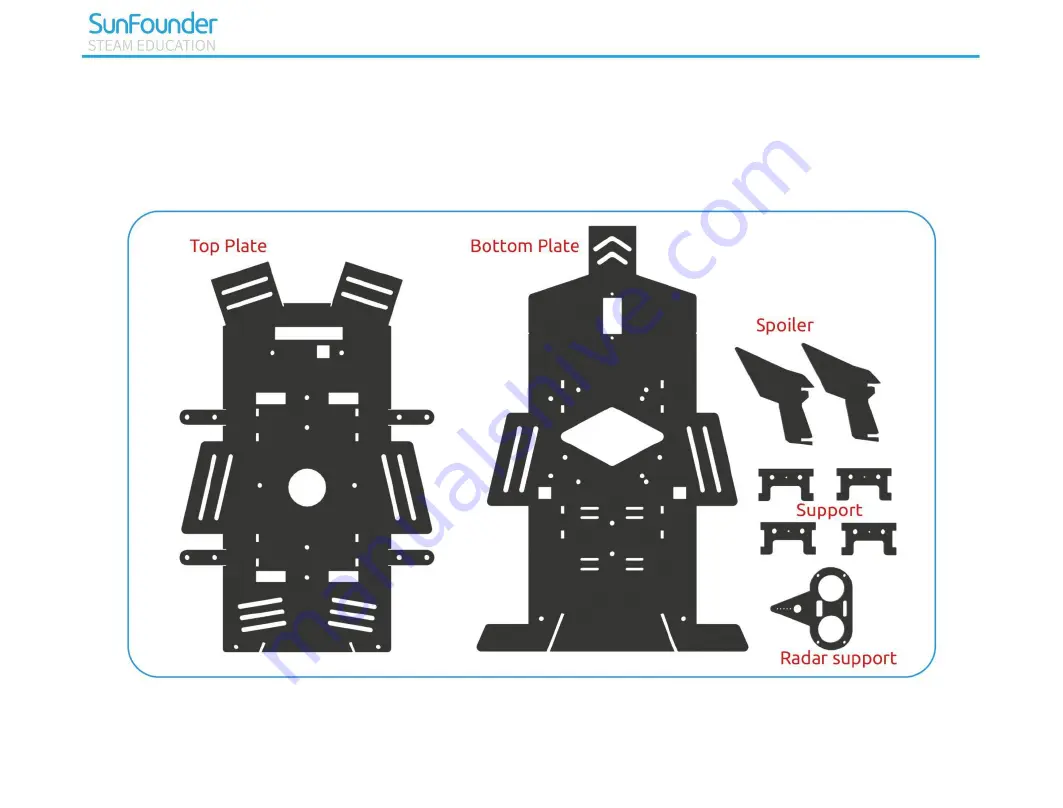
Structural Plates

Содержание PiCar-4WD

Страница 1: ...exposing you to a fascinating world of science and engineering To embrace the future of artificial intelligence it is urgent and meaningful to learn abundant STEAM knowledge About This Kit PiCar 4WD is a cost effectively developmental smart car kit of Raspberry Pi suitable for the Raspberry Pi 3 model B B and 4 Model B With the grayscale module ultrasonic module Photo interrupter sensor module the...

Страница 2: ...ues please send an email to service sunfounder com You re also welcomed to share your projects on FORUM Copyright Notice All contents including but not limited to texts images and code in this manual are owned by the SunFounder Company You should only use it for personal study investigation enjoyment or other non commercial or nonprofit purposes under the related regulations and copyrights laws wi...

Страница 3: ...this product near any liquid or fire Keep conductive materials away from this product Do not allow children under 3 years old to use this product without adult supervision Please place this product in the position where children under 3 years old cannot reach Do not store or use this product in any extreme environments such as extreme hot or cold high humidity and etc Remember to break the circuit...

Страница 4: ... 6 Get Started with Raspberry Pi 7 If You Have A Screen 8 Required Components 8 Procedures 9 If You Have No Screen 20 Required Components 20 Burn System 20 Connect the Raspberry Pi to the Internet 22 Start SSH 23 Power on the Raspberry Pi 23 Get the IP Address 24 Use the SSH Remote Control 26 Download the Code 30 Test the Modules 31 ...

Страница 5: ...Assembling Battery Holder 40 Assembling Servo 41 Assembling Nylon Standoffs 42 Assembling Top Plate and Bottom Plate 43 Assembling Spoiler 44 Assembling Control Board 45 Connect Wires 46 Assembling Radar Support 47 Assembling Ultrasonic Sensor Module 48 Assembling Wheels finished 49 Web Control 50 Boot Web Control 50 Setting Page 53 Python Program Control 60 Python Example Program 60 Python Exampl...

Страница 6: ...1 Component List Structural Plates ...

Страница 7: ...2 Mechanical Parts ...

Страница 8: ...3 Electronic Parts ...

Страница 9: ...4 Other Parts ...

Страница 10: ...5 ...

Страница 11: ...6 Driving Parts Self prepared Part Note After opening the package please check whether the quantity of components is compliance with product description and whether all components are in good condition ...

Страница 12: ...tem You are recommend to install the version Raspbian Buster with desktop and recommended software If you have installed the other two versions you need to install the following softwares manually and then skip this chapter sudo apt get update sudo apt get install git core sudo apt get install python3 pip sudo pip3 install setuptools If you are a beginner for Raspberry Pi please follow this chapte...

Страница 13: ...ons in this chapter Otherwise please find the corresponding steps in the following chapters If You Have A Screen If you have a screen you can use the NOOBS New Out Of Box System to install the Raspbian system Required Components Any Raspberry Pi 1 2 5A Power Adapter 1 Monitor 1 Monitor Power Adapter 1 HDMI cable 1 Micro SD card 1 Mouse 1 Keyboard 1 Personal Computer ...

Страница 14: ...e NOOBS LITE can only be operated online Here you are suggested to use the former Here is the download address of Noobs https www raspberrypi org downloads noobs Step 2 Plug in the Micro SD reader and format the Micro SD card with the SD Formatter https www sdcard org downloads formatter index html If there are some important files in the Micro SD card please backup them first ...

Страница 15: ...ebsite Find the downloaded archive by default it should be in your Downloads folder Double click on it to extract the files and keep the resulting Explorer Finder window open Finally select all the files in the NOOBS folder and copy them to the Micro SD card Step 4 All the files transferred the Micro SD card pops up ...

Страница 16: ...ro SD card into the Raspberry Pi In addition connect the screen keyboard and mouse to it Finally switch on the 4WD Hat board Due to the long test time you can also plug a 2 5A power adapter into the Raspberry Pi Switch On Off ...

Страница 17: ... starting up If you use NOOBS LITE you need to select Wi Fi networks w first Tick the checkbox of the Raspbian and click Install in the top left corner The NOOBS will help to conduct the installation automatically This process will take a few minutes ...

Страница 18: ...13 Step 7 When the installation is done the system will restart automatically and the desktop of the system will appear ...

Страница 19: ...14 Step 8 If you run Raspberry Pi for the first time the application of Welcome to Raspberry Pi pops up and guides you to perform the initial setup ...

Страница 20: ...15 Step 9 Set country region language and time zone and then click next again ...

Страница 21: ...16 Step 10 Input the new password of Raspberry Pi and click Next ...

Страница 22: ...17 Step 11 Connect the Raspberry Pi to WIFI and click Next ...

Страница 23: ...18 Step 12 Retrieve update ...

Страница 24: ... 13 Click Done to complete the Settings Now we can run the Raspberry Pi Note You can check the complete tutorial of NOOBS on the official website of the Raspberry Pi https www raspberrypi org help noobs setup ...

Страница 25: ... 1 2 5A Power Adapter 1 Micro SD card 1 Personal computer Burn System Step 1 Prepare the tool of image burning Here we use the balenaEtcher You can download the software from the link https www balena io etcher Step 2 Download the complete image on the official website by clicking this link https www raspberrypi org downloads raspbian There are three different kinds of Raspbian system available Yo...

Страница 26: ... DO NOT extract the file Step 4 Plug the USB Card Reader into the computer then you can burn the image file with the Etcher At this point Raspbian is installed Keep the USB card reader plug in your computer If you want to apply it next you need to complete the settings accordingly ...

Страница 27: ... card by your PC that is located in the directory etc wpa supplicant If your personal computer is working on a linux system you can access the directory directly to modify the configuration file however if your PC use Windows system then you can t access the directory and what you need next is to go to the directory boot to create a new file with the same name wpa supplicant conf Input the followi...

Страница 28: ... control of the Raspberry Pi you need to start SSH firstly that is a more reliable protocol providing security for remote login sessions and other network services Generally SSH of Raspberry Pi is in a disabled state Additionally if you want to run it you need to create a file named SSH under directory boot Now the Raspbian system is configured Power on the Raspberry Pi You can plug out the USB ca...

Страница 29: ...s After the Raspberry Pi is powered on with a 2 5A power adapter we need to get the IP address of it There are many ways to know the IP address and two of them are listed as follows 1 Checking via the router Switch On Off ...

Страница 30: ...need to find it If you are using ArchLinuxARM system please find alarmpi 2 Network Segment Scanning You can also use network scanning to look up the IP address of Raspberry Pi You can apply the software Advanced IP scanner download from Google Click Scan and the name of all connected devices will be displayed Similarly the default hostname of the Raspbian system is raspberrypi now you need to find...

Страница 31: ...ram written in C that is the bridge linking the customers and Unix Linux Moreover it can help to complete most of the work needed For Linux or Mac OS X Users Step 1 Go to Applications Utilities find the Terminal and open it Step 2 Type in ssh pi ip_address pi is your username and ip_address is your IP address For example ssh pi 192 168 18 197 Step 3 Input yes ...

Страница 32: ...ssword is raspberry Step 5 We now get the Raspberry Pi connected and are ready to go to the next step Note When you input the password the characters do not display on window accordingly which is normal What you need is to input the correct passcode ...

Страница 33: ... with the application of some software Here we recommend PuTTY Step 1 Download PuTTY Open PuTTY and click Session on the left tree alike structure Enter the IP address of the RPi in the text box under Host Name or IP address and 22 under Port by default it is 22 ...

Страница 34: ...TY window prompts login as type in pi the user name of the RPi and password raspberry the default one if you haven t changed it Step 4 Here we get the Raspberry Pi connected and it is time to conduct the next steps Note When you input the password the characters do not display on window accordingly which is normal What you need is to input the correct password ...

Страница 35: ...des please go to github to download as following methods Change directory to home pi cd home pi Note cd short for change directory is to change from the current path to the intended directory Informally here is to go to the path home pi Clone the repository from github git clone https github com sunfounder picar 4wd ...

Страница 36: ...he components you can firstly debug them then start your assembling and use Initialize the Environment Initialize the environment before using the product example The methods are as follows Assemble 4WD Hat and boot the Raspberry Pi 4WD Hat Raspberry Pi ...

Страница 37: ...32 Enter the folder picar 4wd cd home pi picar 4wd Start up the initialization function sudo python3 setup py install Switch On Off ...

Страница 38: ...car 4wd to call the function of example code Note Initialization needs connecting to the internet and spending a lot of time The final line will appear finish after configuration is finished Module Testing To make sure that the module works well you can test the module by these means Testing the motor of the car Wire up the motor according to the diagram ...

Страница 39: ...nput the command the four motors will last working till you press on CTRL C Among the motors two of them rotate clockwise and the rest of them rotate anticlockwise Testing the grayscale sensor module Finishing the wire up according to the diagram Detector ...

Страница 40: ...rayscale After you input the command the monitor will print the readings of three detectors of line following module once Testing the servo and the ultrasonic module Start your wire up Servo Pin 0 Brown Black Red Red Orange Yellow Recognize the same ...

Страница 41: ...is when you assemble the car and the servo Power Supply Detection You can use the following command to get the supply voltage picar 4wd power read The supply voltage ought to be 6V 8 5V to ensure that the car works well Reset Controller If you encounter some errors during your use for example the car don t make response to your control command of control terminal you can try to reset HATS by using...

Страница 42: ...emble 4 motor to the bottom plate Note 1 Keep the vertex angle of the triangle sticking upward 2 For the convenience of later assembly please mark the number 1 2 3 4 on the socket of the 4 motors Bottom Plate M3 28mm Screw M3 Nut Support 1 3 2 4 ...

Страница 43: ...coding Disk into the motor then assemble the Photo interrupter module from bottom to top Note Keep the Encoding Disk on the motor away from the Photo interrupter module to avoid the potential abrasion M3 8 Screw Encoding Disk M3 Nut Photo interrupter Module ...

Страница 44: ...39 Assembling Grayscale Sensor Module Have the Grayscale sensor module be under the head of the car M3 8 Screw Grayscale Sensor Module M3 Nut ...

Страница 45: ...emble the battery holder to the top plate and put the battery in Note To get the battery out of the holder easily you can wind the battery with ribbon like this Battery Case M3 8 Flat Head Screw Ribbon 18650 Batteries M3 Nut Top Plate ...

Страница 46: ...41 Assembling Servo Assemble the servo from bottom to top Note the output axis is to face outwards Top Plate M2 Nut M2 8 Screw Servo ...

Страница 47: ...42 Assembling Nylon Standoffs M2 5 6 Screw M2 5 8 6mm Nylon Standoff ...

Страница 48: ...43 Assembling Top Plate and Bottom Plate M3 8 Screw M3 30mm Nylon Standoff M3 8 Screw ...

Страница 49: ...44 Assembling Spoiler Spoiler ...

Страница 50: ...45 Assembling Control Board 4WD Hat M2 5 11mm Nylon Standoff M2 5 6 Screw Raspberry Pi ...

Страница 51: ...ect the modules properly with the guidance of the marks on the 4WD Hat board Note For good appearance you need to make sure that all the wires go through the bottom plate of the car to the HAT on the upper plate of the car ...

Страница 52: ...47 Assembling Radar Support Note Assemble the servo arm only when the Raspberry Pi is energized and the command picar 4wd test servo is running M1 5 4 Screw Servo Screw Servo Arm Radar Support ...

Страница 53: ...48 Assembling Ultrasonic Sensor Module M1 4 8 Screw M1 4 Nut Ultrasonic Module ...

Страница 54: ...49 Assembling Wheels finished ...

Страница 55: ...ended tablet and so on You can use most functions of Picar 4wd such as obstacle avoidance line following object following and voltage check Note Check the next chapter if you want to use python to control Picar 4wd Boot Web Control Input the command and start up the web control program cd home pi picar 4wd picar 4wd web example As the program is running on the browser type the IP of the Raspberry ...

Страница 56: ...51 Interface Introduction ...

Страница 57: ...tacle monitor and the ultrasonic measurement function 2 Grayscale turning on off the grayscale monitor and the line following function 3 Avoid turning on off obstacle avoidance function can make the car get around the obstacles automatically or not 4 Follow turning on off line following function can let the car follow the objects ahead or not 5 Cliff turn on off edge detection The car retreats onc...

Страница 58: ...eshold on the setting page 7 Setting You can enter the Setting page by clicking this one Setting Page Ultrasonic This page is used to test whether the ultrasonic sensor works well The slider below can be used to adjust the current direction and angle of the ultrasonic sensor ...

Страница 59: ...e two buttons in bottom right corner When you press the button at left the wheel goes forward press the button on the right the wheel go backward If the car doesn t follow your operation like that you should adjust the direction The methods are as follows 1 Input the following command to open the configure file cd ...

Страница 60: ...4 lines of codes are used to control the turning of the motor The last line is used to adjust the angle of the servo For example if in the above test the direction of the motor at bottom left is reverse so we change the code in the third line to left_rear_reverse True ...

Страница 61: ...56 3 Rerun the following commands cd home pi picar 4wd picar 4wd web example 4 In the browser click Retry and you can test the direction of the wheel ready to be used ...

Страница 62: ...out 150 as is predicted So we set the value of Line Reference to 400 Of course you can change the value Once you finish doing this you can see that the corresponding area turning into gray if the value of Grayscale is larger than 400 if not so turning into black Cliff Reference Put the car at the edge of the desk with the car s head sticking out from the desk Record three values of Grayscale and n...

Страница 63: ...58 ...

Страница 64: ...ing condition of the system on this page 1 Make the example program run automatically at startup picar 4wd web example enable 2 If you want to turn off the Start on Boot please type in the following command picar 4wd web example disable ...

Страница 65: ...ple press W A S D and you can get the car going ahead back left right And the keys 4 and 6 can increase or decrease the power of the motor Run it by using the following command python3 keyboard_control py obstacle_avoidance py After running the example the car goes ahead automatically It can also turn right to get around the obstacles if there is anything obstructive ahead python3 obstacle_avoidan...

Страница 66: ...ine py If you paste a black lane width around 2 5cm on the white floor the car will move along the lane python3 track_line py follow py When the example runs the car will follow the object ahead python3 follow py ...

Страница 67: ...62 Python Example Code Analysis Program Structure Framework ...

Страница 68: ...e functions to the keys by using if statement import picar_4wd as fc import sys import tty import termios import asyncio power_val 50 key status def readchar def readkey getchar_fn None getchar getchar_fn or readchar def Keyborad_control while True global power_val key readkey if key 6 elif key 4 if key w elif key a ...

Страница 69: ...judgement on the distance states of the fourth and the seventh sampling If radar indicates no obstacle the returned value is 2 the car will continue moving ahead or else the car turn right to get around the obstacle Note Check scan_step get_status_at in the _init_ py for more details about the judgement on radar sampling and distance state import picar_4wd as fc speed 30 def main while True scan_l...

Страница 70: ...r adjusts the directions according to the detection values of these three detectors to follow the black line Note About Grayscale judgement refer to get_line_status in _init_ py for more details import picar_4wd as fc Track_line_speed 20 def Track_line gs_list fc get_grayscale_list if fc get_line_status 400 gs_list 0 fc forward Track_line_speed elif fc get_line_status 400 gs_list 1 fc turn_left Tr...

Страница 71: ...the 2 as a delimiter to divide the array anew The examples above will be divided into several null elements and a 111 value element The corresponding angular range of the element with a value 111 is 108 144 0 18 6 108 0 18 8 144 and the car will turn its angle into a median 126 144 108 2 Judge the distance and keep the car away from the object about 10cm Note Refer to scan_step and get_status_at i...

Страница 72: ... len path if max length_list 0 fc stop else i length_list index max length_list pos scan_list index paths i pos len paths i 1 2 delta len scan_list 3 if pos delta fc turn_left speed elif pos 2 delta fc turn_right speed else if scan_list int len scan_list 2 1 0 fc backward speed else fc forward speed if __name__ __main__ try main finally fc stop ...

Отзывы: