


Maintenance
35
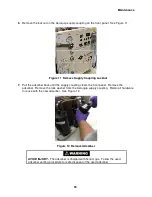
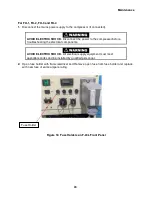
6.
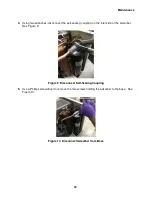
Remove the locknut on the Aeroquip supply coupling on the front panel. See Figure 11.
Figure 11 Remove Supply Coupling Locknut
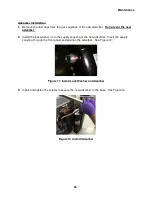
7.
Pull the adsorber back until the supply coupling clears the front panel. Remove the
adsorber. Remove the lock washer from the Aeroquip supply coupling. Retain all hardware
to reuse with the new adsorber. See Figure 12.
Figure 12 Remove Adsorber
AVOID INJURY.
The adsorber is charged with helium gas. Follow the used
adsorber venting procedure for safe disposal of the used adsorber.
Содержание F-20L
Страница 2: ......
Страница 10: ...6 This page is intentionally blank...
Страница 12: ...8 This page is intentionally blank...
Страница 23: ...Specifications 19 Figure 2 F 20L Compressor Front View...
Страница 24: ...Specifications 20 Figure 3 F 20L Compressor Dimensions Dimensions are in inches and mm...
Страница 34: ...30 This page is intentionally blank...
Страница 36: ...32 This page is intentionally blank...
Страница 48: ...44 This page is intentionally blank...
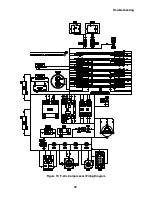
Страница 53: ...Troubleshooting 49 Figure 19 F 20L Compressor Wiring Diagram...
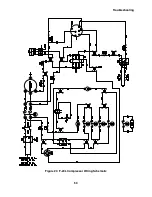
Страница 54: ...Troubleshooting 50 Figure 20 F 20L Compressor Wiring Schematic...