18
Connecting the Cables
Connecting Network Cables
T
To connect the network cables
¬
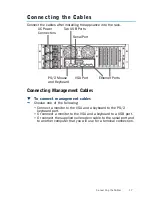
Connect the network cables to the ethernet ports.
•
The ethernet ports are mapped to Interface IDs during the initial
configuration.
•
The number of ports and their numbering varies between
different models within this model range. Check the numbering of
the ports on the back panel and in
Ethernet Port Numbering
(page 36).
The port LED indicators provide information on the activity and link
status of the ports. See
Port Indicators
(page 44) for more information.
Cable Types
Make sure that the copper cables you use are correctly rated (CAT 5e or
CAT 6 in gigabit networks).
Speed/Duplex Settings
Network cards at both ends of each cable must have identical speed/
duplex settings. This also applies to the automatic negotiation setting: if
one end of the cable is set to autonegotiate, the other end must also be
set to autonegotiate. Gigabit standards require interfaces to use
autonegotiation—fixed settings are not allowed at gigabit speeds.
Connecting the Appliance to the Power Supply
T
To connect the appliance to the power supply
1.
Connect the power cables to the AC power connectors on the back
of the appliance.
•
It is recommended to connect all three power connectors to a
power source to guarantee that the appliance can function even if
one of the power connectors fails.
2.
Plug the power cords into grounded, high-quality power strips that
offer protection from electrical noise and power surges.
•
We highly recommend using an uninterruptible power supply
(UPS) to ensure continuous operation and minimize the risk of
damage to the appliance in case of sudden loss of power.
•
For a truly redundant power supply, connect each AC power
connector on the appliance to a different UPS, so that the failure
of one UPS will not cut off the power to the power supplies.

