EN - 7
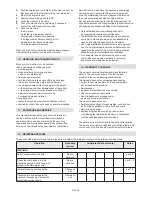
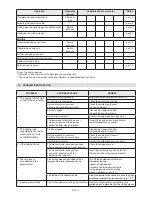
6.2.1
General safety check
Object
Result
Cutting means
Not damaged or worn.
Rear discharge guard;
grass catcher
Good condition. No
damage. Properly installed.
Side discharge guard,
side discharge chute
Good condition. No
damage. Properly installed.
Engine brake lever
/ cutting means
The lever must move
freely, it must not need
forcing and should return
automatically and rapidly
back to the neutral position.
Handgrip and starter cable.
The cable must be intact.
Screws/nuts on the machine
and on the cutting means
Correctly tightened
(not loose)
Fuel lines and connections.
No leaks.
Oil lines
No leaks.
No damage.
Spark plug cap
Connected to the
spark plug itself
Test driving
No abnormal vibrations.
No abnormal sound
6.2.2 Machine operating test
Action
Result
Start the machine (par. 6.3) The cutting means
must move.
Engage the drive lever
The wheels should move
the machine forward.
Disengage the drive lever
The wheels should stop
and the machine stops
moving forward.
Release the engine /
cutting means brake lever
The engine must switch off
and the cutting means must
stop within a few seconds.
If any of the results fails to match the
indications provided in the tables, do not use
the machine! Contact a service centre to have
it checked and repaired if necessary.
6.3 STARTUP
NOTE
Start up the machine on a flat
surface without obstacles or high grass.
6.3.1 Manual ignition handgrip models
1. For cold starts
: move the throttle to the "Choke"
engaged position (fig. 6.A) (if provided).
2.
Pull
the engine / cutting means brake
lever towards the handle (fig. 15.A).
NOTE
Keep pulling the engine / cutting
means brake lever or the engine will stop.
3.
Grab hold of the starter handgrip and tug the
starter cable firmly to start the engine (fig. 15.B).
4.
When the engine has started
, shift the throttle
to the full speed position (if fitted).
NOTE
Using the choke when the engine
is already warm can foul the spark plugs and
cause the engine to run erratically.
6.3.2 Electric push-button ignition control models
1.
Insert the supplied battery in the relative
engine compartment (fig. 16.A). (follow the
instructions provided in the engine manual)
2.
Insert the key as far as possible (if provided) (fig. 16.B).
3.
Pull
the engine cutting means brake lever
towards the handle (fig. 15.A).
NOTE
Keep pulling the engine / cutting
means brake lever or the engine will stop.
4.
Press and hold the ignition button
unyil
the engine switches on. (fig. 16.D)
.
6.4 OPERATION
IMPORTANT
When working, always keep a safe distance
from the cutting means, given by the length of the handle.
6.4.1 Grass cutting
1.
Start moving forward and mowing in the grass area;
2.
Regulate the forward speed and the cutting
height (par. 5.7) considering the conditions of
the lawn (the height, density and dampness of
the grass) and the amount of grass collected;
For mulching or rear grass discharge:
always avoid
removing a large quantity of grass. Never cut more than
one third of the total grass height per single pass (fig. 17).
3.
The appearance of the lawn will improve if you alternate
cutting in both directions at the same height (fig. 18).
For side discharge:
it is best to mow in a pattern where
cut grass is not discharged on the grass still to be cut.
6.4.2
Suggestions for maintaining a nice lawn
Each type of grass has different characteristics and may
thus require different ways of caring for the lawn; always
read the instructions on seed boxes for mowing height
in relation to the growing conditions in the work area.
Keep in mind that most grass is made up of a stem
and one or more leaves. If leaves are fully cut, the
lawn is damaged and growth is more difficult.
The following indications generally apply:
•
cutting too low tears and uproots the grass,
giving it a "spotted" appearance;
•
in the summer, cutting must be higher to
prevent the ground from drying;
•
do not cut wet grass; this could reduce cutting means
efficiency due to sticky grass and tear the lawn;
•
for particularly high grass, initially mow at the
maximum height allowed by the machine
then mow again after two or three days.
Содержание MP2 504 Series
Страница 2: ......
Страница 4: ...A C G F B 3 6 4 8 1 5 7 2 9 I D H E K J 2 1 ...
Страница 5: ...3 B A A A A 4 ...
Страница 6: ...A B A A B A 7 6 5 8 ...
Страница 7: ...A D CLICK C B E A B C 10 9 ...
Страница 8: ...A E A E 13 A B 12 D C A 11 ...
Страница 9: ...2 1 A B D A B A B B 18 17 16 15 14 ...
Страница 10: ...23 22 A B 21 A 20 A 19 ...

