17
ENGLISH
6. SERVICING THE TOOL
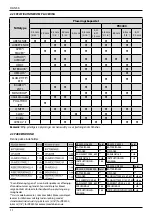
6.1. MAINTENANCE FREQUENCY
Item
Frequency
General Tool Inspection
Daily
Clean & lubricate Nose Equipment
5,000 rivets
Clean & grease Ball Screw and Thrust Bearing
50,000 rivets*
*Recommend contacting authorized service centre
6.2. CLEANING
ALWAYS wear approved eye protection at all times when cleaning equipment
Tool Exterior
Keep the brushless motor exhaust vent openings (H) free from dust and dirt. If necessary, use a soft, moist
cloth to remove dust and dirt from the exhaust vents. Blow dirt and dust out of the main power tool housing
with dry air as often as dirt is seen collecting in and around the exhaust vents (H).
WARNING:
Wear approved eye protection and approved dust mask when performing this procedure.
WARNING:
Never use solvents or other harsh chemicals for cleaning the non-metallic parts of the tool.
These chemicals may weaken the materials used in these parts. Use a cloth dampened only with water
and mild soap. Never let any liquid get inside the tool; never immerse any part of the tool into a liquid.
Cleaning the Nose Equipment (fi g. 4 & 5)
x
Loosen the nose housing nut (C). Remove the nose housing (B).
x
Press the front clutch or Jaw case lock (U) and loosen the jaw guide (P). Release the front clutch or Jaw
case lock (U).
x
Remove the jaws (Q) and the jaw pusher (R).
x
Remove the spring (S) and Mandrel guide(AA)
x
Clean the inside of the nose housing (B) using a dry cloth.
x
Clean the jaws (Q) and the jaw pusher (R) using a dry cloth. If necessary, replace the jaws (Q) and the jaw
pusher (R) and Mandrel guide(AA)
x
Clean the pulling head (T) using a dry cloth.
x
Apply grease to the inside of the jaw guide (P) where the jaws (Q) make contact. A Molybdenum
Disulphide based grease is recommended.
x
Mount the spring (S) and Mandrel guide(AA)
x
Mount the jaw pusher(R) and the jaws (Q)
x
Press front clutch (U) and tighten the jaw guide (P). Release front clutch or Jaw case lock (U).
x
Mount the nose housing (B). Tighten the nose housing nut (C).
x
Perform tool reset function to ensure the tool is at the initial home position as described in section 5.2
Charger Cleaning Instructions
WARNING:
Shock hazard. Disconnect the charger from the AC outlet before cleaning.
Dirt and grease may be removed from the exterior of the charger using a cloth or soft non-metallic brush.
DO NOT
use water or any cleaning solutions.
Содержание PROSET PB2500
Страница 4: ...0...
Страница 230: ......
Страница 231: ...A B C D E F G H I J K L i F PB3400 Ref Section 2 4 Model no Serial no Figure 1 Figure 2 Figure 3 K K N M O...


