background image

6

ENGLISH

(Original instructions)

u

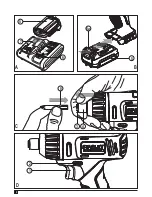
  Pull and hold the chuck collar (4) away from the front of 

the tool. 

u

  Insert the bit shaft (8) into the chuck (3).

u

  Release the collar. The accessory is locked in place.

Note!

 To remove the bit/socket repeat the above steps.

Warning!

 Use only impact sockets. Non-impact sockets may 

break and cause a hazardous condition. Inspect socket prior 

to use to ensure that it contains no cracks.

Use

Warning!

 Let the tool work at its own pace. Do not overload.

Charging the battery (fig. A)

The battery needs to be charged before first use and whenev

-

er it fails to produce sufficient power on jobs that were easily 

done before. The battery may become warm while charging; 

this is normal and does not indicate a problem.

Warning!

 Do not charge the battery at ambient temperatures 

below 10 °C or above 40 °C. Recommended charging tem-

perature: approx. 24 °C.

Note: The charger will not charge a battery if the cell 

temperature is below approximately 10 °C or above 40 °C.

The battery should be left in the charger and the charger 

will begin to charge automatically when the cell tempera-

ture warms up or cools down.

u

  To charge the battery (5), insert it into the charger (7). 

The battery will only fit into the charger in one way. Do 

not force. Be sure that the battery is fully seated in the 

charger.

u

  Plug in the charger and switch on at the mains.

The charging indicator (8) will flash green continuously 

(slowly).

The charge is complete when the charging indicator (8) lights 

green continuously. The charger and the battery can be left 

connected indefinitely with the LED illuminated. The LED will 

change to flashing green (charging) state as the charger occa

-

sionally tops up the battery charge. The charging indicator (8) 

will be lit as long as the battery is connected to the plugged-in 

charger.

u

  Charge discharged batteries within 1 week. Battery life will 

be greatly diminished if stored in a discharged state.

Leaving the battery in the charger

The charger and battery pack can be left connected with the 

LED glowing indefinitely. The charger will keep the battery 

pack fresh and fully charged.

Charger diagnostics

If the charger detects a weak or damaged battery, the 

charging indicator (8) will flash red at a fast rate. Proceed as 

follows:

u

  Re-insert the battery (5).

u

  If the charging indicators continues flashing red at a fast 

rate, use a different battery to determine if the charging 

process works properly.

u

  If the replaced battery charges correctly, the original 

battery is defective and should be returned to a service 

centre for recycling.

u

  If the new battery gives the same indication as the original 

battery, take the charger to be tested at an authorised 

service centre.

Note: It may take as long as 60 minutes to determine that 

the battery is defective. If the battery is too hot or too 

cold, the LED will alternately blink red, fast and slow, one 

flash at each speed and repeat.

Selecting the direction of rotation (fig. D)

For tightening, use forward (clockwise) rotation. For loosening, 

use reverse (counterclockwise) rotation.

u

  To select forward rotation, push the forward/reverse slider 

(2) to the left.

u

  To select reverse rotation, push the forward/reverse slider 

to the right.

u

  To lock the tool, set the forward/reverse slider into the 

centre position.

Screwdriving / nut setting 

u

  Select the appropriate bit / socket for the screw or nut to 

be driven.

u

  Select forward or reverse rotation as described above.

u

  Hold the tool in line with the fastener.

u

  After tightening, check torque with a torque wrench.

LED work light

The LED work light (6) is activated automatically when the trig-

ger is depressed. The LED work light will illuminate when the 

trigger is partially depressed, before the unit begins running. 

Hints for optimum use

Screwdriving

u

  Always use the correct type and size of screwdriver bit.

u

  If screws are difficult to tighten, try applying a small 

amount of washing liquid or soap as a lubricant.

u

  Always hold the tool and screwdriver bit in a straight line 

with the screw.

Maintenance

Your Stanley Fat Max tool has been designed to operate 

over a long period of time with a minimum of maintenance. 

Continuous satisfactory operation depends upon proper tool 

care and regular cleaning.

Your charger does not require any maintenance apart from 

regular cleaning.

Содержание FATMAX FMC041

Страница 1: ...www stanley eu FMC041 1 4 3 6 5 2...

Страница 2: ...2 5 8 7 A 5 5a 4 3 8 C B 1 2 D...

Страница 3: ...shock 3 Personal safety a Stay alert watch what you are doing and use common sense when operating a power tool Do not use a power tool while you are tired or under the influence of drugs alcohol or me...

Страница 4: ...ed metal parts of the power tool live and could give the operator an electric shock u Use clamps or another practical way to secure and support the workpiece to a stable platform Holding the work by h...

Страница 5: ...environment p Do not attempt to charge damaged batteries Chargers u Use your Stanley Fat Max charger only to charge the bat tery in the tool with which it was supplied Other batteries could burst cau...

Страница 6: ...arger will keep the battery pack fresh and fully charged Charger diagnostics If the charger detects a weak or damaged battery the charging indicator 8 will flash red at a fast rate Proceed as follows...

Страница 7: ...nty K 1 5 m s2 EC declaration of conformity MACHINERY DIRECTIVE Cordless Impact Driver FMC041 Stanley Europe declares that these products described under technical data are in compliance with 2006 42...

Страница 8: ...rwenden Sie nur f r den Au enbereich zugelassene Verl ngerungskabel wenn Sie mit dem Ger t im Freien arbeiten Die Verwendung eines f r den Au enbereich geeigneten Verl ngerungskabels verringert das Ri...

Страница 9: ...c Bewahren Sie den Akku bei Nichtbenutzung nicht in der N he metallischer Objekte wie B roklammern M nzen Schl sseln N geln oder Schrauben auf da diese eine Verbindung zwischen beiden Polen des Akkus...

Страница 10: ...g angegebenen Werte f r die Vibrationsemission wurden mit einer Standard Pr fmethode nach EN60745 ermittelt und k nnen zum Vergleich verschiedener Ger te herangezogen werden Au erdem kann mit Hilfe di...

Страница 11: ...das Bohrfutter 3 ein Lassen Sie den Bohrfutterkopf los Der Einsatz sitzt fest im Bohrfutter Hinweis Wiederholen Sie zum Entfernen des Einsatzes die oben aufgef hrten Schritte Warnung Nur Werkzeughalte...

Страница 12: ...um das Ger t zu verriegeln Schraub und Setzarbeiten W hlen Sie den geeigneten Einsatz f r die zu verwen dende Schraube bzw Mutter W hlen Sie wie oben erl utert die Vorw rts bzw R ck w rtsdrehung aus H...

Страница 13: ...eite der Anleitung Der Unterzeichnete ist verantwortlich f r die Zusammen stellung der technischen Daten und gibt diese Erkl rung im Namen von Stanley Europe ab Ray Laverick Director of Engineering St...

Страница 14: ...haleur des substances grasses des bords tranchants ou des pi ces mobiles Les cordons endommag s ou emm l s augmentent le risque de choc lectrique e Si vous utilisez un outil lectrique l ext rieur util...

Страница 15: ...e diff rent b N utilisez les outils lectriques qu avec les blocs batteries qui leurs sont d di s L utilisation d un autre bloc batterie peut engendrer des blessures et un incendie c Lorsque le bloc ba...

Страница 16: ...s d clar e dans les caract ristiques techniques et la d claration de conformit a t mesur e conform ment la m thode de test normalis e tablie par la norme EN60745 et peut tre utilis e pour comparer un...

Страница 17: ...la douille proc dez l inverse Avertissement N utilisez que des douilles choc Les autres douilles peuvent casser et causer une situation dangereuse V rifiez l absence de fissure sur la douille avant ut...

Страница 18: ...quement lorsque la g chette est enfonc e Il s allume quand la g chette est en fonc e mi course avant que l outil ne commence tourner Conseils pour une utilisation optimale Vissage Choisissez toujours...

Страница 19: ...c les conditions g n rales de Stanley Fat Max et vous devez fournir une preuve d achat au vendeur ou au r parateur agr Les conditions g n rales de la garantie de 1 an Stanley Fat Max ainsi que l adres...

Страница 20: ...gati alla rete elettrica con l interruttore nella posizione di acceso provoca incidenti d Prima di accendere un elettroutensile togliere eventuali utensili o chiavi di regolazione Un utensile di regol...

Страница 21: ...ici per fissare e bloc care il pezzo da lavorare ad una piattaforma stabile Tenere il lavoro con le mani o contro il corpo non assicura la stabilit e potrebbe portare ad una perdita del controllo Ques...

Страница 22: ...e caricabatterie Batterie Non tentare mai di aprirle per qualsiasi motivo Non lasciare che la batteria si bagni Non riporre in luoghi dove la temperatura potrebbe superare 40 C Caricare solo a temper...

Страница 23: ...sia completamente insediata nel caricabatterie Collegare l alimentatore alla presa di corrente L indicatore di carica 8 passa al lampeggio verde continuo lentamente La carica completa quando l indicat...

Страница 24: ...enti a base di solventi Aprire regolarmente il mandrino e batterlo leggermente per eliminare la polvere dall interno Protezione dell ambiente Z Raccolta differenziata I prodotti e le batterie contrass...

Страница 25: ...ne veiligheidswaarschuwingen voor elek trisch gereedschap Waarschuwing Lees alle veiligheidswaarschu wingen en alle instructies Wanneer de volgende waarschuwingen en voorschriften niet in acht worden...

Страница 26: ...uit de buurt van bewegende onderdelen Loszittende kleding sieraden of lang haar kunnen door bewegende delen worden gegrepen g Als voorzieningen voor stofafzuiging of stofopvang kunnen worden gemontee...

Страница 27: ...zijn of die geen ervaring met of kennis van dit gereedschap hebben tenzij ze onder toezicht staan of instructies krijgen wat betreft het gebruik van het gereed schap van een persoon die verantwoordeli...

Страница 28: ...n dan ook de accu open te maken Stel de accu niet bloot aan water Bewaar de accu niet op locaties waar de temperatuur kan stijgen tot boven 40 C Laad de accu uitsluitend op bij een omgevingstemperatuu...

Страница 29: ...ader 8 blijft langzaam groen knipperen Wanneer het indicatielampje 8 continu groen brandt is de accu volledig opgeladen U kunt de accu voor onbeperkte tijd in de lader laten zitten terwijl het Led lam...

Страница 30: ...spanknop en verwijder eventueel stof uit het binnenste door erop te tikken Het milieu beschermen Z Gescheiden afvalinzameling Producten en accu s waarop dit symbool is aangebracht mogen niet bij het...

Страница 31: ...ridad Advertencias de seguridad generales para herrami entas el ctricas Advertencia Lea todas las advertencias de seguridad y todas las instrucciones En caso de no atenerse a las siguientes advertenci...

Страница 32: ...las piezas en movimiento La ropa suelta las joyas y el pelo largo pueden quedar atrapados en las piezas en movimiento g Siempre que sea posible utilizar unos equipos de aspiraci n o captaci n de polvo...

Страница 33: ...n con respecto al uso del aparato por parte de una persona responsable de su seguridad Los ni os deben vigilarse en todo momento para garan tizar que el aparato no se toma como elemento de juego En e...

Страница 34: ...No guarde la bater a en lugares en los que la temperatura pueda superar los 40 C Recargue la bater a nicamente a una temperatura ambiente entre 10 C y 40 C Utilice nicamente el cargador suministrado c...

Страница 35: ...or Enchufe el cargador y con ctelo a la red el ctrica El indicador de carga 8 parpadear en verde de forma continua lentamente La carga habr finalizado cuando el indicador de carga 8 se ilumine en verd...

Страница 36: ...rgador antes de limpiarlo Limpie peri dicamente las ranuras de ventilaci n de la herramienta y el cargador con un cepillo suave o un pa o seco Limpie peri dicamente la carcasa del motor con un pa o h...

Страница 37: ...s especiales Utiliza o pretendida A sua chave de impacto Stanley Fat Max FMC041 foi conce bida para aparafusar parafusos e porcas em aplica es Esta ferramenta destina se a utiliza o profissional bem c...

Страница 38: ...forma correcta A utiliza o de dispositivos de extrac o de part culas pode reduzir os riscos relacionados com as mesmas 4 Utiliza o e manuten o da ferramenta el ctrica a N o sobrecarregue a ferramenta...

Страница 39: ...neste manual de instru es A utiliza o de qualquer acess rio ou a reali za o de qualquer opera o com esta ferramenta que n o se inclua no presente manual de instru es poder representar um risco de fer...

Страница 40: ...pectiva Outras baterias podem rebentar provocando ferimentos e danos Nunca tente carregar baterias n o recarreg veis Substitua os cabos defeituosos imediatamente N o exponha o carregador gua N o abra...

Страница 41: ...bateria estiver fixa ao carregador ligado na tomada As baterias descarregadas devem ser carregadas no espa o de 1 semana A vida til de uma bateria diminuir consideravelmente se for guardada sem carga...

Страница 42: ...m o lixo dom stico normal Os produtos e as baterias cont m materiais que podem ser recuperados ou reciclados reduzindo assim a necessidade de mat rias primas Recicle os produtos el ctricos e as bateri...

Страница 43: ...rningarna och instruktionerna som listas nedan inte f ljts kan orsaka elst tar brand och eller allvarliga kroppsskador Spara alla s kerhetsf reskrifter och anvisningar f r framtida bruk Begreppet Elve...

Страница 44: ...yget innan inst llningar g rs tillbeh rsdelar byts ut eller elverktyget st lls undan S dana f rebyggande s kerhets tg rder minskar risken att oavsiktligt starta elverktyget d F rvara elverktyg utom r...

Страница 45: ...nordningar anv nds kan vissa ytterligare risker inte undvikas Dessa omfattar Skador orsakade av att roterande r rliga delar vidr rs Skador som uppst r vid byte av delar blad eller tillbeh r Skador som...

Страница 46: ...n 4 bort fr n verktygets fr mre del S tt borren 8 i chucken 3 u Sl pp hylsan Tillbeh ret r nu l st p plats Notera Upprepa ovanst ende steg f r att ta bort biten sockeln Varning Anv nd endast slaghylso...

Страница 47: ...llerar du vridmomentet med en momentnyckel LED arbetsbelysning LED arbetsbelysningen 6 aktiveras automatiskt n r str mbrytaren trycks in LED arbetsbelysningen t nds n r str mbrytaren r delvis nedtryck...

Страница 48: ...med Stanley Fat Max villkor och du kommer att beh va skicka in bevis p k pet till f rs ljaren eller en auktoriserad reparat r Villkoren f r Stanley Fat Max ett riga garanti och var du hittar din n rm...

Страница 49: ...te og st st tt hele tiden Dette f rer til at du har bedre kontroll over det elektriske verkt yet ved uventede situasjoner f Bruk egnede kl r Ikke ha p deg l stsittende kl r eller smykker Hold h r antr...

Страница 50: ...festeanor dninger til spesifiserte momenter Du b r bruke et uavhengig kalibrert verkt y som m ler moment for eksempel en momentn kkel n r koblinger kan svikte hvis festeanordninger er for lite eller...

Страница 51: ...krage 5 Batteri 6 LED arbeidslampe Figur A 7 Lader 8 Ladingsindikator Montering Advarsel Fjern batteriet fra verkt yet f r montering Sette inn og ta ut batteriet figur B N r du skal sette inn batteri...

Страница 52: ...ken N r du skal velge rotasjon fremover skyver du glidebry teren 2 for fremover bakover til venstre N r du skal velge rotasjon bakover skyver du glidebry teren til h yre N r du skal l se verkt yet set...

Страница 53: ...eller se baksiden av bruksanvisningen Undertegnede er ansvarlig for utarbeidelsen av den tekniske dokumentasjonen og gir denne erkl ringen p vegne av Stanley Europe Ray Laverick Director of Engineerin...

Страница 54: ...brug reducerer risikoen for elektrisk st d f Brug en str mkilde med fejlstr msrel hvis det er n dvendigt at anvende elv rkt j p fugtige steder Ved at benytte en fejlstr msafbryder reduceres risikoen f...

Страница 55: ...h rev rn ved slagboring Uds ttelse for st j kan medf re h retab Brug de ekstra h ndtag der f lger med v rkt jet Tab af kontrol kan medf re personskade Hold i elv rkt jets isolerede gribeflader hvis d...

Страница 56: ...l se brugervejledningen for at reducere risikoen for tilskadekomst Yderligere sikkerhedsvejledninger for batterier og ladere Batterier Fors g aldrig at bne den af en eller anden grund Batteriet m ikke...

Страница 57: ...afsluttet n r ladeindikatoren 8 lyser konstant gr nt Du kan lade opladeren og batteriet v re tilsluttet i l ngere tid med t ndt lysdiode LED en begynder at blinke gr nt opladning n r laderen en gang...

Страница 58: ...vendt og s ledes reducere eftersp rgs len efter r varer Genbrug venligst elektriske produkter og batterier i henhold til lokale regulativer Yderligere informationer findes p www 2helpU com Tekniske da...

Страница 59: ...vulliset loitolla s hk ty kalua k ytt ess si Keskittymiskyvyn herpaantuminen voi aiheuttaa hallinnan menett misen 2 S hk turvallisuus a S hk ty kalun pistokkeen on sovittava pistorasiaan l koskaan tee...

Страница 60: ...turi joka on sopiva yhden tyyppiselle akulle voi aiheuttaa tulipalon vaaran jos sit k ytet n toisen tyyppisell akulla b K yt s hk ty kalussa ainoastaan kyseiseen s hk ty kaluun tarkoitettua akkua Muun...

Страница 61: ...vaan arviointiin Varoitus S hk ty kalun k yt n aikana mitattu todellinen t rin p st arvo voi poiketa ilmoitetusta t rin p st arvosta ty kalun k ytt tavan mukaan T rin taso voi olla ilmoitettua tasoa s...

Страница 62: ...i lataa akkua jos akun kennon l mp tila on alle 10 C tai yli 40 C Akku tulee kuitenkin j tt laturiin Laturi aloittaa lataamisen automaattisesti kun kennon l mp tila nousee tai laskee riitt v sti Lataa...

Страница 63: ...hjaisia puhdistusaineita Avaa istukka s nn llisesti ja naputtele p ly pois sen sis lt Ymp rist nsuojelu Z Toimita t m laite erillisker ykseen T ll symbo lilla merkittyj tuotteita ja akkuja ei saa h vi...

Страница 64: ...in T m takuu on voimassa kaikissa EU ja ETA maissa Edellytyksen takuun saamiselle on ett vaade t ytt Stanley Fat Maxin ehdot ja ett ostaja toimittaa ostotositteen j lleenmyyj lle tai valtuutetulle huo...

Страница 65: ...65 RCD RCD 3 4...

Страница 66: ...66 5 6 u 8...

Страница 67: ...67 MDF EN60745 2002 44 E 40 C 10 C 40 C p Stanley Fat Max...

Страница 68: ...68 Stanley Fat Max 1 2 3 4 5 6 LED A 7 8 B 5 5a C 2 4 8 3 10 C 40 C 24 C 10 C 40 C 5 7 8 8 LED LED 8 1 LED...

Страница 69: ...69 8 5 60 LED D 2 LED LED 6 LED Stanley Fat Max Z www 2helpU com FMC041 VDC 10 8 0 2500 BPM 0 3400 PTI Nm 110...

Страница 70: ...12 9 m s2 K 1 5 m s2 EK FMC041 Stanley Europe 2006 42 EN 60745 1 2009 A1 2010 EN60745 2 2 2010 2014 30 2011 65 Stanley Europe Stanley Europe Ray Laverick Stanley Europe Egide Walschaertsstraat14 18 28...

Страница 71: ...71...

Страница 72: ...a Monza 7 A Fax 039 9590313 20871 Vimercate MB www stanley it Nederland Stanley Fat Max Tel 31 164 283 065 Joulehof 12 Fax 31 164 283 200 4600 RG Bergen op Zoom Enduser NL SBDinc com Norge Stanley Fat...

Отзывы: