background image

EN

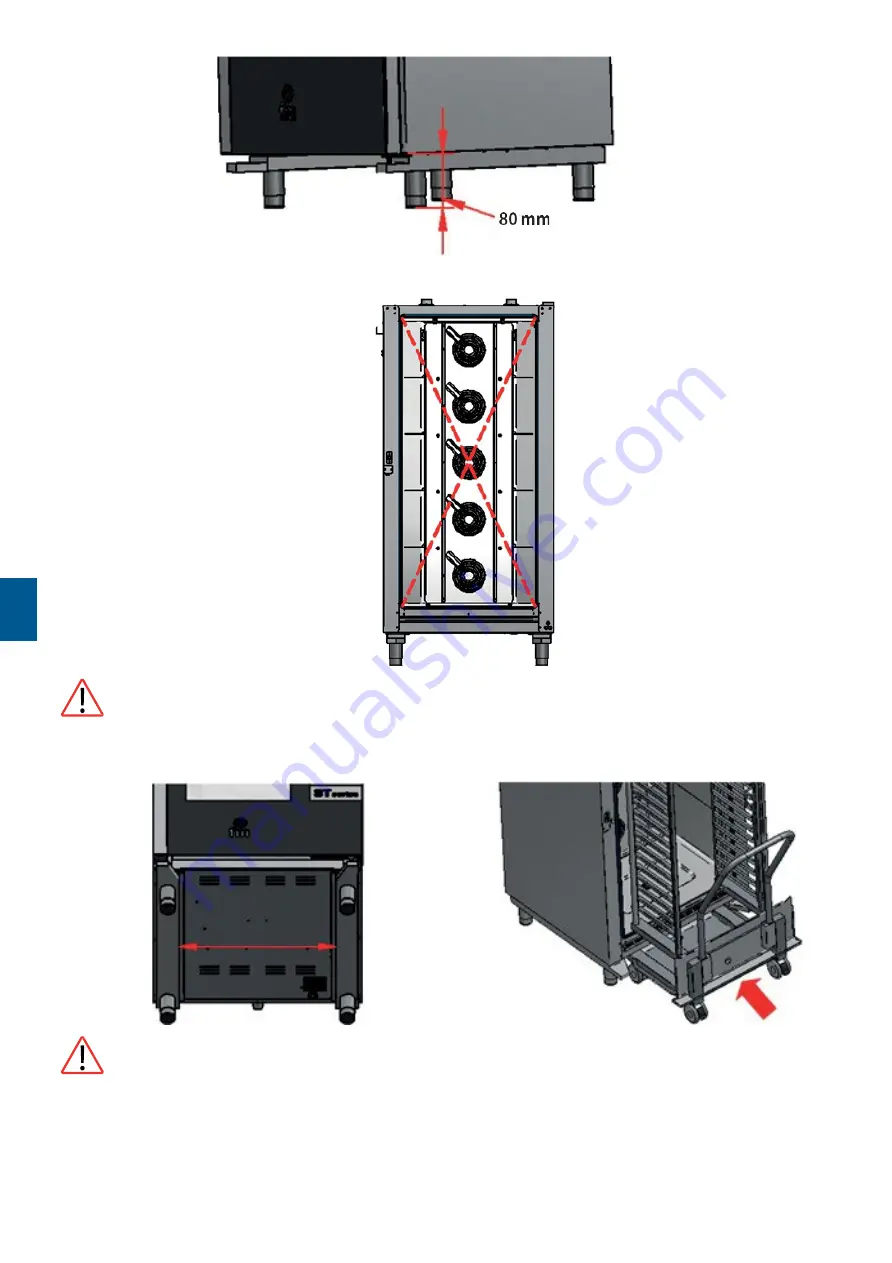
Check the length of the diagonals of the oven inlet, and they must be identical. If not, act again on the regulation of the legs.

Ensure the correct movement of the trolley inside the oven, avoiding blows or obstructions that can cause the 

leakage of liquids and lead to burns.

To correctly insert the trolleyriage inside the oven, position it following the guides located at the bottom of the oven.

Ensure the correct movement of the trolley inside the oven, avoiding blows or obstructions that can cause the 

leakage of liquids and lead to possible burns.

The oven should be placed on a completely flat surface. In the event that a ramp is necessary to access the trolley to the oven, it 

must not have an angle greater than 2 °.

-27-

Содержание SMARTCOOK

Страница 1: ...KOMBIDÄMPFER CONVECTION OVEN SMARTCOOK Bedienungsanleitung Instruction manual v1 0 06 2021 L 2 21 DE 22 42 EN 43 62 ...

Страница 2: ......

Страница 3: ...erlust der Garantie führt Der Ofen sollte von geschultem Personal verwendet werden Das Typenschild des Ofens bietet unerlässliche technische Informationen im Fall einer Wartung oder Reparatur daher darf es nicht abgenommen beschädigt oder verändert werden Die Nichterfüllung der Sicherheitsregeln befreit STALGAST von jedweder Haftung und lässt die Garantie erlöschen Sicherheitsregeln für die Geräte...

Страница 4: ... die beschädigte Ware und die Verpackung sichtbar sind Verdeckte Schäden nach Erhalt des Materials und innerhalb von 24 Stunden nach dem Empfang desselben sollten nach Fest stellung von unsichtbaren Schäden Fotos von der beschädigten Ware mit der entsprechenden Verpackung gemacht werden auf denen das Speditionsetikett deutlich sichtbar ist Nicht gültig sind Fotos die ausschließlich den Inhalt zeig...

Страница 5: ...5ºC liegen um einen korrekten Betrieb zu gewährleisten Die Luftfeuchtigkeit sollte in keinem Fall 70 übersteigen MAX 70 MAX 35o c MIN 5o c Wir empfehlen mindestens 120 mm Platz für Reparaturen zu lassen Sollten sich Hitzequellen oder brennbare Elemente in der Nähe befinden muss der Sicherheitsabstand mindestens 700 mm betragen Es wird empfohlen eine gute Belüftung des Geräts sicherzustellen damit ...

Страница 6: ... Inneren des Ofens sicherstellen damit Schläge oder Blockierungen die ein Flüssigkeitsleck oder Verbrennungen verursachen können zu vermeiden Um den Wagen korrekt in den Ofen zu schieben mus ser auf die Schienen im unteren Teil des Ofens positioniert werten Die korrekte Bewegung des Wagens im Inneren des Ofens sicherstellen damit Schläge oder Blockierungen die ein Flüssigkeitsleck oder Verbrennung...

Страница 7: ...assen 1 Stromanschluss Prüfen Sie vor dem Anschluss des Geräts an das Stromnetz ob die Netzeigenschaften mit denen übereinstimmen die in den technischen Daten des jeweiligen Geräts beschrieben sind Die elektrische Installation muss von autorisiertem Personal durch gefürt werden und den geltenden Vorschriften entsprechen Der elektrische Anschluss sollte vorzugsweise durch die Montage eines elektris...

Страница 8: ...et Außerdem ist es ratsam ein Digimeter oder digitales Instrument zu installieren um die vom Ofen verbrauchten Liter Wasser zu messen und auf diese Wiese zu wissen wann der Filter ausgetauscht werden muss Wichtig Bevor der Wasseranschluss erfolgt sollte das Wasser abgelassen werden um mögliche Rückstände aus den Schläuchen zu entfernen Der Wasserzufluss sollte einen Druck zwischen 1 und 3 bar aufw...

Страница 9: ...lte keine vertikale Belüftungsleitung installiert werden kann eine korrekte Drainage nicht garantiert werden was zu Störun gen und dem Verlust der Garantie führen kann Pionowy kanał wentylacyjny Vertikaler Lüftungskanal Vertical ventilation duct Przyłącze 40mm Anschluss 40mm Connection 40mm 9 Zacisk Klemme Clamp Przyłącze Verbindung Connection Rura spustowa Abflussrohr Drain pipe BRAK W ZESTAWIE N...

Страница 10: ...tigen Richtlinien im Land der Installation erfüllen und müssen von Fachpersonal durchgeführt werden Die Nichterfüllung der Richtlinien kann zu Verletzungen und Schäden führen was zur sofortigen Erlöschung der Garantie führt unf STALGAST von jeder Haftung befreit Überprüfen Sie vor dem Anschluss ob die zu verwendende Gasart sowie deren Druck mit der Verwendungskonfiguration Ihres Ofens übereinstimm...

Страница 11: ...ne Mindeststeigung von 10 aufweisen und sollte sie in Kurven verlaufen dürfen diese keine Winkel unter 90 besitzen Die erste Strecke muss gerade und vertikal verlaufen und nicht weniger als 1m lang sein Der Durchmesser der Rohre sollte in der gesamten Installation derselbe sein und keine Strecken au fweisen deren Rohrdurchmesser kleiner als der des Auslaufrohrs ist Sollte die Notwendigkeit bestehe...

Страница 12: ...ass das Gerät eingeschaltet ist und Prozesse ausgeführt warden 1 Im Hauptmenü drücken Sie auf das Icon um auf Einstellungen zuzugreifen oder oder die Scrolleiste um die oder oder die Scrolleiste um die 2 Wählen Sie Uhr um Datum und Uhrzeit einzustellen 3 Drücken Sie auf den Buchstaben h und die Icons Stunden zu verändern 4 Drücken Sie auf den Buchstaben m und die Icons Minuten zu verändern 5 Drück...

Страница 13: ...Garart und jedes Garmodus existieren verschiedene veränderbare Parame ter Zugewiesene Temperatur der Ofenkammer eine Änderung ist nur im Garmodus Timer oder im Garmo dus Sonde Spieß möglich unabhängig von der Garart trockene Hitze Dampf oder gemischt Temperaturunterschied DeltaT eine Änderung ist nur im Modus Delta T ΔT möglich unabhängig von der Garart trockene Hitze Dampf oder gemischt Freuchtig...

Страница 14: ...1 Der Zeitwert kann nur im Modus Timer ausgewählt werden Für die restlichen Modi kann das Öff nen oder Schließen nur im gewünschten Moment durch den Nutzer ausgewählt werden Drücken Sie dazu auf das Icon und danach auf die Icons oder oder bewegen Sie die Laufleiste um den gewünschten Zeitwert auszuwählen sollte sich das Gerät im Modus Timer befinden oder Öffnen Schließen sollte es sich im Modus So...

Страница 15: ... den Einstellungen die im Rezept gespeichert sind funktioniert Rezept speichern 1 Konfigurieren Sie den Garzyklus Dafür folgen Sie den Schritte aus Punkt 4 4 A 2 Drücken Sie auf das Icon 3 Drücken Sie auf das Icon um den Speichvorgang des Rezepts zu beginnen um die Speichposition des Rezepts auszuwählen 4 Drücken Sie auf die Position auf welcher Sie das Rezpet speichern möchten und bestätigen Si e...

Страница 16: ...genden Tabellen zeigen die Werkseinstellungen für jeden der oben genannten Zyklen REGENERATIONSZYKLUS MIT SONDE SPIEß Konfiguration Wert Maximal Minimal Kammertemperatur 110ºC 20 180ºC Feuchtigkeit 70 40 100 Temp Sonde Spieß 70ºC 20 100 Ventilatorengeschw Minimum Nur wenn der Ofen über mehrere Geschwindigke itsstufen verfügt Ventilöffnung Am Zyklusende ZEITGESTERUERTER REGENERATIONSZYKLUS Konfigur...

Страница 17: ...ni gungsvorgang beginnt Um den Reinigungsvorgang zu starten foldende Schritte durchführen 1 Drücke Sie auf das Icon um auf das Menü besondere Zyklen aufzurufen 2 Drücke Sie auf das Icon um auf das Manü für die automatische Reinigung zuzugreifen 3 Dann wählen Sie das gewünschte reinigungsprogramm aus SOFT MEDIUM oder HARD 4 Zum Schluß drücken Sie auf das Icon um den Reinigungszyklus zu starten 4 9 ...

Страница 18: ...e aktivieren sich die Widerstände und die Ventilatoren des Ofens zur Trocknung 4 11 Programmierter automatischer Start Die automatische Startfunktion erlaubt es bis maximal 9 Starts pro Woche zu programmieren und die jeweiligen Rezepte auszu wählen mit denen der Ofen starten soll Konfiguration des automatischen Starts 1 Vergewissern Sie sich dass mindestens ein gespeichertes Rezept existiert 2 Drü...

Страница 19: ...das Rezeptbuch aufzurufen 2 Wählen Sie die Parameter des gewünschten Garvorgangs Vorwärmen Feuchtigkeit Temperatur und drücken Sie das Icon um sie zu bestätigen 3 Drücken Sie auf das Icon für das gewünschte Niveau um ein anderes Rezept hin zuzufügen Das Gerät sucht die Rezepte heraus die mit den ausgewählten parametern kompatibel sind um die Garzeit des hinzugefügten Blechs einzustellen oder oder ...

Страница 20: ...den und die Förderung des internationalen Handels durch ein erhöhtes Vertrauen in die Unschädlichkeit von Nahrungsmitteln Als Hauptziele sind vor allem zu erwähnen Verbesserte Nahrungsmittelsicherheit Einfachere Erfüllung der Gesetzgebung in Bezug auf Nahrungsmittel Förderung des Exports durch erhöhtes Vertrauen in die Unschädlichkeit von Nahrungsmitteln Vereinfacht die Agilität und Transparenz vo...

Страница 21: ...pieß nicht gestartet werden Wenn die Warnmeldung während eines Garzyklus Delta T mit Sonde Spieß auftritt wird der Zyklus unterbrochen PF Warnmeldung Beschreibung der Warnmeldung Unterbrechung in der Stromversorgung oder falsch ausgeschalteter Ofen Diese Meldung tritt auf wenn sich eine Unterbrechung der Stromversorgung ereignet oder wenn der Ofen falsch ausge schaltet wurde Um ihn korrekt auszusc...

Страница 22: ...ie bei Alarmtyp n1E513 den Alarm und starten Sie ihn neu Der Ofen macht maximal 7 Startversuche Bei Alarmtyp n1E531 muss der Backofen von der Stromversorgung getrennt und nach 10 Sekunden wieder eingesteckt warden BEHALDELN SIE DEN OFEN NICHT fün den Alarmtyp n1E100 und wenden Sie sic han einen autorisier ten technischen Kundendiens Überprüfen Sie bei Alarmtyp n1E515 ob der Rauchgasauslass kamin n...

Страница 23: ...dürfen nicht zusammen mit anderen Abfällen entsorgt werden Dafür drohen hohe Geld strafen Das am Gerät angebrachte oder in den Geräteunterlagen auftretende Symbol bedeutet dass nach dem Ablauf der Nutzungsdauer das Gerät nicht in den Hausabfall gehört Aus diesem Grund muss es an einen Ort gebracht werden wo es vorschriftsmäßig deponiert oder wiederverwertet wird 7 GARANTIE Unter Haftung des Verkäu...

Страница 24: ...ility and the warranty will become null and void Safety standards for use Please read this manual thoroughly before starting the unit and keep itfor further consultation Ifyou need technical support contact an authorised technical service If the unit is not used for a long time all connections must be interrupted power supply and water The oven must only and exclusively be used for the purpose it ...

Страница 25: ...ate hits to the oven at the time of the delivery take photos of the damages and transport agency label on the packaging Please contact FM Industrial immediately If apparently package is in good conditions and damages are detected when unpacking place the original packaging again on the machine take pictures of the packaging and transport agency label on the packaging Next unpack again and take pho...

Страница 26: ...t without nearbyheat sources Min 120 mm Min 120 mm Min 120 mm Min 700 mm Min 100 mm Placing the unit next to heat sources PANEL IZOLACYJNY DÄMMPLATTE INSULATION PANEL We recommended leaving a free working space of around 500 mm for maintenance operations This unit is not suitable for built in installations In order to ensure correct positioning of the car inside the oven the height of the legs mus...

Страница 27: ...dlead to burns To correctly insert the trolleyriage inside the oven position it following the guides located at the bottom of the oven Ensure the correct movement of the trolley inside the oven avoiding blows or obstructions that cancausethe leakage of liquids and lead to possible burns The oven should be placed on a completely flat surface In the event that a ramp is necessary to access the troll...

Страница 28: ...connecting the unit to the power supply check that the electrical grid characteristics match those described in the techni cal characteristics of each unit The electrical installation must be performed by authorised technicians and meet the regulations in force Preferably the electrical connection should be performed by mounting and electrical outlet NOT INCLUDED of appropriate type and capacity f...

Страница 29: ...nded The oven has a connection for water inlet Besides installing a digimeter or digital instrument for measuring the litres of water consumed by the oven is recommended In this way you will know when the filter needs be replaced Important Before connecting the watersupply check that there are no residues in the pipe The pressure of the incoming water should range between 1 and 3 bar with temperat...

Страница 30: ...w If there is no vertical ventilation conduit installed proper draining is not ensured and it may cause faults and the loss of the warranty Pionowy kanał wentylacyjny Vertikaler Lüftungskanal Vertical ventilation duct Przyłącze 40mm Anschluss 40mm Connection 40mm 30 Zacisk Klemme Clamp Przyłącze Verbindung Connection Rura spustowa Abflussrohr Drain pipe BRAK W ZESTAWIE NICHT ENTHALTEN MATERIAL NOT...

Страница 31: ...stallation of the equipment and must be trolleyried out by qualified and authorized personnel Failure to comply with these regulations maycausedamageand injury resulting in the immediate invalidation of the guaranteeand exempting FM from anyresponsibility Before proceeding to the connection check that the type of gas to be used as well as the pressure of this correspond to the configuration of use...

Страница 32: ...ve The installation must have a minimum ascending slope of 10 and in case there are curved sections they must be trolleyried out at angles not less than 90 The first section of the installation must be straight and vertical with a length not less than 1m The section of the pipe must be the same throughout the installation and must not be provided with sections with a lower section than the connect...

Страница 33: ... to set the hour you want or the scroll bar to set the minutes you want 3 Press the digit h and icons or 4 Press the digit m and icons or 5 Press the digit dayof the week and icons or or the scroll bar to set the dayof the weekyou want 6 Press the digit dd and icons 7 Press the digit mm and icons 8 Press the digit yyyy and icons or or the scroll bar to set the day you want or or the scroll bar to ...

Страница 34: ...at can be modified in each type and mode of cooking cooking selected Within each selected cooking type and mode various parameters can be modified Temperature set point of the cooking cooking chamber It can only be set to the time controlled cooking or core probe mode regardless of the type of cooking cooking selected dry heat vapour and combi Temperature difference Delta T It can only be set to t...

Страница 35: ...ll the other modes only the opening or closing can be selected at the time the user wants To do so press the icon and next press icons or or move the scroll bar to select the time value wanted if at the time controlled cooking mode or opening closing ifatthe modes for core probe cooking or Delta T ΔT Press again to confirm the value or state selected Adding aphaseto the cooking cycle 12 Press the ...

Страница 36: ...he icon to start the recipe saving process to select the recipe saving position to confirm this 4 Pulse Press the position where you want to save the recipe and then press action 5 Enter the name for the recipe and then press to confirm 6 Press the icon to exit and confirm all the saving process 6 Starting a recipe This oven has two types of recipes 1 FM INDUSTRIAL Cookbook In this cookbook images...

Страница 37: ...ng see section 4 8 The following tables show the factory settings for each of the cycles described above TIME CONTROLLED REGENERATION CYCLE Setting Value Maximum Minimum Chambertemperature 110ºC 20 180ºC Humidity 70 40 100 Time 25 min 1 INFINITE Fan speed Minimum only if the oven has various speeds Valve opening At the end of the cycle PROOFING Setting Value Maximum Minimum Chambertemperature 30ºC...

Страница 38: ... for mixing with water providing a faster drying and a better finish Werecommendusing products from Stalgast The use of anyother rinse aid or cleaningproduct maycausepoor results or irreparable damage and will void the appliance warranty How to use Insert the rinse and detergent tubes of the oven in their respective containers Start an automatic cleaning process following the steps in section 4 8 ...

Страница 39: ...e are no ongoing operations 2 Set the multicook cooking cycle from a recipe Next press the icon to go to the cookbook 3 Select an already programmed recipe from the cookbook The screen shows the number of selectable trays At the bottom of the screen the cooking parameters and the present temperature of the unit is displayed 4 Press the icon of the level wanted Next press the icon TRAY to include o...

Страница 40: ...on allows the user to cook different foods with the same finishing time The oven shows when to insert each pre set tray The result of the cooking is the simultaneous finishing of all foods To set an all on time cooking first follow the steps described in point 4 12 setting a multicook cooking cycle from a memorised recipe or from a manually set recipe 1 Once set press to activate the allin time co...

Страница 41: ...d time of the unit should beupdatedfor the registration of HACCPdata to work appropriately 5 ALARMS EN If an alarm is produced a sound will be activated An icon and an alarm code will be displayed on the screen Touch on the centre of the screen to stop the alarm The table below shows the meaning of the device alarm codes ALARM DESCRIPTION RTC Alarm Alarm description RTC Misconfigured date and time...

Страница 42: ...e is ON no cooking cycle can be started If the alarm is activated during a cooking cycle this cycle will stop Thermal protec tion Alarm Alarm description Motor thermal protection Solutions Switch the oven off and switch it on again after 10 minutes Check visually if there is a motor in poor conditions If so replace it If possible check that there is continuity in the internal klixon of motors to d...

Страница 43: ...ligation to take your old equip ment free of charge if you buy new equipment of the same type and in the same quantity The only condition is to deliver the equipment to the store at your own expense Take the used deviceto acollection point You will find information about the nearest location on the municipal website or bulletin board of the municipal office Leave the device at the service point If...

Страница 44: ......

Страница 45: ...6 a export stalgast com export stalgast com 28217 Bremen Tel 49 421 9898066 1 www stalgast eu www stalgast eu stalgast stalgast de www stalgast de Stalgast Sp z o o Plac Konesera 9 Budynek O 03 736 Warszawa tel 22 517 15 75 fax 22 517 15 77 www stalgast com email stalgast stalgast com 64 ...

Отзывы: