Stairville LC-48 Скачать руководство пользователя страница 11

STAIRVILLE • LIGHT OPERATOR • LC-48

www.thomann.de

11

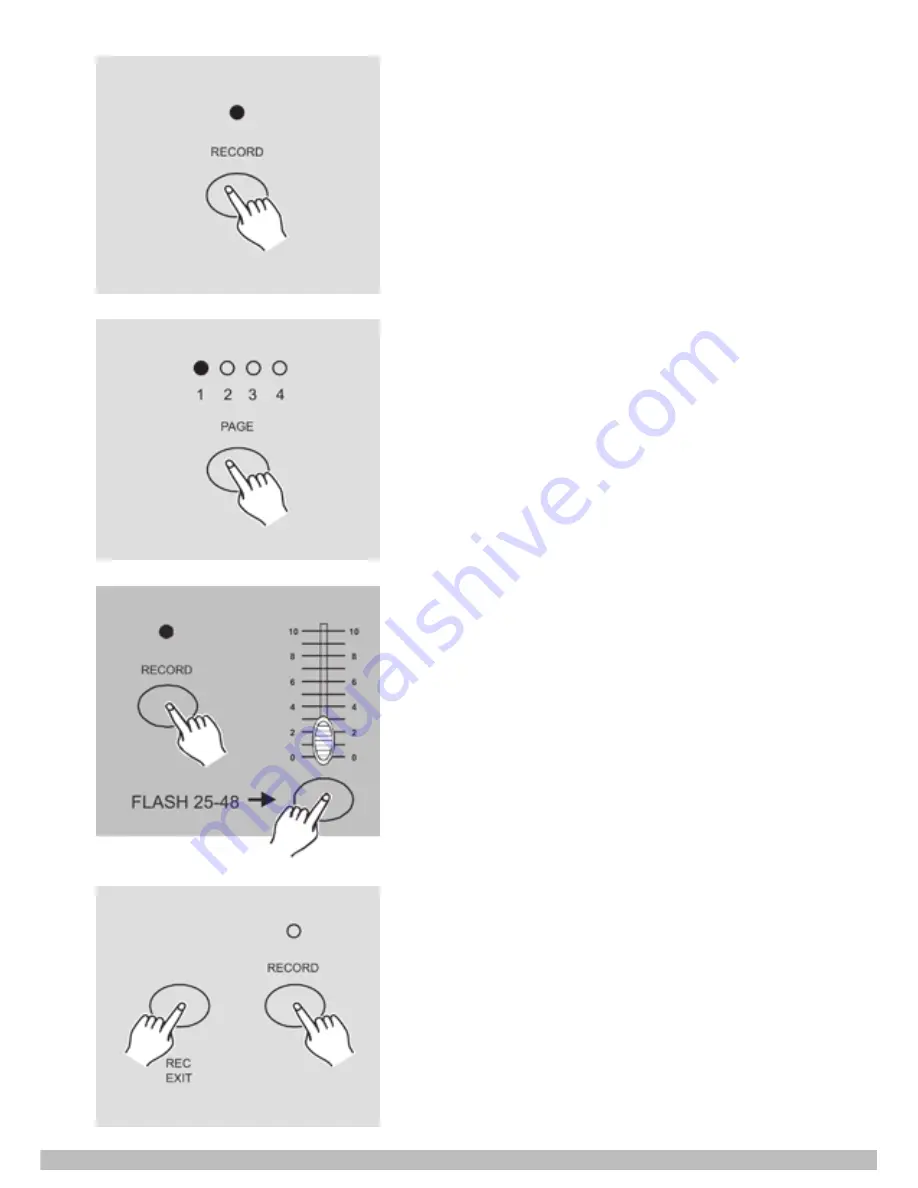
4. Once the scene is satisfactory, tap the 

Record button to program the scene as 

a step into the memory.

5. Repeat steps 3 to 4 until all desired 

steps have been programmed into 

memory. 

You may program up to 1000 steps into 

memory.

6. Select a chase bank or scene master 

to store your program. Tap the Page 

button to select a page (Page 1-4) to 

store your scenes.

7. Press a Flash button between 25-48 

while holding down the Record button. 

All LED will flash indicating the scenes 

have been programmed into memory.

8. You can continue programming or exit. 

To exit Program mode, tap the Exit 

button while holding down the Record 

button, the Record LED should go out.

Содержание LC-48

Страница 1: ...Owner s Manual LIGHT OPERATOR LC 48 ...

Страница 2: ...iew 5 Front view 5 Rear View 8 Operation Guide 9 Begin Programming 9 Security for your Programs 9 Editing 12 Running 17 Change the Speed Mode between 5 Minutes and 10 Minutes 21 MIDI Operation 21 Setting MIDI IN 21 Setting MIDI OUT 22 Exit MIDI Setting 22 Receiving MIDI File Dump 23 Sending MIDI File Dump 23 Implementation 23 Brief of Main Functions 25 Reverse the direction of the scene 25 Fade Ti...

Страница 3: ... the unit immediately and contact the service company X X Keep any flammable material away from the unit while it is operating Otherwise you run the risk of causing a fire X X In the event of serious operating problems stop using the unit immediately Never try to dismantle repair or modify the unit by yourself Otherwise warranty becomes void Repairs carried out by unskilled people can lead to dama...

Страница 4: ...tie knots in the adaptor cord and do not bind it together with other cables Lay the adaptor cord so that no one can step on or stumble over it A damaged power adaptor can cause a fire or an electrical shock Check the power adaptor and its cord from time to time Should it become damaged contact our customer service department to have it replaced X X Before a storm and or a thunderstorm with a risk ...

Страница 5: ...www thomann de 5 Overview Front view ...

Страница 6: ...ming 8 Dark Button This button is used to momentarily black out overall output 9 Down Beat Rev DOWN functions to modify a scene in Edit mode BEAT REV is used to reverse the chasing direction of a program with regular beat 10 Mode Select Rec Speed Each tap will activate the operating mode in the order CHNS SCENES Double Preset and Single Preset Rec Speed Set the speed of any of the programs chasing...

Страница 7: ...l 25 48 to full of current setting or momentarily program a scene into Master B slider depending on the current mode 21 Hold Button This button is used to maintain current scene 22 Step Button This button is used to go to next step when the Speed Slider is pushed to the bottom or in Edit mode 23 Audio Button Activates audio sync of chase and audio intensity effects 24 Master Slider A This slider c...

Страница 8: ...button To control a fog machine Rear View 35 Power Switch Use this switch to turn the power on or off 36 DC Input DC 12 20V 500 mA min 37 MIDI Thru Out In MIDI ports for connection to a sequencer or MIDI device 38 DMX Out This connector sends your DMX value to the DMX fixture or DMX pack 39 Audio Input This jack accepts a line level audio input signal ranging from 100mV to 1Vpp 41 Remote Input Bla...

Страница 9: ...programs from any editing by others you may change the Record Code 1 Enter current Record Code Flash buttons 1 6 6 and 8 2 Press and hold down the Record and Edit buttons at a time 3 While holding the Record and Edit buttons tap the desired Flash button to enter a new Record Code The Record Code consists of 4 Flash buttons the same button or different buttons be sure your new Record Code consists ...

Страница 10: ...ow you want to cancel the new Record Code you may press and hold down the Record and Exit buttons at a time to exit Program Scenes 1 Record Enable 2 Select the 1 48 Single mode by tapping Mode Select button This will give you control of all 48 channels as you program Be sure that Master A B are both set at maximum Master A is at its maximum in the fully up position while Master B is at its maximum...

Страница 11: ... into memory 6 Select a chase bank or scene master to store your program Tap the Page button to select a page Page 1 4 to store your scenes 7 Press a Flash button between 25 48 while holding down the Record button All LED will flash indicating the scenes have been programmed into memory 8 You can continue programming or exit To exit Program mode tap the Exit button while holding down the Record bu...

Страница 12: ...ition its LED lights at full intensity 5 Tap the Record button to program this step into memory 6 Repeat steps 4 and 5 until you ve programmed Channel sliders 1 32 7 Tap the Page button causing Page 1 LED to light 8 Tap the Flash button 25 while holding down the Record button all LEDs will flash indicating you ve programmed the chase into memory Editing Edit Enable 1 Record enable 2 Use the Page b...

Страница 13: ... edit 6 Release the Edit button the relevant scene LED should light indicating you are in the Edit mode Erase a Program 1 Record enable 2 Use the Page button to select the page the program you wish to erase is on 3 While holding down the Edit button tap the Flash button 25 48 4 Release the two buttons all LEDs flash indicating the program is erased Tap this button twice ...

Страница 14: ...cenes 3 If you are not satisfied with the scene or scenes you may tap the Rec Clear button while pressing and holding the Record button all LEDs will flash indicating the scenes have been cleared Delete a Step or Steps 1 Enter the Edit mode 2 Tap the Step button to scroll to the step you wish to delete 3 Tap the Delete button when you reach to the step you wish to delete all LEDs will flash briefl...

Страница 15: ...e Edit button the Scene LED lights 5 Tap the Step button to scroll to the third step 6 Tap the Delete button to delete the step 7 Tap the Rec Exit button while pressing and holding down the Record button to exit Edit mode Insert a Step or Steps 1 Record a scene or scenes you wish to insert 2 Be sure you re in CHNS SCENE and Enter the Edit mode 3 Tap the Step button to scroll to the step which you ...

Страница 16: ... Tap the Insert button to insert the scene you ve created before Modify a Step or Steps 1 Enter Edit mode 2 Tap the Step button to scroll to the step you wish to modify 3 Press and hold the Up button if you want to raise the intensity If you want to lower the intensity press and hold down the Down button 4 While holding down the Up or Down button tap the Flash button corresponding to the DMX chann...

Страница 17: ...ase Programs 1 Tap the Mode Select button to select CHNS SCENE mode indicated by the red LED 2 Tap the Page button to select the correct page the program you wish to run is located 3 Push Master Slider B to its maximum position fully down ...

Страница 18: ...down the relevant Flash button 25 48 to trigger the program 5 Move the Channel slider to adjust the output of the current program Running a Program To Audio 1 Use built in microphone or plug the audio source into the RCA Audio jack 2 Select your program as described above 3 Tap the Audio button until its LED lights indicating Audio mode is active 4 Use the Audio Level slider to adjust the music se...

Страница 19: ... Speed slider to the SHOW MODE position the bottom then tap the Flash button 25 48 while pressing and holding down the Rec Speed button the corresponding program will not run with the Standard beat any longer 4 Now you may move the Speed Slider to select your desired speed NOTE The step 3 is not necessary if the selected program is not recorded with the Standard Beat Running a Program With the Sta...

Страница 20: ...bove 4 Move the Speed slider until the Segment Display reads your desired value You may tap the Tap Sync button twice to define your beat time 5 While pressing and holding down the Rec Speed button tap the Flash button 25 48 that stores the program 6 The program will then run with the set time or beat when engaged 7 Repeat steps 4 and 5 to set a new beat time ...

Страница 21: ...ng down the Record button 3 The 5MIN or 10MIN should light up indicating the Speed slider is set to run in the 5 or 10 minute mode MIDI Operation Setting MIDI IN 1 Tap the Flash button 1 three times while holding down the Record button the LCD display reads CHI indicating MIDI IN channel setup is available Tap this button three times Tap this button three times ...

Страница 22: ... times while holding down the Record button the LCD Display reads CHO indicating MIDI OUT channel setup is available 2 Tap the Flash button numbered from 1 16 to assign MIDI OUT channel 1 16 the relevant channel LED lights indicating MIDI OUT channel is set Exit MIDI Setting Press and hold down the Record button While holding down the Record button tap the Rec Exit button to exit MIDI setting Tap ...

Страница 23: ...atically return when the file dump is completed 2 File dump will be interrupted and stop if errors occur or power failure Implementation 1 During receiving and sending MIDI data all MIDI scenes and channels being run will automatically paused if there is no response within 10 minutes 2 During receiving and sending file dump the controller will automatically search for or send Device ID of 55H 85 a...

Страница 24: ...Off data via the Flash buttons Note NO Velocity Functions 22 69 Program master Turn on or off program 1 48 70 117 Channel intensity Activate Channel 1 48 118 FULL ON 119 DARK 120 HOLD 121 Turn on or off AUDIO 122 CHNS SCENES 123 DOUBLE PRESET Mode 124 SINGLE PRESET Mode 125 Step 126 BLACK OUT ...

Страница 25: ...es will sequence by taping the button several times The chase rate will synchronize to the time of the last two taps The LED above the Step Button will flash at the new chase rate The chase rate may be set anytime whether or not a program is running 2 Tap Sync will override any previous setting of the speed slider control until the slider is moved again 3 Use of Tap Sync in setting a standard beat...

Страница 26: ...MODE A yellow LED will indicate this selection Dimmer Display 1 The 3 Digit Segment Display is used to display intensity percentage or absolute DMX value 2 To change between percentage and absolute value Press and hold the Shift Button While holding down the Shift button press the or 0 255 Button to switch between percentage and absolute values 3 If the Segment Display reads for example 076 it mea...

Страница 27: ...n at a time The Kill mode is activated by pressing the Add Kill button and illuminating the LED above it Pressing any flash button will kill other active Scene or Program In Kill Mode the killed program does not stop running but can not output Double Preset 1 Press Mode Select Button to enter A Double Preset Mode 2 In this mode Channel Sliders 1 12 and channel sliders 13 24 both control Channel 1 ...

Страница 28: ...least two hours every month 2 The Segment Display shows LOP if the voltage is too low Disposal Never throw the device into the regular household waste at the end of its useful life This product is subject to the European Directive 2002 96 EC X X Dispose of the device through an approved disposal centre or at your community waste facility X X Observe the current existing regulations In case of doub...

Отзывы: