


7
Demontage
Die Demontage erfolgt in umge
kehrter Reihenfolge. (Bild
10-12)
Technische Daten
Kontaktart: Schließer 24 V, 2 A
Schu
tzart: IP 54, IK 8
Umgebungstemperatur:
–20 °C bis +40 °C
Abmessungen Frontplatte (mm)
B x H x T: 110 x 273 x 1
Abmessungen Gehäuse (mm)
B x H x T: 85 x 253 x 48
Application
Siedle Compact video door station
flush mounting in bus technology,
for installation in the InHome bus.
With the functions calling, speech,
vision and door release.
Performance features:
• Integrated camera with automatic
day/night switchover, LED lighting
and 2stage heating
• Integrated door loudspeaker
• Adjustable voice volume
• Number of integrated call but
tons: 1, 2
• Acoustic button acknowledgement
can be activated
• Backlit nameplates exchangeable
from the front
• For flush mounting with brushed
stainless steel panel
Electrical voltage
Mounting, installation and servicing
work on electrical devices may only
be performed by a suitably qua
lified
electrician.
Electrostatic charging
As a result of electrostatic charging,
direct contact with the circuit board
can result in destruction of the
device. Direct contact with the circuit
board must therefore be avoided.
1
In the case of video systems, the
following mounting situation must
be avoided at all costs:
• direct backlight
• direct sunlight
• very bright image backgrounds
•
highly reflect
ive walls opposite the
camera
• lamps or direct light sources
English
Scope of supply
•
CVU 850-…-0
• Flushmount housing
• This product information
Terminal assignment
TaK, TbK InHome bus camera
branch
Tö (c)
Relay contact door release
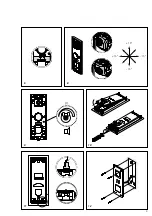
Mounting
2
Remove the housing front. To do
so, loosen the screw on the under
side of the housing. Open the base
plate upwards.
3
Recommended mounting height
app
r. 1.50 m/4.9 ft to
centre device.
4
Remove the cardboard plaster
protector from t
he flush-mount
housing, break out the cable break
through from the housing and
thread in the cable. Reinforce the
flush-m
ount housing using the card
board plaster protector
5
and grout
the flush-mount
hou
sing flush. The plas
ter protector
must be inserted into the housing
to prevent deformation. It must not,
under any circumstances, protrude
from the wall and may be grouted
max. 14
mm in the wall, as other
wise the fixing
screws for the front
panel will be too short.
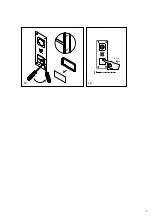
6
The cores may only be laid in the
admissible installation space.
7
Install in accordance with the
wiring diagram.
Circuit diagram note
a)
The camera branch and monitor
branch must be laid separately and
must not be located in the same
cable. This can result in disturbance
to the picture composition.
Important!
Before using the door release
terminal(s) (door release relay con
tact), observe the “Door release
actuation” information in the
System Manu
al In-Home bus: Audi
o
or Video.
Содержание CVU 850-1-0 E
Страница 2: ...2 1 4 max 14 mm 5 3 2 1 50 m 4 9 feet 50 cm 46 cm 127 cm 150 cm 173 cm 50 50 cm 63 cm 65 ...
Страница 3: ...3 8 6 10 9 15 15 15 15 12 11 ...
Страница 5: ...5 13 14 ...