background image

8

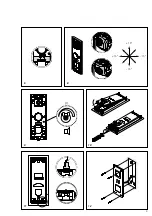
The pick­up angle of the camera 

can be mechanically preadjusted on 
the vertical and horizontal by appr. 
30° depending on the mounting 
situation. To change the pick­up 
direction of the camera, it can be 
positioned in the required direction. 
To change the pick­up direction, 
loosen the two cross­head screws 
slightly. Position the camera in the 
required direction. Then

 fix the 

required position using the two 
cross­head screws.

Depending on the installation 

environment, it may be necessary 
to change the door station speech 
volume in order to permit clear 
speech transmission.

10 

Insert the base plate at the top 

and close downwards. Tighten 
the screw on the underside of the 
housing.

11 

Carefully insert the microphone 

grommet on the underside of the 
housing.

12 

Following completion of installa­

tion, mount the front panel on the 

flush

 mount housing and screw into 

place. The sealing strip fastened at 
the back of the front panel must lie 

flush with the o

utside wall in order 

to guarantee an adequate seal. Do 
not use too much pressure when 
tightening the screws.

Lettering

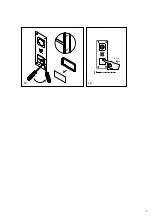
13 

Open the nameplate from the 

outs

ide, for example using a flat 

bladed screwdriver, and carefully 
remove the inscription insert. To 
insert the nameplate, lock into place 
by e

xerting light pressu

re.

Commissioning and  
programming

Installation, commissioning and pro­
gramming are described in the rel­
evant system manual and enclosed 
with the line recti

fier/server.

14 

At the door station, hold down 

the top bell button for 4 seconds. A 
protracted acknowledgement tone 
is then audible which is repeated 
ever

y 5 seconds as long 

as the 

programming mode remains active.

Dismantling

Disassembly takes place in reverse 
order. (Picture

 10-12)

Specifications

Contact type: contact 24 V, 2 

A

Protection system:

 IP 54, IK 8

Ambient temperature: 

–20 °C to +40 °C

Dimensions front panel (mm) 
W

 x H x D: 110 x 273 x 1

Dimensions housing (mm) 

W x H x D: 85 x 253 x 48

Application

Platine de rue vidéo encastrée 

Siedle Compact en technique 

bus pour l’installation dans le bus 
In­Home. Avec les fonctions appeler, 
parler, voir et ouvrir porte.

Caractéristiques fonctionnelles :

• Caméra intégrée avec 
commutation jour/nuit, éclairage à 

LED et chauffage à 2 niveaux

• Haut­parleur de porte intégré

• Volume de la voix réglable

• Nombre de touches d’appel 

intégrées : 1, 2

• Actionnement de touche avec 
signal acoustique activable
• Plaquettes de nom rétroéclairées 
remplaçables par l’avant
• Pour montage encastré avec cache 

en acier inoxydable brossé

Tension électrique

L’installation, le montage et l’entre­
tien d’appareils électriques ne 
doivent être réalisés que par un spé­
cialiste en électricité.

Charge électrostatique

La charge électrostatique peut 
détruire l’appareil en cas de contact 
direct avec la carte de circuits 
imprimés. Evitez par conséquent 
tout contact direct avec la carte de 
circuits imprimés.

Pour les installations vidéo, les 

situations de montage suivantes 
doivent impérativement être évitées :

• un contre­jour direct
• le rayonnement direct du soleil
• un fond d’une grande luminosité

Français

Содержание CVU 850-1-0 E

Страница 1: ...asso Productinformatie Video Deurstation Siedle Compact inbouw Produktinformation Video dørstation Siedle Compact indmuret Produktinformation Video dörrstation Siedle Compact för infälld montering Información de producto Montaje empotrado de estación de puerta con vídeo Siedle Compact Informacja o produkcie Podtynkowa stacja zewnętrzna wideo Siedle Compact Информация о продуктах Дверная видеопанел...

Страница 2: ...2 1 4 max 14 mm 5 3 2 1 50 m 4 9 feet 50 cm 46 cm 127 cm 150 cm 173 cm 50 50 cm 63 cm 65 ...

Страница 3: ...3 8 6 10 9 15 15 15 15 12 11 ...

Страница 4: ...4 Tö Tö Li Li N L1 ETb ERT ETb ERT TbK TaK TbM TaM TbM TaM TbM TaM TbM TaM TbK TaK TaM c b N L1 TbM ERT ERT CVU 850 BVNG 650 BTSV 850 VIB 150 230 V AC TR 603 230 V AC Tö 12 V AC min 20 Ohm 7 ...

Страница 5: ...5 13 14 ...

Страница 6: ... stufiger Heizung integrierter Türlautsprecher Sprachlautstärke einstellbar Anzahl integrierter Ruftasten 1 2 akustische Tastenquittierung akti vierbar hinterleuchtete Namensschilder frontseitig wechselbar für die Unterputzmontage mit Verblendung aus gebürstetem Edelstahl Elektrische Spannung Einbau Montage und Service arbeiten elektrischer Geräte dürfen ausschließlich durch eine Elektro Fachkraft...

Страница 7: ...rect sunlight very bright image backgrounds highly reflective walls opposite the camera lamps or direct light sources English Scope of supply CVU 850 0 Flush mount housing This product information Terminal assignment TaK TbK In Home bus camera branch Tö c Relay contact door release Mounting 2 Remove the housing front To do so loosen the screw on the under side of the housing Open the base plate up...

Страница 8: ...ne rectifier server 14 At the door station hold down the top bell button for 4 seconds A protracted acknowledgement tone is then audible which is repeated every 5 seconds as long as the programming mode remains active Dismantling Disassembly takes place in reverse order Picture 10 12 Specifications Contact type contact 24 V 2 A Protection system IP 54 IK 8 Ambient temperature 20 C to 40 C Dimensio...

Страница 9: ...ur modifier le sens de visée de la caméra il est possible de positionner cette dernière dans le sens souhaité Pour modifier le sens de visée desserrer un peu les deux vis à empreinte cruciforme Positionner la caméra dans le sens souhaité Ensuite fixer la position souhaitée à l aide des deux vis à empreinte cruciforme 9 En fonction de l environnement de montage il peut être nécessaire de modifier l...

Страница 10: ...ormazioni La scatola non deve assolutamente sporgere dalla parete e deve essere incassata al massimo 14 mm nella parete poiché in caso contrario le viti di fissaggio del fron talino risultano troppo corte 6 I fili possono essere posati esclusi vamente in un ambiente di installa zione approvato 7 Eseguire l installazione secondo lo schema di collegamento Note sullo schema elettrico a La derivazione...

Страница 11: ...akman worden uitge voerd Elektrostatische lading Door elektrostatische lading kan bij een direct contact met de printplaat het apparaat worden vernietigd Vermijdt u daarom het direct aan raken van de printplaat 1 Bij video installaties moeten de volgende inbouwsituaties absoluut vermeden worden direct tegenlicht directe zonnestralen achtergrondbeeld met grote fel heid Nederlands sterk reflecterend...

Страница 12: ...am mering Installatie ingebruikname en pro grammering zijn in het betreffende systeemhandboek beschreven en zijn meegeleverd bij de netvoeding resp server 14 Op het deurstation de bovenste oproeptoets gedurende 4 seconden ingedrukt houden Daarna is een lange bevestigingstoon te horen die iedere 5 seconden kort herhaald wordt zo lang de programmeermode actief is Demontage De demontage geschiedt in ...

Страница 13: ... kan dette positioneres i den ønskede retning For at ændre blikretningen løsnes de 2 krydskærvskruer lidt Kameraet positioneres i den ønskede retning Med de 2 krydskærvskruer fastlåses kameraet herefter i den ønskede position 9 Afhængigt af indbygningsomgi velserne kan det være nødvendigt at ændre dørstationens talelydstyrke for at muliggøre en tydelig og klar samtaletransmission 10 Indsæt basispl...

Страница 14: ... korta 6 Ledarna måste installeras i det därför avsedda installationsut rymmet 7 Utför installationen enligt anslut ningsschemat Anvisningar för kopplings schemat a Kameragrenen och monitor grenen måste dras separat och får inte ligga i samma kabel I annat fall kan det uppstå störningar i upp byggnaden av bilden Viktigt Innan en eller flera Tö klämmor reläkontakt dörröppnare används beakta informa...

Страница 15: ...n la tarjeta de circuito impreso 1 En instalaciones de vídeo es abso lutamente imprescindible evitar las siguientes situaciones de montaje Contraluz directa Radiación solar directa Español Fondo de imagen con gran lumi nosidad Paredes muy reflectantes en el lado opuesto de la cámara Lámparas o fuentes de luz directas Alcance de suministro CVU 850 0 Carcasa de empotrar Esta información de producto ...

Страница 16: ...as Para insertar la placa de características engati llarla haciendo una ligera presión Puesta en servicio y programa ción La instalación la puesta en servicio y la programación se describen en el correspondiente manual del sistema y se adjuntan a la fuente de alimen tación o bien al servidor 14 Mantener pulsada durante 4 segundos la tecla de timbre superior en la estación de puerta A continuación ...

Страница 17: ...deo 8 Kąt widzenia kamery można wyre gulować w kierunku lewo prawo i góra dół o ok 30 w zależności od warunków montażowych Aby zmienić kierunek widzenia kamery kamerę można przesunąć w wybranym kierunku Aby zmienić kierunek widzenia należy lekko odkręcić obie śruby z rowkiem krzyżowym Następnie przesunąć kamerę w wybranym kierunku i przykręcić obie śruby z rowkiem krzyżowym w ustalonej pozycji 9 W...

Страница 18: ... тажа ок 1 50 м до центра при бора 4 Вынуть защитный картон из корпуса для скрытого монтажа выломать заглушку кабельного ввода из корпуса и ввести кабель Усилить корпус для скрытого мон тажа защитным картоном 5 Корпус для скрытого мон тажа заштукатурить заподлицо Во избежание деформаций защитный картон должен быть вложен в корпус Корпус не должен выступать из стены и должен быть заштукатурен в сте...

Страница 19: ... эксплуатацию и про граммирование Монтаж ввод в эксплуатацию и программирование описаны в соответствующем системном руководстве которое прилагается к блоку питанию или серверу 14 На дверной панели вызова удерживать нажатой в течение 4 секунд верхнюю кнопку звонка После этого звучит продолжи тельный сигнал квитирования который повторяется каждые 5 секунд до тех пор пока активен режим программирован...

Страница 20: ...Telefon und Telegrafenwerke OHG Postfach 1155 78113 Furtwangen Bregstraße 1 78120 Furtwangen Telefon 49 7723 63 0 Telefax 49 7723 63 300 www siedle de info siedle de 2019 07 21 Printed in Germany Best Nr 210009585 00 ...

Отзывы: