10
If the upper band flows horizontely straight or up to 30 degrees only you have found
the suitable position. In case the band shows more than 30 degrees or turns round
the mast, the position is unsuitable. This test should be carried out at moderate wind
conditions and only gives an orientation. We recommend to do various tests to get a
better assessment. You need not do this test if the windgenerator is mounted far
away from obstructions.
Note:
Please note that the Silentwind generator can never be fully efficient
if it is not mounted in the prevailing wind direction or distracted by
obstructions. Therefore it is important to find a position that is not
obstructed by obstacles !
Having found the suitable position an appropriate mast with suitable equipment must
be chosen. The outer mast diameter must have 48mm and it should be inox steel or
alumine. Please also consider possible maintenance work. The mast with mounted
windgenerator should be able to take a wind blast pressure of 250Nm. Grounding of
the mast is highly recommendable. On boats you can use the central ground for mast
and engine. Ask a specialist for advice.
Once the mast is mounted you can start the relatively simple installation of the
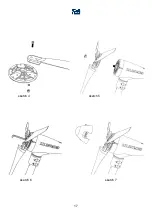
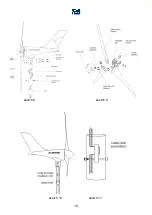
Silentwind generator. First connect the 3 CF blades to the assembly hub (see page
17, sketch 4) with the enclosed srews (page 18, sketch 9). The enclosed nylon discs
protect against electrolytic corrosion. The fastening torque is 7-8Nm equivalent to a
weight of 7-8 kilo on a 10cm long lever arm, upright to the lever arm.
If the fastening torque is too high, this will destroy or damage the blades. If the
fastening torque is not high enough, the blades can get lose. A wrong fastening
torque is a considerable safety risk.
Regularly control the fixation of the blades !
Before fixing the blades finally move the 3 blades in a position opposite to the
running direction. The running direction is clockwise looking from the front. Then fix
the blades as described above. The blades should not be out of balane then. The
blades have been balanced statically and dynamically. In case of damage of only one
blade you can buy a single one. When ordering one blade the purchasing department
needs the exact weight of the undamaged blades.
After connecting the blades the set is fixed to the generator shaft with the enclosed
srew nut and enclosed hexagon socket srew key. After that you snap the nose cone
into place on the assembly hub. (see page 17, sketch 5,6 and 7)
Содержание Silentwind
Страница 1: ...instructions for use installation manual SILENTWIND...
Страница 16: ...16 14 Attachment sketches sketch 1 sketch 2 sketch 3...
Страница 17: ...17 sketch 4 sketch 5 sketch 6 sketch 7...
Страница 18: ...18 sketch 8 sketch 9 sketch 10 sketch 11...
Страница 20: ...20 Notice...

