Customer Service 1-888-707-1880
Dyaco Canada Inc. 2014
Email:
7
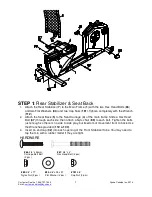
STEP 1:
Rear Stabilizer & Seat Back
1.
Attach the Rear Stabilizer (
7
) to the Main Frame (
1
) with the two Hex Head Bolts (
65
)
and two Flat Washers (
84
) and two Cap Nuts (
191
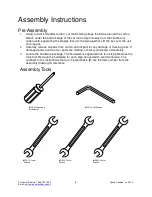
).Tighten completely with the Wrench
(
112
).
2.
Attach the Seat Back (
5
) to the Seat Carriage (
4
) of the main frame. Slide a Hex Head
Bolt (
67
) through each side, then attach a Nyloc Nut (
89
) to each bolt. Tighten the bolts
just enough so there is no side to side play, but freedom of movement front to back. Use
the Wrenches provided (
112
&
130
).
3.
Insert an end cap (
32
) into each opening of the Front Stabilizer Tube. You may need to
tap them in with a rubber mallet if they are tight.
HARDWARE
#65.
3/8” x 53mm
Carriage Bolt Bolt
(2 pcs)
#67.
3/8” x 4”
Hex Head Bolt (2 pcs)
#89.
3/8” x 7T
Nyloc Nut (2 pcs)
#84.
3/8” x 25 x 2T
Flat Washer (2 pcs)
#191.
3/8”
Cap Nut (2 pcs)


