background image

Customer Service 1-888-707-1880 


Dyaco Canada Inc. 2014


Email: 

[email protected]


Assembly Instructions


Pre-Assembly 

1. 

Using a razor knife (Box Cutter), cut the banding straps that wrap around the car ton. 
Reach under the bottom edge of the car ton and pull it away from the cardboard 
underneath, separating the staples that join the two together. Lift the box over the unit 
and unpack. 

2. 

Carefully remove all parts from car ton and inspect for any damage or missing parts. If 
damaged parts are found, or parts are missing, contact your dealer immediately. 

3. 

Locate the hardware package. The hardware is separated into four steps. Remove the 
tools first. Remove the hardware for each step as needed to avoid confusion. The 
numbers in the instructions that are in parenthesis (

#

) are the item number from the 

assembly drawing for reference. 


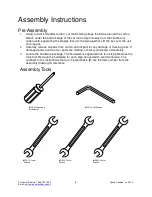
Assembly Tools


#114.

Phillips Head 

Screwdriver 


#115.

L Allen Wrench


#112.

12/14mm 

Wrench


#113.

13/15mm 

Wrench


#130.

13/14mm 

Wrench


Содержание 161168395US

Страница 1: ...Retain For Future Reference Owner s Manual Model No 161168395US Assembly Operation Adjustments Parts Warranty CAUTION Read and understand this manual before operating unit...

Страница 2: ...epair and alterations This warranty provided herein is lieu of all other express warranties any implied warranties including any implied warranties of merchantability of fitness for particular purpose...

Страница 3: ...s 5 Assembly Instructions 6 Product Features 11 Operation of Your Stationary Bike 12 Programmable Features 16 Using Heart Rate Transmitter 28 General Maintenance 30 Parts List and Diagram 31 Training...

Страница 4: ...ur experience more informed and any difficulties easier to remedy Please take a moment at this time to record the name of the dealer their telephone number and the date of purchase below to make any f...

Страница 5: ...Instructions To disconnect turn all controls to the off position Do not operate equipment on deeply padded plush or shag carpet Damage to both carpet and equipment may result Before beginning this or...

Страница 6: ...ely understanding the results of any operational change you request from the computer Understand that changes in resistance do not occur immediately Set your desired resistance level on the computer c...

Страница 7: ...and unpack 2 Carefully remove all parts from carton and inspect for any damage or missing parts If damaged parts are found or parts are missing contact your dealer immediately 3 Locate the hardware pa...

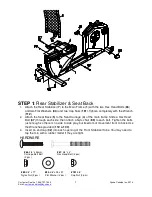
Страница 8: ...f the main frame Slide a Hex Head Bolt 67 through each side then attach a Nyloc Nut 89 to each bolt Tighten the bolts just enough so there is no side to side play but freedom of movement front to back...

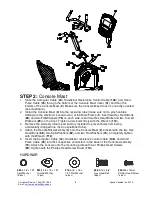
Страница 9: ...hten all six bolts firmly with the Wrench 112 3 Remove the white styrofoam pad factory installed to prevent bolts from being accidentally dropped into the Console Mast Tube 4 Attach the Handle Bar Ass...

Страница 10: ...to the Seat Carriage 4 with the four Hex Head Bolts 71 four Flat Washers 77 and four Nyloc Nuts 89 Tighten with the Wrenches provided 112 130 3 Plug the Hand Pulse Sensor Cables 27 into the rear two...

Страница 11: ...Seat Handle Bar 6 with two pieces of Velcro Tape Wrap the tape around the handlebars in places that will be under the beverage holders so they are out of sight 5 Attach the Pedals 116L 117R to the Cr...

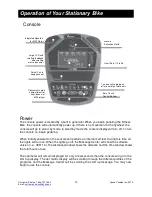
Страница 12: ...ustomizing the resistance profile during the set up phase of con sole programming If you accept the default program profile the selected program will determine which muscles will be activated by autom...

Страница 13: ...l show the software version i e VER 1 0 The distance window shows the distance and the time window shows the total hours of use The odometer will remain displayed for only a few seconds then the conso...

Страница 14: ...feature will begin again There is a lap counter in the message window for monitoring your distance Pulse Grip Feature The Pulse Heart Rate console window will display your current heart rate in beats...

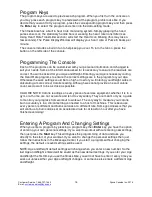
Страница 15: ...al peaks and elite athletic training Basic Information The Message Center will initially be displaying the Program name When in scan mode during a program speed will be displayed for four seconds then...

Страница 16: ...lating a more correct Calorie reading Although we cannot provide an exact calorie count we do want to be as close as possible CALORIE NOTE Calorie readings on every piece of exercise equipment whether...

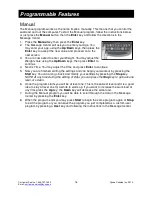
Страница 17: ...theTime and press Enter to continue 5 Now you are finished editing the settings and can begin your workout by pressing the Start key You can also go back and modify your settings by pressing the Stop...

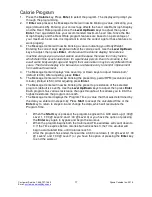
Страница 18: ...ed as a reference only to monitor improvement from workout to workout 4 The Message Center displays Use Level Up or Down keys to adjust Calorie burn default is 300 After adjusting press Enter 5 The Me...

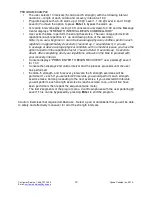
Страница 19: ...ht their calorie burn may be very different than yours The Calorie display is to be used as a reference only to monitor improvement from workout to workout The calorie count displayed in this program...

Страница 20: ...with no medical issues you have the option to perform the repetitions faster 1 second total 5 seconds up 5 seconds down After completing all of your repetitions sit back on the bike to proceed with yo...

Страница 21: ...ells at shoulder height behind your head with a neutral grip palms facing one another your elbows should be pointed straight ahead 2 Raise the dumbbells overhead until your arms are fully extended you...

Страница 22: ...UP EMPHASIS CHEST SHOULDERS BACK OF ARMS There are two variations of this exercise If you aren t able to perform the exercise as shown in this illustration place your knees on the floor a padded mat o...

Страница 23: ...ssing the Start key You can also go back and modify your settings by pressing the Enter key 7 If you want to increase or decrease the resistance at any time during the program press the Level Up Down...

Страница 24: ...ext letter When you have finished entering the name press the Stop key to save the name and continue to the next step 3 The Message Center will ask you to enter your Age You may enter your age using t...

Страница 25: ...m follows a quick progression up to the maximum resistance level default or user input level that is sustained for 2 3 of the workout This program will challenge your ability to sustain your energy ou...

Страница 26: ...NCE CALORIES This program follows a quick progression up to the maximum resistance level default or user input level that is sustained for 2 3 of the workout This program will challenge your ability t...

Страница 27: ...180 maximum heart rate 180 x 6 108 beats per minute 60 of maximum 180 X 8 144 beats per minute 80 of maximum So for a 40 year old the training zone would be 108 to 144 beats per minute If you enter y...

Страница 28: ...The scale is as follows Rating Perception of Effort 6 Minimal 7 Very very light 8 Very very light 9 Very light 10 Very light 11 Fairly light 12 Comfortable 13 Somewhat hard 14 Somewhat hard 15 Hard 16...

Страница 29: ...able readings Wearing the transmitter directly on bare skin assures you of proper operation If you wish you may wear the transmitter over a shirt To do so wet the areas of the shirt that the electrode...

Страница 30: ...n press Enter to continue 4 Next is Time You may adjust the time and press Enter to continue 5 Now you are asked to adjust the Heart Rate Target This is the heart rate level you will strive to maintai...

Страница 31: ...nsole has built in maintenance diagnostic software The software will allow you to change the console settings from English to Metric and turn off the beeping of the speaker when a key is pressed for e...

Страница 32: ...2 19 16839519 Console Assembly 1 20 16839520 Drive Pulley 1 24 16839524 Button Head Plug 2 25 16839525 38_Seat Track Wheel 8 26 16839526 300m m_Hand Pulse Sensor Assembly W Cable 1 27 16839527 750 950...

Страница 33: ...Bolt 1 71 16839571 3 8 1 3 4 _Hex Head Bolt 4 72 16839572 1 4 13 1T_Flat Washer 8 73 16839573 1 4 19 1 5T_Flat Washer 4 75 16839575 17 23 5 1T_Flat Washer 1 76 16839576 5 16 18mm 1 5T_Flat Washer 9 7...

Страница 34: ...age Cover 1 126 168395126 HGP Wire Grommet 1 129 168395129 M6_Nyloc Nut 1 130 168395130 13 14m m_Wrench 1 140 168395140 Sensor Rack 1 141 168395141 Handle Bar Cover 1 143 168395143 Seat Track Fixing P...

Страница 35: ...Customer Service 1 888 707 1880 Dyaco Canada Inc 2014 Email customerservice dyaco ca 34 Parts diagram 161168395US...

Страница 36: ...olves the stretching of muscles and tendons to maintain or increase suppleness and provides increased resistance to muscle injury or soreness Cardio Respiratory Endurance is the most essential compone...

Страница 37: ...ter 3 5 minutes of low intensity aerobic activity or callisthenic type exercise Warm Down or Cool Down This involves a gradual decrease in the intensity of the exercise session Following exercise a la...

Страница 38: ...y for maximum fitness The principle behind circuit training is to give a person all the essentials at one time by going through your exercise program moving as fast as possible between each exercise T...

Страница 39: ...uring Exercise Do not hold your breath while exercising Breathe normally as much as possible Remember breathing involves the intake and distribution of oxygen which feeds the working muscles Rest peri...

Страница 40: ...ide of your neck Next rotate your head back for one count stretching your chin to the ceiling and letting your mouth open Rotate your head to the left for one count and finally drop your head to your...

Страница 41: ...retch toward your toes Reach down as far as you can and hold for 15 counts INNER THIGH STRETCH Sit with the soles of your feet together with your knees pointing outward Pull your feet as close Into yo...

Отзывы: