Speco O2B16 Скачать руководство пользователя страница 6

6


Operation and settings 
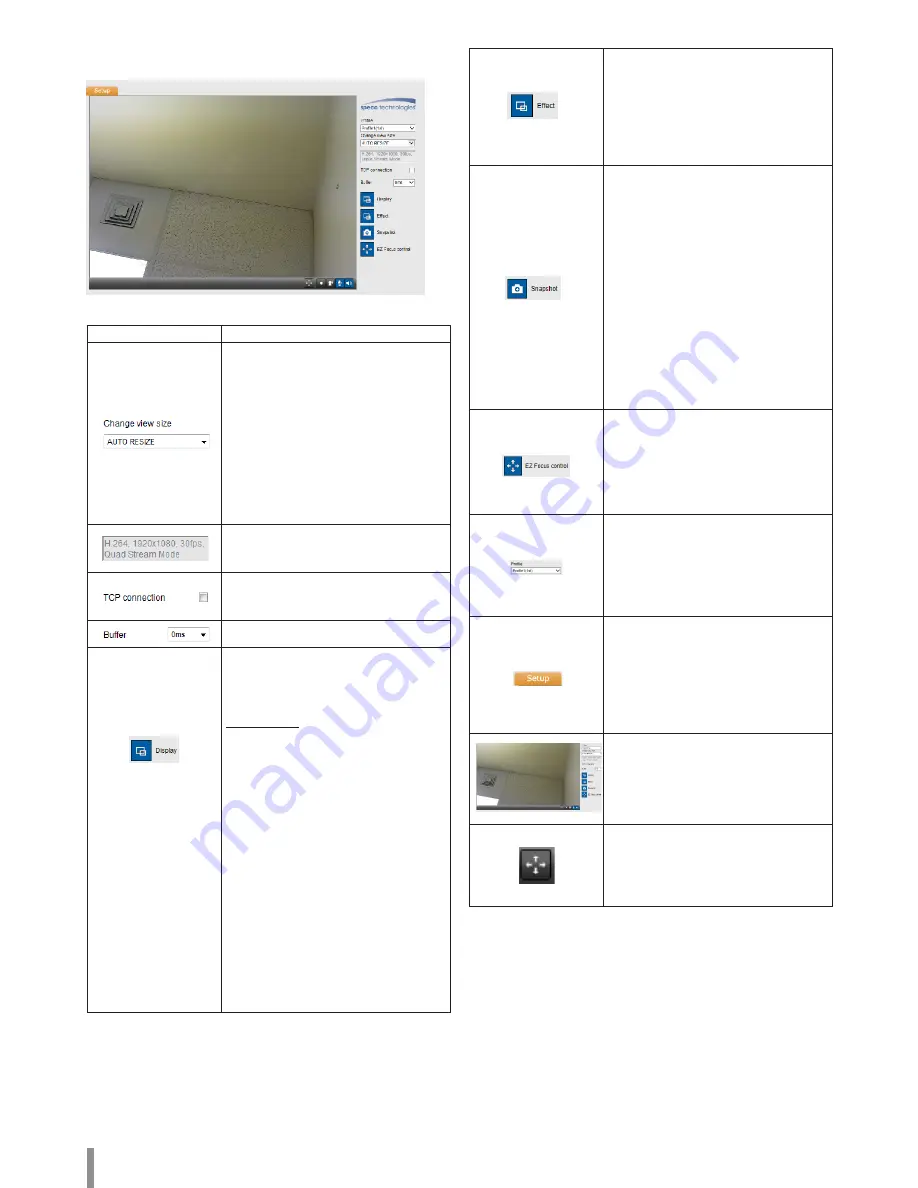
Web Viewer Overview

Item

Description

Select the video image size from the 

drop-down list.  

(FULL SCREEN / AUTO RESIZE / x0.5 / x1 / 

x2 / D1 / CIF)

Note:

• 

Select [FULL SCREEN] to enable full 

screen view. To return to the previous 

screen, press ESC key or double click.

• 

When you select [AUTO RESIZE], size 

of the live view screen will be revised 

to fit the window.

Displays Video Codec, Resolution, FPS 

and Preset Mode of the selected video 

stream. 
Network connection type (TCP or UDP). If 

checked, the client connects to the server 

using TCP connection.
Select buffering time of the live stream.
Click to display the check box of 

[Hostname], [Framerate] and [Bitrate] 

options. Select the [Position] on [Display] 

menu. (Top Left / Top Right)

Video Analysis


>  Hide: Video Analysis display 

function is not in use.


> SVA: Displays the Smart Video 

Analysis function in the live view 

window.


>  MD: Displays the Motion 

Detection function in the live 

view window.

Note:

• 

When [Pivot] is activated,  

on Profile2, Profile3 and Profile4, 

motion detection view is available 

when a profile is set to the same 

codec as Profile1.

• 

When you use the Digital PTZ 

function, all of the Display functions 

are deactivated.

Click to expand and then check the [Edge 

Enhancement] option. The user gets a 

more sharp reception on the live view 

window.

Note:

This feature only affects the live view 

window.
Click to save the current image in JPEG 

format on your computer.
1.  Click the [Snapshot] button and then 

the Snapshot window is displayed.

2.  Click the [Save] button in the 

Snapshot window.

3.  Enter the file name (JPEG format) and 

select the folder to save it.

4.  Click the [Save] button to confirm.
5.  Click the [Cancel] button in the 

Snapshot window to close it.

Note:

The motion detection and SVA windows 

are not displayed in the Snapshot file.
Displays the EZ Focus control window.

Note:

• 

The EZ Focus adjustment is 

recommended during installation 

only. 

• 

O2B16 supports Zoom / Focus only.

Select the video stream. From the Live 

view drop-down list, select the desired 

video image source.

Note:

You can set the stream configurations 

independently.
Provides all the necessary options 

for setting up the device to your 

requirements. The user will need 

administrator level to do this.

Note:

If you want to exit the Setup menu, select 

the Live button.
Displays the current surveillance live 

screen. 

Click this button and drag the area to use 

the Digital PTZ function. Right-clicking 

on the screen will bring up the previous 

magnification. 
(Color icon: On, Gray scale icon: Off.)

Содержание O2B16

Страница 1: ...OWNER S MANUAL Full HD IP Camera Please read this manual carefully before operating the unit and retain it for future reference MODELS O2D10 O2DP14 O2B16 V1 0...

Страница 2: ...rements 4 Accessing the Unit 5 Web Viewer Overview 6 Configuration menu overview 7 Configuring the Network Camera 7 Accessing the Configuration menu 7 System settings 8 Audio Video settings 11 Network...

Страница 3: ...dress to make it accessible This manual contains instructions on how to install and manage the Speco IP Camera in your networking environment Some knowledge of networking environments is recommended S...

Страница 4: ...ow to enable live video in the web viewer When you set the camera to run 60 fps in mobile applications the actual framerate may be degraded depending on mobile performance Recommended PC Requirements...

Страница 5: ...d start the web viewer When accessing the web viewer the window for login will be shown as below 3 3 Enter the user name and password Note that the default administrator user name and password are adm...

Страница 6: ...nctions are deactivated Click to expand and then check the Edge Enhancement option The user gets a more sharp reception on the live view window Note This feature only affects the live view window Clic...

Страница 7: ...bled for both In and Out this function is available Color icon On Gray scale icon Off Click this button to switch the sound off and on for the speaker of the computer Color icon On Gray scale icon Off...

Страница 8: ...s Upgrade Reset System Restart Click the Confirm button to restart the IP device It takes a couple of minutes for the IP device to restart Backup Restore Backup Make a backup of all of the settings 1...

Страница 9: ...may not progress immediately In this case you should try it again after waiting a few minutes Remove the micro SD card 1 Click the Unmount button If the micro SD card is unmounted from the system corr...

Страница 10: ...overlay User Title Enter the user title The user title is displayed on the right bottom of screen Multi Line Text Enter characters in the text field Maximum number of input characters depends on the...

Страница 11: ...int you want by using the arrow buttons 2 Adjust the zoom focus options 3 Set the Pan Tilt Zoom or Focus step options O2B16 does not support the PAN and TILT functions Note Adjust Focus To save the fi...

Страница 12: ...button to restore back to original factory settings Focus Mode Under the Mode option in the Focus menu select the following mode Zoom Trig After changing the zoom on the camera autofocus is performed...

Страница 13: ...rence in the operating level High Middle Low This is because WDR includes the auto adjust function of Defog AGC If the images are too dark change the maximum AGC value to make the images bright Bright...

Страница 14: ...desired red value Blue Set the desired blue value Color Temp If the Mode option set to ATW this option is displayed Click to select the option Indoor Adjust the white balance according to the indoor e...

Страница 15: ...hen the Day Night menu set to Night mode the brightness of the IR LED will be adjusted automatically The Max Level is displayed Manual When the Day Night menu set to Night mode the brightness of the I...

Страница 16: ...same time Default Click this button to restore back to original factory settings Basic Setup Profile Select the stream Profile1 Profile2 Profile3 or Profile4 depending on the Install Preset Note It i...

Страница 17: ...If the Profile is set to Profile1 can be set the Bitrate value from 1024 kbps to 10240 kbps In case of Profile2 Profile3 Profile4 it can be set from 256 kbps to 10 240 kbps Note If the Bit rate is con...

Страница 18: ...e computer of the same segment network receive the same transmission data When multicast option is checked then select Video Port number Audio Port number and Data port number IPv4 address Set the IP...

Страница 19: ...IP addresses in the list are allowed or denied according to the choice made in the drop down list of the Basic policy option The administrator can add up to 10 IP address entries to the list a single...

Страница 20: ...e Point Quality of Service Audio DSCP Enter the priority of Audio for DSCP Quality of Service Event DSCP Enter the priority of Event for DSCP Quality of Service Save Click this button to confirm the s...

Страница 21: ...d to enable it Note Remember the password Displayed Items according access authority are as below Admin Power User Normal User Custom User PTZ O O X DPTZ O O X REC O O X BI AUD O O X MIC O O X SPEAKER...

Страница 22: ...rver 1 Click the Add button SMTP server setting window is displayed 2 Set the SMTP server options Alias Enter the SMTP server name User ID Enter the user ID of the SMTP server This would be the one wh...

Страница 23: ...ection settings also You can reset the window size Click one of the window edge or corner and drag drop to reset the motion detection area Motion Detection can be activated when at least one of channe...

Страница 24: ...ject is being in same condition for 10 seconds Object Removal and Object Desertion need up to 5 minutes to recognize the object as the background Depending on your installation environment detection e...

Страница 25: ...recording Record to SD Card when event occurs Selects the camera stream for SD card recording FTP server JPEG Upload the image or send the e mail to the FTP server Send Image per Base File Name and Su...

Страница 26: ...he local network Firewall Protection Check for the internet firewall with the system administrator either he has to do port forwarding or modify the DMZ function on the router Default router needed Ch...

Страница 27: ...the bidirectional audio button is enabled on the Web viewer and the microphone is set Change the input and the output gain for microphone and the speaker respectively to set correct audio level Browse...

Страница 28: ...Object desertion Text Overlay Supported Audio Compression G 711 G 726 2 way Audio Supported Audio Detection Supported Event Event Trigger Video analytics Audio detection Alarm input Event Notification...

Страница 29: ...ported Audio Compression G 711 G 726 2 way Audio Supported Audio Detection Supported Event Event Trigger Video analytics Audio detection Alarm input Event Notification Relay Out Email FTP Pre Event Bu...

Страница 30: ......

Отзывы: