background image

93 


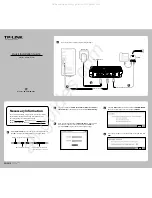
3. Set Save Path, File Name, and File Format. And then click “OK” button. 
4. Still image is saved as set in Capture window. 
     

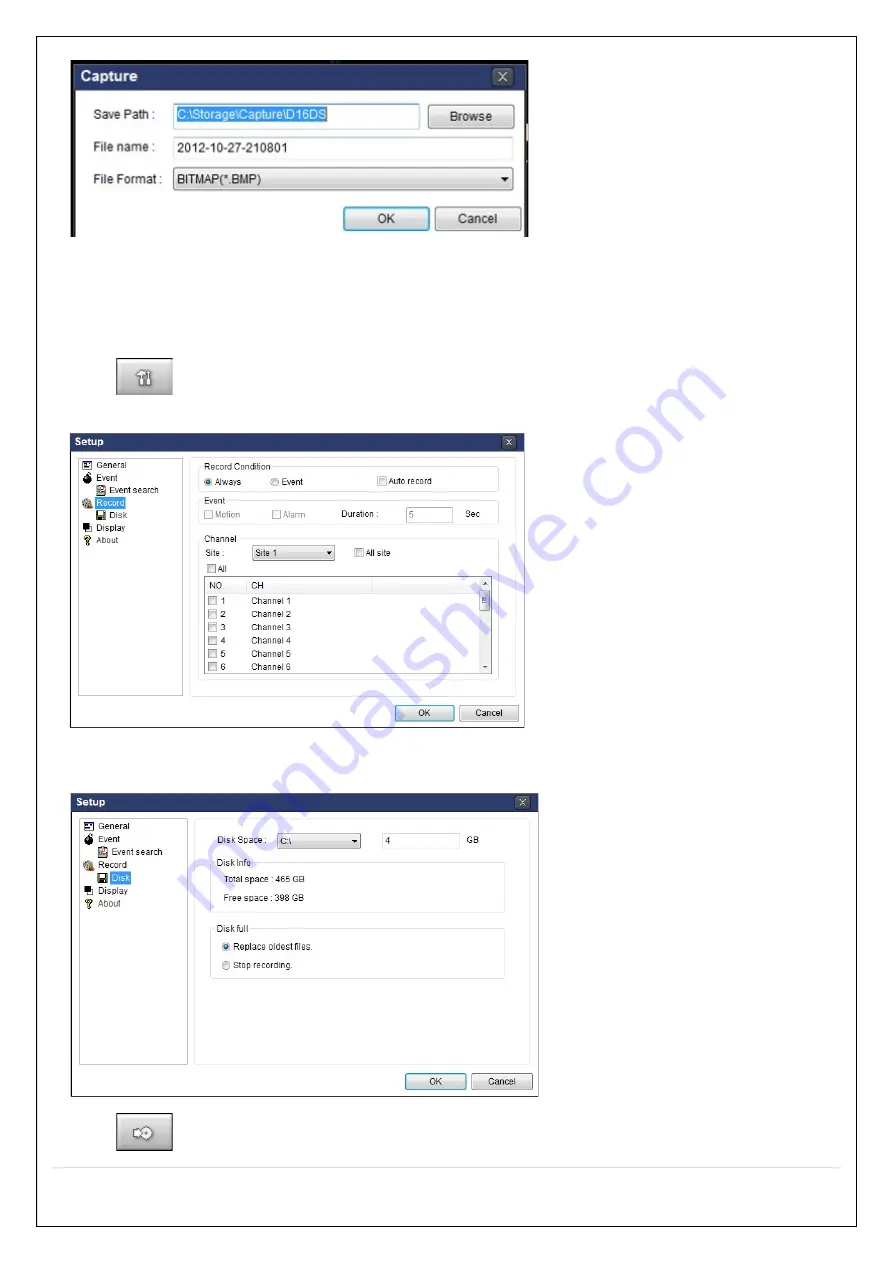
7-8-4.  Recording  Video  on  Local  PC  During  Live   

1. Click 

  “Setup” button. And then a setup window will be displayed as below. 

2. Select Record and set the values. 


3. Select Disk and set the values. 


4. Click 

  “Record On” button. And the color of button is changed.   

Содержание N16NU

Страница 1: ...ls Desktop N8NU N16NU N32NS Wall Mount N8WNU N16WNU 8 16 32 Channel H 265 Network Video Recorder About This User s Guide Before operating the unit please read this user s guide thoroughly and retain i...

Страница 2: ...or explosion Replace only with the same or equivalent type battery recommended by the manufacture Discard used batteries according to manufacturer s instructions This symbol indicates the presence of...

Страница 3: ...vents Do not restrict airflow of the unit doing so can damage the unit Only qualified and experienced personnel should perform installation and servicing Turn off the power of the NU N32NS when conne...

Страница 4: ...cified below Desktop N8NU N16NU N32NS Wall Mount N8WNU N16WNU Remote Control Battery 1 5V AAA x 2 EA Quick Setup Guide User Guide Mouse Software Manual CD Rack mount x 2EA Screws x 6EA Power Adaptor D...

Страница 5: ...30fps Recording Mode Continuous Motion Sensor Schedule Manual Pre Recording Max 20 Minutes Post Recording Max 60 Seconds Playback Search Quick Date Time Event Archive Log Multi Decoding 1 4 8 1 4 9 1...

Страница 6: ...nd CMS 64 channels Remote Setup and Upgrade Simple Web Setup and Upgrade Power Power Supply Voltage 100 240V AC Temperature Operation 5 C 40 C Storage 10 C 50 C Humidity Operation 20 80 Non condensing...

Страница 7: ...te Access IP Camera 10 100 1000 Base TX Protocols TCP IP UDP DHCP HTTP NTP SMTP RTP RTSP ONVIF Recording Compression H 264 H 265 Auto Detection Resolution Frame Rate 1280x720 960fps CH1 32 1920x1080 9...

Страница 8: ...indows IE Chrome Firefox Safari PC Client Single Multi Client and CMS 64 channels Remote Setup and Upgrade Yes Power Power Supply Voltage DC 12V 6 67A Temperature Operating Temperature 41 F 104 F 5 C...

Страница 9: ...0 Setup Main Live Screen 27 4 1 Setup IP Camera 28 4 1 1 Scan Menu 30 4 1 2 ONVIF Setup Menu 31 4 2 Setup System 33 4 3 Setup Record Mode 39 4 3 1 Recording Schedule 40 4 4 Setup Device Mode 41 4 4 1...

Страница 10: ...Still Images or Video from the Archive List 70 6 5 Playback of Backup Video 71 6 5 1 AVI Format 71 6 5 2 NSF Format 71 7 Network Access Using the Multi Sites Network Viewer 72 7 1 Overview 72 7 2 PC R...

Страница 11: ...93 7 8 5 Local Playback and Remote Playback 94 7 8 6 AVI Backup during Playback 96 8 Network Access Using the Web Browser Viewer 98 9 Network Access Using the Smart Phone Viewer 100 9 1 App Viewer fo...

Страница 12: ...1080 RAID 1 5 10 Support Refer to Appendix Password to secure installation authorization Network software supports 10 100 1000Mbps USB 2 0 port for video clip exporting and easy firmware upgrade via U...

Страница 13: ...er the logo select the language and set date and time as specified below 1 User has to set a password before using Cannot use 1111 when the initial boot up password set But user can set 1111 as a pass...

Страница 14: ...ronization take the following steps 1 Enter the Setup mode The default User ID is admin and enter Password set on initial booting 2 Go to Setup System Date Time Setup 3 Select on from the Daylight Sav...

Страница 15: ...MT 7 GMT 6 CT Connecticut GMT 5 GMT 4 DC District of Columbia GMT 5 GMT 4 DE Delaware GMT 5 GMT 4 FL Florida GMT 5 GMT 4 FL Florida W GMT 6 GMT 5 GA Georgia GMT 5 GMT 4 HI Hawaii GMT 10 NA ID Idaho N...

Страница 16: ...6 OH Ohio GMT 5 GMT 4 OK Oklahoma GMT 6 GMT 5 OR Oregon GMT 8 GMT 7 OR Oregon E GMT 7 GMT 6 PA Pennsylvania GMT 5 GMT 4 RI Rhode Island GMT 5 GMT 4 SC South Carolina GMT 5 GMT 4 SD South Dakota E GMT...

Страница 17: ...Camera Setup is displayed Click next to proceed Set up the Date Time settings and click next to get to the camera setup Configure individual cameras in the EZ Camera Setup Select the Channel to confi...

Страница 18: ...e Select EZ Network for Network Setup NVR automatically trying to find an IP address Found address and user can edit the address Click finish to save the setup 2 4 3 EZ Network setting Not using inter...

Страница 19: ...ettings if Manual Configuration STATIC was selected and click test Click finish to save the setup 2 5 PoE Port SETUP Figure 2 5 1 PoE Port N8NU Figure 2 5 2 PoE Port N16NU Figure 2 5 1 1 IP Camera Con...

Страница 20: ...rt maximum power consumption N8NU 110Watt N16NU 185W Power over Ethernet Power N16NU N8NU Number of 802 3af PD Class 2 7 Watt 16 Port 8 Port Number of 802 3af PD Class 0 3 4 15 4 Watt Max 12 Port Max...

Страница 21: ...xample of the N32NS Non PoE Switch The NS Series features a Plug and Play function on board PoE Switch not included Setting up cameras can be done through the EZ CAMERA menu refer to Figure 2 4 1 Figu...

Страница 22: ...essed from the WAN Ports 59011 to 59254 on the router must be port forwarded to the NVR The local address of the NVR can be found in the system information 2 8 Dual Streaming High Quality Main Profile...

Страница 23: ...conds it moves to Ch10 to Ch32 For example press 2 and 1 Ch21 Buttons from 9 to 16 are used as function keys in PTZ control mode To escaping PTZ mode press the ESC button MENU Enters the Setup Menu CO...

Страница 24: ...T Connector for VGA Monitor Main Video Output AUDIO Port Audio inputs connections E SATA 1 External SATA Terminal USB PORT Connector for USB Mouse or USB flash memory IP CAMERA RJ 45 Connector for IP...

Страница 25: ...o Output Max 1920x1080 E SATA 1 External SATA Terminal USB PORT Connector for USB Mouse or USB flash memory ETHERNET PORT RJ 45 Connector for LAN Connection used for Internet Connection SENSOR IN ALAR...

Страница 26: ...he system when pressing ESC button for 5 seconds System unlock Unlocks the system when pressing ESC button for 5 seconds SETUP OpeNU up the SETUP menu Direction buttons Used to move menu items or sele...

Страница 27: ...select setup from the submenu or press the setup button on the remote control Table 4 0 1 Live Screen and Quick Operation Window When the NVR prompts the Login window enter the Password using the vir...

Страница 28: ...IP Camera mode setup screen Table 4 1 1 Menu items in IP Camera mode setup Item Description CHANNEL To manually connect each camera click on the select to get this window Under the column labeled Typ...

Страница 29: ...box and then Log In box will be pop up Enter ID and PASSWORD of IP Camera Protocol Select the protocol for the IP Camera Scan Automatic IP Camera search on the local network IP Address Set up IP came...

Страница 30: ...the IP Camera from the list and then click the register button After registering the basic information is displayed IP cameras using ONVIF protocol require ID Password and Profile to be correctly ent...

Страница 31: ...can the networks for ONVIF Conformance cameras Figure 4 1 4 ONVIF Camera Scan Window Figure 4 1 5 ONVIF Profile Scan Window Select ONVIF for Vendor and click the SCAN button Select the camera on the l...

Страница 32: ...VIF Setup Window Under ONVIF Setup the following can be viewed and changed VIDEO NETWORK SYSTEM settings Menu Item Description VIDEO Video Encoder to view and change to audio settings NETWORK View and...

Страница 33: ...d DDNS Status Language Select the display language using the mouse or the remote control Once a language is selected the display language will change English Spanish and French Date Display Format Sel...

Страница 34: ...ERVER Input the address of the primary NTP time server SECONDARY SNTP SERVER Input the address of the secondary NTP time server TIME ZONE NTP synchronizes with GMT Greenwich Mean Time regardless of ge...

Страница 35: ...nter the appropriate email address to enable sending e mail reports using a virtual keyboard MAIL FROM To set the email address sent to the destination host TEST E mail settings sent a test mail to th...

Страница 36: ...r Motion Detection Enable Email notification when the camera detects motion Video Loss Enable Email Beep and Alarm output notification when the camera signal is lost HDD Temperature Enable Email Beep...

Страница 37: ...loud 1 2 Select Google Drive Cloud Archiving to Yes 1 3 Video clip will be save at Google Drive when Alarm In and Motion triggered 1 4 If the Google Drive Account is not activated then please sign it...

Страница 38: ...count for NVR in order to follow the Twitter followers DVR send event message to Twitter followers when Event Triggered 1 How to set Setup System System Event Notification SNS 1 1 Click select icon be...

Страница 39: ...rol To change the values of all channels take the following steps Select the button select to change the values of all channels Recording Mode Assign the recording mode for the selected channel Option...

Страница 40: ...ne Continuous or Motion Highlight area To copy a schedule to a different channel select the channel from the Copy Schedule menu Figure 4 3 2 Schedule Recording Setup Screen None Disable recording duri...

Страница 41: ...the mouse or the remote control Figure 4 4 1 Device Setup Screen Table 4 4 1 Menu Items in Device Setup Screen Item Description Alarm Out Beep Duration Only one Alarm out is available Set alarm dwell...

Страница 42: ...the remote control ID number 3 An icon will indicate on the Live Screen if the remote control ID is synchronized The options are from 0 to 99 Sensor Select the type of each sensor Option is Off Norma...

Страница 43: ...able 4 4 2 Item for Digital Deterrent Setup Screen Item Description Import From USB Import up to 8 sound files from USB Export To USB Export the sound file to USB Record Select a channel and set up th...

Страница 44: ...rd controller to the RS 485 port on the rear panel Figure 4 4 2 2 Sensor Alarm and RS 485 Setup Screen Open the Controller sub menu by selecting the submenu button Figure 4 4 2 3 Keyboard Control Setu...

Страница 45: ...or left click and drag the mouse pointer to select or deselect the area Highlighted area indicates the partial motion detection zone Press the ESC button or right click on the mouse to return to the...

Страница 46: ...he name and covert settings change using the mouse or the remote control Select a channel to apply the following settings using the mouse Name Set the channel name Press the right square button and se...

Страница 47: ...port NETWORK PORT 1 Web Port Enter the port number for connection using web 4 6 1 Network Types 4 6 1 1 DHCP An IP address is automatically assigned by the DHCP server which automatically assigns the...

Страница 48: ...router To access NVR beyond a router firewall you must open the proper TCP ports for live playback streaming for commands for remote backup and for audio streaming If these ports are not opened proper...

Страница 49: ...Checkbox blank to disable the functions SETUP Enable Disable of access to Setup PB Enable Disable of access to Playback PTZ Enable Disable of access to PTZ Control REC OFF Enable Disable of manual Rec...

Страница 50: ...the current password And enter a new password enter the same password again to confirm and select OK Then the message PASSWORD CHANGED is displayed The factory default password is set on first bootup...

Страница 51: ...ick disconnect button Network User Limits Select 4 users or 12 user to connect NVR simultaneously If user change this setting NVR will restart 4 8 Setup Storage Mode In the SETUP menu select the Stora...

Страница 52: ...d the format sequence will load The format sequence allows user to select which HDDs to format Caution It is recommended to archive any data that you may need in the future before formatting the hard...

Страница 53: ...he menu items or change the settings using the mouse or the remote control Figure 4 9 1 Configuration Setup Screen Table 4 9 1 Configuration Setup Item Description Export To USB User can save the curr...

Страница 54: ...ecting USB flash drive to USB port on the NVR click SEARCH It will automatically find the upgrade file 4 9 1 Firmware Upgrade 1 Create a new folder named upgrade in the USB flash drive root directory...

Страница 55: ...they are configured in the Display Setup screen Various On Screen Display OSD symbols which indicate the status of the NVR are described in Table 5 1 1 Figure 5 1 1 Live Screen and Quick Operation Wi...

Страница 56: ...that sequencing mode is enabled Displays the current date and time RC ALL Remote control ID display If a remote ID is not set the message ALL is displayed Displays the amount of recording on the hard...

Страница 57: ...stantly playback 10 to 60 seconds of recorded data Recommended to be used with record mode set to Continuous Advanced Menu EZ Setup Select this option to start EZ Setup Wizard Connect Select this opti...

Страница 58: ...ess the button to view the system information Export Help Displays window with instructions for exporting video System Lock Locks the system from unauthorized user access System Shutdown Select this o...

Страница 59: ...n to return to the previous menu Press the PTZ button to close the OSD menu AUTOSCAN Press the right key to start auto scan Press the left key to stop auto scan PRESET Select PRESET then press the lef...

Страница 60: ...nd drag to make rectangular shape 5 3 Search Screen To enter the search screen menu select Search menu on the screen using the mouse or press Search icon on live screen Figure 5 3 1 Search Screen Ther...

Страница 61: ...ute Thumbnail Screen Figure 5 3 1 5 Playback Mode Screen 1 When the EZSearch menu is selected the user can see a calendar which displays recorded dates with highlights Select a specific date on a cale...

Страница 62: ...en Figure 5 3 2 1 Calendar Screen Figure 5 3 2 2 Channel Selection Screen Figure 5 3 2 3 Full Zone Screen Figure 5 3 2 4 Partial Zone Screen Figure 5 3 2 5 Event Searched Screen Search Smart Search Se...

Страница 63: ...bove red box Press the play button after selecting the specific time Press the prev to return to the Search window 5 3 4 Event Search The Event Search window is used to find stored video Figure 5 3 4...

Страница 64: ...e and time in the Go To Specific Time menu Use the mouse or the remote control to change the date and time value and press the play button after setting If there is no video data in the set date and t...

Страница 65: ...he log data will be displayed Press the SAVE button to save the data and then the data is saved as a text file format 5 4 Play Mode During playback of a recorded event the mode changes from SEARCH to...

Страница 66: ...position moves 60 seconds backward Press to play or pause recorded video Jump Step forward Playback position moves 60 seconds forward 2x 4x 8x 16x 32x speeds at 4 split screen 2x 4x 8x 16x at 9 split...

Страница 67: ...tton the system will capture a still image and archive onto a USB flash drive NOTICE USB Flash Drive must be in FAT32 file format 6 2 Video Backup onto USB Flash Drive during playback Video can be cap...

Страница 68: ...nd duration the system will start to archive the data to the USB drive 4 The following image shows the progress of archiving the data 5 The following shows the image to complete the backup Select lose...

Страница 69: ...unction 1 Press EZCopy button on the selected channel or all channels 2 Then EZCopy Start time will display 3 Move time bar cursor to the time of end of backup and press EZCopy button Then EZCopy Stop...

Страница 70: ...ote control 2 Once user has selected the date press the next button to open the list of stored data 3 Use the mouse or the remote control to scroll through the archive list 4 Select a list of stored e...

Страница 71: ...with the video 2 Otherwise the video and time stamp over video can t be properly played back and displayed on Window Media Player Timestamp On AVI The subtitle is embedded to the video clip file The s...

Страница 72: ...PC Requirements Minimum PC Requirements Recommended PC Requirements Before installing the program check the PC specifications The NVR remote software may not perform correctly if the PC does not meet...

Страница 73: ...d double click SpecoTech Multi Client XXXX exe 2 Select a destination folder and click Next 3 Select the program folder and click Next 4 The installation status screen is displayed 5 After the install...

Страница 74: ...k window to search and play videos that are recorded in the remote NU SITE MANAGEMENT THUMBNAIL REFRESH Click this icon to refresh and renew thumbnail image of the connected sites SITE ADDITION Click...

Страница 75: ...volume control bar to set the audio level MIC Use the microphone volume control bar to set the micro phone level PRESET TOUR SCAN MENU User can control PRESET TOUR SCAN MENU CHANNEL SPLIT To select th...

Страница 76: ...pecific site CONNECT Click this icon to connect the selected site sites DISCONNECT Click this icon to disconnect the selected site sites SETUP Click this icon to setup configuration of SpecoTech Multi...

Страница 77: ...Single Channel Viewing 7 6 Setup of SpecoTech Multi Client Click the setup icon to setup the configuration of Multi Client software The Setup window is displayed as below 7 6 1 General Security Optio...

Страница 78: ...78 7 6 2 Event Event log can be archived and searched Event Log Specify the location to save event logs and select event to archive...

Страница 79: ...7 6 3 Record Record Setup You can set the recording conditions as the following Always Event or Auto record And you can also select target NU NUs and channel channels When you set the recording condit...

Страница 80: ...rd and the amount of disk space you want to allow the program to use for recording You can also select the option to overwrite data or stop recording when the maximum amount of disk space is full 7 6...

Страница 81: ...81 7 6 5 Language English French and Spanish is selectable 7 6 6 About About provides network client version information...

Страница 82: ...window is displayed as below Select the Remote Setup Then the setup window is displayed The specified menu screen is displayed on the upper left of the screen Enter the password of the NVR when prompt...

Страница 83: ...AY FORMAT Select the time display format TIME ZONE Select the TIME ZONE DAYLIGHT SAVING Select the area for DAYLING SAVING TIME SET DATE TIME For the date time changes to be applied the system will re...

Страница 84: ...SERVER Input the SMTP server name as well as the user ID and password o MAIL PORT Mail port setting o SEURE OPTION Select a secure mail server connection SSL or TLS o ID Email User ID o PASSWORD Emai...

Страница 85: ...Notification when the HDD reaches the maximum temperature HDD BAD SECTOR Enable Email Notification when the HDD has bad sectors HDD ALMOST FULL Enable Email Notification when the HDD is almost full H...

Страница 86: ...wing settings can be changed to trigger an alarm output o ALARM DURATION DIGITAL DETERRENT The schedule of digital deterrent can be set and a sound file can be uploaded to the NU To set up schedule se...

Страница 87: ...display or not date and time as well as channel number on the screen OSD CONTRAST Adjust the character contrast on the screen MAIN MONITOR SEQUENCE Setting for automatically switching the displayed vi...

Страница 88: ...SSID Service set identifier Wireless Network ID o KEY 8 15 Characters Wireless Network Password 7 7 7 User Management Select the USER MANAGEMENT tab to set the DISPLAY conditions AUTHORITY SETUP Sele...

Страница 89: ...nue recording by overwriting when the hard disk becomes full RECORD LIMIT Sets whether to limit or not the recording data storage period 7 7 9 Remote Upgrade Shows the current Firmware version install...

Страница 90: ...fault Port Number is 5445 o ID Input ID of NVR Default ID is admin o Password Input network password of NU Password set on initial booting 2 Click OK button And then the registered site is added on th...

Страница 91: ...then the modified information is displayed as below 7 8 2 Connect and Disconnect 7 8 2 1 Connect 1 Select site sites to connect from the directory window 2 Click Connect button and then site sites di...

Страница 92: ...2 Click Disconnect button and then selected site sites disconnected 7 8 3 Still image Capture During Live 1 Double click a channel to capture from the display screen Otherwise all channels will be cap...

Страница 93: ...e is saved as set in Capture window 7 8 4 Recording Video on Local PC During Live 1 Click Setup button And then a setup window will be displayed as below 2 Select Record and set the values 3 Select Di...

Страница 94: ...on a Local PC 1 Click Local Playback And then Playback Window will be displayed over the Live Window 2 Select site sites to connect from the directory window 3 Click Connect button And then blue bar d...

Страница 95: ...then Playback Window will be displayed over the Live Window 2 Select the site to connect from the directory window 3 Click Connect And then blue bar displays on Search calendar and timeline scale win...

Страница 96: ...ch calendar and timeline scale bar 3 Click EZCopy Start button on the timeline scale to select the beginning point of the backup 4 Click EZCopy End button on the timeline scale to select the ending po...

Страница 97: ...dow After selecting a channel for backup click the OK button The backup will begin 7 AVI video data is recorded as set in AVI Backup window AVI format video can be played back by using Window Media Pl...

Страница 98: ...U from SETUP SYSTEM DESCRIPTION IP ADDRESS or 2 Input the IP address or Domain name address that you pre registered 3 Click this bar Then the dialog box is displayed 4 Click Install to download and in...

Страница 99: ...is connected or Domain name Port Number Default Port Number is 5445 ID Input ID of NU Default ID is admin Password Input network password of NU Password set on initial booting 7 Then the cameras conn...

Страница 100: ...Port number default 5445 ID default admin and Password set on initial booting Then click Save button Note Network Port and Web Port must be forwarded before adding a new site 3 Select a registered de...

Страница 101: ...on 6 Drag and drop channels Touch and drag one channel to the other channel to swap the channel location To swap the channel drag a channel to another channel 7 Digital Zoom In Out Double tap on the d...

Страница 102: ...e PTZ icon on the screen can control PTZF functions 9 1 3 Playback 1 Select mode as Playback and click Connect button Then select Date Time and click Connect button 2 The app will display the selected...

Страница 103: ...2 1 Live 1 Open the installed Speco Player App and select the Live view Playback Then click the menu button of the phone to add a remote device 2 Select the registered device and select Live view and...

Страница 104: ...screen to switch 1 channel display to 4 channels split display 9 2 2 Playback 1 Select the registered device and select Play back and select up to 4 channels to search Then click Start button As soon...

Страница 105: ...hannel screen to switch 1 channel display to 4 channels split display 9 2 3 PTZ Control To control the PTZ function of the camera tap the channel screen and then the channel name will be highlighted i...

Страница 106: ...6 APPENDIX Network Connection LAN 1 Install the network client software from the supplied CD 2 Check the IP address from SETUP SYSTEM DESCRIPTION or SETUP NETWORK of NU 3 Run the network client softwa...

Страница 107: ...Input a name that properly describes a site IP Address Input IP address Port Number Default Port Number is 5445 ID Input ID of NU Default ID is admin Password Input network password of NU Password set...

Страница 108: ...up Network DDNS Host Name Manually enter a domain name using the virtual keyboard and click Enter button 3 When a manual host name is completed Go to Setup Network DDNS Submit Update and select ON to...

Страница 109: ...r Setup System Description DDNS Status 7 Check the Network Port Default 5445 Web Port Default 80 and the IP Address of the NVR from Setup Network 8 Port forward the Network Video Port Default 5445 and...

Страница 110: ...escribes a site Site address Domain name or Public IP address of a router that NVR is connected Port number Default Port Number is 5445 ID Input ID of NU Default ID is admin Password Input network pas...

Страница 111: ...loss caused by improper usage Use ONLY a new HDD or a HDD that is approved for the unit Turn off the NU before plugging the E SATA HDD DO NOT disconnect the E SATA port while the NVR power is on The...

Страница 112: ...Ex HDD0 1 HDD1 3 HDD2 3 and so on 2 2 RAID10 Mirroring Stripping 4 HDDs are required 2 3 RAID5 Stripping Parity 3 or 4 HDDs are required Ex HDD0 1 2 HDD0 1 2 3 and so on 3 RAID Creation Procedure Inst...

Страница 113: ...States Normal State RAID configuration is in a healthy state Degrade State One of HDDs in a RAID has some problem However recording continues through normal HDD Rebuild State After replacing the fail...

Страница 114: ...114 6 RAID State Flow 7 RAID Status Check Setup Storage Disk Info Setup Storage Disk Info Open the top cover of the DVR and replace the HDD except HDD0 with a new one...

Страница 115: ...nal It can be enabled or disabled through HDD Failure item on the System Event Notification menu E mail conditional It can be enabled or disabled through HDD Failure item on the System Event Notificat...

Страница 116: ...Check if the RAID state is Rebuilding 10 RAID Capacity Limitations Maximum Capacity of RAID is 16TB which is due to the limitation of 32 bit CPU Maximum Capacity of HDDs per RAID Levels is as below T...

Страница 117: ...117 When a RAID configuration is in progress When there is no RAID When the user selects HDD incorrectly Final confirmation for RAID rebuild When RAID rebuild is in progress End...

Отзывы: