


switched off.
WARNING:
Wear heavy duty work gloves when
handling the bar and chain.
1.
Move the STOP switch down.
2.
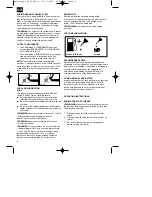
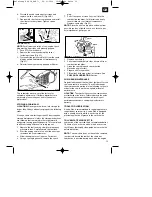
Clean the guide bar sprocket tip.
3.
Using a Lube Gun, insert needle nose into the
lubrication hole and inject grease until it appears
at outside edge of sprocket tip (Fig .23).
4.
Rotate saw chain by hand. Repeat lubrication
procedure until the entire sprocket tip has been
greased.
GUIDE BAR MAINTENANCE:
Most guide bar problems can be prevented merely
by keeping the chain saw well maintained.
Insufficient guide bar lubrication and operating the
saw with chain that is TOO TIGHT will contribute to
rapid bar wear.
To help minimize bar wear, the following guide bar
maintenance procedures are recommended.
WARNING
: Always wear protective gloves during
maintenance operations. Do not carry out
maintenance when the engine is hot.
CHAIN SHARPENING:
Chain sharpening requires special tools to ensure
that cutters are sharpened at the correct angle and
depth. For the inexperienced chain saw user, we
recommend that the saw chain be professionally
sharpened by the nearest professional Service
Center. If you feel comfortable sharpening your own
saw chain, special tools are available from the
professional Service Center.
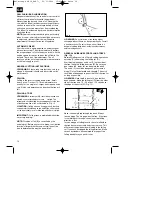
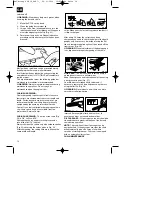
CHAIN SHARPENING
- The pitch of the chain (Fig.
24) is 3/8” LoPro x .050”.
Sharpen the chain using protective gloves and a
round file of ø3/16” (4.8mm).
Always sharpen the cutters only with outward strokes
(Fig. 25) observing the values given in Fig. 24.
After sharpening, the cutting links must all have the
same width and length.
WARNING
: A sharp chain produces well-defined
chips. When your chain starts to produce sawdust, it
is time to sharpen.
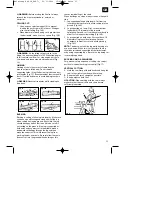
After every 3-4 times the cutters have been
sharpened you need to check the height of the depth
gauges and, if necessary, lower them using the flat
file and template supplied optional, then round off the
front corner. (Fig. 26)
WARNING
: Proper adjustment of the depth gauge
is as important as proper sharpening of the chain.
GUIDE BAR
- The bar should be reversed every 8
working hours to ensure uniform wear.
Keep the bar groove and lubrication hole clean using
a bar groove cleaner. (Fig. 27)
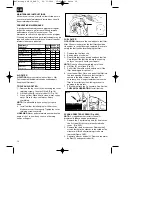
Check the bar rails frequently for wear and, if
necessary, remove the burs and square-up the rails
using the flat file. (Fig. 28)
WARNING
: Never mount a new chain on a worn
sprocket or self-aligning ring.
BAR WEAR
- Turn guide bar frequently at regular
intervals (for example, after 8 hours of use), to
ensure even wear on top and bottom of bar.
OIL PASSAGES
- Oil passages on the bar should be
cleaned to ensure proper lubrication of the bar and
chain during operation.
NOTE:
The condition of the oil passages can be
easily checked. If the passages are clear, the chain
will automatically give off a spray of oil within
seconds of starting the saw. Your saw is equipped
with an automatic oiler system.
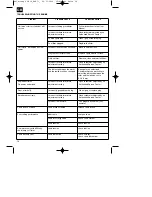
CHAIN MAINTENANCE
GB
14
Fig. 23
Fig. 25
Fig. 26
Fig. 24
Fig. 27
Fig. 28
Anleitung SCS 38_SPK7:_ 20.11.2006 15:43 Uhr Seite 14


