-24-
For Machines Mfd. Since 12/21
South Bend Tools
Model SB1102
O P E R A T I O N
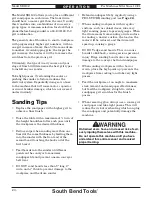
8.
Insert screwdriver into rear hole in pulley,
as shown in Figure 22.
IMPORTANT:
To avoid damage to grease
fitting, position hole in pulley so that
screwdriver is inserted between grease fitting
and machine frame.
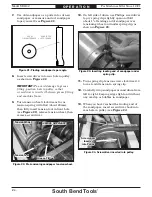
Figure 23. Inserting leading end of sandpaper under
Figure 23. Inserting leading end of sandpaper under
spring clip.
spring clip.
10.
On left side of drum, use Phillips screwdriver
to pry spring clip slightly open and fold
about 1" of leading end of sandpaper over
tensioning wheel and under spring clip, as
shown in Figure 23.
11.
Turn spring clip tension screw clockwise 2–3
turns to add tension to spring clip.
12.
Carefully wrap sandpaper around drum from
left to right, keeping edges tight and without
any overlap or bubbles in sandpaper.
Figure 22. Pre-tensioning sandpaper tension wheel.
Figure 22. Pre-tensioning sandpaper tension wheel.
Inserted Screwdriver
Inserted Screwdriver
Tension Tool
Tension Tool
Tension Wheel
Tension Wheel
Grease Fitting
Grease Fitting
9.
Turn tension wheel clockwise as far as
tension spring will allow (about 20mm),
then fully insert tension tool in front hole
(see Figure 22), release tension wheel, then
remove screwdriver.
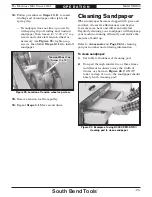
Figure 24. Screwdriver inserted into pulley.
Figure 24. Screwdriver inserted into pulley.
Screwdriver
Screwdriver
Inserted
Inserted
into Pulley
into Pulley
13.
When you have reached the trailing end of
the sandpaper, insert screwdriver back into
rear hole in pulley (see Figure 24).
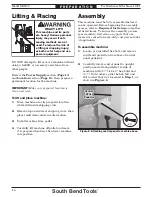
CIRCUMFERENCE
DRUM
SANDPAPER
= HYPOTENUSE
Figure 21. Finding sandpaper taper angle.
Figure 21. Finding sandpaper taper angle.
7.
Use old sandpaper as a pattern to cut new
sandpaper, or measure and cut sandpaper
taper yourself (see Figure 21).
Содержание SB1102
Страница 60: ...southbendtools com Printed In Taiwan JP21221...

