background image

Make and Receive Calls

19

User Guide

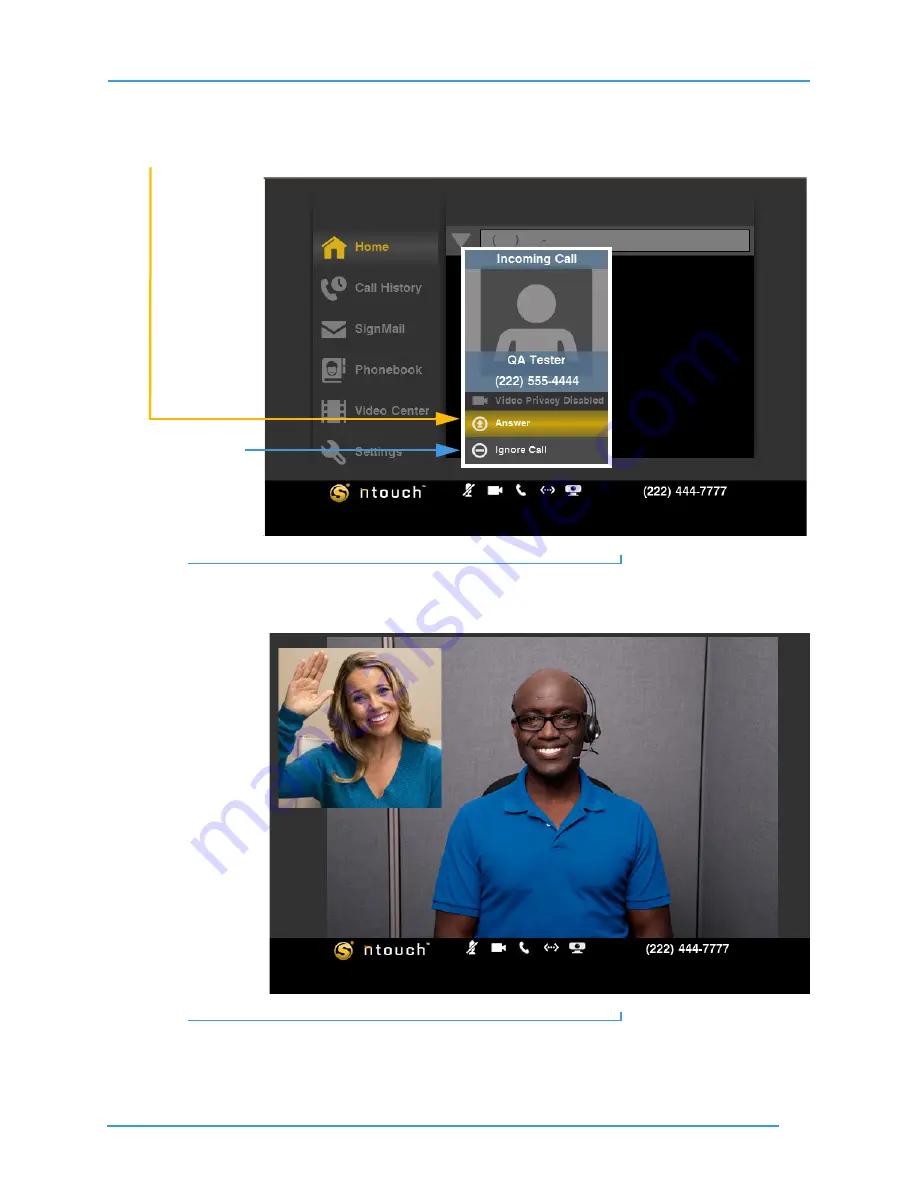
To Answer an Incoming Call

Step 1.

Look for the Incoming Call dialog to appear. Select the 

Answer

 button. 

Figure 25:  

Home button

Note:

If you do not want to answer the incoming call, select the 

Ignore Call 

button.

Step 2.

When the caller appears, begin your conversation. 

Figure 26:  

Dial field

You can change the placement and size of the two video images by pressing the “View” 
buttons on the bottom of the remote control. 

Ignore Call button

Содержание ntouch VP

Страница 1: ...sons businesses or numbers Firmware 8 0 February 29 2016 Version 8 0 Table of Contents New 8 0 Features 2 Hardware Overview 3 User Interface Overview 8 Make and Receive Calls 16 Use Call Transfer 25 S...

Страница 2: ...turn on the Don t Accept Anonymous Calls feature other Sorenson users will not be able to call you if they have enabled the Hide My Caller ID feature described above on their endpoints N11 Dialing Th...

Страница 3: ...The Main Unit connects to a standard TV set or to an HDTV using either a composite video cable or an HDMI cable ntouch VP supports both Standard and High Definition video signals Take a Quick Look at...

Страница 4: ...ng up a call without touching the remote You might have to press the button once to wake up the VP and then press it again to make an SVRS call Figure 2 Main Unit and SVRS Quick Connect button Step 3...

Страница 5: ...amera lens Figure 4 Remote Camera Unit with LightRing and lens Step 5 Look at this picture to see ntouch VP s hand held remote control unit The arrangement of the buttons is very similar to those on t...

Страница 6: ...H 3KRQHERRN H 0LVVHG DOOV H RPH H 9LGHR HQWHU H DQFHO H ODVK H QWHU H UURZ H V H ERDUG H 6WDWXV H 1XPEHU H SDG RW H OHDU H DPHUD LUHFWLRQ H V 7KHLUV H 0LQH H 3DJH 8S RZQ DQG RRP Q 2XW 5RFNHU 6ZLWFK 9L...

Страница 7: ...HOHFWURQLF SDQ DQG WLOW DGMXVWPHQWV Missed CallT FZ JTQMBZT WKH 0LVVHG DOOV VFUHHQ Number FZQBE 8VHG WR HQWHU SKRQH QXPEHUV LQ D GLDO HOG RU IRU D FRQWDFW UHFRUG Page Zoom 3PDLFS 4XJUDI FZ 8VHG WR SDJ...

Страница 8: ...t in action The steps in this section show you how to move around ntouch VP s UI and how to access the six main screens To Learn About the Interface Step 1 Take a few minutes to learn the about the va...

Страница 9: ...the Arrow keys on the remote control to move to and select the Dial field as shown below Notice how the Dial field is now highlighted in a gold color Figure 8 Dial field highlighted and selected Note...

Страница 10: ...has replaced the Self View image You can use this list as a speed dial to help you quickly redial any recent phone numbers Figure 9 Call History list on Home screen Step 5 Use the remote control to mo...

Страница 11: ...left column to select the Call History button You will then see the Call History screen as shown in the image below Figure 11 Call History button selected Step 7 Use the remote to move to the Video Ce...

Страница 12: ...Step 8 Use the remote to move to the Phonebook button This is the Phonebook screen Figure 13 Phonebook button and screen Step 9 Use the remote to move to the Settings button This is the Settings scre...

Страница 13: ...of the screen This new column of buttons is used to access the five Personal settings screens Figure 15 Personal button and right column buttons Step 11 Move to the right again to select the General b...

Страница 14: ...closely at the four keys at the top of the remote control as shown in the image below You can use these four keys to go directly to three of the main screens that you have just visited or to go direct...

Страница 15: ...off This icon will disappear if the videophone s audio feature is turned off The checkbox named Enable In Call Audio on the Audio Settings screen controls this feature Video Camera Shows whether Video...

Страница 16: ...ice that they use When you dial a hearing person s telephone number your call automatically goes through Sorenson VRS The Sorenson interpreter who answers your call will place a voice telephone call t...

Страница 17: ...ep 2 Enter the phone number that you want to call in the Dial field Figure 21 Number entered in Dial field Step 3 The Dialing screen appears Notice the Number of Rings indicator Figure 22 Dialing scre...

Страница 18: ...ved video images Figure 23 In Call screen Full Screen view Step 5 To end your call press the Enter key on the remote control to display the In Call Status Bar The Hang Up button will then appear in th...

Страница 19: ...button Figure 25 Home button Note If you do not want to answer the incoming call select the Ignore Call button Step 2 When the caller appears begin your conversation Figure 26 Dial field You can chang...

Страница 20: ...y on the remote control to display the Status Bar The Hang Up button will appear on the screen as shown below Figure 27 Hang Up button Step 4 Select the Hang Up button to end the call Step 5 You will...

Страница 21: ...Dial Tone Multi Frequency DTMF signals The Number Entry feature works through ntouch VP s Share Text feature See the steps that start on Page 35 for details on using the Share Text feature during a c...

Страница 22: ...the list of calls as shown below Figure 30 Recent Calls list on Home screen Step 2 Select the call that you want to redial The Dialing screen appears as shown below Figure 31 Dialing a recent call Not...

Страница 23: ...ls or received new SignMails or other videos during your absence Figure 32 Screen saver showing missed calls and new videos Step 2 If the Home screen is displayed instead of the screen saver look for...

Страница 24: ...son videophone or other endpoint cannot be completed for some reason you will see the dialog shown below Figure 34 Call Not Completed dialog Step 2 If the non Sorenson videophone or other endpoint you...

Страница 25: ...rks only for calls that use the SIP protocol When a call is made using the H 323 protocol the Transfer feature will not be available Calls between ntouch VP and a VP 200 use H 323 Most calls between n...

Страница 26: ...trol to move to the Share Text button as shown below Figure 37 Share Text button on active call screen Step 3 Use the remote control to move to the Transfer button as shown below Figure 38 Transfer bu...

Страница 27: ...will appear when your ntouch VP is a member of a myPhone Group Step 5 To transfer this call to a member of your myPhone Group select the myPhone button to display the screen shown below Figure 40 myPh...

Страница 28: ...e screen shown below Figure 41 Choose a Contact dialog Step 8 Move to the contact to which you want to transfer the call as shown below Figure 42 Contact selected in Choose a Contact dialog Step 9 Sel...

Страница 29: ...elect the call history record to which you want to transfer this call The call will be transferred and you will return to the Home screen Step 12 To enter a phone number to which you want to transfer...

Страница 30: ...he call begins The Saved Text function lets you save up to 5 short text messages to use during calls The Share Contacts function lets you share information about any of your contacts name phone number...

Страница 31: ...gs screen Step 3 Select the Saved Text button to display the screen shown below Figure 47 Saved Text screen You add or edit any one of the ten 10 Saved Text messages using the Select to modify drop do...

Страница 32: ...sages Three are marked as Empty Step 2 Select which one of the five Saved Text messages you want to add or to change Step 3 Move to the Edit Saved Text field so that it is highlighted as shown below F...

Страница 33: ...ectly enter numbers into the dialog Step 5 Use the on screen keyboard to enter the text as shown in the example below Figure 51 Entering text using the Keyboard Entry dialog This sample image shows an...

Страница 34: ...through 6 above to enter more Saved Text messages When you are ready to exit the screen select the OK button Step 7 If you want to erase a Saved Text message first select the item from the drop down...

Страница 35: ...eature during any active videophone call Step 1 At an active call screen press the Enter key on the remote control as shown below Figure 54 In call Menu Bar on active call screen Step 2 Use the remote...

Страница 36: ...f your contact records Clear lets you clear both the outgoing and incoming text fields Close lets you close both text fields on the screen Step 4 Select the Saved Text button to display the pop up men...

Страница 37: ...going text field Step 6 To clear the text from the outgoing text field first display the in call menu bar and select the Share Text button Then select the Clear button as shown below Figure 59 Clear b...

Страница 38: ...with a caller during a call Step 1 At an active call screen press the Enter key on the remote control as shown below Figure 60 In call Menu Bar on active call screen Step 2 Use the remote control to...

Страница 39: ...to the Contacts button as shown below Figure 62 Contacts button in Share Text pop up menu Step 4 Select the Share Text button to open the pop up menu shown below Figure 63 Choose a Contact dialog The...

Страница 40: ...lect the contact entry you want to share to display the screen shown below Figure 64 Contact record shown in outgoing text field The name and phone number s for the selected contact will be shown in t...

Страница 41: ...ture can be used during point to point P2P calls The microphone inside ntouch VP s Remote Camera Unit RCU is used to pick up audio near the videophone Note In firmware prior to 3 0 the 2 Line VCO feat...

Страница 42: ...vice button to display the screen shown below Figure 66 Device button selected Notice the addition of the Audio button to the Device menu Step 3 Move to the Audio button to display the screen shown be...

Страница 43: ...en You can use this screen to enable the In Call Audio feature and to select to use either the 1 Line VCO or 2 Line VCO feature Step 5 Select the 1 Line VCO radio button as shown below Figure 69 Audio...

Страница 44: ...ure 70 Audio Settings screen 2 Line VCO enabled Notice that enabling the 2 Line VCO feature has enabled the Callback number field The 2 Line VCO feature works exactly the same as in previous firmware...

Страница 45: ...icon shaped like a microphone has appeared in the bottom center part of the screen This icon has appeared because you just enabled the In Call Audio feature You can turn off mute the audio by pressing...

Страница 46: ...ine VCO enabled Step 3 When connected you can speak to the person you called using your own voice The audio picked up by the microphone in ntouch VP s Remote Camera Unit RCU will be sent with the vide...

Страница 47: ...Call Screen Step 3 After you answer the voice call to your Callback number the interpreter will then call the hearing person When the hearing person answers you can start speaking The interpreter will...

Страница 48: ...ages or create a text only greeting You can change your personal greeting as often as you like You can switch back to the Sorenson greeting video or even use no greeting The SignMail Alerts screen is...

Страница 49: ...ow Figure 77 Select type buttons on SignMail Settings screen Notice the four Greeting type radio buttons You use these buttons to select to record a personal greeting with or without text use a text o...

Страница 50: ...e 78 Record button for Personal Greeting type Step 2 Select the Record button to display the screen shown below Figure 79 SignMail Greeting Type dialog Notice that a dialog has appeared in which you c...

Страница 51: ...Self View image area so that you can see your image as it is being recorded by ntouch VP s camera The Record button is used to start the recording Step 4 Select the Record button to start recording as...

Страница 52: ...e Preview button to view the personal greeting you just recorded as shown below Figure 82 Preview button for Personal Greeting type Step 7 If you select the Preview button but you have not yet recorde...

Страница 53: ...re 84 Record button for Personal Greeting type Step 2 Select the Record button to display the screen shown below Figure 85 SignMail Greeting Type dialog Notice that a dialog has appeared in which you...

Страница 54: ...em and a text entry field where you can enter text using the remote control Step 4 If you want to select some text from the list of built in Saved Text items select the drop down list to display the s...

Страница 55: ...h begins on Page 25 to see how to create more text items Step 6 If you want to enter text using the on screen keyboard move to the text entry field Then press the Keyboard key on the remote control to...

Страница 56: ...Text dialog entered text in field Step 8 Select the Next button to go to the Record screen Step 9 Select the Record button to start recording as shown in the screen below Figure 91 Record screen durin...

Страница 57: ...ton for Text Only Greeting type Step 2 Select the Edit button to display the screen shown below Figure 93 SignMail Greeting Text dialog The SignMail Greeting Text dialog contains a drop down list from...

Страница 58: ...ple One shows your phone number the other shows your name in this example the name is Test ntouch VP Step 4 Select an item from the drop down list to display the screen shown below Figure 95 SignMail...

Страница 59: ...dialog to enter text letters or numbers to be saved You can use the remote control s numeric keypad to directly enter numbers into the dialog Step 6 After entering the text using the on screen keyboar...

Страница 60: ...ext you selected or entered will be shown as a video image when callers leave a SignMail message Select the Save button to save and exit this screen Step 9 You will be back at the SignMail Settings sc...

Страница 61: ...Edit SignMail Alerts button Step 2 Select the checkbox to enable the fields on the screen as shown below Figure 101 SignMail Alerts screen checkbox and fields enabled Step 3 Enter the required inform...

Страница 62: ...begin playing when ntouch VP answers a call after 8 rings If you want to set a lower number of rings to make your ntouch VP answer calls sooner see Page 125 To Record a Deaf SignMail Step 1 Dial the...

Страница 63: ...ends with a visual Ready Set Go signal shown below Figure 103 Ready Set Go signal Step 3 You can start recording your SignMail when you see the Recording progress bar shown below Figure 104 SignMail R...

Страница 64: ...n to send this SignMail video Select Record if you want to re record the video Select Exit if you want to cancel the recording of a video Step 6 If you choose to send the SignMail video the video will...

Страница 65: ...ignMail add a new contact for the sender delete a selected SignMail video or block any new calls and videos from the sender To See Your SignMail List Step 1 Select the SignMail button A list will appe...

Страница 66: ...on the selected video Figure 107 Video List one selected Step 3 Notice the blue dots at the right side of the name of some or all of the videos These blue dots mean that you have not yet viewed the Si...

Страница 67: ...Then select the View button from the menu Figure 109 View button Step 2 The View Video screen appears The selected video will begin playing Notice the function and playback control buttons at the rig...

Страница 68: ...rom the SignMail list Close button Select this button to close the View Video screen and return to the SignMail list Download Status Indicator and Information Area These areas shows information about...

Страница 69: ...rom the list Then select the Call button from the menu Figure 112 Call button Step 2 The Dialing screen appears Complete your call as usual when the person answers Figure 113 Dialing screen Step 3 Aft...

Страница 70: ...u Figure 114 Add Contact button If the Add button is grayed out a contact record already exists for the sender of this video Step 2 The Add Contact screen appears Complete the required entries in the...

Страница 71: ...en select the Delete Item button from the menu Figure 116 Delete Item button Step 2 A confirmation dialog appears Select Yes to delete just this one video from the list Select No to exit without delet...

Страница 72: ...ked Phone Number dialog will appear You can enter a descriptive name in the first field The second field will already contain the phone number to be blocked The phone number came from the SignMail vid...

Страница 73: ...he list Then select the Clear List button from the menu Figure 120 Clear List button Step 2 A confirmation dialog appears To delete all videos at once select Yes To exit without deleting select No Fig...

Страница 74: ...option to block incoming calls from specified phone numbers When you block a phone number ntouch VP will automatically reject all incoming calls and SignMails from that number You cannot block certain...

Страница 75: ...ns to display the call list that you want to see The All Calls button is selected in this example Figure 123 All Calls button and List Step 3 Select one of the other buttons The Missed Calls button is...

Страница 76: ...ts you will notice that they look very similar Because there is only one Call History list the four buttons simply let you choose which group of calls you want to see at one time The difference betwee...

Страница 77: ...ll Calls list Then select one of the calls from that list Notice that a menu has appeared to the right of the call list This menu contains a list of functions you can perform on the selected call Figu...

Страница 78: ...ntouch VP will dial the number that was associated with the call even if the contact record for the caller if any contains more than one phone number Step 4 After you hang up you will be back at the...

Страница 79: ...uide To Add a Contact Step 1 Select the list you want to view All Missed etc Then select a call from the list Figure 130 Call selected from list Step 2 Select the Add Contact button from the menu Figu...

Страница 80: ...e Add Contact screen appears Study the table on the next page to learn about the fields and buttons Then make your selections and entries on the screen Figure 133 Add Contact screen Note The three 3 p...

Страница 81: ...IP address you cannot change the Default Pattern setting for this contact Default Pattern drop down list Select the LightRing pattern to be used for this contact Unless you deliberately change the sel...

Страница 82: ...t select Existing Contact in the dialog in Figure 134 as shown in the image below Figure 134 Existing Contact radio button selected Step 7 Select the OK button to display the dialog shown in the image...

Страница 83: ...e 136 Select Phone Number Type dialog Note The options in this dialog will vary depending on the numbers that have already being stored for the existing contact Step 9 Select the Add number to Mobile...

Страница 84: ...gain as shown in the image below Figure 138 Call History list Note Because the Call History lists are snapshots of events that have happened in the past the phone numbers shown for the existing entrie...

Страница 85: ...elete One Call from a List Step 1 Select the list that you want to view All Missed etc Then select a call from the list Figure 139 Call selected from list Step 2 Select the Delete Item button from the...

Страница 86: ...og appears Select Yes to delete just the selected call from the list Select No to exit without deleting the call Figure 141 Dialing screen Note Be careful when using the Delete Item function Remember...

Страница 87: ...ect the list that you want to view All Missed etc Then select the call you want to block You will not receive calls or SignMails from numbers you choose to block Figure 142 Call selected from list Ste...

Страница 88: ...ock certain Sorenson phone numbers with this feature for example Sorenson Technical Support Step 4 Select OK to block any future calls or SignMails from this number Select Cancel to exit the dialog wi...

Страница 89: ...o Clear All Calls from All Lists Step 1 Select any one of the lists All Missed etc Then select any call from the list Figure 145 Call selected from list Step 2 Select the Clear List button from the me...

Страница 90: ...dialog appears To delete all calls in the Call History list at once select Yes To exit without deleting select No Figure 147 Delete Confirmation dialog Note Be careful when using the Clear List functi...

Страница 91: ...SignMail and Phonebook lists if a contact record for your phone number is saved on the endpoint You have the option to choose how widely you will share your profile photo You can choose to share your...

Страница 92: ...t type buttons on SignMail Settings screen Notice the new Profile Photo icon and the Change Photo button on this User Identity Settings screen The Change Password button and the fields on the screen i...

Страница 93: ...tacts in your Phonebook If you do not want anyone to see a profile photo of you or avatar icon then do not add one You can use the Take Photo button to use ntouch VP s camera to take your photo You ca...

Страница 94: ...the photo you want to take Select the Snap button to use ntouch VP s camera to take a photo Step 7 You will return to the screen shown below Figure 153 Change Photo screen You can repeat the process...

Страница 95: ...tacts You can store your most important contacts in the Favorites list to make them easy to find quickly Using the Favorites list is helpful if you have a large number of contacts You can add a phone...

Страница 96: ...Select any letter from the column to display the records stored under that letter In this example there are only two contact records Figure 156 Alphabet column selected Note You do not have to use the...

Страница 97: ...the number keys on the remote control This is the Searchable Contacts feature For example press the 2 key on the remote control to show the dialog below Figure 158 Searchable Contacts A Step 6 This d...

Страница 98: ...C as shown below Figure 160 Searchable Contacts C Step 9 After a moment ntouch VP will show you the contacts that match or are nearest to the letter you selected You can scroll up and down through the...

Страница 99: ...p Figure 161 Dr Smith contact record selected Step 11 Notice the menu at the right of the list The menu contains a list of functions you can perform on the selected contact You can call edit or delete...

Страница 100: ...m the list Then select the Call button from the menu Figure 163 Dr Smith contact record selected Step 2 If more than one phone number is stored for a contact a dialog will appear Select the number you...

Страница 101: ...k 101 User Guide Step 3 The Dialing screen appears Complete your call as usual when the person answers Figure 165 Dialing screen Step 4 After you hang up you will be back at the contact list screen wh...

Страница 102: ...it Contact screen appears Complete the required entries in the fields Figure 167 Edit Contact screen Step 3 Select OK to save any changes you made to this contact record Select Cancel to exit without...

Страница 103: ...ted Then select the Delete Item button from the menu Figure 168 Delete Contact button Step 2 A confirmation dialog appears To delete only this one contact from the list select Yes To exit without dele...

Страница 104: ...the New Contact button Figure 170 New Contact button Step 2 The Add Contact screen appears Notice all the fields are empty for a new contact Figure 171 Add Contact screen Fields and buttons Need Help...

Страница 105: ...this contact is named Simon Garfunkel Enter a phone number for this contact Figure 172 Name and number entered Step 4 Select the Default Pattern drop down list to reveal a list of LightRing options as...

Страница 106: ...d for this contact A generic profile photo image is shown in this example Step 6 Select the profile photo stored for this number or select an avatar icon Step 7 If you have enabled the feature and wan...

Страница 107: ...cked button A list of blocked numbers will appear to the right The list will be empty until you add numbers Figure 175 Blocked button Step 2 Select one of the blocked numbers in the list In this examp...

Страница 108: ...igure 177 Edit button Step 4 The Edit Blocked Phone Number dialog appears You can enter a description in the first field The second field will already contain the phone number to be blocked Figure 178...

Страница 109: ...st Then select the Unblock button the menu Figure 179 Unblock button Step 2 A confirmation dialog appears Select Yes to delete unblock the selected blocked number Select No to exit without deleting th...

Страница 110: ...Then select the Block Caller button Figure 181 Block Caller button Step 2 The Add Blocked Phone Number dialog appears Enter a name and a phone number into the two fields Figure 182 Add Blocked Phone N...

Страница 111: ...screen Step 2 Move to the Favorites button to open the screen shown below Figure 184 Favorites button selected Notice the instruction panel that appears in the empty Favorites list This instruction a...

Страница 112: ...ton to open the screen shown below Figure 185 Contacts button selected Step 4 Select the contact you want to add as a Favorite to open the screen shown below Figure 186 Edit Contact button highlighted...

Страница 113: ...this icon that is to make the icon turn yellow you add the number to the Favorites list Step 6 Select one or more of the star icons to add the number s to the Favorites list Step 7 Select OK to return...

Страница 114: ...s in the Favorites list to open the screen shown below Figure 189 Function button for selected Favorite contact Notice the function buttons in the right side panel You can move the contact up or down...

Страница 115: ...f the Dial field This is the Favorites button Step 11 Select the star icon Favorites button to open the screen shown below Figure 191 Favorites list open on Home screen Notice that the Favorites list...

Страница 116: ...at the Home screen Step 2 Move to the Video Center button to display the screen shown below Figure 192 Video Center button selected Notice that a Channels list has appeared in the center column of th...

Страница 117: ...s for this channel The individual episodes shown for each program is also shown in the list You cannot delete videos from the Video Center yourself Step 4 Move to the right column to display the scree...

Страница 118: ...w button to open the View Video screen The video will begin playing Notice the function and playback control buttons at the right side of the screen Figure 196 View Video screen Note The View Video sc...

Страница 119: ...VRS Announce Network settings screens Profiles New Profile and Port Settings Device settings screens About Audio Time Zone Display and Video myPhone settings screen Manage myPhone Group This option w...

Страница 120: ...o the Personal button Notice that the Personal menu has appeared in the middle of the screen Figure 198 Personal button and menu Step 3 Move to the General button in the Personal menu Then select the...

Страница 121: ...x Select this checkbox to display the In Call Status Bar continuously during a call Disable In Call Audio turn off microphone checkbox Select this checkbox to disable In Call Audio by turning off ntou...

Страница 122: ...on Figure 201 Location button Step 8 The 911 Location Info screen appears Figure 202 911 Location Info screen You must make an entry in all of the fields on this screen except for the Address 2 field...

Страница 123: ...ess Address 2 field Enter the apartment or unit number if any of the address in this field City field Enter the city name of the address in this field State drop down list Enter the state name of the...

Страница 124: ...e Group You cannot change this field Toll Free field This field shows the toll free 10 digit number assigned to your Sorenson user account if you have one You cannot change this field E mail field Ent...

Страница 125: ...on in the Personal menu Then select the button Figure 205 Incoming button in Personal menu Step 16 The SignMail Settings screen appears Figure 206 Incoming Call Settings screen For complete instructio...

Страница 126: ...ically answers the call and begins playing the selected SignMail greeting Select SignMail Greeting Type radio buttons This group of four radio buttons are used to select the type of SignMail greeting...

Страница 127: ...ve email notifications Even if you enter an invalid email address you will still be able to receive and view SignMail videos Pager E mail field If you wish you can enter the email address that is asso...

Страница 128: ...tton Notice that the Settings menu has appeared in the middle of the screen Figure 208 Settings button and menu Step 2 Move to the Call Options button Notice that the Call Options menu has appeared in...

Страница 129: ...Saved Text button in the Call Options menu Then select the button Figure 210 Saved Text button Step 4 The Saved Text screen appears Figure 211 Saved Text screen For complete instructions for using th...

Страница 130: ...Description Select to Modify drop down list Use this drop down list to select which one of the five allowed saved text messages you want to add or edit See the section that starts on Page 30 for inst...

Страница 131: ...ge while this mode is active You can turn Video Privacy off and on by pressing the Video Privacy key on the remote control Silence the internal ringer checkbox Select this checkbox to turn off ntouch...

Страница 132: ...VP 8 0 Step 11 Move to the Call Waiting button in the Personal menu Then select the button Figure 214 Call Waiting button in Personal menu Step 12 The Call Waiting Settings screen appears Figure 215 C...

Страница 133: ...Waiting button in Personal menu Feature Description Automatically reject incoming calls when in a call checkbox Select this checkbox to turn off the Incoming Call notice during active calls All incom...

Страница 134: ...nnounce screen details Step 18 Select OK to save the changes Select Cancel to exit without saving Feature Description Select how interpreters will introduce VRS calls radio buttons Select one of these...

Страница 135: ...ngs button Notice that the Settings menu has appeared in the middle of the screen Figure 218 Settings button and menu Step 2 Move to the Network button Notice that the Network menu has appeared in the...

Страница 136: ...file is named Default active Figure 220 Profiles button in Network menu Step 4 To create a new profile move to the New Profile button in the Network menu Then select the button Figure 221 New Profile...

Страница 137: ...een will be inactive DHCP provides this information IP Address field This field contains the static IP address to be used by the videophone If you are not using DHCP you must make a valid entry in thi...

Страница 138: ...is less than or equal to the maximum Send upload speed in Kilobits per second Kbps that you are certain is provided by your high speed Internet connection The default setting is 512Kbps The options a...

Страница 139: ...een Then enter a profile name in the field Table 16 Network Profile Name screen details Step 13 Select Finish to create the new profile Select Back to return to the previous screen if you need to make...

Страница 140: ...screen The profile you added will now be shown in the list The profile name used in the example shown below is MyHomeProfile Figure 225 New profile shown in list Step 15 To make the new profile active...

Страница 141: ...e Connect button to activate and then connect to the selected profile Figure 226 Connect button in menu Step 17 A message appears as the network settings are being updated to use the new profile When...

Страница 142: ...the list Then select the Edit button from the menu Figure 228 Edit button in menu Step 19 The Network Profile Settings screen appears Select the Profile Name button Figure 229 Profile Name button Do...

Страница 143: ...elect Cancel to exit without saving You will then be back at the Network Profile Settings screen Figure 229 Step 22 Select the IP Settings button at the screen shown in Figure 229 Step 23 The IP Addre...

Страница 144: ...in Figure 229 Step 26 The Network Speed screen appears Figure 232 Network Speed screen Step 27 Make changes as needed to the settings Select OK to save the changes Select Cancel to exit without savin...

Страница 145: ...detect its Public IP address The detected IP address is displayed in parentheses Leaving this checkbox selected is usually the proper configuration Use Private IP Address radio button Select this butt...

Страница 146: ...ct OK You will then be back at the Network Profile Settings screen Figure 235 Network Profile Settings screen Step 35 Select Close You will then be at the Network Profile screen shown in screen Figure...

Страница 147: ...e then select the Delete button Figure 236 Delete button in menu Step 37 The Delete Network Profile dialog appears Figure 237 Delete Network Profile dialog Step 38 Select Yes to delete the selected pr...

Страница 148: ...ttings button Notice that the Settings menu has appeared in the middle of the screen Figure 238 Settings button and menu Step 2 Move to the Device button Notice that the Device menu has appeared in th...

Страница 149: ...ser Guide Step 3 Move to the About button in the Device menu Then select the button Figure 240 About button in Device menu Step 4 The About Your Sorenson ntouch screen appears Figure 241 About Your So...

Страница 150: ...Address This area shows the MAC ID of the videophone Software version Boot version This area shows ntouch VP s Software and Boot versions This information can be useful for troubleshooting purposes i...

Страница 151: ...t this checkbox if you want to enable the In Call Audio feature The feature is automatically enabled when the 1 Line VCO option is selected Do not use Voice Carry Over VCO button Select this button to...

Страница 152: ...ntouch VP 8 0 Step 13 Move to the Time Zone button in the Device menu Then select the button Figure 244 Time Zone button in Device menu Step 14 The Time Zone Settings screen appears Figure 245 Time Z...

Страница 153: ...nu Then select the button Figure 246 Display button in Device menu Feature Description Select your time zone list Select the time zone in which you live from this list Automatically adjust for Dayligh...

Страница 154: ...can use either the Standard Definition 480p or the High Definition option 720p if ntouch VP is connected to a television using an HDMI cable The High Definition option creates a larger display area o...

Страница 155: ...lor feature first select the Text Color drop down list to display the screen shown below Figure 248 Text Color drop down list opened Step 21 Select Black from the list to display the screen shown belo...

Страница 156: ...round Color drop down list to display the screen shown below Figure 250 Background Color drop down list opened Step 23 Select White from the list to display the screen shown below Figure 251 White sel...

Страница 157: ...OK button highlighted Step 25 You will then see the Device options menu as shown in the image below Figure 253 Display button in new colors Notice the Display button is now shown in black type over a...

Страница 158: ...8 0 Step 26 Move to the Video button in the Device menu Then select the button Figure 254 Video button in Device menu Step 27 The Video Settings screen appears Figure 255 Video Settings screen Video...

Страница 159: ...and then move the slider left or right to adjust the overall brightness of the image Tone drop down list This drop down list provides a Tone A and Tone B color options When your videophone is first in...

Страница 160: ...ings menu has appeared in the middle of the screen If your ntouch VP is already a member of a myPhone Group you will see a menu option named myPhone as shown in the example below Figure 256 Settings b...

Страница 161: ...tails Feature Description Your myPhone Group phone number Shows the phone number used by all members of a myPhone Group When a call is made to this phone number will group members i e ntouch endpoints...

Страница 162: ...r our Technical Support departments for help with your videophone To Call Customer Service Step 1 Select the Settings button as shown below Figure 259 Settings button and menu Step 2 Select the Help b...

Страница 163: ...rvice button on Help menu Step 4 Select the Customer Service button to display the Customer Service dialog Figure 262 Customer Service dialog Step 5 Select Call to place a call to Customer Service Sel...

Страница 164: ...ll Technical Support Step 1 Select the Technical Support button to display the Technical Support dialog Figure 263 Technical Support dialog Step 2 Select Call to place a call to Technical Support Sele...

Отзывы: