background image

Mi
s

c

el

lane

ous

Troubleshooting

21

Troubleshooting

If a problem appears, check the following trouble 
shooting guide first and perform whatever action is 
necessary to solve the problem. If the problem persists, 
turn off the printer and consult with your Sony dealer.

Error Messages

If a problem occurs, the ALARM indicator lights and an 
error message stating the problem appears in the printer 
window display. Note the message and perform 
whatever action is necessary to solve the problem.

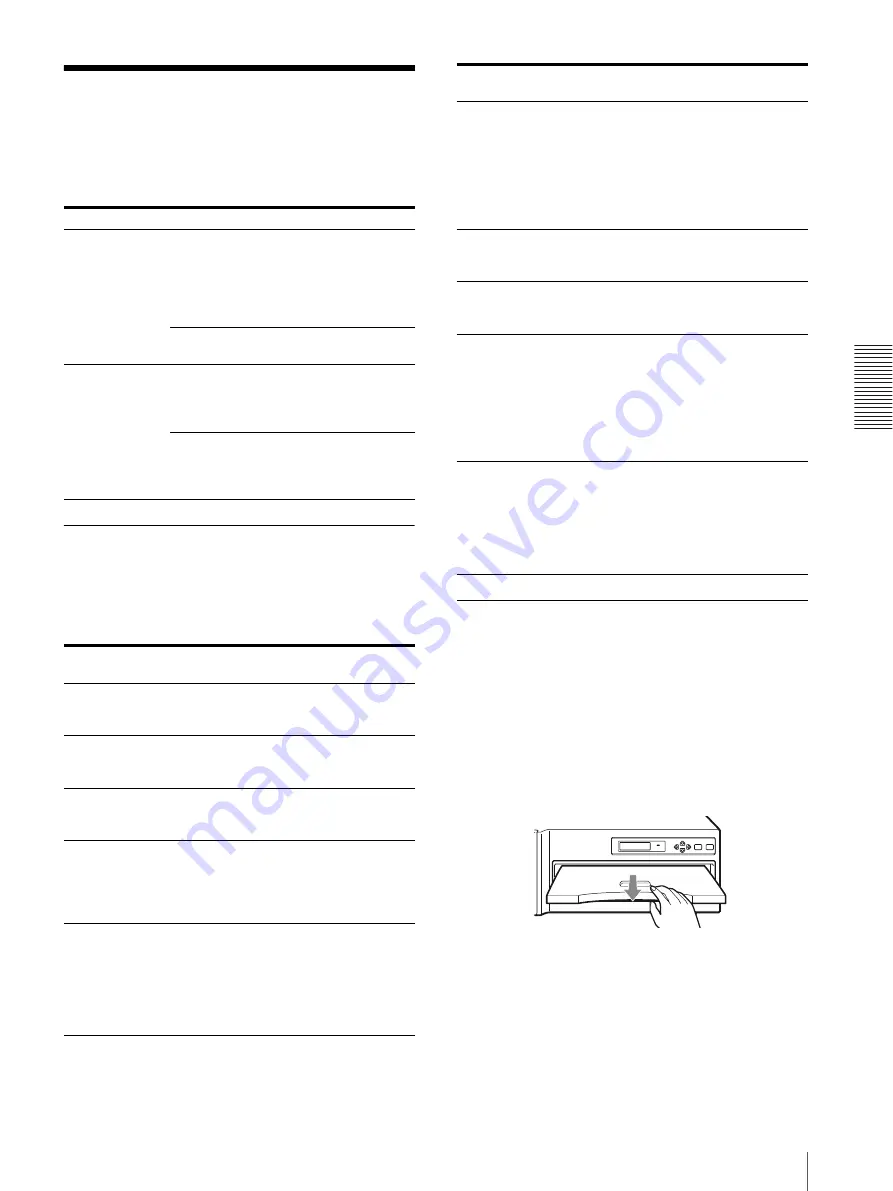
If the Paper Jams

If the paper jams, printing stops and the error message 
stating “REMOVE PAPER AND PRESS [

g

]” appears 

on the printer window display. Follow the steps below to 
remove the jammed paper.

1

Remove the paper cover. 
If any printouts have been ejected on the paper 
cover, remove them first before removing the paper 
cover.

2

Check where any paper is jammed inside the 
printer.
If you find a jammed sheet around the paper outlet, 
slowly pull it out starlight to the right.

Symptom

Possible causes and remedies

Nothing appears 
in the printer 
window display.

The POWER switch of the printer is not set 
to ON.

t

Set the POWER switch of the printer to 
ON. If the POWER switch is set to ON, 
once set it to OFF, then to ON again. 
(page 6)

Connections may not be correct.

t

Make connections correctly. (page 8)

The printer does 
not print.

An error message appears on the printer 
window display.

t

Take remedies according to “Error 
Messages.”(page 21).

An ink ribbon cassette and paper are not 
loaded.

t

Load an ink ribbon cassette and paper. 
(pages 9 and 10)

Error 
messages

Possible causes and remedies

END OF 
RIBBON

The ink ribbon has been completely used.

t

Replace with the new ink ribbon. (Ink 
ribbons cannot be reused.) (page 9)

HEAD IN 
COOLING

The thermal head has overheated.

t

Leave the printer until the head cools 
down and this message disappears.

HEAD IN 
HEATING

The thermal head is warming up.

t

Leave the printer until the head has 
warmed up and this message disappears.

NO RIBBON

Ink ribbon cassette is not fitted properly.

t

Ensure that the ink ribbon is loaded 
properly in the ink ribbon holder, and 
the ink ribbon cassette in the printer. 
(page 9)

NO IMAGE 
DATA

No image data for the patch print is stored 
in the printer memory.

t

Transfer the image data from your 
computer to make a printout before 
making a patch print by pressing the 
EXEC button in the adjustment mode. 
(page 14)

NO PAPER

• The paper has run out.

t

Load the paper into the paper tray. 
(page 10)

• The spacer of the paper tray is not set 

correctly.

t

Set the spacer to the correct position 
according to the size of the currently 
used printing pack. (page 11)

PLEASE WAIT

The printer is carrying out processing 
which requires time.

t

Wait for a while.

REMOVE 
PAPER AND 
PRESS [

g

]

The paper has jammed.

t

Remove jammed paper from the printer 
and press 

g

 button. (page 21)

RIBBON 
ERROR

The ink ribbon develops some trouble.

t

Ensure that the ink ribbon does not tear 
and the ink ribbon cassette and paper 
tray are loaded properly. (pages 7, 9 and 
10)

t

Check that the currently used printing 
pack is the UPC-770 or UPC-771. 
(page 19)

MECHA 
TROUBLE

The mechanical trouble occurs in the 
printer.

t

Turn off the power once and then turn it 
on. If the message will still remain in the 
printer window display, turn off the 
power immediately and contact your 
Sony dealer.

Error 
messages

Possible causes and remedies

Содержание UP-D77MD

Страница 1: ...anual Page 24 This manual is comprised of the Instructions for Use and the Setup Manual The Instructions for Use gives the information on how to use the printer for the routine work The Setup Manual gives the system administrator the information needed to setup the printer and connect it to the network ...

Страница 2: ... to connect peripherals must be shielded in order to comply with the limits for a digital device pursuant to Subpart B of Part 15 of FCC Rules For the customers in Canada This unit has been certified according to Standard CSA C22 2 No 601 1 For the customers in the U S A and Canada Model UP D77MD is Non Patient Equipment This unit can not be used in the vicinity of patients Patient Vicinity When y...

Страница 3: ...roper ratings Voltage Ampere If you have questions on the use of the above Power Cord Appliance Connector Plug please consult a qualified service personnel Warning on power connection for medical use Please use the following power supply cord With connectors plug or female and cord types other than those indicated in this table use the power supply cord that is approved for use in your area Note G...

Страница 4: ...tion Before Printing 9 Loading an Ink Ribbon Cassette 9 Loading the Paper 10 Printing 12 Starting to Print 12 Making Printouts with the Desired Color 12 Adjusting Printouts 13 Adjusting Gray 13 Adjusting the Color 14 Miscellaneous Precautions 17 Safety 17 Installation 17 On Transportation 17 Cleaning 17 Ink Ribbon and paper 19 Specifications 20 Troubleshooting 21 Error Messages 21 If the Paper Jam...

Страница 5: ...lity via the network processes them in A4 size paper either by enlarging or reducing them High quality and high print resolution The unit allows you to print out in full color 256 gradations process for each color and in high resolution print mode 300 dpi System Configuration The system allows you to make printouts of the data in DICOM format sent from image diagnosis equipment such as CTs NMs The...

Страница 6: ...l up and down through a menu G MENU button 13 Press this button to display or close the printout adjust menu in the printer window display H EXEC button 13 Use this button in menu operation I Paper cover 7 Printouts are ejected here J Paper tray 7 10 Load paper here Press the point marked with PUSH to remove the paper tray Rear A Network connector RJ 45 modular jack 8 Conforms to the 100BASE TX st...

Страница 7: ...it is equipped with a hard disk which is used as the system region and for temporarily storing the image data The hard disk is susceptible to shock vibration and so on Pay attention to the following when using the unit Do not subject the printer to shock Do not use the printer in a place that vibrates or is unstable Do not move the printer while it is turned on Do not turn the printer off while pr...

Страница 8: ...h the ferrite cores see How to attach the ferrite cores on page 8 How to attach the ferrite cores Before using the unit attach the supplied ferrite cores for noise prevention To confirm to radiation standards attach the supplied ferrite cores to both ends of the cable 1 Release the two stoppers to open the ferrite core 2 Make a loop at the end of the cable about 13 mm 1 2 inch away from the connec...

Страница 9: ...n and paper on page 19 Loading an Ink Ribbon Cassette Load the ink ribbon to the supplied ink ribbon holder and load the ink ribbon cassette referring to the ink ribbon holder loaded with the ink ribbon to the printer s ribbon compartment Notes When you use the printer at the first time the thermal head was locked at the factory Turn on the printer first to unlock the thermal head then start to lo...

Страница 10: ...er Load the paper by the following procedure Be careful not to touch the printing surface of the paper Note When loading the paper do not turn off the power If you turn off the power the image data stored in the memory will be lost 1 Press PUSH on the paper tray The paper tray is ejected 2 Open the tray cover and place the paper in the paper tray 1 Load the spool holding the ink ribbon into the ri...

Страница 11: ...ribbon used the gray balance may be changed Load the paper so that it lays flat in the paper tray If the paper is curled it will overflow the paper tray and the printing position may shift If this happens load fewer sheets in the paper tray 3 Close the tray cover and slide the paper tray into the printer until it clicks into place Avoid storing the paper in a location subject to high temperatures ...

Страница 12: ... has been completed the printer returns to standby status Notes Do not pull the paper out until the printer finishes printing To prevent paper jamming do not allow more than 20 printouts on the paper cover If the printer does not print The printer will fail to print when an error message is displayed in the printer window display Take remedies according to explanation of the message given in Error...

Страница 13: ...r settings by loading the appropriate user set If the data of the loaded user set is modified the printer operates according to the modified data In such a case the modified data remains effective until another user set is loaded even if you turn off the power Adjusting Gray 1 Make a printout of image data which has a large amount of gray parts It is recommended that you make a printout of the ful...

Страница 14: ...the button pressed the number changes quickly 3 After finishing the adjustment of 1 and 2 press the MENU button to exit the adjustment mode 4 Make a printout again Repeat your adjustments until the desired gray level is obtained When the desired gray is obtained go to the next color adjustment Adjusting the Color After finishing the gray continue adjustment for the color Before starting the color ...

Страница 15: ...STANDARD by pressing the g button 9 Adjust the hue saturation and value of the color 1 Select the item to be adjusted by using the F or f button f Scrolls up to the next item F Scrolls down to the previous item 2 Adjust the level by pressing the G or g button You can adjust each item between 32 to 32 The value 0 is the standard level 3 After adjusting the hue saturation and value of the color pres...

Страница 16: ...ser set number selected in step 2 The printer operates according to this registered value set unless you load another user set Also if you modify the settings the modified values remain effective until another user set is loaded even if you turn off the power 11 Press the MENU button to exit menu mode for adjusting gray and color The printer returns to standby status and READY appears in the print...

Страница 17: ...e printer standing for at least one hour If the printing pack is subjected to wide and sudden changes in temperature condensation may form on the ink ribbon or paper inside This will cause the printer to malfunction Also if the printing pack is used in this state spots are likely to appear on the printout To store a half used printing pack replace it in its original packing and reseal the package ...

Страница 18: ...ack tip in the following cases When a scratch appears only on the printout but no scratches appear on the spaces around the picture When the use of the white tip has no effect Periodic head cleaning We recommend use of the black tip every month or every 500 sheets of printout to keep the thermal head clean Store the tips by inserting the white one into the cleaning tip hole on the holder and the b...

Страница 19: ... black tip be careful not to insert pull out the holder too many times at one cleaning The lifespan of the head may be decreased Be careful not to swallow the cleaning tips Store them out of the reach of children Ink Ribbon and paper You need paper and ink ribbon cassette for printing Ink ribbon cassette stands for the supplied ink ribbon holder loaded with ink ribbon Use the ink ribbon and paper ...

Страница 20: ...k Conforming to 100BASE TX standard Accessories supplied Ink ribbon holder 1 Paper tray 1 Paper cover 1 Fan cover 1 Bottom cover 1 Ferrite core 2 Thermal Head Cleaning Kit 1 CD ROM 1 Before Using this Printer 1 Optional accessories Self Laminating Color Printing Pack UPC 770 Self Laminating Color Printing Pack UPC 771 Medical Specifications Protection against electric shock Class I Protection agai...

Страница 21: ...d remedies END OF RIBBON The ink ribbon has been completely used tReplace with the new ink ribbon Ink ribbons cannot be reused page 9 HEAD IN COOLING The thermal head has overheated tLeave the printer until the head cools down and this message disappears HEAD IN HEATING The thermal head is warming up tLeave the printer until the head has warmed up and this message disappears NO RIBBON Ink ribbon c...

Страница 22: ...ny paper is found on the bottom of the printer If you find one remove it 6 Ensure that the paper is properly loaded Discard the sheets removed in steps 2 and 5 7 Re insert the removed bottom cover paper tray tray cover and or paper cover into the printer 8 Press the g button The error message disappears and the printer returns to the standby status If the tray cover is in the way remove it by lift...

Страница 23: ...ading the paper 10 M Mounting paper tray and cover 7 P Paper adding paper 11 If paper jams 21 Loading 10 Paper cover 7 Paper jams 21 Paper outlet 12 Paper tray 7 10 11 Part Names and Functions Front 6 Rear 6 Picture size 20 Power requirements 20 Precautions Condensation 17 Installation 17 Safety 17 Transportation 17 Print paper Notes on storing 11 Printer window display 12 Printing 12 If the print...

Страница 24: ...erview 25 Requirements 25 IP Address 26 Setup Setting up the Personal Computer to be Used for Setup 27 About the Setup Window 27 Opening the Setup Window 27 Components of Pages 28 Setup of the Unit 30 Setup of E Mail 30 Confirmation After Setup 31 ...

Страница 25: ...e connected to the network connector of the UP D77MD Operating system a Microsoft Windows 95 Windows 98 Windows NT 4 0 Windows 2000 or Windows XP LAN cable 100BASE TX cross cable Web browser software Internet Explorer a 5 5 or later or Netscape a 4 or later Set the Web browser software as follows No proxy A blank page is opened when the Web browser software is started a Microsoft Windows Windows N...

Страница 26: ...network administrator The IP address the UP D77MD will use on the network Sub net mask of the network Gateway address if a gateway is included in the network To confirm the IP address The IP address assigned to the UP D77MD can be confirmed 1 Turn the UP D77MD on 2 Press the MENU button 3 Display INFORMATION on the LCD by pressing the G or g button 4 Display IP ADDRESS on the LCD by pressing the F...

Страница 27: ...o be used for setup using the network cross cable About the Setup Window The UP D77MD can be set up on the setup window displayed on the Web browser of the personal computer to be used for setup The setup window has the following pages Summary Print Job page Displays the summary and print job status of the UP D77MD DICOM Settings page Sets up the IP address DICOM AE title and so on Printer Status ...

Страница 28: ... IP address and DICOM AE title A TCP IP section Setup Software Version Displays the version of the setup window IP Address Sets the IP address and displays it Sub net Mask Sets the Sub net mask and displays it Default Gateway Sets the default gateway and displays it B Printer section DICOM Software Version Displays the version of the DICOM software DICOM Software Serial Displays the serial number ...

Страница 29: ...inting and so on B Printer Statistics display area Displays the total printings performed by the unit Print count with the current thermal head Displays the total prints after the thermal head has been replaced Lifetime print count Displays the total prints since the unit has been shipped C Printer Media Information display area Vendor ID Model Name Version Number Media Type Media Size Pixel Matri...

Страница 30: ...aved Setup of E Mail The E Mail settings page allows you to set up E mail service so that an e mail message will be sent automatically when an error occurs in the UP D77MD 1 Open the E Mail settings page For detailed information on how to open the page see Opening the Setup Window on page 27 2 Set criteria determining when an e mail message should be sent Place the check marks on the check box cor...

Страница 31: ... a modality The unit starts printing When the image data is not sent Check whether or not the IP address of the modality side is correct When setting up an E mail Confirm the settings for an E mail as follows 1 Click E mail settings in the page selection area to open the E mail settings page When this page is opened after E mail settings have been completed the Send a test E Mail button appears 2 ...

Страница 32: ...Sony Corporation ...

Отзывы: