


VAIO User Guide SVS13A1/SVS1311/SVS1511 Series
Back
|
Back to Top
Troubleshooting
How to Use
Parts Description
Setup
Network / Internet
Connections
Settings
Playback
Backup / Recovery
Security
Other Operations
Notifications
Adding and Removing Memory Modules
If you want to increase your computer’s speed or improve performance when running
programs simultaneously, increase the amount of memory by installing optional memory
modules.
Before you upgrade your computer’s memory, see
Notes on Adding and Removing
Memory Modules
.
[Details]
If you install a memory module into the slot, the dual-channel mode is enabled to help
improve performance.
The type of module and the amount of memory installed on your computer may differ
depending on the model.
1.
Turn off your VAIO computer and peripheral devices, and disconnect the power cord
and all connection cables.
2.
Wait for a while until your VAIO computer cools down.
The inner parts of your VAIO computer may be hot just after turning off. Be careful to
avoid burns while handling your VAIO computer in this state.
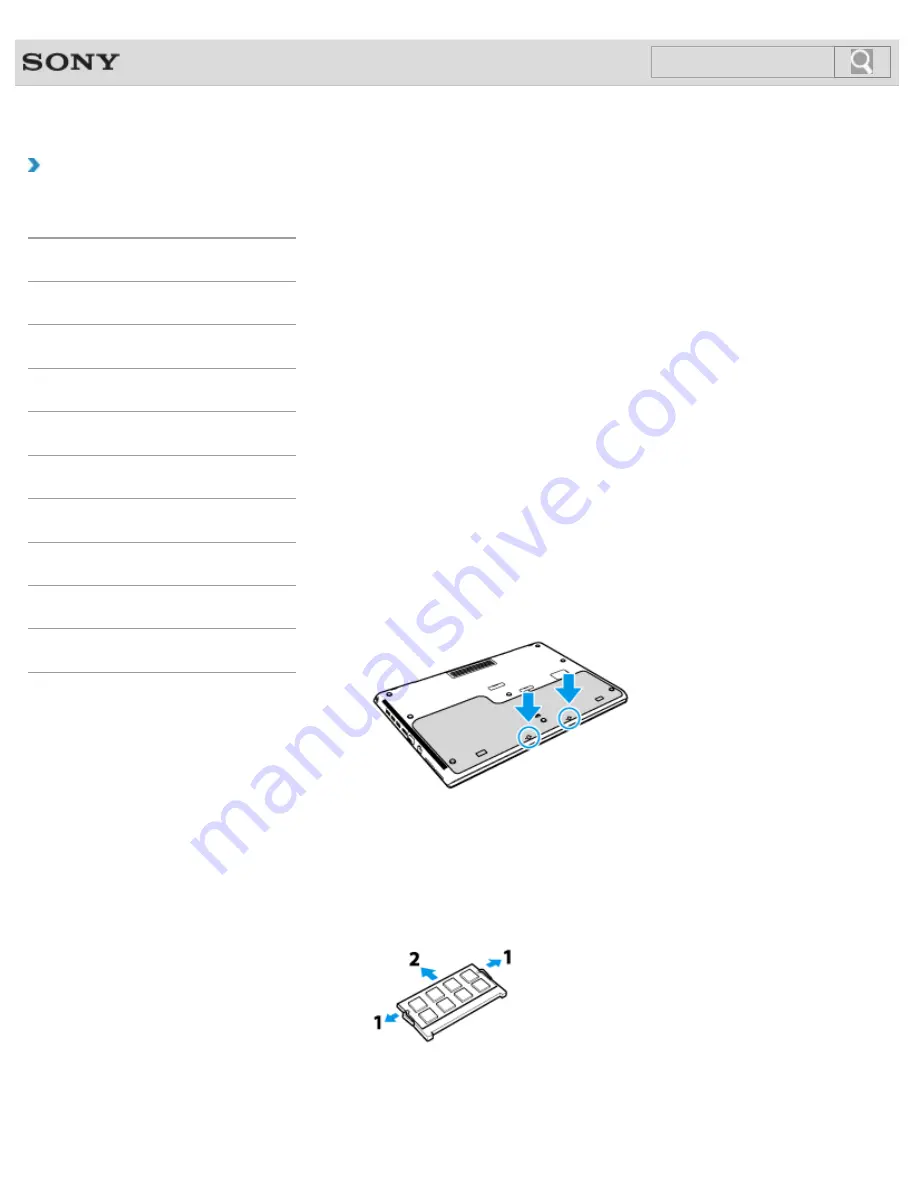
3.
Lay a clean cloth on a level, flat surface, place your VAIO computer on it as illustrated
below. Remove the screws with a cross slot screwdriver to open the memory module
compartment cover.
The screw locations are indicated by the arrows in the illustration below.
On some models, captive screws are used on the memory module compartment cover
and cannot be detached from the cover.
4.
Remove the battery pack.
[Details]
5.
Touch an external metal object to discharge static electricity.
Do not touch any metal parts inside your VAIO computer.
6.
If there is no free slot, remove the currently installed memory module. Pull the latches
in the direction of the arrows to pop up the module at an angle (1), then pull the
module out in the direction of the arrow (2).
7.
Remove the new memory module from its antistatic bag.
8.
Hold the memory module by its edge and slide it into the memory module slot with its
end terminal facing downward while aligning the notch on the module with the small
132
Содержание SVS13112FXB
Страница 139: ... 2012 Sony Corporation 139 ...
Страница 155: ...155 ...
Страница 166: ...Changing the Rapid Wake Sleep Mode Settings 2012 Sony Corporation 166 ...
Страница 173: ... 2012 Sony Corporation 173 ...
Страница 183: ...Changing the Sound Output Device Adjusting the Volume in Windows 2012 Sony Corporation 183 ...
Страница 191: ...191 ...
Страница 217: ... 2012 Sony Corporation 217 ...
Страница 234: ... 2012 Sony Corporation 234 ...
Страница 236: ...Related Topic Notes on the Built in Camera Built in camera equipped models 2012 Sony Corporation 236 ...
Страница 241: ... 2012 Sony Corporation 241 ...
Страница 249: ...Notes on Using SD Memory Cards 2012 Sony Corporation 249 ...
Страница 253: ...Related Topic Inserting Removing SD Memory Cards 2012 Sony Corporation 253 ...
Страница 272: ... 2012 Sony Corporation 272 ...
Страница 283: ...Not all the software listed above may be delivered with your model 2012 Sony Corporation 283 ...


