


1-18
72
Available DV Dubbing
Functions
◆
One Touch Dubbing (page 73)
Records the entire contents of a DV format tape to
a disc of your choice with a single touch of the
ONE TOUCH DUBBING button.
◆
Program Edit (page 74)
Allows you to pre-select scenes from a currently
playing DV format tape and rearrange the scene
order before dubbing.
◆
Advanced Program Edit (page 76)
Allows you to first record the entire contents of a
DV format tape onto a disc, and later select and
rearrange the scenes using the copied disc. Since
Advanced Program Edit makes use of the disc’s
quick accessibility, the operation is smoother than
editing with a playing tape.
About
“
programs
”
and
“
DV Edit List
”
A “program” is created after One Touch Dubbing,
Program Edit, or Advanced Program Edit. Like a
Playlist title that contains control information for
playback, the program contains only the control
information, such as the scene start point and end
point, within the dubbed title.
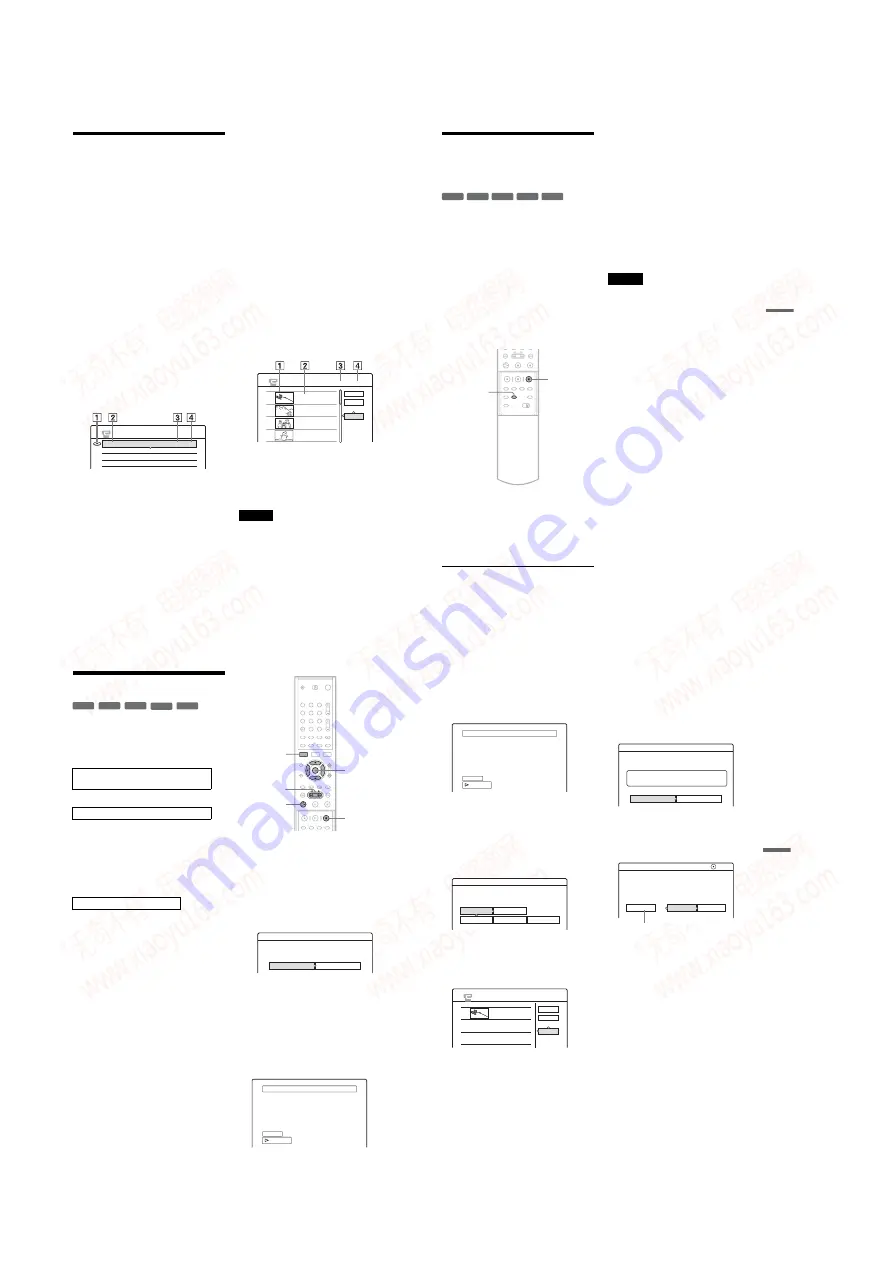
“DV Edit List” stores up to 20 programs.
1
Disc mark
2
Program name
3
Total playing time
4
Date of editing or dubbing
The created program is automatically stored in the
“DV Edit List.” You can later select the program
from the DV Edit List to re-edit and copy discs.
The recorder calls up the data from the source tape
according to the control information (program),
and dubs the selected scenes onto a disc.
◆
Copy Dubbing (page 78)
Allows you to make duplicate copies of the
programs in the DV Edit List to a disc of your
choice. When making copies, you will need the
original DV format tapes used to create the
program.
◆
Re-editing a program in the DV Edit List
(DVD-RW (VR mode) only) (page 79)
This allows you to select a program from the DV
Edit List, and make further edits by using the
“Scene List.” After checking scene thumbnails on
the Scene List, you can add or delete scenes, or
rearrange the scene order. Note that when you re-
edit a program, the original program is written
over and lost.
The “Scene List” displays the program contents by
scenes. Up to 50 scenes can be added to the Scene
List (a program).
1
Thumbnail picture
2
Time information
3
Total duration of the program
4
Total number of scenes
Note
After you make a dubbing, do not throw away or record
over your tapes. You will need them later to make
additional edits or copies.
DV EDIT LIST
Spring vacation 2004
My Birthday
DV 24.12.2003 11:34 - 25.12.2003 13:18
1H12M 5.6
1H16M 10.6
1H24M 18.6
SCENE LIST
Total 1:23:30 Scenes 20
OK
Quit
Add
0:00:30-0:00:52
Duration 0:00:22
1
0:01:40-0:06:23
Duration 0:06:43
2
0:07:07-0:10:51
Duration 0:03:44
3
0:11:40-0:16:19
Duration 0:04:39
4
73
D
V
Du
bbi
ng (R
D
R
-G
X7
00 on
ly
)
Recording an Entire DV
Format Tape (One Touch
Dubbing)
You can record the entire contents of a DV format
tape onto a disc with a single press of the ONE
TOUCH DUBBING button. The recorder controls
the digital video camera for the whole process, and
completes the recording.
◆
How chapters are created
The dubbed contents on the disc become one title,
and the title is divided into chapters. For a
DVD-RW (VR mode), every shooting on the tape
becomes a chapter on the disc (Auto Scene
Chaptering function). For other discs, the recorder
divides the title in either 6 or 15-minute intervals,
according to the setting in “Auto Chapter” in
Features Setup.
Follow steps 1 to 6 of
“
Preparing for recording
using the DV IN jack
”
(page 70), and press
ONE TOUCH DUBBING on the remote.
The recorder rewinds the tape and then starts
recording the tape contents.
When the recording is finished, the recorder
rewinds the tape in the digital video camera.
To stop during recording
Open the remote’s cover and press
x
REC STOP.
Note that it may take a few seconds for the
recorder to stop recording.
z
Hints
• If you set “Finalize Disc” to “Auto” in Features Setup
(page 94), the recorded disc (except DVD-RW(VR
mode)) will automatically be finalized after recording
is finished.
• When you use a DVD-RW (VR mode) and “Add to
Edit List” in Features Setup is set to “On” (default), a
program for the One Touch Dubbing recording is
created and saved in the DV Edit List. You can use the
program later to edit and dub the edited contents
(page 94).
Notes
• When a blank space between the recordings on the tape
continues for more than five minutes, One Touch
Dubbing ends automatically.
• The recorder records a blank for five minutes before it
stops dubbing. To stop the blank recording, press
x
REC STOP.
-RWVR -RW
Video
+
RW
+
R
-
R
ONE TOUCH
DUBBING
x
REC STOP
74
Program Edit
You can select scenes from a DV format tape, and
then automatically record selected scenes to a disc
of your choice.
To use this function, you will do the following:
m
The dubbed contents on the disc become one title,
and the title is divided into chapters. For a DVD-
RW (VR mode), every shooting on the tape and
each selected scene becomes a chapter on the disc
(Auto Scene Chaptering function). For other discs,
the recorder divides the title in either 6 or 15-
minute intervals, according to the setting in “Auto
Chapter” in Features Setup.
Follow steps 1 to 6 of
“
Preparing for
recording using the DV IN jack
”
(page 70),
and press SYSTEM MENU.
“
DV EDIT,
”
and press ENTER.
The DV Edit menu appears.
“
Program Edit,
”
and press ENTER.
The display asks if you want to start selecting
scenes.
• If you have previously saved a program, the
display asks if you want to edit an existing
program or to create a new program. To
resume editing the existing program, select
“Saved Data,” and go to step 7.
4
Select
“
Start,
”
and press ENTER.
The display for setting the IN point (start of
the scene) appears.
The scene starts to play in the background.
Connect your digital video camera and
prepare for recording
Select and edit the scenes you want to dub
Dub the selected scenes to a disc
-RW
Video
+
RW
-
R
-RWVR
+
R
1
2
3
4
5
6
7
8
9
0
<
/
M
/
m
/
,
,
ENTER
m
/
M
x
REC
STOP
H
SYSTEM
MENU
Do you want to select a scene?
Start
Cancel
Select scene (Set IN point)
OUT - : - - : - -
IN 0:00:30
Controlling...
75
D
V
Du
bbi
ng (R
D
R
-G
X7
00 on
ly
)
5
Select the IN point by pressing
m
/
M
,
and press ENTER.
The display for setting the OUT point (end of
the scene) appears. The scene starts to play in
the background from the IN point.
6
Select the OUT point by pressing
m
/
M
,
and press ENTER.
The display asks if you want to add the
selected scene to the Scene List menu. To
preview the scene, select “Preview.” To reset
either the IN or OUT point, select “Change
IN” or “Change OUT,” and repeat from step
5.
7
Select
“
OK,
”
and press ENTER.
A new Scene List menu appears with the
selected scene. To add more scenes, select
“Add” and repeat from step 5. You can add up
to 50 scenes to a tile.
8
When you finish adding scenes, select the
scene you want to edit, and press ENTER.
The sub-menu appears.
“Move”: Changes the scene order. Follow the
explanations on the screen to change the
order.
“Erase”: Erases the scene. When asked for
confirmation, select “OK.”
“Preview”: Plays the selected scene.
“Change IN”: Changes the start of the scene.
Repeat from step 5.
“Change OUT”: Changes the end of the scene.
Repeat from step 6.
9
When you finish editing the Scene List,
select
“
OK,
”
and press ENTER.
The display for entering the title name
appears. To enter a new name, select “Enter,”
and follow the explanations on page 40.
10
Select
“
OK,
”
and press ENTER.
The default title name is fixed, and the display
asks if you want to start recording. To change
the dubbing mode, select “Dub Mode” and
press
M
/
m
.
11
Select
“
Start,
”
and press ENTER.
The recorder starts recording the tape contents
as programmed.
• If the recording does not fit due to the
dubbing mode you selected, the display asks
if you want to continue. To change the
dubbing mode, select “Reset” and repeat
from step 10. To have the recorder adjust the
dubbing mode, select “Auto Dub Mode.”
• If there is not enough disc space even after
changing the dubbing mode, the display
asks if you want to record halfway. To
continue, select “OK.”
Select scene (Set OUT point)
OUT 0:00:52
IN 0:00:30
Controlling...
Scenes Selection
Do you want to capture the scene
between IN 0:00:30 and OUT 0:00:52?
OK
Cancel
Preview
Change IN
Change OUT
SCENE LIST
Total 0:00:22 Scenes 1
OK
Quit
Add
0:00:30-0:00:52
Duration 0:00:22
1
Title Name
Enter the title name.
DV 11.10.2003 13:30 - 12.11.2003 16:46
OK
Enter
Cancel
DV Dubbing
2.6GB
Change the dubbing mode if necessary.
Select "Start" to start dubbing.
SP 0.8GB
Dub Mode
Start
Data capacity required
for the dubbing.
,
continued
www. xiaoyu163. com
QQ 376315150
9
9
2
8
9
4
2
9
8
TEL 13942296513
9
9
2
8
9
4
2
9
8
0
5
1
5
1
3
6
7
3
Q
Q
TEL 13942296513 QQ 376315150 892498299
TEL 13942296513 QQ 376315150 892498299


