background image

43

Setting System Frequency / Setting Timecode

  Chapt

er

 3

  Pre

par

at

ion
s

Setting System 
Frequency

This unit can record and play back video at the system 
frequencies of 59.94i, 50i, 29.97P, 25P, and 23.98P

 1)


(1080) or 59.94P and 50P (720).

1)

 When the PDBK-F1500 option is installed.

Selecting the system frequency

1

Set setup menu item 013 SYSTEM FREQUENCY 
SELECT MENU to “on” and press the PUSH 
SET(S.SEL) knob.

The system frequency selection screen appears.

2

Turn the PUSH SET(S.SEL) knob to select the system 
frequency to be used.

3

Press the PUSH SET(S.SEL) knob or the SAVE 
function button (F5). 

The message “Turn off/on POWER!!” appears.

4

After pressing the on/standby button to power off the 
unit, power it on again.

Setting Timecode

There are the following four ways of recording timecode:

Internal Preset mode: 

This records the output of the 

internal timecode generator, set beforehand to an 
initial value. The following run modes can be 
selected.
• Free Run: Timecode advances continually.
• Rec Run: Timecode advances only during 

recording.

Internal Regen mode:

 This records the output of the 

internal timecode generator, initialized to timecode 
following continuously upon the timecode of the last 
frame of the last clip on the disc.

External Regen mode:

 This records the output of the 

internal timecode generator, synchronized to an 
external timecode generator. As the external input, the 
timecode input to any of the following connectors can 
be selected.
• TIME CODE IN connector: LTC
• SD/HDSDI INPUT connector: VITC and LTC


(i.LINK) S400 connector:


TC

External Preset mode:

 This directly records the input of 

an external timecode generator. As the external input, 
the timecode input to any of the TIME CODE IN 
connector can be selected.

To record timecode after setting an initial 
value (Internal Preset)

Proceed as follows with the function menu. For setting the 
timecode, set TCG on page P5 TC of the function menu to 
INT and PRST/RGN to PRESET.

Setting an initial timecode value

1

Press the CNTR SEL function button on the HOME 
page of the function menu, and select TC.

HD1500

RETURN

-

+

SAVE

SETUP

EXIT

SYSTEM FREQUENCY

SELECT

1080/59.94i

If the System Frequency

setting is changed,    

Turn power off and on  

again.                 

RETURN

-

+

SAVE

SETUP

EXIT

SYSTEM FREQUENCY

SELECT

1080/50i

Push F5(SAVE) Key!!

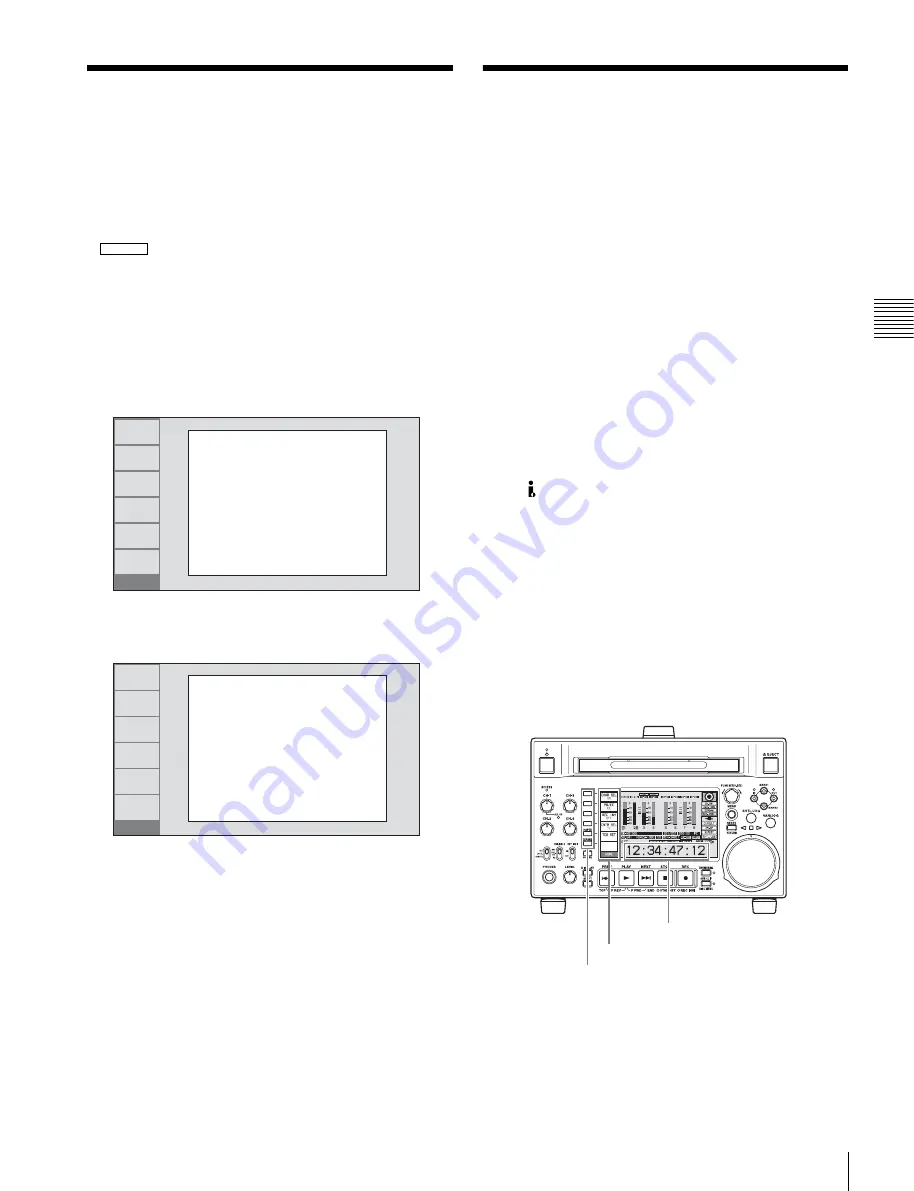
Time data display area

Function menu

Function buttons

Содержание PDW-F1600

Страница 1: ...ANUAL English 1st Edition Revised 4 The supplied CD ROM includes operation manuals for the PDW F1600 HD1500 Professional Disc Recorder English Japanese French German Italian Spanish and Chinese versions in PDF format For more details see Using the CD ROM Manual on page 16 ...

Страница 2: ...s apparatus to rain or moisture To avoid electrical shock do not open the cabinet Refer servicing to qualified personnel only THIS APPARATUS MUST BE EARTHED CAUTION The apparatus shall not be exposed to dripping or splashing No objects filled with liquids such as vases shall be placed on the apparatus The unit is not disconnected from the AC power source mains as long as it is connected to the wal...

Страница 3: ...PARATEN ANVÄNDS PÅ ANNAT SÄTT ÄN I DENNA BRUKSANVISNING SPECIFICERATS KAN ANVÄNDAREN UTSÄTTAS FÖR OSYNLIG LASERSTRÅLNING SOM ÖVERSKRIDER GRÄNSEN FÖR LASERKLASS 1 When installing the installation space must be secured in consideration of the ventilation and service operation Do not block the ventilation slots at the left side right side and bottom of front side panels and vents of the fans Leave mo...

Страница 4: ...me a été mis hors tension Cette étiquette est placée sur le panneau supérieur de l unité de commande AVERTISSEMENT Une pression acoustique excessive en provenance des écouteurs ou du casque peut provoquer une baisse de l acuité auditive Pour utiliser ce produit en toute sécurité évitez l écoute prolongée à des pressions sonores excessives Pour les clients au Canada Cet appareil numérique de la cla...

Страница 5: ... besitzt die CE Kennzeichnung und erfüllt die EMV Richtlinie der EG Kommission Angewandte Normen EN55103 1 Elektromagnetische Verträglichkeit Störaussendung EN55103 2 Elektromagnetische Verträglichkeit Störfestigkeit Für die folgenden elektromagnetischen Umgebungen E1 Wohnbereich E2 kommerzieller und in beschränktem Maße industrieller Bereich E3 Stadtbereich im Freien und E4 kontrollierter EMV Ber...

Страница 6: ...r Sources 32 Supplying power 32 Attaching a battery pack 32 Initial Setup 33 Front Panel Tilt Mechanism 35 Connections and Settings 36 Connections for using PDZ 1 Proxy Browsing Software 36 Connections for cut editing 37 Using the editing functions of the recorder controlling through REMOTE 9P connector 41 Connections for pool coverage 41 Synchronization Reference Signals 42 Setting System Frequen...

Страница 7: ...n 57 Recording with the Clip Continuous Rec function 57 Using the Live Logging function 58 Handling of discs when recording does not end normally salvage functions 58 Linear Editing 60 Overview 60 Connections 61 Preparations for editing 61 Editing operations 62 Playback 63 Playback operation 64 Playback operations using thumbnails 66 Chapter 5 Operations in GUI Screens Overview 68 Switching betwee...

Страница 8: ...owser 96 Transferring Clips Direct FTP Function 99 Preparations for clip transfers 99 Uploading clips 100 Downloading clips 103 Copying clips directly between XDCAM devices 104 Shortcut List 105 Chapter 6 File Operations Overview 106 Directory structure 106 File operation restrictions 107 Assigning user defined clip titles 110 Assigning user defined clip and clip list names 111 File Operations in ...

Страница 9: ...Overview 155 Manipulating planning metadata 155 Setting clip names by using planning metadata 155 Setting essence mark names by using planning metadata 156 Setting volume labels by using planning metadata 157 Appendix Important Notes on Operation 158 Condensation 158 About the LCD panel 158 Periodic Maintenance 159 Digital hours meter 159 Troubleshooting 161 Alarms 161 Error messages 172 To eject ...

Страница 10: ...tems of the HKDV 900 and Setup Menu of This Unit 184 List of Supported USB Keyboards 185 Trademarks and Licenses 188 MPEG 4 visual patent portfolio license 188 MPEG 2 video patent portfolio license 188 About IJG Independent JPEG Group 188 Character display software iType 188 About net snmpd 188 About libupnp 191 Glossary 192 Index 194 ...

Страница 11: ...rder for nonlinear editing For these applications it can be connected to Sony nonlinear editors monitors and video equipment with HDSDI interfaces via its standard HDSDI I O connectors It has a compact lightweight body for easy portability outdoors and can be powered from any of three power sources AC DC or battery 4 power 1 Professional Disc is a trademark of Sony Corporation 2 FAM File access mo...

Страница 12: ...the recorder you can perform insert and assemble editing of recorded clips 1 1 When the PDBZ UPG02 Software Upgrade Key is installed you can perform timecode editing only SD upconvert function The unit can output HD signals while playing discs recorded as SD allowing SD material to be utilized in an HD environment 1 1 When the PDBK S1500 or PDBK F1500 option is installed HD downconvert function Th...

Страница 13: ...ips of a certain type from among all of the clips on a disc For example you can do the following Select clips in a certain video format from a disc that contains clips in different video formats Select only clips with NG bad clip flags and delete all of those clips in one operation Select only clips that were recorded according to planning metadata and use the Direct FTP function to transfer those...

Страница 14: ...g mode User data files other than XDCAM AV files can be recorded on Professional Discs as PC data via the i LINK or FTP interface This allows Professional Discs to be used as data recording media with a data storage capacity of 46 4 GB when dual layer PFD50DLA discs are used Supports a variety of interfaces This unit supports the following interfaces HDSDI video 8 channel audio input and output SD...

Страница 15: ... OUTPUT INPUT SDSDI OUTPUT AC IN DC IN 12V AUDIO MONITOR HDSDI OUTPUT INPUT REMOTE 9P b ANALOG AUDIO OUTPUT INPUT DIGITAL AUDIO AES EBU OUT IN HDSDI OUTPUT COMPOSITE OUTPUT SDSDI OUTPUT ANALOG AUDIO INPUT VIDEO CONTROL PHONES i LINK S400 a If an HKDV 900 is connected be sure to check that the version of the HKDV 900 is 2 00 or higher b For HDW 2000 series only PDW 700 HKDV 900 video control unit a...

Страница 16: ...the United States and or other countries Reading the CD ROM manual To read the operation manual contained on the CD ROM do the following 1 Insert the CD ROM in your CD ROM drive A cover page appears automatically in your browser If it does not appear automatically in the browser double click on the index htm file on the CD ROM 2 Select and click on the operation manual that you want to read This o...

Страница 17: ...ly red If a disc is loaded in the unit the indicator flashes before changing to continuously lit red When using this unit normally leave the rear panel POWER switch in the on position and use this button to switch the unit between the operating state and standby state b ACCESS indicator This lights when the disc is accessed and when a file is opened by a FAM or FTP connection see page 106 If the o...

Страница 18: ...lso cause this to simultaneously adjust the output volume from the AUDIO MONITOR R L connectors on the rear panel To do this set setup menu item 114 AUDIO MONITOR OUTPUT LEVEL to var g Disc slot and EJECT button Insert a disc in the disc slot To remove the disc press the EJECT button 1 Audio level adjustment section a CH 1 ALL CH CH 2 to CH 4 audio level adjustment knobs Depending on the setting o...

Страница 19: ... buttons and dials see Playback operation on page 64 a SHTL JOG button Press this button turning it on to perform shuttle playback with the shuttle dial or jog playback with the jog dial When pressed during recording stops recording and selects shuttle jog mode If you do not want to stop recording when this button is pressed set setup menu item 145 MODE KEY ENABLE DURING RECORDING to stop b VAR JO...

Страница 20: ...enter position it is possible occasionally for vibration from other operations to activate the dial and start playback in shuttle mode 4 Display menu control section a Function buttons F1 to F6 These buttons are enabled when the function menu see page 48 is visible Each press of a button changes the setting of the corresponding item in the menu For convenience this manual refers to these buttons a...

Страница 21: ... the corresponding essence mark frames appear in thumbnails Press once more turning the indicator off to return to a whole screen display See GUI screen operations page 75 for more information about how to use the thumbnail screens h DISPLAY button Each press of this button switches between the basic operation display and video monitor display see page 23 This button is disabled unless either the ...

Страница 22: ... from standby off mode to the original state when you press this button again with the SHIFT button held down The lit or unlit status of the STOP button does not change This button flashes when setup menu item 105 REFERENCE SYSTEM ALARM is set to on and the correct reference video input signal as specified by OUT REF on page P6 REF of the function menu is not being input This unit can automaticall...

Страница 23: ...e P4 AUDIO of the function menu 1 Audio input display Audio level meters a 2 Function menu 3 Clip information 4 Recording format 5 Time data display area 6 Disc information 7 System information 9 Reference signal 8 Format conversion q Video input display a The mixing display appears only on the PDW F1600 see the following figure 2 1 0 1 2 2 1 0 1 2 1 2 3 4 L R AES EBU AES EBU HD SDI HD SDI DATA DA...

Страница 24: ...clip information Clip names are displayed according to the setting of Settings Display Title in the Disc Menu see page 74 However clip names are always displayed during playback The following characters can be displayed as clip names in this area Digits 0 to 9 Alphabetic characters a to z A to Z The following symbols comma period colon semicolon _ Space d Recording format Displays the system frequ...

Страница 25: ...ck Yellow Disc capable of playback only Red Disc incapable of recording and playback Even if the background is blue recording is not possible in the following cases When a disc with recording inhibited is loaded When REC INH on the HOME page of the function menu is set to ON The usable formats displayed when no disc is loaded in this unit are as follows a HD420LP supports playback only When the PD...

Страница 26: ...nput 1 SG Test video signal from the internal signal generator 1 When the PDBK 201 option board is installed The display blinks when there is no video input signal and when the video input signal does not match the system frequency of this unit The video signal input is selected with V INPUT on page P1 VIDEO of the function menu see page 49 Video monitor display AC power power saving mode Battery ...

Страница 27: ...or more information about the Clip Continuous Rec function D Low battery warning Appears and flashes during operation with a battery pack when the battery power is almost exhausted E Converter display Displays the current down or up converter mode depending on the state of the unit The current down converter DC mode appears when HD video is being input and when an HD disc is being played The curre...

Страница 28: ... INPUT SDSDI HDSDI signal input connector BNC type This inputs an SDSDI or HDSDI format video audio signal g HDSDI OUTPUT 1 2 SUPER HDSDI signal output 1 2 superimpose connectors BNC type These output HDSDI format video audio signals When editing with two PDW HD1500 units connect a cable between these connectors on the player unit and the SD HDSDI INPUT connector on the recorder unit You can super...

Страница 29: ...nstructions pour ce port Aus Sicherheitsgründen nicht mit einem Peripheriegerät Anschluss verbinden der zu starke Spannung für diese Buchse haben könnte Folgen Sie den Anweisungen für diese Buchse k MAINTENANCE connectors These are the USB connectors for maintenance Connect a Windows USB keyboard or mouse see page 83 or a USB flash drive to access planning metadata stored on the drive see page 94 ...

Страница 30: ...an audio signal for monitoring The monitored channel is selected with MONITR L and MONITR R on page P2 AUDIO of the function menu See Basic Operations of the Function Menu page 48 for more information 3 Digital audio signal input output section a DIGITAL AUDIO AES EBU IN digital audio input 1 2 3 4 connectors BNC type These input AES EBU format digital audio signals The left connector 1 2 correspo...

Страница 31: ...and Functions of Parts During recording The timecode from the internal timecode generator or the timecode input to the TIME CODE IN connector When setup menu item 611 TC OUTPUT PHASE IN EE MODE is set to muting no timecode is output ...

Страница 32: ...s that can be used with this unit are as follows To use battery pack a BKP L551 Battery Adaptor and a BC L100 Battery Charger are also required BP L80S BP GL95 Continuous recording time at room temperature BP GL95 lithium ion battery pack 80 minutes 95 minutes when used in power save mode For details on charging battery packs refer to the operation manual for the battery charger Notes about batter...

Страница 33: ... the unit has been set up the settings are retained even when the unit is powered off Use the following procedures 1 Power the unit on The INITIAL SETUP screen appears on the display 2 Turn the PUSH SET S SEL knob to select the area of use Display UC for regions outside Japan or J for Japan and then press the SET function button F5 The system frequency screen appears 3 Turn the PUSH SET S SEL knob...

Страница 34: ...on button F5 The date time and time zone settings are saved and the message NOW SAVING appears 5 If you want to save the settings made up to this point press the SET function button F5 again The message NOW SAVING appears again and the setting screen disappears Then the unit powers itself off and on again To return to the original screen without saving settings Press the RETURN function button F1 ...

Страница 35: ...position 2 all the way out to the return position To fix the front panel return it to position 0 and then pull it out to position 1 or position 2 To return the front panel to its original position Unlock the front panel by pulling it out to the return position You can then return it to position 0 To change the angle of the front panel To change the angle to position 2 from position 1 pull the fron...

Страница 36: ...ehand For details of the network related settings see To change network settings page 153 Connecting this unit directly to a laptop computer Connecting three PDW F1600 or PDW HD1500 units to a laptop computer via a LAN Using the i LINK S400 connector FAM connection The following shows an example of a FAM file access mode connection The PDZ 1 Proxy Browsing Software must be installed in advance The...

Страница 37: ...o the manuals provided with the equipment to be connected See page 39 for more information about editing control unit settings When using an editing control unit Using BVE 700 700A The following figure shows a cut editing system comprising this unit as a player an HDW M2000 M2000P unit as a recorder and a BVE 700 700A as an editing control unit i LINK cable not supplied To S400 connector Laptop co...

Страница 38: ... PLAYER 1 PANEL NETWORK GPI EDL MIXER PLAYER 3 PLAYER 2 PLAYER 1 POWER REMOTE 9P VIDEO CONTROL DC IN 12V AC IN REMOTE ANALOG AUDIO INPUT SDSDI OUTPUT ANALOG AUDIO OUTPUT 1 2 1 2 SUPER 1 2 SUPER 1 2 AUDIO MONITOR R L 1 2 3 4 IN 1 2 3 4 OUT DIGITAL AUDIO AES EBU SD HDSDI INPUT HDSDI OUTPUT 1 2 SUPER COMPOSITE OUTPUT IN REF VIDEO INPUT IN OUT TIME CODE S400 MAINTENANCE HDSDI OUTPUT1 HDSDI OUTPUT 2 SU...

Страница 39: ...er a PDW F1600 unit as a recorder and an RM 280 as an editing controller System frequency VTR CONSTANT 1 2 3 4 5 6 7 8 9 10 11 12 13 14 15 16 59 94i 59 94P 29 97P A0 97 00 96 07 a 07 a 03 80 0A 07 FE 00 80 5A FF 5A 50i 50P 25P A1 97 00 7D 07 a 07 a 03 80 0A 07 FE 00 80 4C FF 4B 23 98P A2 97 00 78 07 a 07 a 03 80 0A 07 FE 00 80 48 FF 48 F1600 System frequency VTR CONSTANT 1 2 3 4 5 6 7 8 9 10 11 12...

Страница 40: ...C IN REMOTE ANALOG AUDIO INPUT SDSDI OUTPUT ANALOG AUDIO OUTPUT 1 2 1 2 SUPER 1 2 SUPER 1 2 AUDIO MONITOR R L 1 2 3 4 IN 1 2 3 4 OUT DIGITAL AUDIO AES EBU HDSDI OUTPUT 1 2 SUPER COMPOSITE OUTPUT IN REF VIDEO INPUT IN OUT TIME CODE S400 MAINTENANCE SD HDSDI INPUT POWER REMOTE 9P VIDEO CONTROL DC IN 12V AC IN REMOTE ANALOG AUDIO INPUT SDSDI OUTPUT ANALOG AUDIO OUTPUT 1 2 1 2 SUPER 1 2 SUPER 1 2 AUDI...

Страница 41: ...IGITAL AUDIO AES EBU HDSDI OUTPUT 1 2 SUPER COMPOSITE OUTPUT IN REF VIDEO INPUT IN OUT TIME CODE S400 MAINTENANCE SD HDSDI INPUT REF VIDEO INPUT REMOTE 1 OUT 9P HDSDI OUTPUT 3 SUPER REMOTE 9P REF VIDEO INPUT REFVIDEO INPUT HDSDI INPUT HDSDI OUTPUT2 SUPER HDSDI OUTPUT1 1 1 1 1 1 2 HD video monitor To HDSDI input connector PDW F1600 or PDW HD1500 this unit player Reference video signal HDW M2000 rec...

Страница 42: ...0P signals set OUT REF on page P6 REF of the function menu item to REF and synchronize the internal reference signal generator of this unit to a reference signal input to the REF VIDEO INPUT connector The following reference signals may be used 720 59 94P system 1080 59 94i tri level sync signal 525 black burst signal 720 50P system 1080 50i tri level sync signal 625 black burst signal When you co...

Страница 43: ... the output of the internal timecode generator initialized to timecode following continuously upon the timecode of the last frame of the last clip on the disc External Regen mode This records the output of the internal timecode generator synchronized to an external timecode generator As the external input the timecode input to any of the following connectors can be selected TIME CODE IN connector ...

Страница 44: ...tings are made in hexadecimal 0 9 A F You can record ID codes in user bits To record timecode that follows sequentially upon the last recorded timecode Internal Regen You can record timecode so that it is continuous from one clip to the next on the disc Set TCG on page P5 TC of the function menu to INT and PRST RGN to TC or VITC When this setting is in force the unit reads the timecode of the last...

Страница 45: ...his method the internal timecode generator advances without being affected by the external timecode To directly record timecode input to the TIME CODE IN connector Input the timecode output of an external device to the TIME CODE IN connector and make the following settings on page P5 TC of the function menu Set TCG to EXT Set PRST RGN to PRESET Superimposed Text Information The video signal output...

Страница 46: ...time data OUT Out point time data DUR Duration between In point and Out point Note Display Operation mode Block A Block B DISC OUT Disc is not loaded LOADING Disc is being loaded UNLOADING Disc is being unloaded STANDBY OFF Standby off mode A B C STANDBY OFF Standby off mode a STOP Stop mode C STOP Stop mode a NEXT xxx Cuing up to the first frame of the next clip PREV xxx Cuing up to the first fra...

Страница 47: ...further Deteriorating laser diodes performance The performance of the laser diodes used in optical heads can worsen with age leading to deteriorating playback conditions For details see Digital hours meter page 159 about this setting Refer to the Maintenance Manual for an approximate guide to when it is time to replace optical heads To prevent playback conditions from deteriorating Pay attention t...

Страница 48: ... displayed switches the page to P8 To clear the function menu from the screen Press the DISPLAY button to switch to the video monitor display To change the setting of a function menu item Use the function buttons To select the value of the setting item Press the button to the left of each setting item to change the value of the item Keep pressing the button until the value you want appears To set ...

Страница 49: ... is flashing turn the PUSH SET S SEL knob to adjust the chroma SETUP signal output level Item Setting F5 HUE CHRM PHS Sets the hue chroma phase PRESET Set the hue chroma phase to a preset value regardless of manual setting Manual setting While the setting value is flashing turn the PUSH SET S SEL knob to adjust the hue chroma phase over the range 30 F6 SETUP BLACK Sets the HD SD output black setup...

Страница 50: ...5 SDI Audio signal embedded into SDI signal ANALOG1 Analog 1 audio signal AES EBU1 Signal input to the DIGITAL AUDIO AES EBU IN 1 2 connectors F4 A6 INPUT Selects the audio input signal to assign to audio channel 6 SDI Audio signal embedded into SDI signal ANALOG2 Analog 2 audio signal AES EBU2 Signal input to the DIGITAL AUDIO AES EBU IN 1 2 connectors F5 A7 INPUT Selects the audio input signal t...

Страница 51: ...n the system frequency is set to 1080 59 94i 1080 29 97P or 720 59 94P presets the timecode of the A frame of the pulldown sequence 24F TC Reference timecode for A frame 30F TC Timecode after pulldown conversion from 24 frame timecode F6 TCR Selects the type of timecode to display in the time data display area TC Display TC VITC Display VITC Item Setting F1 OUT REF Selects the reference signal for...

Страница 52: ...e disc The discs should be handled and stored carefully Do not touch the surface of the disc itself within the cartridge Deliberately opening the shutter may cause damage Do not disassemble the cartridge The supplied adhesive labels are recommended for indexing discs Apply the label in the correct position Storage Do not store discs where they may be subjected to direct sunlight or in other places...

Страница 53: ... the following figure When the EJECT button is pressed during recording recording stops and the disc is ejected If you do not want to eject the disc and stop recording when the EJECT button is pressed during recording set setup menu item 145 MODE KEY ENABLE DURING RECORDING to stop Formatting a disc Unused discs are formatted automatically when they are loaded into this unit To format a recorded d...

Страница 54: ...ne format into another and then start again If a transition point between two clips with different recording formats exists in the preroll segment that segment cannot be edited Frame frequency groups The system frequencies supported by this unit are divided into frame frequency groups as shown in the following table You can record clips with different recording formats for example HD422 and HD420S...

Страница 55: ... 300 clips recording operation is not possible The message MAX Clips appears in the time data display area This unit can record video input signals that are not synchronized to a reference signal However in that case video breakup and audio noise may occur in E E playback During recording do not turn off the POWER switch on the rear panel or disconnect the power cord This could cause the clip bein...

Страница 56: ...nge the setting from clip continuous rec the setting change is enabled after the end of Clip Continuous Rec mode recording 3 Exchange the disc When recording on the current disc ends the disc is ejected Until the next disc is inserted the unit records to its internal cache memory Then after the new disc is inserted it copies the data from the cache to the disc and resumes normal recording Disc exc...

Страница 57: ...e because the HDSDI cable is disconnected or the controlling camcorder is powered off When HDSDI signal input is restored the unit resumes operation according to the embedded REC or STOP command Exchanging discs Even during recording it is possible to eject discs by pressing the EJECT button on the front panel After a disc is exchanged the unit resumes operation according to the embedded REC or ST...

Страница 58: ... not end normally if for example the POWER switch on the rear panel is turned off during recording or if the power cord is disconnected during recording Because the file system is not updated video and audio data recorded in real time is not recognized as files and clip contents recorded up to that point are lost However this unit has salvage functions which can hold losses to the minimum by recon...

Страница 59: ...t a disc that has not been salvaged or power the unit on with such as disc loaded No recording is possible on discs containing clips that have not been salvaged although it is possible to play back the normally recorded sections Recording becomes possible if you perform a quick format but this erases all of the original recorded content To restore clips with a full salvage 1 Insert the disc on whi...

Страница 60: ...gnals from the HDSDI output connectors or other connectors and record them to another disc and then try again HD422 clips recorded with the Interval Rec Picture Cache Disc Exchange Cache or Slow Quick Motion functions HD422 clips that have been partially transferred by an FTP or FAM connection Clips for which disc defects have been detected Clips for which errors have been detected such as when th...

Страница 61: ...xtra mode select extra mode on every PDW F1600 HD1500 that you connect to the editing system Model number Capacity Data transfer rate writing PFD23A 23 3 GB 2 4 times normal PFD50DLA 50 0 GB Note Item Setting Recording format Check the recording format of the clip with the display window see page 24 and select the same format with setup menu item 031 RECORDING FORMAT Audio Non audio data To perfor...

Страница 62: ...the setting and return to the input channel selection screen Press the PUSH SET S SEL knob To exchange input channels For example turn input channel 2 on for recording channel 1 and turn input channel 1 on for recording channel 2 To mix multiple audio input signals For each of the recording channels turn any two input channels on To make sound on sound settings In addition to the input channels al...

Страница 63: ...t with MONITR L and MONITR R on page P2 AUDIO of the function menu Volume adjustment of the monitor audio Adjust with the LEVEL knob Remote local setting Set the remote control switch If you set it to REMOTE also set setup menu item 214 REMOTE INTERFACE RM and the connector used appear on the display see page 133 Clip playback modes You can set the clip playback mode to either of the following Con...

Страница 64: ... 98P matches the system frequency of the unit but the system line settings 1080 or 720 do not match then an FC mark appears and disc playback is cross converted automatically E E output is not cross converted SD up convert function By installing the PDBK S1500 option you can output HD while playing discs recorded as SD HD down convert function You can always output SD while playing discs recorded ...

Страница 65: ...during playback Shot marks cannot be set to a locked clip To set a clip flag You can set one of the three types of flag OK NG or KEEP for the clip while it is being played back by viewing its video image and using the function menu see page 51 Playback in jog mode In jog mode you can control the speed of playback by the speed of turning the jog dial The playback speed range is 1 to 1 times normal ...

Страница 66: ...back in variable speed mode starts 3 To stop playback in variable speed mode return the shuttle dial to the center position or press the STOP button To alternate between normal speed playback and variable speed mode playback Set the shuttle dial to the position corresponding to the desired variable playback speed then switch between normal speed playback and variable speed mode playback by pressin...

Страница 67: ...hapter 4 Recording and Playback See Thumbnail Operations page 76 for more information about thumbnail operations and Scene Selection Clip List Editing page 87 for more information about the scene selection function ...

Страница 68: ... title at the upper left of the screen see page 69 Clip list thumbnail screen displays thumbnails of sub clips in a clip list Clip List is displayed as the title at the upper left of the screen see page 69 There are also two playback screens Clip playback screen playback screen for normal video Clip list playback screen playback screen for clip list video You will use the THUMBNAIL button 1 and th...

Страница 69: ...ISC MENU THUMBNAIL SUB CLIP DISC MENU TCR 00 23 00 26 JOG STILL 001 036 TCR 00 00 18 01 SHUTTLE STILL F0008 003 005 Clip List E0001 002 013 TC 00 00 00 00 TC 00 00 28 08 TC 00 00 59 16 DATE TIME 28 JUL 2006 19 55 TOTAL DUR 00 01 31 16 TC 00 00 04 14 TC 00 00 35 15 TC 00 01 06 18 TC 00 00 12 04 TC 00 00 46 08 TC 00 01 13 11 TC 00 00 20 13 TC 00 00 53 22 TC 00 01 17 27 Clip C0006 006 040 TC 00 23 00...

Страница 70: ... quality Number of audio channels f Clip date and time Displays the date and time when the selected clip was shot and recorded g Duration Displays the duration recording time of the selected clip When multiple clips are selected displays the total recording time of the selected clips A Thumbnail display items a Index picture Displays an image to stand for the content of the clip The index picture ...

Страница 71: ...list Expand thumbnail screen This screen displays thumbnails of equally sized divisions of the selected clip a Selection frame See the description in Clip thumbnail screen page 70 b Clip number total clips number of divisions Displays the number of the selected clip the total number of clips on the disc and the number of times that the selected clip has been divided to display the expansion thumbn...

Страница 72: ... screen displays thumbnails of the specified essence mark found by searching all clips on the disc a Essence mark name Displays the name of the essence mark Shot Mark1 here If the shot mark name has been defined by the user it is enclosed in quotation marks in the display see page 96 b Selection frame See the description in Clip thumbnail screen page 70 c Essence mark number total essence marks Di...

Страница 73: ...ing column are the factory defaults REC NET REMOTE LOCAL VARIABLE KEY INHI PRE SET ON OFF PB PHONES LEVEL SHIFT DISPLAY HOME PAGE EXPAND CHAPTER TOP F REV F FWD END STANDBY REC INHI PREV NEXT PLAY STOP REC THUMBNAIL RETURN PUSH SET S SEL MENU RESET MARK2 MARK1 IN OUT SHTL JOG SUB CLIP DISC MENU VAR JOG EJECT ACCESS CH 1 ALL CH CH 2 CH 3 CH 4 2 1 1 MENU button 2 RESET RETURN button Note Clip thumbn...

Страница 74: ...cending alphabetic order Date Newest First Sort by date and time of creation newest clip list first Sort Planning Metadata by Selects a method to sort the planning metadata Name A Z Sort in ascending alphabetic order Date Newest First Sort by date and time of creation newest planning metadata first Display Title Selects whether to display clip and clip list titles On Title1 title1 Display the titl...

Страница 75: ...Y HOME PAGE EXPAND CHAPTER TOP F REV F FWD END STANDBY REC INHI PREV NEXT PLAY STOP REC THUMBNAIL RETURN PUSH SET S SEL MENU RESET MARK2 MARK1 IN OUT SHTL JOG SUB CLIP DISC MENU VAR JOG EJECT ACCESS CH 1 ALL CH CH 2 CH 3 CH 4 3 2 1 1 SHIFT button 2 SUB CLIP DISC MENU button 3 RESET RETURN button Clip List E0001 002 013 TC 00 00 00 00 TC 00 00 28 08 TC 00 00 59 16 DATE TIME 28 JUL 2006 19 55 TOTAL ...

Страница 76: ...T S SEL knob To skip quickly through thumbnails Skip Scroll function When you have a large number of thumbnails like in expand thumbnail screen you can use the Skip Scroll function to skip through them quickly See page 75 for more information about operations in thumbnail screens 1 In the screens like clip thumbnail screen or expand thumbnail screen display the Thumbnail Menu 2 Select Skip Scroll ...

Страница 77: ...ervals See page 75 for more information about thumbnail screen operations 1 In the clip thumbnail screen select the thumbnail of the clip that contains the scene you want to find 2 Press the EXPAND button The selected clip is divided into 12 blocks and a list appears in the expand thumbnail screen see page 71 with the first frame of each block displayed as a thumbnail 3 Select the thumbnail that y...

Страница 78: ...st the position of shot marks at chapter positions You can use the chapter thumbnail screen to adjust the position of shot marks Shot Mark0 to 9 at chapter positions The positions of Rec Start essence marks cannot be adjusted 1 In the chapter thumbnail screen select the thumbnail of the shot mark whose position you want to adjust 2 Display the Thumbnail Menu 3 Select Move Essence Mark The Move Ess...

Страница 79: ...us or next recording start points The DISPLAY button does not switch to the Rec Start essence mark thumbnail screen from the expand thumbnail screen or the chapter thumbnail screen Playing the scene you have found After finding a clip with one of the methods explained in the previous section Searching with thumbnails see page 77 you can cue up and play the clip that you have found To search for a ...

Страница 80: ...filtering condition to narrow down the filtering results repeat steps 2 to 6 The command name selected in step 4 changes to Filter Clips Narrowing To play selected clips continuously Register all of the filtered clips in an automatically generated clip list and play the clip list 1 Display the Thumbnail Menu in the filter thumbnail screen 2 Select Copy to Clip List and then press the PUSH SET S SE...

Страница 81: ...plays thumbnails as index pictures for clips Normally the index picture is the first frame in a clip but you can set any frame in the clip as the index picture You can only change index pictures from the clip thumbnail screen The thumbnails shown in the clip list thumbnail screen the expand thumbnail screen and the chapter thumbnail screen cannot be changed To select a clip index picture while vie...

Страница 82: ... clip was shot For clips shot using Slow Quick Motion PB Capture where PB is the playback frame rate and Capture is the shooting frame rate TC DUR Timecode of the first frame Recording time Created Date and time of creation Modified Date and time of most recent modification Rec Device Name of device that created clip product number 1 When the unit s area of use UC J MODEL SELECT see page 33 is set...

Страница 83: ...n USB appears 2 Only ASCII characters can be entered from a Japanese keyboard To change the display language font for clip names clip list names and title2 clip titles Select one of the following languages fonts with the Disc Menu item Settings Select Font European Alphabet The keyboard language can be selected with the Disc Menu item Settings USB Keyboard Language see following section Korean The...

Страница 84: ...nter key To discard the edit and then exit the software keyboard On the USB keyboard press the r key or the Tab key to move to Cancel and then press the Enter key To continue editing Press any key except the Enter key the Esc key and the Tab key Setting clip flags You can set three types of clip flags OK NG KP KEEP during recording or playback Setting these flags in each clip that you record makes...

Страница 85: ... step 1 you can also perform a shortcut operation by pressing the STOP button with the SHIFT button held down To lock all clips 1 Display the Disc Menu 2 Select Lock or Delete All Clips and then select Lock All Clips A message appears asking you to confirm locking all clips 3 Select OK to lock all clips or Cancel to cancel it and then press the PUSH SET S SEL knob To unlock a specific clip See pag...

Страница 86: ...mes from the target clip the first frame two intermediate frames and the last frame along with the name title1 date of creation and duration of the clip One of the following messages also appears depending on whether the clip is referenced in a clip list When the clip is not referenced in a clip list Delete Clip When the clip is referenced in a clip list Delete Clip Clip List All clip lists that r...

Страница 87: ...lled a clip list Clip lists have numbers beginning with E for example E0001 Up to 99 clip lists can be saved on a disc Sub clips clips in clip lists Clips or parts of clips that have been added to a clip list are called sub clips Sub clips are virtual editing data that specify ranges in the original clips You can use them without modifying the original data The following figure illustrates the rel...

Страница 88: ...isplay the Thumbnail Menu 3 Select Add Sub Clips and then press the PUSH SET S SEL knob The Add Sub Clip screen appears The clip s selected in step 1 appear in the upper part of this screen and the clip list appears in the lower Scene Selection window The I cursor in the Scene Selection window indicates the location where the currently selected sub clip s will be inserted To display the total dura...

Страница 89: ...location where you want to insert the clip The existing thumbnails arrange themselves to the left and right of the I cursor 6 Press the PUSH SET S SEL knob The sub clips are added at the I cursor position and you return to the clip list thumbnail screen You can check the results of the addition in that screen 7 Repeat steps 1 to 6 as required to add more clips 8 Save the clip list see page 92 In s...

Страница 90: ...e clip list see page 92 To adjust the In and Out points of sub clips trim Proceed as follows to define the range of a scene by changing the positions of the In and Out points See page 75 for more information about thumbnail screen operations 1 In the clip list thumbnail screen select a thumbnail 2 Display the Thumbnail Menu 3 Select Trim Sub Clip and then press the PUSH SET S SEL knob The Clip Lis...

Страница 91: ...GUI screen operations To play using GUI screens 1 In the clip list thumbnail screen select the thumbnail of the sub clip where you want to start play To start play from the start of the clip list Select the thumbnail of the first sub clip 2 Press the PUSH SET S SEL knob To play using the clip list playback screen 1 Display the clip list playback screen 2 Press the PREV button or the NEXT button to...

Страница 92: ... first 3 Select the desired clip list name and then press the PUSH SET S SEL knob To save under the same name The following procedure saves the current clip list under its current name the name that appears in the clip list thumbnail screen See page 75 for more information about thumbnail screen operations 1 In the clip list thumbnail screen display the Disc Menu see page 74 2 Select Save Clip Lis...

Страница 93: ...the clip list thumbnail screen display the Disc Menu 2 Select Delete Clip List and then press the PUSH SET S SEL knob A list of clip lists appears 3 Select the clip list that you want to delete and then press the PUSH SET S SEL knob A message appears asking you to confirm the deletion 4 Select OK and then press the PUSH SET S SEL knob To sort clip lists See page 75 for more information about thumb...

Страница 94: ...ers can be used for the title1 See To edit clip information page 82 for more information about operations Using planning metadata Planning metadata is a file that contains metadata about the clips to be shot and recorded To use planning metadata you will need to save a file in advance in the specified location of a media and insert the media into this unit See Setting clip names by using planning ...

Страница 95: ...ecorded with this planning metadata 1 This can be set as the clip name see page 155 To scroll hidden parts of the string into view When a b or B mark is displayed for an item you can press the B IN or b OUT button to scroll the display by one character for each press The V MARK1 and v MARK2 buttons scroll the beginning and end of the string into view To return to the previous screen Press the PUSH...

Страница 96: ...To prevent inadvertent disc formatting resulting in the loss of recorded data you can disable the Format Disc command See page 75 for more information about GUI information 1 Display the Disc Menu 2 Select Settings and then press the PUSH SET S SEL knob 3 Select Setting Format Disc and then press the PUSH SET S SEL knob 4 Select Disable and then press the PUSH SET S SEL knob Displaying disc and cl...

Страница 97: ... Connections between this unit and a computer by the Live Logging function Disconnected Setting of setup menu item 258 LIVE LOGGING Values other than live view mode off or live mode 2 Display the XDCAM web pages in the browser of your computer see the previous section To display disc properties Click Disc Properties in the Disc menu The disc properties of this unit appear in the Disc Properties pa...

Страница 98: ...oaded to the specified location in your computer FTP download limitations The following limitations apply to FTP download operations They do not apply to HTTP download operations The characters that can be used in the names of clip related data files are single byte letters numbers and symbols However the following symbols cannot be used If you click Cancel in the download dialog or if the downloa...

Страница 99: ...vice or computer The transfer target device XDCAM device or computer must be supplied with stable power and the power must not be turned off during the transfer For battery powered devices the batteries must have sufficient remaining capacity The settings under maintenance menu item M5 NETWORK must be set to values that allow network connections The remote control switch must be set to NET For XDC...

Страница 100: ...hile preserving the UMID of the transfer source clips Check the UMID Unchanged option If the remote host is a computer clips are transferred with the UMID unchanged regardless of this setting To reconnect to a remote host The Reconnect button is enabled if the most recent operation successfully established a connection to a remote host You can select Reconnect and press the PUSH SET S SEL knob to ...

Страница 101: ...ET S SEL knob A software keyboard appears so that you can enter a setting 9 Select Connect and then press the PUSH SET S SEL knob The settings are saved and the Connecting Status screen appears Item Setting Host Name Host name IP Address IP address a Subnet Mask Subnet mask DHCP Setting that specifies whether to acquire the IP address automatically from a DHCP server Enabled Acquire automatically ...

Страница 102: ...tination The name of the file on the transfer source this unit appears in the Original field and the name of the file on the transfer destination appears in the Copy field 1 1 If the clip name is a standard name it is changed to the unused clip name with the smallest number Example If names C0001 to C0020 are in use the name C0021 If the clip name is a user defined name a serial number is appended...

Страница 103: ...less than two seconds it is expanded automatically to two seconds 3 Execute step 2 to 9 of the previous section To upload entire clips Downloading clips Proceed as follows to download clips from a remote host such as other XDCAM device devices or a material server See page 75 for information about thumbnail screen operations 1 Display the Disc Menu 2 Select Download Clip via Direct FTP and then pr...

Страница 104: ...pe screen of the Upload Clips via Direct FTP command appears 8 Press the PUSH SET S SEL knob The Select Remote Host screen appears 9 Select Hosts Discovered via UPnP and then press the PUSH SET S SEL knob The detected connection destination device the PDW HD1500 appears in the Select Host Discovered via UPnP screen 10Press the PUSH SET S SEL knob Detailed information about the connection destinati...

Страница 105: ...il display expand thumbnail screen EXPAND Chapter Thumbnail display chapter thumbnail screen CHAPTER Essence Mark Thumbnail display essence mark thumbnail screen SHIFT THUMBNAIL Add Sub Clip add sub clip SHIFT PUSH SET S SEL knob Delete Clip delete clip SHIFT RESET RETURN Lock Unlock Clip lock or unlock clip SHIFT STOP Set Inpoint set In point B IN PUSH SET S SEL knob Set Outpoint set Out point b ...

Страница 106: ...K IEEE1394 connector on the remote computer using an i LINK cable see page 36 FTP connection Connect the network connectors on this unit and the remote computer using a network cable see page 36 Directory structure The following figure shows the directory structure of discs visible to a remote computer This structure is not the same as the actual structure recorded on the disc a Root directory b O...

Страница 107: ...to recording enabled Root directory a Only when sub item NAMING FORM of setup menu item 036 is set to free b Only files which can be written by XDCAM Continued Note File name Content Operations Read Partial read Write Partial write Rename Create Delete INDEX XML Contains data for management of the material on the disc Yes No No No No ALIAS XML a Contains conversion tables for assigning user define...

Страница 108: ...th a user defined name b Only files which are 2 seconds or longer in length and which can be written by XDCAM c Overwriting is not possible d Multiple files cannot be opened at the same time e Only when sub item NAMING FORM of setup menu item 036 is set to free f Selection and deletion of any specified clip is possible Directories cannot be created in the Component directory Edit directory Notes F...

Страница 109: ... a UTF 8 file names can be up to 63 bytes in length Depending on the character type file names including extension may be limited to 21 characters The following directory operations are possible in the UserData directory Directory creation up to 62 levels including the UserData directory Deletion and renaming of directories General directory a UTF 8 file names can be up to 63 bytes in length Depen...

Страница 110: ...in clips with the same names The automatic title generation function allows you to assign titles to all of the clips on several discs which facilitates clip management For example if the titles TITLE00001 to TITLE00020 are assigned to clips C0001 MXF to C0020 MXF on disc 1 then the titles TITLE00021 to TITLE00037 are assigned to clips C0001 MXF to C0017 MXF on disc 2 Proceed as follows to specify ...

Страница 111: ...nd clip list names The following standard format names are assigned automatically to clips and clip lists that are created or recorded by XDCAM devices Clips C0001 MXF to C9999 MXF Clip lists E0001E01 SMI to E0099E01 SMI This unit can handle clips and clip lists with user defined names as well as names in the standard format Limitations Letters numbers and symbols from the Unicode 2 0 character se...

Страница 112: ...names over file access mode FAM connections page 113 and FTP connections page 116 To check clip names Press the THUMBNAIL button to display the thumbnail screen and select the clip whose name you want to check The name of the selected clip appears at the upper left of the screen See Thumbnail Operations page 76 for more information about the thumbnail screen The item at the upper left of the scree...

Страница 113: ... a disc loaded in this unit put the unit into the following state Recording playback search and other disc operations see page 54 Stopped THUMBNAIL button see page 21 Off Disc access by Lock or Delete All Clips Format Disc and so on in the Disc Menu see page 74 Stopped Unsaved current clip list Save or clear Connections between this unit and a computer by the Live Logging function Disconnected Set...

Страница 114: ...BP2 Device F1600 or HD1500 and click OK Windows XP Sony XDCAM PDW IEEE 1394 SBP2 Device F1600 or HD1500 is deleted from the Hardware devices list Windows Vista A message appears to inform you that you can now safely remove the device from your computer This unit can now resume normal operations The limitations described in Operation limitations during FAM connections no longer apply 4 Disconnect t...

Страница 115: ...by the Live Logging function Disconnected Setting of setup menu item 258 LIVE LOGGING Values other than live view mode off or live mode 2 Connect the i LINK S400 connector on this unit to the i LINK IEEE1394 connector on the remote computer using an i LINK cable see page 36 When a disc is inserted into this unit the remote computer recognizes this unit as a removable disc The following icon appear...

Страница 116: ...h the remote computer is connected see connections illustration on page 36 2 Set the IP address and other network setting items for this unit 1 For details see To change network settings page 153 If network settings have already been made Check the IP address of this unit For details see To check the assigned IP address page 153 1 This unit is able to acquire an IP address automatically from a DHC...

Страница 117: ...odel name pdw f1600 or pdw hd1500 when the unit is shipped from the factory The login is complete when the password is verified See page 117 for the FTP protocol commands supported by this unit If the connection times out This unit terminates FTP connections if no command is received within 90 seconds of the last command If this occurs log out see the next section and repeat steps 2 to 4 If you po...

Страница 118: ...ure default R Record structure P Page structure Input example STRU F MODE Specifies the transfer mode Command syntax MODE SP mode code CRLF mode code can be any of the following However for XDCAM the mode is always S regardless of the mode code specification S Stream mode default B Block mode C Compressed mode Input example MODE S LIST Sends a list of files from this unit to the remote computer Co...

Страница 119: ...nput example STOR Edit E0001E01 SMI RNFR RNTO Rename a file Specify the file to be renamed with the RNFR command and specify the new name with the RNTO command Always follow a RNFR command with a RNTO command For details see File operation restrictions page 107 Command syntax RNFR SP path name before change CRLF RNTO SP path name after change CRLF Input example RNFR General info txt RNTO General c...

Страница 120: ...irectories can be deleted only in the General directory For details see File operation restrictions page 107 Command syntax RMD SP path name CRLF MDTM Acquires the date and time of the most recent modification of the file in the format YYYYMMDDhhmmss YYYY year MM month DD day hh hour mm minute ss second The date and time cannot be acquired in the following cases When the path name includes a wildc...

Страница 121: ... function version For XDCAM sent in a format like 200 MXF DISK 1 200 is a response code Command syntax SITE FUNC CRLF SITE UMMD When a C MXF file is sent with the STOR command the copy source UMID is saved if this command is invoked immediately before the STOR command Command syntax SITE UMMD CRLF SITE DF Acquires the amount of free disc space Command syntax SITE DF CRLF SITE CHMOD Locks and unloc...

Страница 122: ...of the function menu to INT and set PRST RGN to TC Then proceed as follows Continuous timecode cannot be recorded if PRST RGN on page P5 TC of the function menu is set to VITC See Extended menu operations page 146 for more information FAM connection Write clip files to the unit from the computer or other device that is connected to this unit FTP connection Use the STOR command to transfer clip fil...

Страница 123: ...ter the preroll time the text information superimposed on the video output to the monitor the menu banks for retaining menu settings Extended menu This menu is used to make a wide range of settings relating to the functions of this unit for example the control panel functions video and audio control and digital data processing Configuration of the basic menu The basic menu comprises the following ...

Страница 124: ... relating to digital processing page 143 Item group Function Refer to Item number Item name Settings 001 PREROLL TIME 0 s 0 sec 5 s 5 sec 30 s 30 sec Set the preroll time to between 0 and 30 seconds in steps of 1 second A preroll time of at least 5 seconds is recommended when using this unit for editing 002 CHARACTER H POSITION Adjust the horizontal screen position as a hexadecimal value of the te...

Страница 125: ...all enable All buttons and switches are enabled 007 DISC TIMER DISPLAY Determine whether to display the counter in 12 hour mode or 24 hour mode 12H 12H 12 hour mode 24H 24 hour mode 009 CHARACTER TYPE Determine the type of characters such as timecode output from the COMPOSITE OUTPUT 2 SUPER connector the SDSDI OUTPUT 2 SUPER connector or the HDSDI OUTPUT 2 SUPER connector for superimposed display ...

Страница 126: ...layback of the selected clip total number of clips pbr playback remain The remaining playback time of the selected clip from the current playback position hours minutes seconds frames name clip name title The name of the clip that is currently being recorded or played as set in Settings Display Title of the Disc Menu standard name user defined name title or planning metadata name The following cha...

Страница 127: ...itles to recorded clips disable Do not assign titles to clips enable Assign titles to clips 2 PREFIX Set the prefix of the title up to 10 characters The allowable characters are alphanumeric characters symbols _ and the space character TITLE 3 NUMERIC Set the initial value of the numeric part of the title 00001 to 99999 five digit number 00001 036 FILE NAMING Specify whether to allow use of clip a...

Страница 128: ... NEXT button Buttons used to change settings Use the following buttons to change setup menu settings B11 SAVE SETUP BANK 1 Set to on to save current menu settings to menu bank 1 B12 SAVE SETUP BANK 2 Set to on to save current menu settings to menu bank 2 B13 SAVE SETUP BANK 3 Set to on to save current menu settings to menu bank 3 B20 RESET SETUP MENU Set to on to return the settings of the current...

Страница 129: ...s and the system exits the menus To change more than one setting be sure to press the SAVE function button F5 after making the settings To return menu settings to their factory default settings After changing menu settings use the following procedure to return the settings to their factory default settings setting initialization To return a particular setting to its factory default setting In the ...

Страница 130: ... setup menu You can press the UP function button F3 or the DOWN function button F4 to move the mark by 100 menu items 4 Press the PUSH SET S SEL knob A setting screen for the currently selected item appears 5 Turn the PUSH SET S SEL knob to select on or off on Display the item in the setup menu off Do not display the item in the setup menu 6 Press the PUSH SET S SEL knob To continue selecting item...

Страница 131: ... 20 F FWD F REV mode Maximum speed Shuttle mode 20 times normal speed MAX F FWD F REV mode Maximum speed Shuttle mode maximum speed Note Maximum speed is about 50 times normal speed However the maximum speed may vary depending on the state of the clip and the playback position on the disc 105 REFERENCE SYSTEM ALARM Select whether to display a warning when the reference video signal is not being su...

Страница 132: ...he CH 1 ALL CH adjustment knob alone functions as a master control When all is selected the ALL CH indicator under the CH 1 ALL CH adjustment knob lights up 140 AREA MARKER Select whether to display the display area of SD output on the color LCD off Do not display on Display 142 REPEAT MODE Put the unit into repeat playback mode or exit from repeat playback mode off Exits from repeat playback mode...

Страница 133: ...s relating to the remote control interface Item number Item name Settings 201 PARA RUN Select whether to use synchronized operation for two or more VTRs dis disable No synchronized operationena ena enable Use synchronized operation Note To use synchronized operation for two or more VTRs set item 201 to ena on all of the VTRs 212 VIDEO REMOTE CONTROL SELECT a Select whether to control the up conver...

Страница 134: ...ode from a remote control unit connected to the REMOTE 9P connector 2 2 2 to 2 times normal speed wide 2 20 to 2 20 times normal speed 311 F1600 ANALOG AUDIO EDIT PRESET REPLACE FOR CH1 Select methods for setting the edit presets of the digital audio channels CH1 to CH4 of this unit Make these settings when using an editor PVE 500 BVE 600 etc or remote control unit without a function to control di...

Страница 135: ...ng the AUTO EDIT command 9 pin protocol 20 42 from a nonlinear editing system connected to the REMOTE 9P connector on the rear panel Note Linear editing systems follow the settings made on the linear editing systems off Do not record postroll on Records approximately 2 seconds of postroll Menu items in the 300s relating to editing operations Item number Item name Settings Menu items in the 400s re...

Страница 136: ... insert VITC signals in two places To insert in two places set both item 601 and item 602 In 59 94i 59 94P 29 97P mode J output of wide picture information is given priority if OUTPUT in setup menu item 731 is set to auto and the VITC insertion line is set to line 16 In 59 94i 59 94P 29 97P mode UC output of wide picture information is given priority if OUTPUT in setup menu item 731 is set to auto...

Страница 137: ...s the input video signal phase v out video output phase Output the timecode with the same phase as the output video signal phase 612 TC OUTPUT MUTING IN SEARCH MODE Select whether to suppress the output from the TIME CODE OUT connector in jog shuttle mode on Suppress off Do not suppress 618 UPCONV EMBEDDED VITC c Select the source of the VITC embedded into output HDSDI when up converting during pl...

Страница 138: ...H 10 line 12 H 12 line 13 H 13 line 14 H 14 line 15 H 15 line 16 H 16 line 17 H 17 line 18 H 18 line 50i 50P 25P mode 665 ESSENCE MARK HD VANC LINE When item 657 is set to on select the line to which to output essence marks 9H to 17H to 20H 59 94i 50i 29 97P 25P 23 98P mode 9H to 17H to 25H 59 94P 50P mode Note The output VANC line during playback follows the setting for recording 666 METADATA ITE...

Страница 139: ...out half blanking thru throu Switch off blanking 705 EDGE SUBCARRIER REDUCER MODE Select whether to enable the edge subcarrier reducer ESR on Enable off Do not enable When playing back a composite signal set this to on 707 FORCED VERTICAL INTERPOLATION OFF The Y add function is normally switched on automatically during jog or variable speed playback This item selects whether to force the Y add fun...

Страница 140: ...ried out according to these settings Sub Item 1 ALL LINE Specify the blanking for each line separately blnk blank Regardless of the settings of other sub items blank all lines which can be specified in this menu item thru throu Regardless of the settings of other sub items switch blanking off for all lines which can be specified in this menu item 2 10 LINE 12 LINE 20 In 59 94i 59 94P 29 97P mode S...

Страница 141: ...iority if the VITC insertion line is set to line 20 in setup menu item 601 or 602 740 MASTER LEVEL HD Adjust the high definition video signal output from the HDSDI OUTPUT 1 2 SUPER connectors This adjusts the Y PB and PR levels simultaneously 2048 to 0 to 846 741 Y LEVEL HD Adjust the Y level of the high definition video signal output from the HDSDI OUTPUT 1 2 SUPER connectors 2048 to 0 to 846 742...

Страница 142: ...ls 1 and 2 tr1 2 Tracks 1 and 2 assigned to audio output channels 1 and 2 tr3 4 Tracks 3 and 4 assigned to audio output channels 1 and 2 tr5 6 Tracks 5 and 6 assigned to audio output channels 1 and 2 tr7 8 Tracks 7 and 8 assigned to audio output channels 1 and 2 827 AES EBU AUDIO OUTPUT SELECT Select the audio signals to assign to AES EBU audio output channels Sub item 1 CH1 CH2 tr1 2 Tracks 1 and...

Страница 143: ...1600 or PDW HD1500 with the PDBZ UPG02 Software Upgrade Key installed set maintenance menu item M393 AUDIO DSP to AGC limiter When maintenance menu item M393 AUDIO DSP is set to linear edit this item is not displayed This setting is valid only for channels where mic is selected with setup menu item 834 AUDIO INPUT LEVEL Regardless of this setting AGC is off for channels where line is selected 841 ...

Страница 144: ...djust the down converter image enhancer Set the luminance range for edge enhancement 0 to 8 to FH 939 H DETAIL FREQUENCY DC Adjust the down converter image enhancer Set the central frequency for edge enhancement 2 6MHz 3 4MHz 3 9MHz 4 6MHz 940 H V RATIO DC Adjust the down converter image enhancer Set the horizontal vertical ratio for edge enhancement 0 to 3 to 7 942 V FILTER SELECT DC Set the vert...

Страница 145: ... converter image enhancer the threshold amplitude at which low amplitude signals are not emphasized 0 to 8 to FH 957 LEVEL DEPEND THRESHOLD UC a Adjust the up converter image enhancer Set the luminance range for edge enhancement 0 to 8 to FH 958 H DETAIL FREQUENCY UC a Adjust the up converter image enhancer Set the center frequency and frequency properties for edge enhancement 3 2MHz 3 2 MHz 1 1 M...

Страница 146: ... the letter box mode SQUEZ Select the squeeze mode 3 H CROP P When sub item UP CONVERTER MODE of menu item 965 is set to crop adjust the H crop horizontal crop position for up converter output in edge crop mode 120 to 0 to 120 4 L BOX P When sub item UP CONVERTER MODE of menu item 965 is set to l box adjust the vertical location of the position where the picture is cut out for up converter output ...

Страница 147: ...on the video monitor display and Saving appears in the time data display area while the new settings are saved in memory When the saving operation is completed the video monitor display and the time data display area return to their normal indications When you next display the menu and change the item display the extended menu will appear after the basic menu M0 CHECK p MAINTENANCE MENU M1 ADJUST ...

Страница 148: ...ROAV DISPLAY Selects whether or not to display PROAV directory DISABLE Do not display PROAV directory ENABLE Display PROAV directory PC REMOTE Disables or enables a FAM connection ENALBE Enable a FAM connection F KEY SELECT Enable or disable a FAM connection using the function menu M36 HOURS METER RESET Display and reset of the hours meter and the thread counter M37 AUDIO CONFIG M370 HEAD ROOM Sel...

Страница 149: ...ip or sub clip playback start position KEEP Play from the position where playback stopped FORCED TOP Play from the first frame of the first clip or sub clip M393 AUDIO DSP Select the function for which the audio digital signal processor shall be used linear edit Use for linear editing microphone input is disabled a AGC limiter Use for microphone input linear editing is disabled Note It is not poss...

Страница 150: ...t VANC line When a UMID or essence mark line is selected with M3B1 or M3B2 UMID or essence mark output takes priority To disable UMID or essence mark output set setup menu item 651 or 657 to off Sub item 1 LINE Selects the lines for the VANC to be received OFF 9LINE to 20LINE 59 94i 50i 29 97P 25P 23 98P mode OFF 9LINE to 25LINE 59 94P 50P mode 2 DID Specification of the DID of the VANC to receive...

Страница 151: ...ot recall settings from a menu bank from BANK1 Recall settings from menu bank 1 from BANK2 Recall settings from menu bank 2 from BANK3 Recall settings from menu bank 3 from BANK4 Recall settings from menu bank 4 M49 RESET ALL SETUP Reset the current menu settings to the factory settings SAVE function button F5 Reset MENU button Return to the next highest menu level without resetting Notes The syst...

Страница 152: ...munications method AUTO Full Duplex Half Duplex For how to set the communication method see To change network settings page 153 M56 JUMBO FRAME a Set the size of jumbo frames 9014 4088 OFF 1514 Note This value does not include the 4 bytes of the FCS Frame Check Sequence M57 DNS1 Set the address of DNS server 1 000 000 000 000 Notes The address of DNS server 1 cannot be set when DHCP is set to ENAB...

Страница 153: ...to this unit before carrying out the operation Follow the procedure as shown in previous section To change a menu item setting to set maintenance menu item M5 NETWORK M50 DHCP to ENABLE To check the assigned IP address Select maintenance menu item M5 NETWORK M51 IP ADDRESS PRESET If the IP address cannot be assigned this is shown as 000 000 000 000 In this case consult the network administrator To...

Страница 154: ...r network administrator if you have any questions about the proper settings for these items To set the communications speed 1 Select maintenance menu item M5 NETWORK M54 LINK SPEED 2 Press the PUSH SET S SEL knob The communications speeds AUTO 10Mbps 100Mbps and 1000Mbps appear and the arrow flashes 3 Press the PUSH SET S SEL knob or use the v MARK1 or V MARK2 button to select a communications spe...

Страница 155: ...e 95 2 When no UTF 8 format name string is specified the ASCII format name string is registered as the actual clip name By loading a file from one of the following locations into the unit s memory before starting to record you can register the names in the file as clip names There are two ways to load files Automatically load a file that has been written to the following directory on a Professiona...

Страница 156: ...ext recording operation if you reach number 999 Serial numbers are not reset when you power the unit off or exchange discs newly generated numbers are continuous on the old ones If the ASCII format clip name string is longer than 14 characters it is displayed in the viewfinder as the first 8 characters x abbreviated the last 4 characters for a total of 13 characters Setting essence mark names by u...

Страница 157: ...ng to change the existing volume label to the name that you want The software keyboard screen see page 94 PDZ 1 Proxy Browsing Software You can also use the above tools to erase the existing volume label before reading the planning metadata This makes it possible to set a new volume label by reading the planning metadata However the setting is reflected to DISCMETA XML only when recording of the f...

Страница 158: ...ature inside a car with the windows closed can easily exceed 50 C 122 F In damp or dusty locations Locations where the unit may be exposed to rain Locations subject to violent vibration Near strong magnetic fields Close to radio or TV transmitters producing strong electromagnetic fields In direct sunlight or close to heaters for extended periods To prevent electromagnetic interference from portabl...

Страница 159: ... by one optical head in units of hours 1 This can be used as a guide in determining when to replace the optical head 1 The counter advances at different rates during recording and playback It is also affected by the ambient temperature H03 LASER PARAMETER 1 mode not resettable Same as H02 Of the two optical heads this shows a counter of the cumulative light output time by the other optical head in...

Страница 160: ...e cumulative seek operation time for the other optical head in units of hours The count is resettable To display the digital hours meter Press the MENU button to display the setup menu then turn the PUSH SET S SEL knob to display the required item in the time data display area and on the monitor connected to the unit To exit from the digital hours meter Press the RETURN function button F1 to retur...

Страница 161: ...r video section Alarm message in time data display area Alarm message in video monitor screen Description action ADJ Mode THE UNIT IS IN ADJUSTMENT MODE CHECK THE SWITCHES OF S2701 ON THE HPR 23 BOARD AND S1 ON THE VPR 99 BOARD This appears when the unit is in adjustment mode Contact a Sony service representative MENU Ver UP THE SETUP MENU SOFTWARE HAS BEEN UPGRADED SET THE SETUP MENU ITEMS TO THE...

Страница 162: ...recorded on the disc No Support FORMAT NOT SUPPORTED RECORDING AND PLAYBACK IS NOT POSSIBLE A disc in an unsupported recording format is loaded Use a disc in a format supported by this unit ILL Index INDEX FILE ERROR PLEASE FORMAT DISC OR EJECT Format the disc or eject it see page 96 Formatting AUTO FORMATTING IS EXECUTING Wait until the format has been completed and try again FORMAT NG AUTO FORMA...

Страница 163: ...xecute a reverse search when the unit is stopped at the first frame of a clip To move to another clip press the PREV NEXT SHIFT PREV or SHIFT NEXT button or perform a thumbnail search Clip End CLIP END This appears in single clip playback mode if you execute a forward search when the unit is stopped at the last frame of a clip To move to another clip press the PREV NEXT SHIFT PREV or SHIFT NEXT bu...

Страница 164: ...URING RECORDING Stop recording and try again CANNOT EXECUTE IN REC MODE DRIVE MAINTENANCE MENU CANNOT BE EXECUTED WHILE IN REC MODE INPUT SELECTION CANNOT BE CHANGED DURING RECORDING AUDIO REC MODE CANNOT BE CHANGED DURING RECORDING REC PAUSE TC UB CANNOT BE PRESET IN REC PAUSE MODE Stop recording and try again Disc Exchg EXIT DISC EXCHANGE CACHE MODE This appears when you perform one of the follo...

Страница 165: ... LOADING This appears if you press a button while a disc is loading Wait until the disc has finished loading and try again Unloading a UNLOADING This appears if you press a button while a disc is unloading Wait until the disc has finished unloading and try again Clip lock CLIP IS LOCKED UNLOCK CLIP IN THUMBNAIL MENU This appears when an operation is attempted on a locked clip or when an edit prese...

Страница 166: ...NU FROM DATA TO AUDIO This appears when digital audio signals are set to data and an edit preset command is received for individual channels in the audio input channel pairs CH1 2 CH3 4 CH5 6 CH7 8 To perform insert editing of non audio signals always operate on channel pairs If you want to perform insert editing of the audio of individual channels from channel pairs set maintenance menu item M37 ...

Страница 167: ...mory becomes full while performing the disc exchange cache function Change the disc immediately Clip End EDITING ACROSS MULTIPLE CLIPS IS NOT POSSIBLE This appears when an edit across multiple clips is attempted It is not possible to edit across multiple clips Disc Full DISC FULL FOR MORE RECORDING DELETE SOME CLIPS This appears when the free capacity of the disc is exhausted during assemble editi...

Страница 168: ...s Sub Clip does not Exist There are no sub clips in the current clip list This appears when an attempt is made to move trim or delete sub clips or preset timecode Clip List does not Exist There are no clip lists on the disc This appears when an attempt is made to execute a Delete Clip List operation when there are no clip lists on the disc Move is Invalid The sub clip cannot be moved This appear w...

Страница 169: ...set to Save This appears when an attempt is made to format a write protected disc Try formatting the disc after moving the write protect tab away from the Save position The REC Inhibit Mode is Selected Check Function Menu This appears when an attempt was made to format when function menu item HOME F3 REC INH is set to ON Set F3 REC INH to OFF and try formatting again Auto Formatting was not Comple...

Страница 170: ... monitor screen Action 1080 59 94i RECORDING AND PLAYBACK IS NOT POSSIBLE SYSTEM SETTINGS DIFFERENT FROM DISC This appears when the system frequency of the unit differs from that of the loaded disc Insert a disc with the same system frequency as the unit or change the unit s system frequency 1080 29 97P 1080 50i 1080 25P 1080 23 98P 720 59 94P 720 50P 525 59 94i 625 50i 1080 59 94i DISC CANNOT BE ...

Страница 171: ...it or change the audio recording format of this unit 4CH 24 Clip 2CH 16 Clip System FREQ RECORDING AND PLAYBACK IS NOT POSSIBLE SYSTEM FREQUENCY SELECTION DIFFER FROM IT ON DISC This appears when mixed format recording mode is disabled and the system frequency setting of this unit does not match the system frequency of voice over clips on the inserted disc Insert a disc with a system frequency tha...

Страница 172: ...2 396 mm 8 3 8 5 1 4 15 5 8 inches Mass 6 5 kg 14 lb 5 oz Power requirements 100 V to 240 V AC 50 60 Hz 12 V DC Power consumption AC operation 80 W DC operation 65 W Power saving mode 55 W Peak inrush current 1 Power ON current probe method 45 A 240 V 18 A 100 V 2 Hot switching inrush current measured in accordance with European standard EN55103 1 11 A 230 V Operating temperature 5ºC to 40ºC 41ºF ...

Страница 173: ... dB or more Y C delay 20 ns or less K factor K2T 1 0 or less Processor adjustment range Video level to 3 dB Chroma level to 3 dB Set up black level 30 IRE 210 mV Chroma phase 30 System phase SYNC 15 µs SC 0 to 400 ns Audio performance Sampling frequency 48 kHz Quantization 24 bits Headroom 20 18 16 12 dB selectable Frequency response 20 Hz to 20 kHz 0 5 1 0 dB 0 dB at 1 kHz Dynamic range 90 dB or ...

Страница 174: ...51 812 41 125 V 10 A about 2 4 m For the customers in the United Kingdom Part number 1 777 823 12 250 V 10 A about 2 0 m For the customers in European countries other than the United Kingdom Part number 1 551 631 61 250 V 10 A about 2 0 m RCC G5 9 pin Remote Control Cable RM 280 Remote Edit Controller PFD23A Professional Disc PFD50DLA Dual layer Professional Disc BP L80S Battery Pack BP GL95 Batte...

Страница 175: ...st 1 GHz installed memory at least 512 MB Operating system Microsoft Windows XP Professional SP3 or higher Microsoft Windows Vista Business Ultimate 32 bit 64 bit SP2 or higher or Microsoft Windows 7 Professional Ultimate 32 bit 64 bit Web browser Internet Explorer 6 0 SP1 or higher DirectX DirectX 8 1b or higher To install PDZ 1 Insert the supplied XDCAM Application Software CD ROM into the CD RO...

Страница 176: ... table in ISO 3166 and set the organization code and user code according to the guidelines of your organization For details see Setting UMID ownership information page 177 Functions of UMID data UMID data enables the following Addition of a globally unique ID to every clip of audio visual material The unique ID is used to detect the material source and to link it with the original source material ...

Страница 177: ...he values defined in ISO 3166 1 There are about 240 country codes Find your own country code on the following web page Refer to ISO 3166 1 http www iso org iso country codes iso_3166_code_lists htm When the country code is less than 4 bytes the active part of the code occupies the first part of the 4 bytes and the remainder must be filled with the space character 20h Example Japan For Japan the co...

Страница 178: ... line for the VANC to be received 9LINE example DID data identification word 61h SDID secondary data identification word 01h V INPUT on function menu page P1 VIDEO SDSDI Setup menu item 031 RECORDING FORMAT HD422 420HQ or 420SP VANC packets The Japanese ARIB TR B23 standard limits the number of packets that can be multiplexed into HDSDI to 4 packets per line The number of VANC packets that can be ...

Страница 179: ...d caption data in SDSDI line 21 signals are recorded and played back output as SDSDI or composite signals regardless of menu settings Recording and playback after EIA 608t708 conversion In response to closed caption input data that complies with the EIA 608 standard record play and output that data after conversion to EIA 708 format However settings are required for recording of EIA 608 standard c...

Страница 180: ... with the EIA 608 standard record play and output that data after conversion to EIA 708 format By performing down convert playback you can also play and output EIA 608 standard closed caption data However settings are required for output of EIA 608 standard closed caption data by down convert playback For details see To record and playback EIA 708 B standard closed caption data in HDSDI signals pa...

Страница 181: ... closed caption data and down convert playback When you cross convert and play 1080 or 720 clips EIA 708 compliant closed caption data recorded in the clips is played and output with no changes By performing down convert playback you can also play and output EIA 608 standard closed caption data However settings are required for output of EIA 708 standard closed caption data For details see To reco...

Страница 182: ...yed after cross conversion EIA 608 standard closed caption data recorded in the clips is played and output without conversion By performing down convert playback you can also play and output EIA 608 standard closed caption data However settings are required for output of EIA 608 standard closed caption data For details see To record and playback EIA 708 B standard closed caption data in HDSDI sign...

Страница 183: ... convert and playback Down convert playback Down convert playback HDSDI VANC output 1080 playback SDSDI line 21 output Composite line 21 output HDSDI VANC output 720 playback SDSDI line 21 output Composite line 21 output Internal processing by this unit ...

Страница 184: ...b LEVEL HD a HD Pr 743 Pr LEVEL HD a HD Setup 745 SETUP LEVEL HD a HD Sync Phase 746 SYNC PHASE HD UC a HD Fine 747 FINE HD UC a D1 Master No menu item corresponds to this setting item D1 Y No menu item corresponds to this setting item D1 B Y No menu item corresponds to this setting item D1 R Y No menu item corresponds to this setting item D2 VIDEO 715 VIDEO GAIN CONTROL DC SD a D2 CHROMA 716 CHRO...

Страница 185: ... and symbols supported by the keyboards listed below Select the corresponding language by selecting Settings Select USB Keyboard Language in the Disc Menu see page 83 1 When the font setting is Simplified Chinese or Traditional Chinese a keyboard with the same layout as the English United States keyboard is selected automatically English United Kingdom English United States French France German Ge...

Страница 186: ...n Italy Polish Programmers Poland Russian Russia Spanish Spain When the area of use is set to UC and the font setting is Korean The keyboard is fixed as the Korean keyboard and you can enter Hangul characters The keyboard language cannot be changed Note ...

Страница 187: ...rted USB Keyboards Appendix When the area of use is set to J The keyboard is fixed as the Japanese keyboard The keyboard language cannot be changed It is not possible to enter Japanese hiragana katakana and kanji Notes ...

Страница 188: ...2 video information such as DVD movie which are sold distributed to general consumers Disc replicators or sellers of the PACKAGED MEDIA need to obtain licenses for their own business from MPEG LA Please contact MPEG LA for any further information MPEG LA L L C 250 STEELE STREET SUITE 300 DENVER COLORADO 80206 http www mpegla com About IJG Independent JPEG Group This software is based in part on th...

Страница 189: ...urce code must retain the above copyright notice this list of conditions and the following disclaimer Redistributions in binary form must reproduce the above copyright notice this list of conditions and the following disclaimer in the documentation and or other materials provided with the distribution The name of Cambridge Broadband Ltd may not be used to endorse or promote products derived from t...

Страница 190: ...SE ARE DISCLAIMED IN NO EVENT SHALL THE COPYRIGHT HOLDERS OR CONTRIBUTORS BE LIABLE FOR ANY DIRECT INDIRECT INCIDENTAL SPECIAL EXEMPLARY OR CONSEQUENTIAL DAMAGES INCLUDING BUT NOT LIMITED TO PROCUREMENT OF SUBSTITUTE GOODS OR SERVICES LOSS OF USE DATA OR PROFITS OR BUSINESS INTERRUPTION HOWEVER CAUSED AND ON ANY THEORY OF LIABILITY WHETHER IN CONTRACT STRICT LIABILITY OR TORT INCLUDING NEGLIGENCE ...

Страница 191: ...THER IN CONTRACT STRICT LIABILITY OR TORT INCLUDING NEGLIGENCE OR OTHERWISE ARISING IN ANY WAY OUT OF THE USE OF THIS SOFTWARE EVEN IF ADVISED OF THE POSSIBILITY OF SUCH DAMAGE About libupnp Copyright c 2000 2003 Intel Corporation All rights reserved Redistribution and use in source and binary forms with or without modification are permitted provided that the following conditions are met Redistrib...

Страница 192: ...e Pro MPEG Forum Equipment from different manufacturers can exchange files in this format Non audio General term for audio signals other than linear PCM such as Dolby E 1 and Dolby Digital AC 3 1 XDCAM can record non audio as an input signal 1 Dolby is a trademark of Dolby Laboratories Non drop frame mode A mode of advancing timecode which ignores the difference in frame values between real time a...

Страница 193: ...r can use to record such information as date reel number or scene number on video tape or disc Also called user s bits VBID Video Blanking ID This is a video ID signal defined in the EIAJ CPR 1204 standard which is inserted into VBS video output to enable the aspect ratio to be detected The ID signal is inserted into line 20 VBI 283 ...

Страница 194: ...3 thumbnail screen 68 71 Clip Properties screen 82 Closed caption data 179 Command list 117 Communications speed 154 COMPOSITE OUTPUT 1 2 SUPER connectors 29 Connections 36 cut editing system 37 editing control unit settings 39 FAM connection 36 for pool coverage 41 for using PDZ 1 36 FTP connection 36 using the editing function of recorder 41 Current clip list 87 D Date time setting 34 DC IN 12V ...

Страница 195: ...hanging 81 Initial Setup 33 J Jog dial 19 mode 65 Jog shuttle transport indicators 19 K KEY INHI switch 18 L LEVEL adjustment knob 18 Linear editing 60 Live Logging function 58 Loading unloading disc 53 M Maintenance periodic 159 MAINTENANCE connector 29 Maintenance menu 148 communication speed 154 items 148 network settings 153 operations 152 MARK1 MARK2 buttons 19 Menu bank setting 127 changing ...

Страница 196: ...ng 90 trimming 90 Superimposed text information 45 Supplying power 32 AC power supply 32 Battery power supply 32 DC power supply 32 Synchronization reference signals 42 System frequency setting 34 System information 25 T Text information 45 THUMBNAIL button 68 indicator 21 68 Thumbnail display items 70 operations 76 selecting 76 selecting information displayed 81 selecting multiple thumbnails 77 T...

Страница 197: ... for use by the purchasers of the equipment described in this manual Sony Corporation expressly prohibits the duplication of any portion of this manual or the use thereof for any purpose other than the operation or maintenance of the equipment described in this manual without the express written permission of Sony Corporation ...

Страница 198: ...PDW F1600 PDW HD1500 SYL 3 282 295 07 1 Sony Corporation Printed on recycled paper Printed in Japan 2010 03 32 2008 ...

Отзывы: