background image

Getting Started

11

-EN

EN

R

L

IN

OUT

VIDEO 1

VIDEO 3 VIDEO 4 VIDEO 5 SELECT AUDIO AUDIO

(

VAR

)

(

FIX

)

S VIDEO

VIDEO

AUDIO

(MONO)

L

R

20W(NOM)
40W(MAX)16

IN

OUT

CONTROL S

CENTER SPEAKER IN

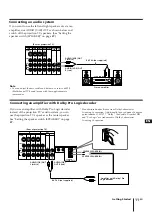
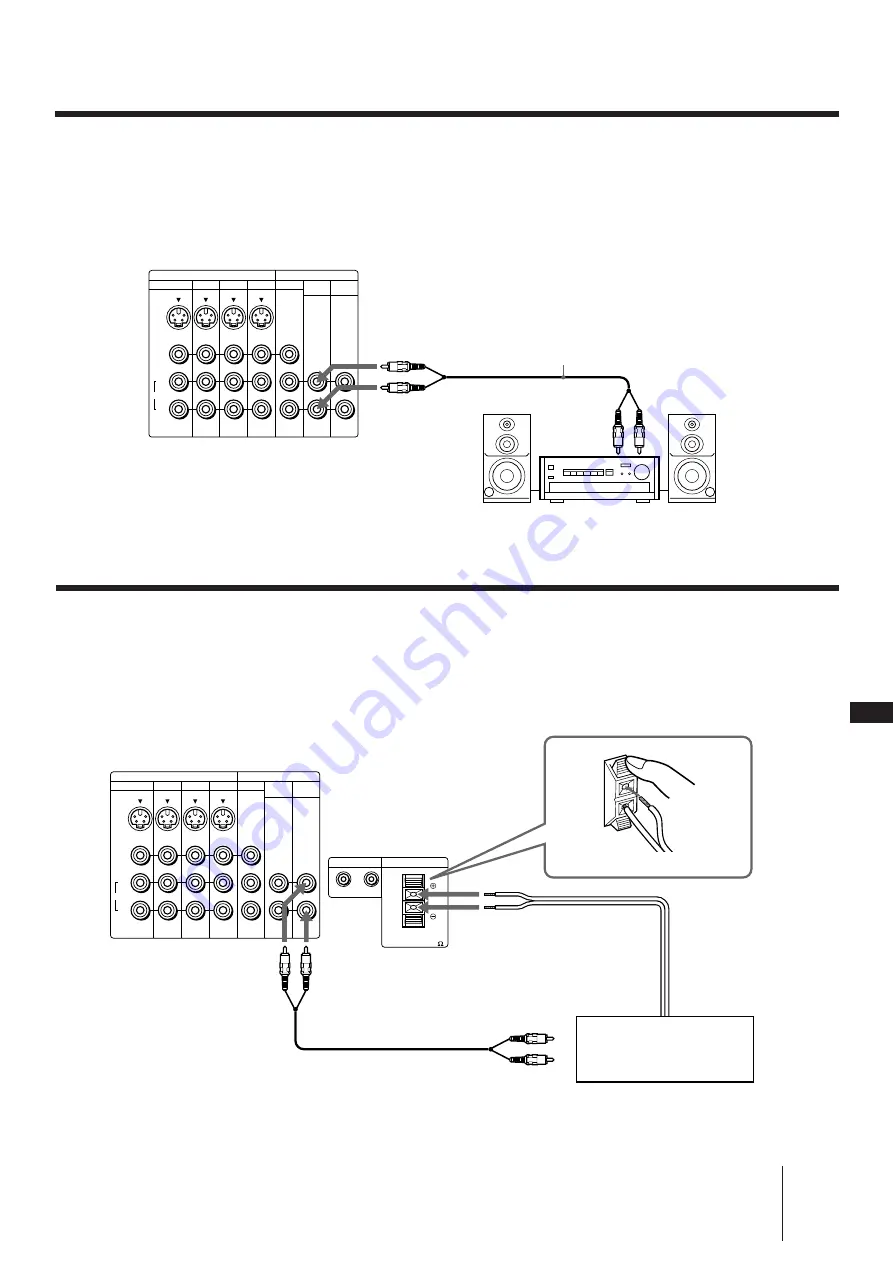
Connecting an audio system

If you want to use the left and right speakers of a stereo
amplifier, use AUDIO (VAR) OUT as shown below and
switch off the projection TV speakers. (See “Setting the
speaker switch (SPEAKER)” on page 

27

.)

AUDIO (VAR) OUT
R (red)

AUDIO (VAR) OUT
L (white)

RK-74A (not supplied)

Note

• You can adjust the bass, treble and balance, or select an MTS

(Multichannel TV Sound) mode with the supplied remote
commander.

If you use an amplifier with Dolby Pro Logic decoder
instead of the projection TV’s audio system, you can
use the projection TV’s speaker as the center speaker.
See “Setting the speaker switch (SPEAKER)” on page

27

.

* Manufactured under license from Dolby Laboratories

Licensing Corporation.  Additionally licensed under Canadian
patent number 1,037,877. “Dolby,” the double-D symbol 

a

and “Pro Logic” are trademarks of Dolby Laboratories
Licensing Corporation.

AUDIO (FIX)
OUT R (red)

CENTER SPEAKER IN 

Amplifier with Dolby* Pro

Logic decoder

RK-74A (not supplied)

R

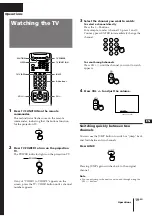
L

IN

OUT

VIDEO 1

VIDEO 3 VIDEO 4 VIDEO 5 SELECT AUDIO AUDIO

(

VAR

)

(

FIX

)

S VIDEO

VIDEO

AUDIO

(MONO)

L

R

(Rear of projection TV)

Stereo amplifier

Line input

Connecting an amplifier with Dolby Pro Logic decoder

CENTER SPEAKER IN +

(Rear of projection TV)

AUDIO (FIX) OUT
L (white)

Содержание KP-53XBR4CT

Страница 1: ...3 858 079 11 1 1996 by Sony Corporation KP 53XBR4CT Color Rear Video Projector EN ES Operating Instructions Manual de instrucciones ...

Страница 2: ...ines for proper grounding and in particular specifies that the cable ground shall be connected to the grounding system of the building as close to the point of cable entry as practical Use of this television receiver for other than private viewing of programs broadcast on UHF or VHF or transmitted by cable companies for the use of the general public may require authorization from the broadcaster c...

Страница 3: ...hannels FAVORITE CHANNEL 36 Selecting a favorite channel 37 Selecting a VCR input directly DIRECT PLAY 37 Customizing the pointer CUSTOMIZED POINTER 38 Displaying Caption Vision XDS CAPTION VISION XDS 40 Operating video equipment 41 Operating a cable box or DBS receiver 42 Operating non preprogrammed equipment Learning function Additional Information 43 Troubleshooting 45 Specifications 46 Index T...

Страница 4: ...precautions below Safety Operate the projection TV only on 120 V AC One blade of the plug is wider than the other for safety purposes and will fit into the power outlet only one way If you are unable to insert the plug fully into the outlet contact your dealer Should any liquid or solid object fall into the cabinet unplug the projection TV and have it checked by qualified personnel before operatin...

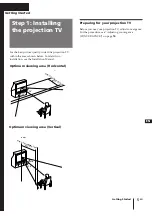
Страница 5: ...g Started For the best picture quality install the projection TV within the areas shown below For details on installation see the Installation Manual Optimum viewing area Horizontal Step 1 Installing the projection TV Preparing for your projection TV Before you use your projection TV adjust convergence For the procedure see Adjusting convergence CONVERGENCE on page 16 ...

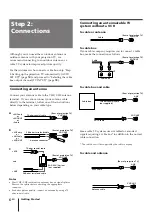
Страница 6: ...ut channel TV INPUT page 18 Connecting an antenna Connect your antenna cable to the VHF UHF antenna terminal If you cannot connect your antenna cable directly to the terminal follow one of the instructions below depending on your cable type OUT IN Cable Cable box 75 ohm coaxial cable VHF only or VHF UHF or Cable A Rear of projection TV VHF UHF Rear of projection TV VHF UHF Rear of projection TV VH...

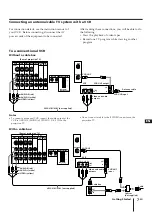
Страница 7: ... the S VIDEO connector on the projection TV IN OUT R L IN OUT CONTROL S 20W NOM 40W MAX 16 CENTER SPEAKER IN VIDEO 1 VIDEO 3 VIDEO 4 VIDEO 5 SELECT AUDIO AUDIO VAR FIX S VIDEO VIDEO AUDIO MONO L R AUX VHF UHF AUDIO VIDEO LINE OUT OUT IN AUDIO R red AUDIO L white VIDEO yellow VMC 810S 820S not supplied VHF UHF VCR VHF UHF output Video and audio outputs VHF UHF input Antenna cable Rear of projection...

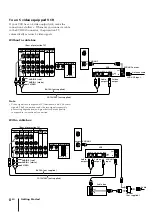
Страница 8: ...ignals separately preventing degradation and gives better picture quality compared to conventional connection With a cable box To an S video equipped VCR If your VCR has an S video output jack make the connection as follows Whenever you connect a cable to the S VIDEO connector the projection TV automatically receives S video signals Without a cable box VHF UHF RK 74A not supplied Audio outputs AUD...

Страница 9: ... Satellite antenna input R L 20W NOM 40W MAX 16 IN OUT IN OUT CONTROL S CENTER SPEAKER IN VIDEO 1 VIDEO 3 VIDEO 4 VIDEO 5 SELECT AUDIO AUDIO VAR FIX S VIDEO VIDEO AUDIO MONO L R AUX VHF UHF IN S VIDEO OUT AUDIO VIDEO LINE OUT VHF UHF S VIDEO OUT AUDIO VIDEO LINE OUT IN VHF UHF LINE IN Rear of projection TV AUDIO R red AUDIO L white VIDEO yellow VMC 810S 820S not supplied Antenna VCR DBS receiver V...

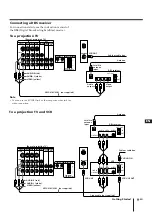
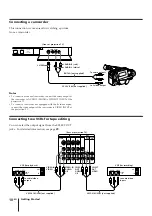
Страница 10: ...IO L R R L IN OUT VIDEO 1 VIDEO 3 VIDEO 4 VIDEO 5 SELECT AUDIO AUDIO VAR FIX S VIDEO VIDEO AUDIO MONO L R AUDIO VIDEO LINE OUT OUT IN AUDIO VIDEO OUT IN LINE IN Connecting a camcorder Connecting two VCRs for tape editing You can select the output signal from the SELECT OUT jacks For detailed information see page 29 VMC 810S 820S not supplied to audio video inputs to audio video outputs VMC 810S 82...

Страница 11: ...use an amplifier with Dolby Pro Logic decoder instead of the projection TV s audio system you can use the projection TV s speaker as the center speaker See Setting the speaker switch SPEAKER on page 27 Manufactured under license from Dolby Laboratories Licensing Corporation Additionally licensed under Canadian patent number 1 037 877 Dolby the double D symbol a and Pro Logic are trademarks of Dolb...

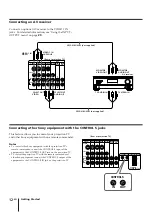
Страница 12: ...ommander Notes To control other Sony equipment with the projection TV s remote commander connect the CONTROL S input of the equipment to the CONTROL S OUT jack on the projection TV To control the projection TV with the remote commander of other Sony equipment connect the CONTROL S output of the equipment to the CONTROL S IN jack on the projection TV VMC 810S 820S not supplied Rear of projection TV...

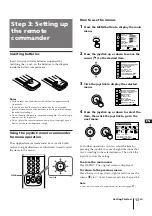
Страница 13: ...ing the and on the batteries to the diagram inside the battery compartment Notes With normal use the batteries should last for approximately six months If you do not use the remote commander for an extended period of time remove the batteries to avoid possible damage from battery leakage Do not handle the remote commander roughly Do not drop it step on it or let it get wet Do not place the remote ...

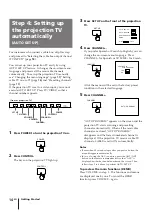
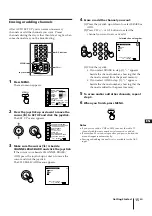
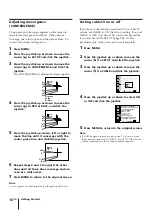
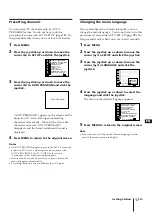
Страница 14: ...language 5 Press CHANNEL AUTO PROGRAM appears on the screen and the projection TV starts scanning and presetting channels automatically When all the receivable channels are stored AUTO PROGRAM disappears and the lowest numbered channel is displayed If the projection TV receives cable TV channels CABLE is set to ON automatically Notes If more than 90 seconds elapse after you press a button the menu...

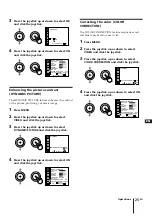
Страница 15: ...URE HUE COLOR BRIGHT SHARP TRINITONE HIGH NR OFF DYNAMIC PICTURE MODE STANDARD COLOR CORRECTION RESET OFF OFF INPUT OUTPUT 0 9 buttons CH MENU Joystick Use RETURN Exit MENU ERASE ADD CH ERASE ADD 23 Select the channel 4 Erase or add the channel you want 1 Press the joystick up or down to select ERASE or ADD 2 Press CH or 0 9 buttons to select the channel you want to erase or add 3 Click the joysti...

Страница 16: ...cable TV on or off If you have connected the projection TV to a cable TV system set CABLE to ON the factory setting If not set CABLE to OFF You do not have to do this procedure if you execute AUTO SET UP page 14 Do this procedure only when you want to set it manually 1 Press MENU 2 Press the joystick up or down to move the cursor to SET UP and click the joystick 3 Press the joystick up or down to ...

Страница 17: ...reen and the projection TV starts scanning and presetting channels automatically When all the receivable channels are stored AUTO PROGRAM disappears and the lowest numbered channel is displayed 4 Press MENU to return to the original screen Notes If AUTO PROGRAM appears in grey in the SET UP menu the projection TV is set to a video input and you cannot select AUTO PROGRAM Press TV VIDEO on the remo...

Страница 18: ...en you use a cable box 1 Press MENU 2 Press the joystick up or down to select SET UP and click the joystick 3 Press the joystick up or down to select TV INPUT and click the joystick The cable box output channel options are displayed 4 Press the joystick up or down to select the cable box output channel and click the joystick You can select the cable output channel among 2 6 channels VIDEO 1 and AU...

Страница 19: ...channel directly Press the 0 9 buttons For example to select channel 10 press 1 and 0 You may press ENTER to immediately change the channel To scan through channels Press CH until the channel you want to watch appears 4 Press VOL to adjust the volume Switching quickly between two channels You can use the JUMP button to switch or jump back and forth between two channels Press JUMP Pressing JUMP aga...

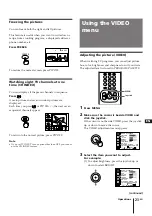
Страница 20: ...ption Vision will be displayed on the screen if the broadcaster offers this service See page 38 for selecting Caption Vision To cancel the display press DISPLAY repeatedly until DISPLAY OFF appears DISPLAY OFF goes off after three seconds Freezing the picture You can freeze the picture Press FREEZE This feature is useful when you want to write down a recipe from a cooking program a displayed addre...

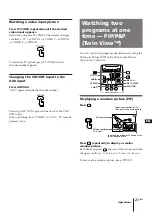
Страница 21: ...DEO to AUX TV must be pressed twice ANT AUX TV VIDEO You can watch two programs simultaneously using the Picture in Picture PIP or the Picture and Picture Twin View feature Displaying a window picture PIP Press Press repeatedly to display a smaller window picture Each time you press the size of the window picture changes as follows 1 4 size n 1 9 size n 1 16 size To remove the window picture press...

Страница 22: ...ress PIP CH 6 6 Left picture Right picture Input source mode or TV channel for the left picture Input source mode or TV channel for the right picture TV VIDEO VIDEO 1 6 6 VIDEO 1 7 VIDEO 1 CH Listening to the sound of the window left picture Press AUDIO appears for a few seconds on the window left picture indicating that the window left picture sound is being received To restore the main right pic...

Страница 23: ...2 salt 1 2 butter 1 Adjusting the picture VIDEO When watching TV programs you can adjust picture hue color brightness and sharpness to suit your taste The adjusted level is stored in PROGRAM PALETTE 1 Press MENU 2 Make sure the cursor is beside VIDEO and click the joystick If the cursor is not beside VIDEO press the joystick up or down to move the cursor The VIDEO adjustment menu appears 3 Select ...

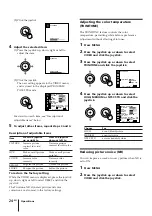
Страница 24: ...ease color intensity Brighten the picture Sharpen the picture Press the joystick down or left to Decrease picture contrast for soft color Make overall picture purplish Decrease color intensity Darken the picture Soften the picture Adjusting the color temperature TRINITONE The TRINITONE feature controls the color temperature permitting white balance preference adjustment without affecting skin tone...

Страница 25: ...OFF OFF INPUT OUTPUT TRINITONE HIGH SET UP VIDEO AUDIO TIMER Use RETURN Exit MENU PROG PALETTE STANDARD DYNAMIC PICTURE ON OFF INPUT OUTPUT SET UP VIDEO AUDIO TIMER Use RETURN Exit MENU PROG PALETTE PICTURE HUE COLOR BRIGHT SHARP NR OFF DYNAMIC PICTURE MODE STANDARD COLOR CORRECTION RESET ON OFF INPUT OUTPUT TRINITONE MEDIUM Correcting the color COLOR CORRECTION The COLOR CORRECTION feature emphas...

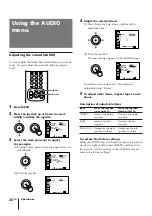
Страница 26: ...N SPEAKER ON RESET Use INPUT OUTPUT SET UP VIDEO AUDIO TIMER RETURN Exit MENU PROG PALETTE TREBLE BASS BALANCE MTS MAIN SPEAKER ON RESET Use INPUT OUTPUT Using the AUDIO menu 2 5 8 0 1 4 7 3 6 9 MENU Joystick 4 Adjust the selected item 1 Press the joystick up down right or left to adjust the item 2 Click the joystick The new setting appears in the AUDIO menu For details on each item see Descriptio...

Страница 27: ...SAP when available The initial setting is stereo sound MAIN 1 Press MENU 2 Press the joystick up or down to select AUDIO and click the joystick 3 Press the joystick up or down to select MTS and click the joystick 4 Press the joystick up or down to select MAIN SAP or MONO and click the joystick Choose To MAIN Listen to stereo sound The STEREO indicator on the projection TV lights up while a stereo ...

Страница 28: ...ccording to the steps 3 to 5 in Adjusting the picture on page 23 To restore the factory setting While the VIDEO menu is displayed press the joystick up down right or left to select RESET and click the joystick Item Picture effect STANDARD Standard MOVIE Finely detailed picture SPORTS Vivid bright picture NEWS Reduced noise in picture GAME Softer picture SET UP VIDEO AUDIO TIMER Use RETURN Exit MEN...

Страница 29: ... select EDIT OUT 1 Press the joystick up or down to select EDIT OUT and click the joystick 2 Press the joystick up or down to select the input to be edited and click the joystick To select TV OUT 1 Press the joystick up or down to select TV OUT and click the joystick Set up using only VIDEO1 input appears 2 If you connect only an AV receiver to your projection TV press the joystick up or down to s...

Страница 30: ...UP VIDEO AUDIO TIMER PROG PALETTE VIDEO LABEL RETURN Exit MENU Use VIDEO 2 VIDEO 1 VIDEO 2 VIDEO 3 VIDEO 4 VIDEO 5 VHS 8mm BETA LD S VIDEO Hi 8 DBS INPUT OUTPUT AVRECEIVER SET UP VIDEO AUDIO TIMER PROG PALETTE VIDEO LABEL RETURN Exit MENU Use VIDEO 1 VIDEO 1 VIDEO 2 VIDEO 3 VIDEO 4 VIDEO 5 VHS 8mm BETA LD S VIDEO Hi 8 AVRECEIVER DBS INPUT OUTPUT Using the TIMER menu Setting the clock CURRENT TIME ...

Страница 31: ...OG PALETTE DS TIME YES MON INPUT OUTPUT CURRENT TIME 1 15 PM RESET Set the day SET UP VIDEO AUDIO TIMER Use RETURN Exit MENU PROG PALETTE DS TIME NO MON INPUT OUTPUT CURRENT TIME 1 25 PM RESET YES NO NONE To correct the time While the CURRENT TIME menu is displayed press the joystick up down right or left to select RESET and then click the joystick To display the current time on the projection TV ...

Страница 32: ...o turn the projection TV on and off ON OFF TIMER You can set the projection TV to turn on and off at the time you specify Make sure the clock is set correctly If it is not set the clock first page 30 1 Press MENU 2 Press the joystick up or down to select TIMER and click the joystick 3 Press the joystick up or down to select ON OFF TIMER and click the joystick 4 Enter the ON OFF TIMER setting 1 Pre...

Страница 33: ...rogram INPUT OUTPUT ON OFF TIMER 1 05 PM RESET MONDAY 4h CH 23 12AM 12PM 12AM 6 6 2 12 00 AM RESET SUN SAT 0h CH 12AM 12PM 12AM 6 6 EVERY EVERY 0 SET UP VIDEO AUDIO TIMER Use RETURN Exit MENU PROG PALETTE Select the channel INPUT OUTPUT ON OFF TIMER 1 05 PM MONDAY 4h CH 0 12AM 12PM 12AM 6 6 12 00 AM RESET SUN SAT 0h CH 12AM 12PM 12AM 6 6 2 EVERY EVERY 0 Blocking out a channel CHANNEL BLOCK This fe...

Страница 34: ...2AM 6 6 RESET SUN SAT 2 EVERY EVERY CHANNEL BLOCK MONDAY Set the duration CH 0 12 00 AM 0h 12AM 12PM 12AM 6 6 SET UP VIDEO AUDIO TIMER Use RETURN Exit MENU PROG PALETTE 1 Select a program INPUT OUTPUT CHANNEL BLOCK RESET SUN SAT CH 23 2 RESET SUN SAT EVERY EVERY 2h 10 00 PM 12AM 12PM 12AM 6 6 CH 0 12 00 AM 0h 12AM 12PM 12AM 6 6 Customizing the channel names CH CAPTION LOGO You can add a caption to...

Страница 35: ...etter Use RETURN Exit MENU CH CAPTION LOGO Use 0 9 to select the channel 19 LOGO CAPTION RESET A M B C D E F G H I J K L M N O P Q R S T U V W X Y Z 0 1 2 3 4 5 6 7 8 9 _ Select the 2st letter 4 Repeat steps 2 and 3 to select the remaining letters If you select fewer than three letters move the cursor to after entering the letters and click the joystick 6 Repeat steps 4 and 5 to caption other chan...

Страница 36: ...TE CHANNEL RETURN Exit MENU Use Select a position 2 FAVORITE CHANNEL RETURN Exit MENU Use 23 Select a position FAVORITE CHANNEL RETURN Exit MENU Use Select the channel 2 6 Repeat steps 4 and 5 to set other favorite channels Note If you set TV INPUT to any option other than OFF you cannot use the FAVORITE CHANNEL feature Selecting a favorite channel After you set your favorite channels you can sele...

Страница 37: ...ired cursor pointer from among eight different designs and or colors 1 Press MENU 2 Press the joystick up or down to select SET UP and click the joystick 3 Press the joystick up or down to select CUSTOMIZED POINTER and click the joystick 4 Press the joystick in any of eight directions to select the desired cursor and click the joystick SET UP VIDEO AUDIO TIMER Use RETURN Exit MENU PROG PALETTE INP...

Страница 38: ...ick 3 Press the joystick up or down to select the caption type and click the joystick The selected caption type is colored green Displaying Caption Vision XDS CAPTION VISION XDS To display Caption Vision Press DISPLAY See page 20 for details Notes Poor reception of TV programs can cause errors in Caption Vision and XDS Captions may appear with a white box or other errors instead of a certain word ...

Страница 39: ...to enter the manufacturer s code number see the chart below and press ENTER For example to operate a Sony 8 mm VCR press CODE SET 3 0 2 and ENTER VCR manufacturer code numbers Manufacturer Code number Sony 301 302 303 Aiwa 338 Audio Dynamic 314 337 Bell Howell M Wards 330 343 Brocsonic 319 Canon 309 308 Citizen 332 Craig 315 302 332 Curtis Mathis 304 338 309 Daewoo 341 312 309 DBX 314 336 337 Dime...

Страница 40: ...ber Sony 701 Kenwood 707 Magnavox 703 Maranz 702 Mitsubishi 702 Panasonic 704 Philips 703 Pioneer 702 RCA 702 Sanyo 706 Sharp 705 Yamaha 703 Notes If more than one code number is listed try entering them one by one until you come to the correct code for your equipment In some rare cases you may not be able to operate your non Sony video equipment with this remote commander This is because your equ...

Страница 41: ... using the other codes listed for your equipment If after trying all the codes listed for your equipment you still cannot get the remote commander to work properly try the learning function described on page 42 Manufacturer code numbers cable box CABLE DBS POWER Operating a cable box or DBS receiver 2 5 8 0 1 4 7 3 6 9 CABLE POWER CABLE FUNCTION CODE SET DBS POWER DBS FUNCTION TV FUNCTION 0 9 butt...

Страница 42: ...ARN indicator flashes off then on again When the LEARN indicator flashes off and then on again this indicates that learning is complete If not repeat steps 4 and 5 6 Repeat steps 4 and 5 to learn other functions 7 Press LEARN The LEARN indicator goes off indicating that learning is complete Notes The LEARNING function does not work in VTR1 or VTR2 setting Do not move the remote commanders during l...

Страница 43: ...o close to the projection TV Move lights at least 3 4 feet away from the projection TV Additional Information Troubleshooting After trying the methods below if the problem persists contact your nearest Sony dealer No picture screen not lit no sound Make sure the power cord is connected securely Check to see if the TV VIDEO setting is correct when watching TV set to TV and when watching video tapes...

Страница 44: ...ble box Increase the volume at the cable box Then press TV FUNCTION and adjust the projection TV s volume page 41 The current time resets whenever the projection TV is turned on Connect the projection TV s and the cable box s AV power cords to separate wall outlets Cannot operate the 0 9 buttons CH TV VIDEO and ANT AUX buttons on the remote commander Select TV OUT in the INPUT OUTPUT menu and ente...

Страница 45: ...es 3 lenses horizontal in line system Picture tube 7 inch high brightness monochrome tubes 6 3 raster size with optical coupling and liquidcooling system Projection lenses High performance large diameter hybrid lens F1 0 Screen size measured diagonally Screen brightness Television system American TV standard Channel coverage VHF 2 13 UHF 14 69 CATV 1 125 Antenna 75 ohm external antenna terminal fo...

Страница 46: ...ew 21 Video label 30 Watching TV 19 video tapes 21 XDS 20 38 Names of controls channel index button 23 P P button 21 PIP button 21 ANT AUX button 21 AUDIO button 22 AUDIO L MONO R IN jacks 7 10 12 AUDIO FIX OUT jacks 11 AUDIO VAR OUT jacks 11 CENTER SPEAKER IN terminals 11 CH channel buttons 15 19 CODE SET button 39 CONTROL S jacks 12 DISPLAY button 20 ENTER button 19 39 FREEZE button 23 FUNCTION ...

Страница 47: ...rmas de la FCC Nota para el instalador del sistema de cable Esta nota tiene el propósito de llamar la atención del instalador del sistema de cable sobre el Artículo 820 40 de NEC que contiene las directrices para la puesta a tierra y en particular especifica que el cable de puesta a tierra debe estar conectado al sistema de puesta a tierra del edificio más cercano al de la entrada de cable El empl...

Страница 48: ...nales de TV de la imagen de ventana izquierda 22 Recepción del sonido de la imagen de ventana izquierda 22 Cambio de la posición de la imagen de ventana 22 Cambio de las imágenes principal derecha y de ventana izquierda 23 Congelación de imágenes 23 Visualización de ocho canales de TV simultáneamente CH INDEX 23 Uso del menú VIDEO 23 Ajuste de la imagen VIDEO 24 Ajuste de la temperatura del color ...

Страница 49: ...plea las teclas del TV de proyección oprima la tecla CONTROL de éste para iluminar las teclas del panel de control Este TV de proyección emplea un voltaje extremadamente alto Para evitar incendios o descargas eléctricas siga cuidadosamente las indicaciones que se indican a continuación Seguridad Asegúrese de que la unidad funciona sólo a 120 V CA Una clavija del enchufe es más ancha que la otra po...

Страница 50: ...a sobre la instalación consulte el manual de instalación Zona de visualización óptima horizontal Zona de visualización óptima vertical Preparación del TV de proyección Antes de utilizar el TV de proyección ajuste la convergencia Para conocer el procedimiento consulte el Ajuste de la convergencia CONVERGENCIA en la página 16 75 75 75 m n 2 4 m aprox 8 pies 61 min 2 1 m aprox 7 pies 53 27 5 2 4 m ap...

Страница 51: ... el procedimiento del apartado Selección del canal de salida del decodificador TV INPUT página 18 Conexión de una antena Conecte el cable de antena al terminal de antena VHF UHF Si no puede conectar el cable de antena directamente al terminal siga las instrucciones que se indican a continuación en función del tipo de cable de que disponga Parte posterior del TV de proyección VHF UHF Parte posterio...

Страница 52: ...onexión consulte el manual de instrucciones de la videograbadora Antes de realizar la conexión desconecte los cables de alimentación de CA del equipo que va a conectar Videograbadora A una videograbadora convencional Sin decodificador Notas Para conectar una videograbadora monofónica conecte la salida de audio de la videograbadora a AUDIO L MONO de VIDEO 1 3 4 5 IN del TV de proyección Con decodif...

Страница 53: ...EO el TV de proyección recibe automáticamente señales S vídeo Sin decodificador Nota Las señales de vídeo están formadas de señales Y luminancia y C crominancia La conexión S envía y las dos señales separadas que evitan la degradación y proporcionan una mejor calidad de imagen si se compara con la conexión convencional Con decodificador VHF UHF Cable Salida de S vídeo Salidas de audio Separador no...

Страница 54: ...ECT AUDIO AUDIO VAR FIX S VIDEO VIDEO AUDIO MONO L R AUX VHF UHF Si desea detalles sobre la conexión vea el manual de instrucciones en el receptor DBS A un TV de proyección Conexión de un receptor DBS VHF UHF OUT Parte posterior del TV de proyección Cable o decodificador AUDIO L blanco Parte posterior de la caja de funciones VIDEO amarillo Cable o decodificador VHF UHF IN VHF UHF Antena Receptor D...

Страница 55: ...DIO VAR FIX S VIDEO VIDEO AUDIO MONO L R AUDIO VIDEO LINE OUT OUT IN AUDIO VIDEO OUT IN LINE IN Conexión de una videocámara Videograbadora para reproducción Videograbadora para grabación VMC 810S 820S no suministrado VMC 810S 820S no suministrado Parte posterior del TV de proyección a entradas de audio vídeo a salidas de audio vídeo Conexión de dos videograbadoras para editar cintas Es posible sel...

Страница 56: ...estereofónico RK 74A no suministrado Nota Es posible ajustar los graves los agudos y el balance o seleccionar un modo MTS Multichannel TV Sound con el control remoto suministrado Conexión de un amplificador con el decodificador Dolby Pro Logic Si utiliza un amplificador con el decodificador Dolby Pro Logic en vez del sistema de audio del TV de proyección es posible utilizar la bocina de éste como ...

Страница 57: ... Para controlar el TV de proyección con el control remoto de otro equipo Sony conecte la salida CONTROL S del equipo a la toma CONTROL S IN del TV de proyección R L IN OUT VIDEO 1 VIDEO 3 VIDEO 4 VIDEO 5 SELECT AUDIO AUDIO VAR FIX S VIDEO VIDEO AUDIO MONO L R 20W NOM 40W MAX 16 IN OUT CONTROL S CENTER SPEAKER IN IN OUT CONTROL S R L IN OUT VIDEO 1 VIDEO 3 VIDEO 4 VIDEO 5 SELECT AUDIO AUDIO VAR FIX...

Страница 58: ...ESTANDAR CORRECCIÓN DE COLOR RESET NO NO 3 Haga clic en el control universal para visualizar el menú seleccionado 4 Oprima el control universal arriba o abajo para seleccionar la opción y a continuación haga clic en el control universal para ir al siguiente menú Para realizar otras operaciones es posible seleccionar la opción oprimiendo el control universal en alguna de las ocho direcciones que va...

Страница 59: ...ipales DEMO Oprima VOLUME en el paso 2 Las funciones y menús se muestran de uno en uno Para cancelar la función DEMO vuelva a oprimir VOLUME 1 Oprima POWER para activar el TV de proyección 2 Oprima CONTROL Las teclas del TV de proyección se iluminarán Paso 4 Ajuste del TV de proyección automáticamente AUTO AJUSTES Los clientes que conecten un decodificador deberán omitir este paso y realizar el pr...

Страница 60: ...O NO 4 Para borrar o añadir el canal que desee 1 Oprima el control universal arriba o abajo para seleccionar BORRAR o AÑADIR 2 Oprima CH o los botones de 0 a 9 para seleccionar el canal que desee borrar o añadir 3 Haga clic en el control universal Si selecciona BORRAR en el paso 1 aparece junto al número de canal para indicar que el canal se ha borrado de la memoria programada Si selecciona AÑADIR...

Страница 61: ...e menú Si prefiere el español o el francés al inglés puede cambiar el idioma de menú No es preciso realizar este procedimiento si ejecuta AUTO AJUSTES página 14 Utilice esta función sólo si realiza el ajuste manualmente 1 Oprima MENU 2 Oprima el control universal arriba o abajo para desplazar el cursor hasta SET UP y haga clic en el control universal 3 Oprima el control universal arriba o abajo pa...

Страница 62: ...ontrol universal 4 Oprima el control universal arriba o abajo para seleccionar SI o NO y haga clic en el control universal 5 Oprima MENU para volver a la pantalla original Nota Si CABLE aparece en color gris significa que el TV de proyección está ajustado a una entrada de vídeo y no es posible seleccionar CABLE Oprima TV VIDEO en el control remoto de forma que aparezca un número de canal Programac...

Страница 63: ...cción como se indica a continuación al conectar un decodificador 1 Oprima MENU 2 Oprima el control universal arriba o abajo para seleccionar AJUSTES y haga clic en el control universal 3 Oprima el control universal arriba o abajo para seleccionar TV INPUT y haga clic en el control universal Se muestran las opciones de canal de salida del decodificador 4 Oprima el control universal arriba o abajo p...

Страница 64: ... TV VIDEO VOL TV POWER TV FUNCTION JUMP Botones 0 9 CH JUMP TV TV POWER ENTER 2 5 8 0 1 4 7 3 6 9 CH VOLUME VOL 3 Seleccione el canal que desee ver Para seleccionar un canal directamente Oprima los botones de 0 a 9 Por ejemplo para seleccionar el canal 10 oprima 1 y 0 Puede oprimir ENTER para cambiar de canal inmediatamente Para explorar los canales Oprima CH hasta que aparezca el canal que desee ...

Страница 65: ...cerán las imágenes de Caption Vision si la emisora ofrece este servicio Con respecto a Capation Vision consulte la página 36 Para cancelar la indicacion vuelva a oprimir DISPLAY hasta que aparezca DISPLAY OFF DISPLAY OFF se desactiva después de tres segundos Congelación de la imagen Es posible congelar la imagen Oprima FREEZE Esta función resulta útil para anotar una receta de un programa de cocin...

Страница 66: ...ible visualizar Es posible visualizar dos programas simultáneamente mediante la función PIP Picture in Picture o la función Twin ViewTM Picture and Picture Visualización de una imagen de ventana PIP Oprima Oprima varias veces para mostrar una imagen de ventana más pequeña Cada vez que oprima el tamaño de la imagen de ventana cambia como se indica a continuación tamaño 1 4 n tamaño 1 9 n tamaño 1 1...

Страница 67: ...e ventana izquierda Oprima PIP TV VIDEO para seleccionar el modo de entrada Cada vez que oprima PIP TV VIDEO TV VIDEO 1 VIDEO 2 VIDEO 3 VIDEO 4 y VIDEO 5 aparecerán secuencialmente Cambio de los canales de TV de la imagen de ventana izquierda Oprima PIP CH Recepción del sonido de la imagen de ventana izquierda Oprima AUDIO aparece durante unos segundos en la imagen de ventana izquierda indicando q...

Страница 68: ...OLOR RESET NO NO AJUSTES VIDEO AUDIO HORA Usar RETURN Salir MENU SELECCI VIDEO ENTRADS SALIDAS CAPTION VISION CONTRASTE TINTE COLOR BRILLO NITIDEZ TRINITONE ALTO NR NO DYNAMIC PICTURE MODO ESTANDAR CORRECCIÓN DE COLOR RESET NO NO Congelación de imágenes Es posible congelar ambas imágenes la derecha y la izquierda Esta función resulta útil para anotar una receta de un programa de cocina una direcci...

Страница 69: ...RE MODO ESTANDAR CORRECCIÓN DE COLOR RESET NO NO Para un blanco azulado un blanco neutro un blanco rojizo 2 Haga clic en el control universal 4 Ajuste la opción seleccionada 1 Oprima el control universal arriba abajo a la derecha o la izquierda para ajustar la opción 2 Haga clic en el control universal El nuevo ajuste aparece en el menú VIDEO y se almacena en el modo SELECCION VIDEO mostrado Para ...

Страница 70: ...TURE MODO ESTANDAR CORRECCIÓN DE COLOR RESET NO SI Reducción del ruido de imagen NR Es posible mejorar la calidad de una imagen débil o borrosa ajustando NR en la posición SI 1 Oprima MENU 2 Oprima el control universal arriba o abajo para seleccionar VIDEO y haga clic en el control universal 3 Oprima el control universal arriba o abajo para seleccionar NR y haga clic en el control universal 4 Opri...

Страница 71: ...del sonido AUDIO Es posible ajustar los agudos los bajos y el balance según sus preferencias También puede ajustar el sonido de la entrada o entradas de vídeo 1 Oprima MENU 2 Oprima el control universal arriba o abajo para seleccionar AUDIO y haga clic en el control universal 3 Seleccione la opción que desee ajustar Por ejemplo 1 Para ajustar los graves oprima el control universal arriba o abajo p...

Страница 72: ...N SAP MONO Seleccione Para ON Recibir el sonido por el TV de proyección CENTRO Utilizar las bocinas centrales del TV de proyección como bocina central en otro sistema periférico aidop OFF Cancelar el sonido de las bocinas del TV de proyección y recibir el sonido del TV de proyección únicamente a través de las bocinas del sistema de audio Seleccione Para MAIN Escuchar sonido en estéreo El indicador...

Страница 73: ...ga clic en el control universal 5 Ajuste la imagen siguiendo los pasos de 3 a 5 del apartado Ajuste de la imagen en la página 23 Para restaurar los ajustes de fábrica Con el menú VIDEO en pantalla oprima el control universal arriba abajo a la derecha o la izquierda para seleccionar RESET y a continuación haga clic en el control universal ESTANDAR PELICULAS DEPORTES NOTICIAS JUEGOS MODO AJUSTES VID...

Страница 74: ...nar la entrada que vaya a editar y haga clic en el control universal Para seleccionar TV OUT 1 Oprima el control universal arriba o abajo para seleccionar TV OUT y haga clic en el control universal Aparece Set up using only VIDEO1 input 2 Si sólo conecta un receptor de AV la toma del TV de proyección oprima el control universal arriba o abajo para seleccionar SI A continuación haga clic en el cont...

Страница 75: ... 2 VIDEO 1 VIDEO 2 VIDEO 3 VIDEO 4 VIDEO 5 VHS 8mm BETA LD S VIDEO Hi 8 ETIQUETA DE VIDEO DSS AVRECEIVER AJUSTES VIDEO AUDIO HORA Usar RETURN Salir MENU SELECCI VIDEO ENTRADS SALIDAS CAPTION VISION VIDEO 1 VIDEO 1 VIDEO 2 VIDEO 3 VIDEO 4 VIDEO 5 VHS 8mm BETA LD S VIDEO Hi 8 AVRECEIVER ETIQUETA DE VIDEO DSS AJUSTES VIDEO AUDIO HORA Usar RETURN Salir MENU SELECCI VIDEO ENTRADS SALIDAS CAPTION VISION...

Страница 76: ...R HORA ACTUAL en pantalla oprima el control universal arriba o abajo a la derecha o a la izquierda para seleccionar RESET y a continuación haga clic en el control universal Para mostrar la hora actual en la pantalla del TV de proyección Oprima DISPLAY Notas Si desenchufa el TV de proyección o se produce un corte del suministro eléctrico el reloj se desactivará Reajuste la hora actual Si conecta la...

Страница 77: ... Oprima el control universal arriba o abajo para seleccionar RELOJ y haga clic en el control universal 4 Introduzca el ajuste RELOJ 1 Oprima el control universal arriba o abajo para seleccionar el programa 1 o 2 y haga clic en el control universal 2 Oprima el control universal arriba o abajo para definir el día o días y a continuación haga clic en el control universal Cada vez que lo oprima los dí...

Страница 78: ...ORA y haga clic en el control universal 3 Oprima el control universal arriba o abajo para seleccionar BLOQUEAR CANAL y haga clic en el control universal 4 Introduzca un ajuste BLOQUEAR CANAL 1 Oprima el control universal arriba o abajo para seleccionar el programa 1 o 2 y haga clic en el control universal 2 Oprima el control universal arriba o abajo para definir el día o días y haga clic en el con...

Страница 79: ...UDIO HORA Usar RETURN Salir MENU SELECCI VIDEO ENTRADS SALIDAS CAPTION VISION LUNES CADA DOM SAB CADA 2h 12 00 AM RESET 0h CH 12AM 12PM 12AM 6 6 2 0 CH 0 10 00 PM 12AM 12PM 12AM 6 6 BLOOUEAR CANAL LUNES seleccione el canal AJUSTES VIDEO AUDIO HORA Usar RETURN Salir MENU SELECCI VIDEO ENTRADS SALIDAS CAPTION VISION CADA DOM SAB CADA LUNES CADA 1 RESET CH 23 2 RESET 2h 10 00 PM 12AM 12PM 12AM 6 6 CH...

Страница 80: ...las ocho direcciones de que dispone para seleccionar RESET y a continuación haga clic en el control universal Notas Si el menú NOMBRE DEL CANAL aparece en gris significa que se ha seleccionado una entrada de vídeo en el TV de proyección y no es posible seleccionar NOMBRE DEL CANAL Oprima TV VIDEO de forma que aparezca el número de canal Si transcurren más de 90 segundos después de oprimir un botón...

Страница 81: ...y 5 para ajustar otros canales preferidos Nota Si ajusta TV INPUT en una opción que no sea OFF no es posible utilizar la función de selección de canal preferido CANAL FAVORITO Selección de un canal preferido Después de ajustar los canales preferidos es posible seleccionar un canal que desee mientras se muestran todos los canales preferidos en la pantalla de TV simultáneamente 1 Haga clic en el con...

Страница 82: ...R1 2 3 MDP y haga clic en el control universal AJUSTES VIDEO AUDIO HORA Usar RETURN Salir MENU SELECCI VIDEO NOMBRE DEL CANAL CANAL FAVORITO CONVERGENCIA ENCENDIDO DIRECTO TV INPUT NO CABLE SI AUTO PROGRAMMACION CUSTOMIZED POINTER BORRAR AÑADIR CANAL LANGUAJE ESPAÑOL ENTRADS SALIDAS CAPTION VISION VIDEO1 NO ENCENDIDO DIRECTO VIDEO2 NO VIDEO3 NO VIDEO4 NO VIDEO5 NO 1 2 3 MDP VTR AJUSTES VIDEO AUDIO...

Страница 83: ...para seleccionar el tipo de subtítulo y haga clic en el control universal El tipo de subtítulo seleccionado se muestra en color verde Para que aparezcan los subtítulos Oprima DISPLAY para obtener información detallada consulte la página 20 Notas Una recepción de baja calidad de los programas del televisión puede causar errores en los subtítulos y en XDS Los subtítulos pueden aparecer con un recuad...

Страница 84: ...ma CODE SET y a continuación oprima los botones 0 9 para introducir el número de código del fabricante consulte la tabla siguiente y oprima ENTER Por ejemplo para utilizar una videograbadora Sony de 8 mm oprima CODE SET 3 0 2 y ENTER Números de código de fabricantes de videograbadoras Fabricante Número de código Sony 301 302 303 Aiwa 338 Audio Dynamic 314 337 Bell Howell M Wards 330 343 Brocsonic ...

Страница 85: ...8 mm 302 Videograbadoras Beta ED Beta 303 Reproductor de múltiples discos 701 Precaución Si al extraer las pilas por ejemplo para cambiarlas tarda demasiado tiempo los números de código cambiarán a los predefinidos en fábrica y será necesario realizar una puesta a cero Empleo de una videograbadora Para activarla y desactivarla Para cambiar los canales Para grabar Para reproducir Para detención Par...

Страница 86: ...receptor DBS Consulte el manual de instrucciones que se suministra con el equipo Si el control remoto no funciona En primer lugar repita los procedimientos de ajuste utilizando los otros códigos incluidos en su equipo Si tras probar todos los códigos no puede conseguir que el control funcione correctamente utilice la función de control de equipos no preprogramados de la página 42 Números de código...

Страница 87: ... programado 5 Mantenga oprimido el botón correspondiente en el otro control remoto y suéltelo cuando el indicador LEARN se apague y se vuelva a encender Cuando el indicador LEARN se apaga y se vuelve a encender significa que la programación ha finalizado En caso contrario repita los pasos 4 y 5 6 Repita los pasos 4 y 5 para programar otras funciones 7 Oprima LEARN El indicador LEARN se apaga para ...

Страница 88: ...ir ningún canal si utiliza un sistema de TV por cable Compruebe que CABLE se encuentra en la posición SI en el menú AJUSTES página 17 Emplee AUTO PROGRAMACION para añadir canales que no están incluidos en la memoria actualmente página 17 Si después de realizar los procedimientos siguientes no se resuelve el problema póngase en contacto con su proveedor local Sony Ausencia de imagen pantalla no ilu...

Страница 89: ...remoto no funcionan Oprima el botón FUNCTION correcto en función del equipo que utilice páginas 19 40 No es posible aumentar el volumen hasta un nivel adecuado al utilizar un decodificador Aumente el volumen del decodificador A continuación oprima TV FUNCTION y ajuste el volumen del TV de proyección página 41 La hora actual se reajusta cada vez que se activa el TV de proyección Conecte los cables ...

Страница 90: ...Diseño y especificaciones sujetos a cambio sin previo aviso Especificaciones Sistema de proyección 3 tubos de imagen 3 objetivos sistema de 3 líneas horizontales Tubo de imagen Tubos monocromos de alto nivel de brillo de 7 pulgadas tamaño de trama de 6 3 con acoplamiento óptico y sistema de refrigeración Objetivos de proyección Objetivo híbrido de diámetro largo y alto rendimiento F1 0 Tamaño de p...

Страница 91: ...3 Terminal de antena VHF UHF 6 7 Terminales CENTER SPEAKER IN 11 Toma de entrada S VIDEO 8 Tomas AUDIO L MONO R IN 7 10 12 Tomas AUDIO FIX OUT 11 Tomas AUDIO VAR OUT 11 Tomas CONTROL S 12 Tomas VIDEO 1 3 4 5 IN 7 10 Tomas VIDEO 2 INPUT 10 Tomas SELECT OUT 10 12 Ajuste convergencia 16 hora de verano 31 32 imagen 23 reloj 30 sonido 26 Antena 6 Bloqueo de canales 33 Borrado adición 15 Cambio del idio...

Страница 92: ...Color Rear Video Projector Sony Corporation Printed in U S A ...

Отзывы: